New Things in the Store 3 Oct 2012 8:51 AM (13 years ago)
 I've got new canvases in the Etsy store now, and I'm working on a few fun pieces we've not done before -- smaller pieces that would be perfect for a tailgate, table, or hanging in a collection in your favorite game-watching room.
Have an idea for some art you'd like to see? Email us at attemptingcreative at hotmail dot com. We'd love to make something for you!


New to the Store Monday 17 Oct 2011 9:21 AM (14 years ago)
It's a Monday, so that means new things in the store! Mom worked super hard on getting the Alabama canvas done. That is a LOT of words! See the listing here.

I'm putting the finishing touches on a custom-ordered Kentucky canvas, and I'll have that up to share soon! Request a custom canvas of your own by emailing me at attemptingcreative [at] hotmail [dot] com.
See something you like? Print it. Share it. Email it. But please, link back here when you do.

New in the Store! 3 Oct 2011 7:59 AM (14 years ago)
Did you see my announcement last week? (If you didn't, you can see it here.) We opened an Etsy store - Sweet Begonia!! And we sold out of all our canvases! Thank you!!! We've been at work on more (and different!) canvases.
Take a look! And then go see everything we've put up in the store today.
 |
| We added our medium canvas option. These canvases are 24" x 20" with a 5/8" canvas profile. |
 |
| Our orange background is the perfect partner to navy blue. |
 |
| These fun 12" x 12" canvases are ideal for offices, small spaces, or on the table at a tailgate. |


We look forward to sending a canvas to you very soon!
See something you like? Print it. Share it. Email it. But please, link back here when you do.
%20We%20opened%20an%20Etsy%20store%20-%26nbsp;%3Ca%20href%3D%22http://www.etsy.com/shop/SweetBegonia%22%20target%3D%22blank%22%3ESweet%20Begonia%3C/a%3E!!%20And%20we%20sold%20out%20of%20all%20our%20canvases!%20Thank%20you!!!%20We've%20been%20at%20work%20on%20more%20(and%20different!)%20canvases.%3Cbr%20/%3E%0A%3Cbr%20/%3E%0ATake%20a%20look!%20And%20then%20go%20see%20everything%20we've%20put%20up%20in%20the%20%3Ca%20href%3D%22http://www.etsy.com/shop/SweetBegonia%22%3Estore%3C/a%3E%20today.%3Cbr%20/%3E%0A%3Cbr%20/%3E%0A%3Ctable%20align%3D%22center%22%20cellpadding%3D%220%22%20cellspacing%3D%220%22%3E%3Ctbody%3E%0A%3Ctr%3E%3Ctd%3E%3Ca%20href%3D%22https://blogger.googleusercontent.com/img/b/R29vZ2xl/AVvXsEilR2TxyFBV0S0OprO7fL-NVq8o2KessWhaOyRsj8pXetcWBzGiZXVcPJSkNELfg-7PUa-2Jah2hOY67pgeXrHX6siT1IqGcwELL_CMCRHcP46iBxMhP8vFNNHB1QMwz_d841gjxu_goaKV/s1600/FightSongMed.jpg%22%20imageanchor%3D%221%22%3E%3Cimg%20border%3D%220%22%20height%3D%22400%22%20src%3D%22https://blogger.googleusercontent.com/img/b/R29vZ2xl/AVvXsEilR2TxyFBV0S0OprO7fL-NVq8o2KessWhaOyRsj8pXetcWBzGiZXVcPJSkNELfg-7PUa-2Jah2hOY67pgeXrHX6siT1IqGcwELL_CMCRHcP46iBxMhP8vFNNHB1QMwz_d841gjxu_goaKV/s400/FightSongMed.jpg%22%20width%3D%22346%22%20/%3E%3C/a%3E%3C/td%3E%3C/tr%3E%0A%3Ctr%3E%3Ctd%3EWe%20added%20our%20medium%20canvas%20option.%20These%20canvases%20are%2024%22%20x%2020%22%20with%20a%205/8%22%20canvas%20profile.%3C/td%3E%3C/tr%3E%0A%3C/tbody%3E%3C/table%3E%3Ctable%20align%3D%22center%22%20cellpadding%3D%220%22%20cellspacing%3D%220%22%3E%3Ctbody%3E%0A%3Ctr%3E%3Ctd%3E%3Ca%20href%3D%22https://blogger.googleusercontent.com/img/b/R29vZ2xl/AVvXsEioArGYAdacDAXBC1xi1VkZcH_dGfTG-IypsO6KEJYFvZK7MFC2l585zcLxxpuVE0kZHovdA0z5VXecAE3ltdk_hdMwc34WnSW9Y9erKo5fKbPO7AUn6tnbw8QZTPWjbHHkfSHFG-NXBUYx/s1600/FightSongMed2.jpg%22%20imageanchor%3D%221%22%3E%3Cimg%20border%3D%220%22%20height%3D%22400%22%20src%3D%22https://blogger.googleusercontent.com/img/b/R29vZ2xl/AVvXsEioArGYAdacDAXBC1xi1VkZcH_dGfTG-IypsO6KEJYFvZK7MFC2l585zcLxxpuVE0kZHovdA0z5VXecAE3ltdk_hdMwc34WnSW9Y9erKo5fKbPO7AUn6tnbw8QZTPWjbHHkfSHFG-NXBUYx/s400/FightSongMed2.jpg%22%20width%3D%22330%22%20/%3E%3C/a%3E%3C/td%3E%3C/tr%3E%0A%3Ctr%3E%3Ctd%3EOur%20orange%20background%20is%20the%20perfect%20partner%20to%20navy%20blue.%3C/td%3E%3C/tr%3E%0A%3C/tbody%3E%3C/table%3E%3Ctable%20align%3D%22center%22%20cellpadding%3D%220%22%20cellspacing%3D%220%22%3E%3Ctbody%3E%0A%3Ctr%3E%3Ctd%3E%3Ca%20href%3D%22https://blogger.googleusercontent.com/img/b/R29vZ2xl/AVvXsEiXZ-l5b-cvfJklWYucO-4wVmSG1dmlEJUUck22EBx_5Ch39GvcSlcRrFlI6xzkzxV5PJImVY-zgAltguSMqAOUYEx0aZAWFh24htRp0vvSFPFFqsiRgjpNCawwHJMvxivZR4WlV4-gzusJ/s1600/WarEagle1.jpg%22%20imageanchor%3D%221%22%3E%3Cimg%20border%3D%220%22%20height%3D%22366%22%20src%3D%22https://blogger.googleusercontent.com/img/b/R29vZ2xl/AVvXsEiXZ-l5b-cvfJklWYucO-4wVmSG1dmlEJUUck22EBx_5Ch39GvcSlcRrFlI6xzkzxV5PJImVY-zgAltguSMqAOUYEx0aZAWFh24htRp0vvSFPFFqsiRgjpNCawwHJMvxivZR4WlV4-gzusJ/s400/WarEagle1.jpg%22%20width%3D%22400%22%20/%3E%3C/a%3E%3C/td%3E%3C/tr%3E%0A%3Ctr%3E%3Ctd%3EThese%20fun%2012%22%20x%2012%22%20canvases%20are%20ideal%20for%20offices,%20small%20spaces,%20or%20on%20the%20table%20at%20a%20tailgate.%3C/td%3E%3C/tr%3E%0A%3C/tbody%3E%3C/table%3E%3Cdiv%3E%3Ca%20href%3D%22https://blogger.googleusercontent.com/img/b/R29vZ2xl/AVvXsEig11VI0KdXCQkFb8n89B7NN_gzbPAiINXM5FMsxAYNP67P17yOT7sKIv6hwFbgipPy62NLv2UZSqB3IUtO9fWlMa1pK6nHdjtmb1FgpN-DEFF5qSz5SqE8q3hZNJijfK3DSdW52dC4UGui/s1600/WarEagle2.jpg%22%20imageanchor%3D%221%22%3E%3Cimg%20border%3D%220%22%20height%3D%22332%22%20src%3D%22https://blogger.googleusercontent.com/img/b/R29vZ2xl/AVvXsEig11VI0KdXCQkFb8n89B7NN_gzbPAiINXM5FMsxAYNP67P17yOT7sKIv6hwFbgipPy62NLv2UZSqB3IUtO9fWlMa1pK6nHdjtmb1FgpN-DEFF5qSz5SqE8q3hZNJijfK3DSdW52dC4UGui/s400/WarEagle2.jpg%22%20width%3D%22400%22%20/%3E%3C/a%3E%3C/div%3E%3Cbr%20/%3E%0A%3Cdiv%3E%3Ca%20href%3D%22https://blogger.googleusercontent.com/img/b/R29vZ2xl/AVvXsEi0WiedcHyeOBlV6kpSk16SmDJDDhcNaaxsjTiHNC4UQl-qxYTsa2l7r8AYmqzLCCKMP6gfitBpaxIUnFuPuCOWRlt75Zt2knvOq0ZNy_N1LafF1AWU3BdJVHh8a282paM_SqtwdHvKZt0A/s1600/WarEagle3.jpg%22%20imageanchor%3D%221%22%3E%3Cimg%20border%3D%220%22%20height%3D%22366%22%20src%3D%22https://blogger.googleusercontent.com/img/b/R29vZ2xl/AVvXsEi0WiedcHyeOBlV6kpSk16SmDJDDhcNaaxsjTiHNC4UQl-qxYTsa2l7r8AYmqzLCCKMP6gfitBpaxIUnFuPuCOWRlt75Zt2knvOq0ZNy_N1LafF1AWU3BdJVHh8a282paM_SqtwdHvKZt0A/s400/WarEagle3.jpg%22%20width%3D%22400%22%20/%3E%3C/a%3E%3C/div%3E%3Cbr%20/%3E%0AWe%20look%20forward%20to%20sending%20a%20canvas%20to%20you%20very%20soon!%3Cbr%20/%3E%0A%3Cimg%20src%3D%22http://i809.photobucket.com/albums/zz13/attemptingcreative/signature1.png%22%20/%3E%3Cbr%20/%3E%0A%3Cbr%20/%3E%0A%3Cspan%3ESee%20something%20you%20like?%20Print%20it.%20Share%20it.%20Email%20it.%20But%20please,%20link%20back%20here%20when%20you%20do.%3C/span%3E)
Say hello to Sweet Begonia! 27 Sep 2011 10:51 AM (14 years ago)

See something you like? Print it. Share it. Email it. But please, link back here when you do.
%20Meanwhile,%20thank%20you%20for%20your%20support%20as%20we%20worked%20to%20get%20this%20project%20off%20the%20ground.%20We're%20very%20excited,%20and%20we%20hope%20to%20send%20you%20a%20beautiful%20canvas%20painting%20of%20your%20very%20own%20soon!%3C/div%3E%3Cdiv%3E%3Cimg%20src%3D%22http://i809.photobucket.com/albums/zz13/attemptingcreative/signature1.png%22%20/%3E%3C/div%3E%3Cspan%3E%3Cbr%20/%3E%0A%3C/span%3E%3Cbr%20/%3E%0A%3Cspan%3ESee%20something%20you%20like?%20Print%20it.%20Share%20it.%20Email%20it.%20But%20please,%20link%20back%20here%20when%20you%20do.%3C/span%3E)
We've Been Busy 27 Sep 2011 10:25 AM (14 years ago)
A lot of you have been stopping by in recent weeks to ask about my Auburn Subway Art. I've had many requests to buy the art, too. So look what I've been up to...


UPDATE: Yes, we've opened an Etsy store! It's called Sweet Begonia. Click here to hop on over!
If you're interested or have any questions, you can email me at attemptingcreative at hotmail dot com.
See something you like? Print it. Share it. Email it. But please, link back here when you do.

Exciting News 26 Sep 2011 2:17 PM (14 years ago)
If you've previously emailed me about the Auburn Fight Song Subway Art, you already know the secret. (Check your email!) But if you're new to attempting creative or just wondering when the heck I'll finally post the canvases, I've got some fun news for you!
Check back tomorrow for a very exciting link!

See something you like? Print it. Share it. Email it. But please, link back here when you do.
%20But%20if%20you're%20new%20to%20attempting%20creative%20or%20just%20wondering%20when%20the%20heck%20I'll%20finally%20post%20the%20canvases,%20I've%20got%20some%20fun%20news%20for%20you!%3Cbr%20/%3E%0A%3Cbr%20/%3E%0ACheck%20back%20tomorrow%20for%20a%20very%20exciting%20link!%3Cbr%20/%3E%0A%3Cbr%20/%3E%0A%3Cdiv%3E%3Ca%20href%3D%22https://blogger.googleusercontent.com/img/b/R29vZ2xl/AVvXsEiWD_X91dPpcblTK_qEw0kYjThT9fqMLvzrkjblFMDBYu75LAVhYfSK06-971jEjbA5i4qrX50tpGQUfkuI2RlVFokvwb8LorxRdLKxacZOHV3I3HG7D4Z7V3_7XB8152N6lfjF75nUIJql/s1600/art4.jpg%22%20imageanchor%3D%221%22%3E%3Cimg%20border%3D%220%22%20height%3D%22300%22%20src%3D%22https://blogger.googleusercontent.com/img/b/R29vZ2xl/AVvXsEiWD_X91dPpcblTK_qEw0kYjThT9fqMLvzrkjblFMDBYu75LAVhYfSK06-971jEjbA5i4qrX50tpGQUfkuI2RlVFokvwb8LorxRdLKxacZOHV3I3HG7D4Z7V3_7XB8152N6lfjF75nUIJql/s400/art4.jpg%22%20width%3D%22400%22%20/%3E%3C/a%3E%3C/div%3E%3Cbr%20/%3E%0A%3Cdiv%3E%3Ca%20href%3D%22https://blogger.googleusercontent.com/img/b/R29vZ2xl/AVvXsEiIWJmud2EmyGqymjpE6Z_9tQUnRsZphOGzN7M8aYWTt_ViW1STVMAoDHh__DYb4thJyQW-wXAJyNooBVIM2pK2aPlnqNHBctvsMRfBMKrG4uyApjJ26bMMvWcW2s1zX62NPwchd7MYNWnA/s1600/canvas_2.jpg%22%20imageanchor%3D%221%22%3E%3Cimg%20border%3D%220%22%20height%3D%22225%22%20src%3D%22https://blogger.googleusercontent.com/img/b/R29vZ2xl/AVvXsEiIWJmud2EmyGqymjpE6Z_9tQUnRsZphOGzN7M8aYWTt_ViW1STVMAoDHh__DYb4thJyQW-wXAJyNooBVIM2pK2aPlnqNHBctvsMRfBMKrG4uyApjJ26bMMvWcW2s1zX62NPwchd7MYNWnA/s400/canvas_2.jpg%22%20width%3D%22400%22%20/%3E%3C/a%3E%3C/div%3E%3Cbr%20/%3E%0A%3Cimg%20src%3D%22http://i809.photobucket.com/albums/zz13/attemptingcreative/signature1.png%22%20/%3E%3Cbr%20/%3E%0A%3Cbr%20/%3E%0A%3Cspan%3ESee%20something%20you%20like?%20Print%20it.%20Share%20it.%20Email%20it.%20But%20please,%20link%20back%20here%20when%20you%20do.%3C/span%3E)
I Have a Crush On... Mason Jars 31 Aug 2011 9:15 AM (14 years ago)
Maybe it's because I'm in a wedding mood (my best friend gets married this Saturday) or maybe it's because I can't stop looking at "southern" weddings on Pinterest. Either way, I'm head-over-heels in love with Mason Jars right now. I wanted to share a few.
 |
| pinterest.com |
 |
| oncewed.com |
 |
| minted. |
 |
| Eisele Family News |
 |
| Celebrations at Home |
 |
| Attempting Creative |
What are some of your favorite ways to use Mason Jars?
See something you like? Print it. Share it. Email it. But please, link back here when you do.
%20or%20maybe%20it's%20because%20I%20can't%20stop%20looking%20at%20%22southern%22%20weddings%20on%20%3Ca%20href%3D%22http://pinterest.com/kmhollan/%22%3EPinterest%3C/a%3E.%20Either%20way,%20I'm%20head-over-heels%20in%20love%20with%20Mason%20Jars%20right%20now.%20I%20wanted%20to%20share%20a%20few.%3Cbr%20/%3E%0A%3Cbr%20/%3E%0A%3Cdiv%3EAs%20a%20last%20tribute%20to%20summer...%3C/div%3E%3Ctable%20align%3D%22center%22%20cellpadding%3D%220%22%20cellspacing%3D%220%22%3E%3Ctbody%3E%0A%3Ctr%3E%3Ctd%3E%3Ca%20href%3D%22https://blogger.googleusercontent.com/img/b/R29vZ2xl/AVvXsEil4qFlr0aLnINKrsxZvD69-gKdMLva3yh8IMaHoIzMlAziMFVn3zFGB2GOfrz33r6YHJJNTfPUgZEKTmapr8UgMsDxxDZ4wKQOXXzZ07xDGTVIrDj99puDC0WmXGPzFxyKnFNRMvZzUsdP/s1600/pinterest_mason.jpg%22%20imageanchor%3D%221%22%3E%3Cimg%20border%3D%220%22%20height%3D%22640%22%20src%3D%22https://blogger.googleusercontent.com/img/b/R29vZ2xl/AVvXsEil4qFlr0aLnINKrsxZvD69-gKdMLva3yh8IMaHoIzMlAziMFVn3zFGB2GOfrz33r6YHJJNTfPUgZEKTmapr8UgMsDxxDZ4wKQOXXzZ07xDGTVIrDj99puDC0WmXGPzFxyKnFNRMvZzUsdP/s640/pinterest_mason.jpg%22%20width%3D%22512%22%20/%3E%3C/a%3E%3C/td%3E%3C/tr%3E%0A%3Ctr%3E%3Ctd%3Epinterest.com%3C/td%3E%3C/tr%3E%0A%3C/tbody%3E%3C/table%3E%3Cbr%20/%3E%0A%3Cdiv%3EAs%20centerpieces...%3C/div%3E%3Ctable%20align%3D%22center%22%20cellpadding%3D%220%22%20cellspacing%3D%220%22%3E%3Ctbody%3E%0A%3Ctr%3E%3Ctd%3E%3Ca%20href%3D%22http://www.oncewed.com/wp-content/uploads/2010/06/pink-peony-wedding-centerpieces.jpg%22%20imageanchor%3D%221%22%3E%3Cimg%20border%3D%220%22%20height%3D%22263%22%20src%3D%22http://www.oncewed.com/wp-content/uploads/2010/06/pink-peony-wedding-centerpieces.jpg%22%20width%3D%22400%22%20/%3E%3C/a%3E%3C/td%3E%3C/tr%3E%0A%3Ctr%3E%3Ctd%3E%3Ca%20href%3D%22http://www.oncewed.com/30206/wedding-blog/real-weddings/a-pink-vintage-wedding/%22%3Eoncewed.com%3C/a%3E%3C/td%3E%3C/tr%3E%0A%3C/tbody%3E%3C/table%3E%3Cdiv%3E%3Cbr%20/%3E%0A%3C/div%3E%3Cdiv%3EOn%20a%20Save-the-Date%20card...%3C/div%3E%3Ctable%20align%3D%22center%22%20cellpadding%3D%220%22%20cellspacing%3D%220%22%3E%3Ctbody%3E%0A%3Ctr%3E%3Ctd%3E%3Ca%20href%3D%22https://blogger.googleusercontent.com/img/b/R29vZ2xl/AVvXsEgUgmiqqMjo36WCWLXL1LsiMWsNfIQlMSN8tnQpIXiSoF0_-QC2lIq1D7AgHS9-fGDei_ibsJmVt9eTf-3ON5UoVTrSysXGaknlBjkp_geZ-SnccXn8rSpSCFHoy3qpuHv7ORHqEfZTqYQ6/s1600/minted_mason.jpg%22%20imageanchor%3D%221%22%3E%3Cimg%20border%3D%220%22%20height%3D%22265%22%20src%3D%22https://blogger.googleusercontent.com/img/b/R29vZ2xl/AVvXsEgUgmiqqMjo36WCWLXL1LsiMWsNfIQlMSN8tnQpIXiSoF0_-QC2lIq1D7AgHS9-fGDei_ibsJmVt9eTf-3ON5UoVTrSysXGaknlBjkp_geZ-SnccXn8rSpSCFHoy3qpuHv7ORHqEfZTqYQ6/s400/minted_mason.jpg%22%20width%3D%22400%22%20/%3E%3C/a%3E%3C/td%3E%3C/tr%3E%0A%3Ctr%3E%3Ctd%3E%3Ca%20href%3D%22http://www.minted.com/customizer/sku/MIN-FRL-STD%22%3Eminted.%3C/a%3E%3C/td%3E%3C/tr%3E%0A%3C/tbody%3E%3C/table%3E%3Cdiv%3E%3Cbr%20/%3E%0A%3C/div%3E%3Cdiv%3EFor%20a%20sophisticated%20southern%20wedding...%3C/div%3E%3Ctable%20align%3D%22center%22%20cellpadding%3D%220%22%20cellspacing%3D%220%22%3E%3Ctbody%3E%0A%3Ctr%3E%3Ctd%3E%3Ca%20href%3D%22https://blogger.googleusercontent.com/img/b/R29vZ2xl/AVvXsEgvnc6ihyphenhyphenn5YPhdPBw_GCUYPcBmfGP1VDOCh8Fqz2Ddl4VSq5gh0AUjJ4v6xpkOPy5bSGQiZbo-nvMj4HpYDQxyKMWvn6ISxhUCgBx-uXEoYPwlGnv-VoocgchdlI-CAUA_oAOpbs3M8BRD/s1600/265413_1453875963478_1730689098_739468_783235_o.jpg%22%20imageanchor%3D%221%22%3E%3Cimg%20border%3D%220%22%20height%3D%22640%22%20src%3D%22https://blogger.googleusercontent.com/img/b/R29vZ2xl/AVvXsEgvnc6ihyphenhyphenn5YPhdPBw_GCUYPcBmfGP1VDOCh8Fqz2Ddl4VSq5gh0AUjJ4v6xpkOPy5bSGQiZbo-nvMj4HpYDQxyKMWvn6ISxhUCgBx-uXEoYPwlGnv-VoocgchdlI-CAUA_oAOpbs3M8BRD/s640/265413_1453875963478_1730689098_739468_783235_o.jpg%22%20width%3D%22427%22%20/%3E%3C/a%3E%3C/td%3E%3C/tr%3E%0A%3Ctr%3E%3Ctd%3E%3Ca%20href%3D%22http://eiselefamilynews.blogspot.com/2011/08/backyard-southern-wedding.html%22%3EEisele%20Family%20News%3C/a%3E%3C/td%3E%3C/tr%3E%0A%3C/tbody%3E%3C/table%3E%3Cdiv%3E%3Cbr%20/%3E%0A%3C/div%3E%3Cdiv%3EFor%20a%20picnic-style%20baby%20shower...%3C/div%3E%3Ctable%20align%3D%22center%22%20cellpadding%3D%220%22%20cellspacing%3D%220%22%3E%3Ctbody%3E%0A%3Ctr%3E%3Ctd%3E%3Ca%20href%3D%22http://celebrationsathomeblog.com/wp-content/uploads/2011/06/sweets_indeed-18.jpg%22%20imageanchor%3D%221%22%3E%3Cimg%20border%3D%220%22%20height%3D%22291%22%20src%3D%22http://celebrationsathomeblog.com/wp-content/uploads/2011/06/sweets_indeed-18.jpg%22%20width%3D%22400%22%20/%3E%3C/a%3E%3C/td%3E%3C/tr%3E%0A%3Ctr%3E%3Ctd%3E%3Ca%20href%3D%22http://celebrationsathomeblog.com/2011/06/picnic-style-baby-shower.html%22%3ECelebrations%20at%20Home%3C/a%3E%3C/td%3E%3C/tr%3E%0A%3C/tbody%3E%3C/table%3E%3Cdiv%3E%3Cbr%20/%3E%0A%3C/div%3E%3Cdiv%3EAs%20a%20salsa%20container...%3C/div%3E%3Ctable%20align%3D%22center%22%20cellpadding%3D%220%22%20cellspacing%3D%220%22%3E%3Ctbody%3E%0A%3Ctr%3E%3Ctd%3E%3Ca%20href%3D%22https://blogger.googleusercontent.com/img/b/R29vZ2xl/AVvXsEhbi6LwS9wTJItIQCjRcJJfr0hS2lwPNqXCLC4uxQp1RqWUJzlEQIyfwBbbaBkYfPu_ufsxOhObmHG-h8pTT7ILCjOgdi139pcyIlPB5xKVkloh-p94DDV4qV039zAb-MrzjN6kPjJC14Qr/s1600/salsa5.jpg%22%20imageanchor%3D%221%22%3E%3Cimg%20border%3D%220%22%20height%3D%22640%22%20src%3D%22https://blogger.googleusercontent.com/img/b/R29vZ2xl/AVvXsEhbi6LwS9wTJItIQCjRcJJfr0hS2lwPNqXCLC4uxQp1RqWUJzlEQIyfwBbbaBkYfPu_ufsxOhObmHG-h8pTT7ILCjOgdi139pcyIlPB5xKVkloh-p94DDV4qV039zAb-MrzjN6kPjJC14Qr/s640/salsa5.jpg%22%20width%3D%22475%22%20/%3E%3C/a%3E%3C/td%3E%3C/tr%3E%0A%3Ctr%3E%3Ctd%3E%3Ca%20href%3D%22http://attemptingcreative.blogspot.com/2010/08/lets-do-salsa.html%22%3EAttempting%20Creative%3C/a%3E%3C/td%3E%3C/tr%3E%0A%3C/tbody%3E%3C/table%3E%3Cdiv%3E%3Cbr%20/%3E%0AWhat%20are%20some%20of%20your%20favorite%20ways%20to%20use%20Mason%20Jars?%3C/div%3E%3Cdiv%3E%3Cimg%20src%3D%22http://i809.photobucket.com/albums/zz13/attemptingcreative/signature1.png%22%20/%3E%3C/div%3E%3Cbr%20/%3E%0A%3Cspan%3ESee%20something%20you%20like?%20Print%20it.%20Share%20it.%20Email%20it.%20But%20please,%20link%20back%20here%20when%20you%20do.%3C/span%3E)
Time gets away... 30 Jun 2011 11:49 AM (14 years ago)
Friends and fellow crafters,
I cannot believe it's been nine months since I last posted. A few of you sweet ladies have sent me messages in the down time to see what's been going on and where I disappeared to. (And a thank you to my roommate and grandmother who check occasionally to see if I've updated, only to remind me that I haven't updated, still.)
First, I should say that around the time of my last post, my grandfather fell very ill and passed away. Losing someone can refocus your mind and sometimes, as in my case, suck (for lack of a better word) the creativity out of you. My Papa Jack meant the world to me, and after his death, I spent a good deal of time with family and friends enjoying their company. That left me with less time to create and craft.
I started a new job in the early part of 2011, and adjusting to it has been a full-time job. I've also taken on several projects helping friends with freelance projects and research, so much of my down time has been dedicated to that.
All of this to say, I still love to create. craft. and dream. I have realized, however, that I was letting the need to constantly update and craft overwhelm me. I got to the point where the drive to have something new every day was driving me (and my roommate) insane.
So here's why I'm updating: I want to come back to crafting and creating.
You all were so amazing to me and so supportive of my creations, and I cannot wait to start sharing and connecting with you all again. So it may not be today, or tomorrow, but in the coming days, I will start sharing again.
I hope you'll stick around with me.
 |
| My family at my brother's Memory Day. He graduated from high school in May! |
See something you like? Print it. Share it. Email it. But please, link back here when you do.
%3Cbr%20/%3E%0A%3Cbr%20/%3E%0AFirst,%20I%20should%20say%20that%20around%20the%20time%20of%20my%20%3Ca%20href%3D%22http://attemptingcreative.blogspot.com/2010/10/youve-got-candy-corn-on-your-shirt.html%22%3Elast%20post%3C/a%3E,%20my%20grandfather%20fell%20very%20ill%20and%20passed%20away.%20Losing%20someone%20can%20refocus%20your%20mind%20and%20sometimes,%20as%20in%20my%20case,%20suck%20(for%20lack%20of%20a%20better%20word)%20the%20creativity%20out%20of%20you.%20My%20Papa%20Jack%20meant%20the%20world%20to%20me,%20and%20after%20his%20death,%20I%20spent%20a%20good%20deal%20of%20time%20with%20family%20and%20friends%20enjoying%20their%20company.%20That%20left%20me%20with%20less%20time%20to%20create%20and%20craft.%3Cbr%20/%3E%0A%3Cbr%20/%3E%0AI%20started%20a%20new%20job%20in%20the%20early%20part%20of%202011,%20and%20adjusting%20to%20it%20has%20been%20a%20full-time%20job.%20I've%20also%20taken%20on%20several%20projects%20helping%20friends%20with%20freelance%20projects%20and%20research,%20so%20much%20of%20my%20down%20time%20has%20been%20dedicated%20to%20that.%3Cbr%20/%3E%0A%3Cbr%20/%3E%0AAll%20of%20this%20to%20say,%20I%20still%20love%20to%20create.%20craft.%20and%20dream.%20I%20have%20realized,%20however,%20that%20I%20was%20letting%20the%20need%20to%20constantly%20update%20and%20craft%20overwhelm%20me.%20I%20got%20to%20the%20point%20where%20the%20drive%20to%20have%20something%20new%20every%20day%20was%20driving%20me%20(and%20my%20roommate)%20insane.%3Cbr%20/%3E%0A%3Cbr%20/%3E%0ASo%20here's%20why%20I'm%20updating:%20I%20want%20to%20come%20back%20to%20crafting%20and%20creating.%3Cbr%20/%3E%0A%3Cbr%20/%3E%0AYou%20all%20were%20so%20amazing%20to%20me%20and%20so%20supportive%20of%20my%20creations,%20and%20I%20cannot%20wait%20to%20start%20sharing%20and%20connecting%20with%20you%20all%20again.%20So%20it%20may%20not%20be%20today,%20or%20tomorrow,%20but%20in%20the%20coming%20days,%20I%20will%20start%20sharing%20again.%3Cbr%20/%3E%0A%3Cbr%20/%3E%0AI%20hope%20you'll%20stick%20around%20with%20me.%3Cbr%20/%3E%0A%3Cbr%20/%3E%0A%3Cimg%20src%3D%22http://i809.photobucket.com/albums/zz13/attemptingcreative/signature1.png%22%20/%3E%3Cbr%20/%3E%0A%3Cbr%20/%3E%0A%3Ctable%20align%3D%22center%22%20cellpadding%3D%220%22%20cellspacing%3D%220%22%3E%3Ctbody%3E%0A%3Ctr%3E%3Ctd%3E%3Ca%20href%3D%22https://blogger.googleusercontent.com/img/b/R29vZ2xl/AVvXsEipnUbt6Mlo0CEd420l4zX879jZgBw1BGduyqdafB-BXobOYwqXGCgliATFUPYWGTyLlj86IIiPw_T8wFI32EF__xCnihxwesiarehr6QVWmRt-4m6JRZhdfLswnP6ioLUN81i_SyH-I3vJ/s1600/memoryday.jpg%22%20imageanchor%3D%221%22%3E%3Cimg%20border%3D%220%22%20height%3D%22320%22%20src%3D%22https://blogger.googleusercontent.com/img/b/R29vZ2xl/AVvXsEipnUbt6Mlo0CEd420l4zX879jZgBw1BGduyqdafB-BXobOYwqXGCgliATFUPYWGTyLlj86IIiPw_T8wFI32EF__xCnihxwesiarehr6QVWmRt-4m6JRZhdfLswnP6ioLUN81i_SyH-I3vJ/s320/memoryday.jpg%22%20width%3D%22240%22%20/%3E%3C/a%3E%3C/td%3E%3C/tr%3E%0A%3Ctr%3E%3Ctd%3EMy%20family%20at%20my%20brother's%20Memory%20Day.%20He%20graduated%20from%20high%20school%20in%20May!%3C/td%3E%3C/tr%3E%0A%3C/tbody%3E%3C/table%3E%3Cbr%20/%3E%0A%3Cbr%20/%3E%0A%3Cspan%3ESee%20something%20you%20like?%20Print%20it.%20Share%20it.%20Email%20it.%20But%20please,%20link%20back%20here%20when%20you%20do.%3C/span%3E)
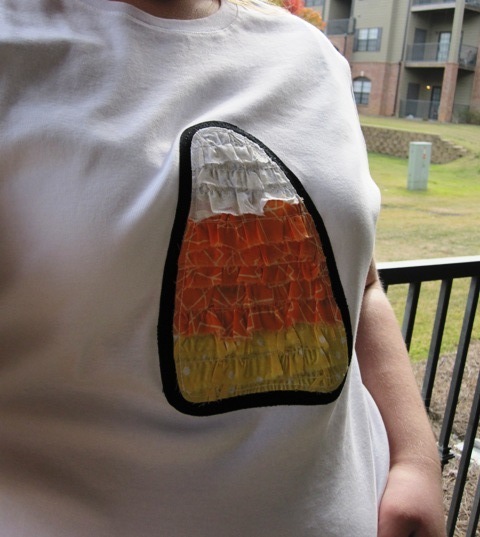
You've Got Candy Corn on Your Shirt 20 Oct 2010 6:43 AM (15 years ago)
Stick with me here. I'm using this new publisher Blogger introduced a while back (and I just found), so if this post looks weird or wonky, let me know.
I'm sure by now you've seen the adorable Candy Corn Ruffled Tee Amy from Positively Splendid posted last week. She matched it with an adorable ruffle skirt, and her little girl might be the cutest Halloween goodie out there!
Since my mom is a kindergarten teacher and can get away with wearing cute things (whereas I just get stares of confusion and concern), I decided to make her something very similar!


,%20so%20if%20this%20post%20looks%20weird%20or%20wonky,%20let%20me%20know.%3Cbr%20/%3E%0A%3Cbr%20/%3E%0AI'm%20sure%20by%20now%20you've%20seen%20the%20adorable%20%3Ca%20href%3D%22http://www.positivelysplendid.com/2010/10/candy-corn-cutie.html%22%20target%3D%22blank%22%3ECandy%20Corn%20Ruffled%20Tee%3C/a%3E%26nbsp;Amy%20from%26nbsp;%3Ca%20href%3D%22http://www.positivelysplendid.com/%22%20target%3D%22blank%22%3EPositively%20Splendid%3C/a%3E%20posted%20last%20week.%20She%20matched%20it%20with%20an%20adorable%20ruffle%20skirt,%20and%20her%20little%20girl%20might%20be%20the%20cutest%20Halloween%20goodie%20out%20there!%3Cbr%20/%3E%0A%3Cbr%20/%3E%0ASince%20my%20mom%20is%20a%20kindergarten%20teacher%20and%20can%20get%20away%20with%20wearing%20cute%20things%20(whereas%20I%20just%20get%20stares%20of%20confusion%20and%20concern),%20I%20decided%20to%20make%20her%20something%20very%20similar!%3Cbr%20/%3E%0A%3Cbr%20/%3E%0A%3Cdiv%3E%3Ca%20href%3D%22https://blogger.googleusercontent.com/img/b/R29vZ2xl/AVvXsEjKfzBVIwzSzXHwBpGwGpz5Ldai3C9KhtC4sSi1Jyqme8zfuZdPjob-FTvyACfvlbCIQk5QyvRfTcFltt2JgCW_RETo4NC9yTQj6Q6vO5E1A6kxPPr34BV9ClGjfhfZOrk52OscIvrG9Ipy/s1600/candycorn3.JPG%22%20imageanchor%3D%221%22%3E%3Cimg%20border%3D%220%22%20ex%3D%22true%22%20height%3D%22400%22%20src%3D%22https://blogger.googleusercontent.com/img/b/R29vZ2xl/AVvXsEjKfzBVIwzSzXHwBpGwGpz5Ldai3C9KhtC4sSi1Jyqme8zfuZdPjob-FTvyACfvlbCIQk5QyvRfTcFltt2JgCW_RETo4NC9yTQj6Q6vO5E1A6kxPPr34BV9ClGjfhfZOrk52OscIvrG9Ipy/s400/candycorn3.JPG%22%20width%3D%22300%22%20/%3E%3C/a%3E%3C/div%3E%3Cdiv%3E%3Cbr%20/%3E%0A%3C/div%3E%3Cdiv%3E%3Ca%20href%3D%22https://blogger.googleusercontent.com/img/b/R29vZ2xl/AVvXsEhTsyuLouIFzi2RxUttzWnhjIGYc2pSmep9DH8q-Y4FvS6TtSwfHSFxNoheyLBbFmOrYkB8HaNLm6Kgy1L-o6F8cMbGmVOwj2xwpuV7L4Rc_MJ8rsFZX-tuL-gfFvB5HZI-oFwfPUgCiOXq/s1600/candycorn4.JPG%22%20imageanchor%3D%221%22%3E%3Cimg%20border%3D%220%22%20ex%3D%22true%22%20height%3D%22400%22%20src%3D%22https://blogger.googleusercontent.com/img/b/R29vZ2xl/AVvXsEhTsyuLouIFzi2RxUttzWnhjIGYc2pSmep9DH8q-Y4FvS6TtSwfHSFxNoheyLBbFmOrYkB8HaNLm6Kgy1L-o6F8cMbGmVOwj2xwpuV7L4Rc_MJ8rsFZX-tuL-gfFvB5HZI-oFwfPUgCiOXq/s400/candycorn4.JPG%22%20width%3D%22356%22%20/%3E%3C/a%3E%3C/div%3E%3Cbr%20/%3E%0A%3Cdiv%3E%3Ca%20href%3D%22https://blogger.googleusercontent.com/img/b/R29vZ2xl/AVvXsEgISetZ4m8jN-By_kN_vJvK9UqRU8I0tBOND3aNtJyIwEgL_ZvzH6GzDKFg73IFAPUklLo9y_1TmnXKZoGVVZqjFgKnJf-BYIeCLFIAqW4KAMpASOh_NS-4PYvKjZrOOkQPkoMgXBbcaHbT/s1600/candycorn2.JPG%22%20imageanchor%3D%221%22%3E%3Cimg%20border%3D%220%22%20ex%3D%22true%22%20height%3D%22400%22%20src%3D%22https://blogger.googleusercontent.com/img/b/R29vZ2xl/AVvXsEgISetZ4m8jN-By_kN_vJvK9UqRU8I0tBOND3aNtJyIwEgL_ZvzH6GzDKFg73IFAPUklLo9y_1TmnXKZoGVVZqjFgKnJf-BYIeCLFIAqW4KAMpASOh_NS-4PYvKjZrOOkQPkoMgXBbcaHbT/s400/candycorn2.JPG%22%20width%3D%22300%22%20/%3E%3C/a%3E%3C/div%3E%3Cbr%20/%3E%0A%3Cdiv%3E%3Cbr%20/%3E%0A%3C/div%3E%3Cdiv%3EI%20chose%20to%20make%20the%20shape%20a%20bit%20more%20off%20center%20-%20to%20give%20it%20a%20somewhat%20whimsical%20look.%20I%20put%20it%20on%20black%20fabric%20so%20it%20would%20stick%20out%20more%20against%20the%20white%20shirt.%EF%BB%BF%20All%20in%20all,%20I%20think%20it's%20super%20cute!%20Thanks,%20Amy,%20for%20sharing!%3C/div%3E%3Cdiv%3E%3Cbr%20/%3E%0A%3C/div%3E%3Cdiv%3EAnd%20tomorrow,%20I'll%20post%20my%20own%20tutorial.%20But%20of%20course,%20check%20out%20Amy's%20if%20you%20want%20to%20get%20busy%20making%20your%20own%20ruffled%20candy%20corn%20tee%20before%20then.%3C/div%3E%3Cdiv%3E%3Cimg%20src%3D%22http://i809.photobucket.com/albums/zz13/attemptingcreative/signature1.png%22%20/%3E%3C/div%3E%3Cdiv%3E%3Cbr%20/%3E%0A%3C/div%3E%3Cdiv%3E%3Cbr%20/%3E%0A%3C/div%3E%3Cdiv%3E%3Cstrong%3E%3Cspan%3ESee%20something%20you%20like?%20Print%20it.%20Share%20it.%20Email%20it.%20But%20please,%20link%20back%20here%20when%20you%20do.%3C/span%3E%3C/strong%3E%3C/div%3E)
Easy Like Sunday Morning 17 Oct 2010 6:16 AM (15 years ago)
What's easy, you might be asking? Printing out adorable free Halloween goodies!
Like these candy corn cupcake toppers from Yellow Mums. Each Friday she puts up wonderful (and free!) printables. It's the first site I visit on Friday mornings.
I can't wait to make some Halloween cupcakes and use these as toppers. You could also make ties for Halloween goodie bags, adorable mini garland, or stickers. Lots of options. Lots of fun!
See something you like? Print it. Share it. Email it. But please, link back here when you do.
%20printables.%20It's%20the%20first%20site%20I%20visit%20on%20Friday%20mornings.%3Cbr%20/%3E%3Cbr%20/%3E%3Ca%20href%3D%22https://blogger.googleusercontent.com/img/b/R29vZ2xl/AVvXsEhujyO5Fh7WOxLqxJK7SodpnJoQo-bI7k_3Gqqf5P_CfnIYcPXPdnAh04nWvE4kaBL8PSTsnhu7vjBwBoo1pFwcfP4EkEXmKbE3f7cyCY5563vjwHYgNkqwlLx784CA76yF6D5y7BVC1bvU/s1600/yellow+mum.JPG%22%3E%3Cimg%20style%3D%22display:block;%20margin:0px%20auto%2010px;%20text-align:center;cursor:pointer;%20cursor:hand;width:%20400px;%20height:%20289px;%22%20src%3D%22https://blogger.googleusercontent.com/img/b/R29vZ2xl/AVvXsEhujyO5Fh7WOxLqxJK7SodpnJoQo-bI7k_3Gqqf5P_CfnIYcPXPdnAh04nWvE4kaBL8PSTsnhu7vjBwBoo1pFwcfP4EkEXmKbE3f7cyCY5563vjwHYgNkqwlLx784CA76yF6D5y7BVC1bvU/s400/yellow+mum.JPG%22%20border%3D%220%22%20alt%3D%22%22%20id%3D%22BLOGGER_PHOTO_ID_5528385769943266546%22%20/%3E%3C/a%3E%3Cdiv%3E%3Cspan%3EPicture%20from%20%3C/span%3E%3Ca%20href%3D%22http://yellowmums.blogspot.com/%22%20target%3D%22blank%22%3E%3Cspan%3EYellow%20Mums%3C/span%3E%3C/a%3E%3Cspan%3E.%3C/span%3E%3C/div%3E%3Cdiv%3E%3Cbr%20/%3EI%20can't%20wait%20to%20make%20some%20Halloween%20cupcakes%20and%20use%20these%20as%20toppers.%20You%20could%20also%20make%20ties%20for%20Halloween%20goodie%20bags,%20adorable%20mini%20garland,%20or%20stickers.%20Lots%20of%20options.%20Lots%20of%20fun!%3Cdiv%3E%3Cbr%20/%3E%3C/div%3E%3Cdiv%3E%3Cimg%20src%3D%22http://i809.photobucket.com/albums/zz13/attemptingcreative/signature1.png%22%20/%3E%3Cbr%20/%3E%3Cbr%20/%3E%3C/div%3E%3Cdiv%3E%3Cbr%20/%3E%3C/div%3E%3Cdiv%3E%3Cbr%20/%3E%3C/div%3E%3Cdiv%3E%3Cbr%20/%3E%3Cb%3E%3Cspan%3ESee%20something%20you%20like?%20Print%20it.%20Share%20it.%20Email%20it.%20But%20please,%20link%20back%20here%20when%20you%20do.%3C/span%3E%3C/b%3E%3C/div%3E%3C/div%3E)
Saturday Afternoon Swag 16 Oct 2010 10:21 AM (15 years ago)
I adore these printable wrapping papers and downloadable desktop wallpapers (with monthly calendars) from Mae, an Australian fabric decal group. See the beauty for yourself here.
See something you like? Print it. Share it. Email it. But please, link back here when you do.
%20from%20%3Ca%20href%3D%22http://www.lovemae.com.au/index.htm%22%20target%3D%22blank%22%3EMae%3C/a%3E,%20an%20Australian%20fabric%20decal%20group.%20See%20the%20beauty%20for%20yourself%20%3Ca%20href%3D%22http://www.lovemae.com.au/yesplease.htm%22%20target%3D%22blank%22%3Ehere%3C/a%3E.%3Cbr%20/%3E%3Cbr%20/%3E%3Ca%20href%3D%22https://blogger.googleusercontent.com/img/b/R29vZ2xl/AVvXsEjW_SnvlYRdnQew7lRJjvTSAQeQnroOdMsFzaVBLQjVoJWMsqRF8OMWaTPoDX4Tgs24Jh3mcFffwTxJa4PncRpjvfAJWasA4hKxgnTDMbAdTbFMk6LOH4r-vWtq_ZMOAse9nBR2Ryv4Es8Q/s1600/Picture+3.png%22%3E%3Cimg%20style%3D%22display:block;%20margin:0px%20auto%2010px;%20text-align:center;cursor:pointer;%20cursor:hand;width:%20400px;%20height:%2075px;%22%20src%3D%22https://blogger.googleusercontent.com/img/b/R29vZ2xl/AVvXsEjW_SnvlYRdnQew7lRJjvTSAQeQnroOdMsFzaVBLQjVoJWMsqRF8OMWaTPoDX4Tgs24Jh3mcFffwTxJa4PncRpjvfAJWasA4hKxgnTDMbAdTbFMk6LOH4r-vWtq_ZMOAse9nBR2Ryv4Es8Q/s400/Picture+3.png%22%20border%3D%220%22%20alt%3D%22%22%20id%3D%22BLOGGER_PHOTO_ID_5528371619030201426%22%20/%3E%3C/a%3E%3Cbr%20/%3E%3Cimg%20src%3D%22http://i809.photobucket.com/albums/zz13/attemptingcreative/signature1.png%22%20/%3E%3Cbr%20/%3E%3Cbr%20/%3E%3Cbr%20/%3E%3Cbr%20/%3E%3Cbr%20/%3E%3Cb%3E%3Cspan%3ESee%20something%20you%20like?%20Print%20it.%20Share%20it.%20Email%20it.%20But%20please,%20link%20back%20here%20when%20you%20do.%3C/span%3E%3C/b%3E)
Get Your Halloween Freebies! 15 Oct 2010 9:05 AM (15 years ago)
Happy Friday! (I think those may be two of the best words in the English language.) You all remember my friend Lauren, right? ("Hi, Lauren!")

She just opened a new stationery shop, Pinwheel Press. She also created the new attempting creative title image for this web site. She's a very talented graphic artist. And other than the fact she's an Alabama fan, she's pretty awesome all the way 'round. (Plus, she has the most adorable dog.)

To add to that awesomeness, she is giving away free printables of some of my most favorite things she's ever done: the Halloween tags!! They don't have to cupcake flags. You could use them for just about anything. In fact, if you do use them, send me some pictures of what you did. I'd love to share!


See something you like? Print it. Share it. Email it. But please, link back here when you do.
%20You%20all%20remember%20my%20friend%20Lauren,%20right?%20(%22Hi,%20Lauren!%22)%3Cdiv%3E%3Cbr%20/%3E%3Ca%20href%3D%22https://blogger.googleusercontent.com/img/b/R29vZ2xl/AVvXsEgD8kM0FiIsCEzmI7OPT2-IHtKS-P_C6Ol2wGw09iDQbY60Ckn2Kzozd4AIqsOkYSXDOW3ZzbwrRdrI4AIpo4Wr6omooFsnyYxVxvP2_FqcF19f5REwGcz6i7_gbsOdk9Xs-PZFn7eUnATf/s1600/lauren.jpg%22%3E%3Cimg%20style%3D%22display:block;%20margin:0px%20auto%2010px;%20text-align:center;cursor:pointer;%20cursor:hand;width:%20274px;%20height:%20400px;%22%20src%3D%22https://blogger.googleusercontent.com/img/b/R29vZ2xl/AVvXsEgD8kM0FiIsCEzmI7OPT2-IHtKS-P_C6Ol2wGw09iDQbY60Ckn2Kzozd4AIqsOkYSXDOW3ZzbwrRdrI4AIpo4Wr6omooFsnyYxVxvP2_FqcF19f5REwGcz6i7_gbsOdk9Xs-PZFn7eUnATf/s400/lauren.jpg%22%20border%3D%220%22%20alt%3D%22%22%20id%3D%22BLOGGER_PHOTO_ID_5528317965017767090%22%20/%3E%3C/a%3E%3Cbr%20/%3EShe%20just%20opened%20a%20new%20stationery%20shop,%20%3Ca%20href%3D%22http://www.etsy.com/shop/thepinwheelpress%22%20target%3D%22blank%22%3EPinwheel%20Press%3C/a%3E.%20She%20also%20created%20the%20new%20%3Ci%3Eattempting%20creative%3C/i%3E%20title%20image%20for%20this%20web%20site.%20She's%20a%20very%20talented%20graphic%20artist.%20And%20other%20than%20the%20fact%20she's%20an%20Alabama%20fan,%20she's%20pretty%20awesome%20all%20the%20way%20'round.%20(Plus,%20she%20has%20the%20most%20adorable%20dog.)%3C/div%3E%3Cdiv%3E%3Cbr%20/%3E%3Ca%20href%3D%22https://blogger.googleusercontent.com/img/b/R29vZ2xl/AVvXsEgzgl0wZHjQqo8MJ9M8vK4GoNqZswnfkpd1G5LdrDj0PdMRiysvaBV7WLiHeC52oszZC5fqiALQRofo082GGDxmGQqI5hv8BwS4splJT8oP0l7_NwMAwxNNGxSYnmFzWfRjLjh34oryvmOE/s1600/murphy.jpg%22%3E%3Cimg%20style%3D%22display:block;%20margin:0px%20auto%2010px;%20text-align:center;cursor:pointer;%20cursor:hand;width:%20300px;%20height:%20400px;%22%20src%3D%22https://blogger.googleusercontent.com/img/b/R29vZ2xl/AVvXsEgzgl0wZHjQqo8MJ9M8vK4GoNqZswnfkpd1G5LdrDj0PdMRiysvaBV7WLiHeC52oszZC5fqiALQRofo082GGDxmGQqI5hv8BwS4splJT8oP0l7_NwMAwxNNGxSYnmFzWfRjLjh34oryvmOE/s400/murphy.jpg%22%20border%3D%220%22%20alt%3D%22%22%20id%3D%22BLOGGER_PHOTO_ID_5528318124379052210%22%20/%3E%3C/a%3E%3Cdiv%3EThat's%20Murphy.%20He's%20the%20best.%3C/div%3E%3Cbr%20/%3ETo%20add%20to%20that%20awesomeness,%20she%20is%20%3Ca%20href%3D%22http://laurenmakes.wordpress.com/2010/10/15/friday-freebies/%22%20target%3D%22blank%22%3Egiving%20away%3C/a%3E%20free%20printables%20of%20some%20of%20my%20most%20favorite%20things%20she's%20ever%20done:%20the%20Halloween%20tags!!%20They%20don't%20have%20to%20cupcake%20flags.%20You%20could%20use%20them%20for%20just%20about%20anything.%20In%20fact,%20if%20you%20do%20use%20them,%20send%20me%20some%20pictures%20of%20what%20you%20did.%20I'd%20love%20to%20share!%3Cbr%20/%3E%3Cbr%20/%3E%3Ca%20href%3D%22https://blogger.googleusercontent.com/img/b/R29vZ2xl/AVvXsEj6YIXSzp5VZwte2955VEnzEpFJUXt5Wra6Sgt0J0TM_lsW08e5dTY_boV1Ic3LCOb0oawggwyy3YVeAdLJdvhlCiCxNm1PsVXeKxRFWG8NJG3Gt67-4RephMAleJFLs4jlg2MTO6esRf50/s1600/giveaway1.jpg%22%3E%3Cimg%20style%3D%22display:block;%20margin:0px%20auto%2010px;%20text-align:center;cursor:pointer;%20cursor:hand;width:%20400px;%20height:%20354px;%22%20src%3D%22https://blogger.googleusercontent.com/img/b/R29vZ2xl/AVvXsEj6YIXSzp5VZwte2955VEnzEpFJUXt5Wra6Sgt0J0TM_lsW08e5dTY_boV1Ic3LCOb0oawggwyy3YVeAdLJdvhlCiCxNm1PsVXeKxRFWG8NJG3Gt67-4RephMAleJFLs4jlg2MTO6esRf50/s400/giveaway1.jpg%22%20border%3D%220%22%20alt%3D%22%22%20id%3D%22BLOGGER_PHOTO_ID_5528318679721558322%22%20/%3E%3C/a%3E%3Cbr%20/%3E%3Ca%20href%3D%22https://blogger.googleusercontent.com/img/b/R29vZ2xl/AVvXsEgrQnAJtvNWXb5IK_wsg0eGK1gpkDg8ayli2E9U63GCuPkLncJpvphe5CKZp5kAvq9Rmd9ud20OxHqshARuefYtFWZuhwZnIgl6PC0V0AMmZzS6A9COqckWNoyot81qp2k1AOqQTF_y02H6/s1600/giveaway2.jpg%22%3E%3Cimg%20style%3D%22display:block;%20margin:0px%20auto%2010px;%20text-align:center;cursor:pointer;%20cursor:hand;width:%20400px;%20height:%20300px;%22%20src%3D%22https://blogger.googleusercontent.com/img/b/R29vZ2xl/AVvXsEgrQnAJtvNWXb5IK_wsg0eGK1gpkDg8ayli2E9U63GCuPkLncJpvphe5CKZp5kAvq9Rmd9ud20OxHqshARuefYtFWZuhwZnIgl6PC0V0AMmZzS6A9COqckWNoyot81qp2k1AOqQTF_y02H6/s400/giveaway2.jpg%22%20border%3D%220%22%20alt%3D%22%22%20id%3D%22BLOGGER_PHOTO_ID_5528318663611155554%22%20/%3E%3C/a%3E%3Cbr%20/%3E%3C/div%3E%3Cdiv%3EGo%20get%20'em%20%3Ca%20href%3D%22http://laurenmakes.wordpress.com/2010/10/15/friday-freebies/%22%20target%3D%22blank%22%3Ehere%3C/a%3E.%20And%20tell%20her%20Kimberly%20sent%20you!%3Cbr%20/%3E%3Cimg%20src%3D%22http://i809.photobucket.com/albums/zz13/attemptingcreative/signature1.png%22%20/%3E%3Cbr%20/%3E%3Cbr%20/%3E%3C/div%3E%3Cdiv%3E%3Cbr%20/%3E%3C/div%3E%3Cdiv%3E%3Cbr%20/%3E%3Cb%3E%3Cspan%3ESee%20something%20you%20like?%20Print%20it.%20Share%20it.%20Email%20it.%20But%20please,%20link%20back%20here%20when%20you%20do.%3C/span%3E%3C/b%3E%3C/div%3E)
Last-Minute Halloween Wreath 11 Oct 2010 5:00 AM (15 years ago)
I had great intentions of making a wonderful Halloween wreath yesterday because every holiday does deserve a great wreath. I had plans for a skull with a bow tie cut from felt. It was going to be super cute.
Then...
I went grocery shopping, picked up some last-minute items for the crafts I'll be sharing this week (including the wreath), and was pumping gas.
As I'm pumping gas, I feel this shudder, and the soda I had placed on my trunk fell to the ground.
Earthquake? No. (But not unheard of in these parts.) Slamming door? No. My car is locked.
That's when I realized what had actually happened.
Someone backed into my car.
Boom.
Crunch.
Now thankfully, the damage isn't so terrible. It's just a bad scratch. But it's definitely noticeable, and it makes my heart hurt for my little Malibu.
You see, I'm dedicated to this car. It's 10 years old now. I bought it when I graduated from high school, and it was to be my college car. ('Cause you know, as soon as I graduated college, I was going to be rich and buy a new one.) But now that we're past that and into reality, this car and I are going all the way. To like at least 2015.
So the fact it's all banged up hurts my heart. But, we'll get her patched up soon enough. She's been through a lot. We've been through a lot. But we've got more time together on this Earth.
That's why my great wreath plan turned into a "How can we make an awesome wreath fast?" kind of thing.
Here's what we got. And I love it! (Even if it wasn't my original plan.)


Just used one of these wire wreath forms. I paid about $2 at Michael's with a Coupon. It's super light, and it allows you to tie the feather boas to something for a bit of support. A piece of cardboard cut into a circle would work well, too.
Then top it with a simple bow. I used orange. 'Cause it's Halloween and all.
For a "This day did not go as I expected" kind of craft, it still looks great, I think! Have you seen any Halloween wreaths you just love?
See something you like? Print it. Share it. Email it. But please, link back here when you do.
,%20and%20was%20pumping%20gas.%3Cbr%20/%3E%3Cbr%20/%3EAs%20I'm%20pumping%20gas,%20I%20feel%20this%20shudder,%20and%20the%20soda%20I%20had%20placed%20on%20my%20trunk%20fell%20to%20the%20ground.%3Cbr%20/%3E%3Cbr%20/%3EEarthquake?%20No.%20(But%20not%20unheard%20of%20in%20these%20parts.)%20Slamming%20door?%20No.%20My%20car%20is%20locked.%3Cbr%20/%3E%3Cbr%20/%3EThat's%20when%20I%20realized%20what%20had%20actually%20happened.%3Cbr%20/%3E%3Cbr%20/%3ESomeone%20backed%20into%20my%20car.%3Cbr%20/%3E%3Cbr%20/%3EBoom.%3Cbr%20/%3E%3Cbr%20/%3ECrunch.%3Cbr%20/%3E%3Cbr%20/%3ENow%20thankfully,%20the%20damage%20isn't%20so%20terrible.%20It's%20just%20a%20bad%20scratch.%20But%20it's%20definitely%20noticeable,%20and%20it%20makes%20my%20heart%20hurt%20for%20my%20little%20Malibu.%3Cbr%20/%3E%3Cbr%20/%3EYou%20see,%20I'm%20dedicated%20to%20this%20car.%20It's%2010%20years%20old%20now.%20I%20bought%20it%20when%20I%20graduated%20from%20high%20school,%20and%20it%20was%20to%20be%20my%20college%20car.%20('Cause%20you%20know,%20as%20soon%20as%20I%20graduated%20college,%20I%20was%20going%20to%20be%20rich%20and%20buy%20a%20new%20one.)%20But%20now%20that%20we're%20past%20that%20and%20into%20reality,%20this%20car%20and%20I%20are%20going%20all%20the%20way.%20To%20like%20at%20least%202015.%3Cbr%20/%3E%3Cbr%20/%3ESo%20the%20fact%20it's%20all%20banged%20up%20hurts%20my%20heart.%20But,%20we'll%20get%20her%20patched%20up%20soon%20enough.%20She's%20been%20through%20a%20lot.%20We've%20been%20through%20a%20lot.%20But%20we've%20got%20more%20time%20together%20on%20this%20Earth.%3Cbr%20/%3E%3Cbr%20/%3EThat's%20why%20my%20great%20wreath%20plan%20turned%20into%20a%20%22How%20can%20we%20make%20an%20awesome%20wreath%20fast?%22%20kind%20of%20thing.%3Cbr%20/%3E%3Cbr%20/%3EHere's%20what%20we%20got.%20And%20I%20love%20it!%20(Even%20if%20it%20wasn't%20my%20original%20plan.)%3Cbr%20/%3E%3Cbr%20/%3E%3Cp%3E%3Ca%20href%3D%22https://blogger.googleusercontent.com/img/b/R29vZ2xl/AVvXsEjEJgcnXtaPVNRaai_xKOG6yNhDU1yC2kr5cGLIv50fDsE4XzHmJ7t2O_Vxh0c2sbGpkMHAUjBkhti-6tiDFRbjvrNi-ve-nrNenGAkj4PnWb5QTnC9Zc7C6TRrVPWUn6vL9pJl-XEVP85D/s1600/wreath1.JPG%22%3E%3Cimg%20style%3D%22TEXT-ALIGN:%20center;%20MARGIN:%200px%20auto%2010px;%20WIDTH:%20300px;%20DISPLAY:%20block;%20HEIGHT:%20400px;%20CURSOR:%20hand%22%20id%3D%22BLOGGER_PHOTO_ID_5526635941631177138%22%20border%3D%220%22%20alt%3D%22%22%20src%3D%22https://blogger.googleusercontent.com/img/b/R29vZ2xl/AVvXsEjEJgcnXtaPVNRaai_xKOG6yNhDU1yC2kr5cGLIv50fDsE4XzHmJ7t2O_Vxh0c2sbGpkMHAUjBkhti-6tiDFRbjvrNi-ve-nrNenGAkj4PnWb5QTnC9Zc7C6TRrVPWUn6vL9pJl-XEVP85D/s400/wreath1.JPG%22%20/%3E%3C/a%3E%3Cbr%20/%3E%3Ca%20href%3D%22https://blogger.googleusercontent.com/img/b/R29vZ2xl/AVvXsEhlMuM71lojd4u9V7KLLR44Ny3rIvj8lLeogMAcyzlJmfPF8zLUYrxcHfKdMgurhzLgxc6KwpW92fiWi5ra5KbAjIw4X_kiaz78xVCuVyVztO9-2ls04n0yd6dhyphenhyphenMFQ3r7xra7f9l4ONozf/s1600/wreath2.JPG%22%3E%3Cimg%20style%3D%22TEXT-ALIGN:%20center;%20MARGIN:%200px%20auto%2010px;%20WIDTH:%20400px;%20DISPLAY:%20block;%20HEIGHT:%20300px;%20CURSOR:%20hand%22%20id%3D%22BLOGGER_PHOTO_ID_5526635935393214850%22%20border%3D%220%22%20alt%3D%22%22%20src%3D%22https://blogger.googleusercontent.com/img/b/R29vZ2xl/AVvXsEhlMuM71lojd4u9V7KLLR44Ny3rIvj8lLeogMAcyzlJmfPF8zLUYrxcHfKdMgurhzLgxc6KwpW92fiWi5ra5KbAjIw4X_kiaz78xVCuVyVztO9-2ls04n0yd6dhyphenhyphenMFQ3r7xra7f9l4ONozf/s400/wreath2.JPG%22%20/%3E%3C/a%3E%3Cbr%20/%3EJust%20used%20one%20of%20these%20wire%20wreath%20forms.%20I%20paid%20about%20$2%20at%20Michael's%20with%20a%20Coupon.%20It's%20super%20light,%20and%20it%20allows%20you%20to%20tie%20the%20feather%20boas%20to%20something%20for%20a%20bit%20of%20support.%20A%20piece%20of%20cardboard%20cut%20into%20a%20circle%20would%20work%20well,%20too.%3Cbr%20/%3E%3Cbr%20/%3E%3Ca%20href%3D%22https://blogger.googleusercontent.com/img/b/R29vZ2xl/AVvXsEiAI3PPkhahFF6Cf9u3c6gE1lY1cAtnq4tDE0MYtRF3BL25uPIT04q-_93MjL_CMxzcQ8Ku86Q59TeNkz7-wbzy0WNv7-MbyYSxn1GKtItsMje5xvm3jbSKAjz8yQCQMM5X82egG96vUArL/s1600/wreath3.JPG%22%3E%3Cimg%20style%3D%22TEXT-ALIGN:%20center;%20MARGIN:%200px%20auto%2010px;%20WIDTH:%20300px;%20DISPLAY:%20block;%20HEIGHT:%20400px;%20CURSOR:%20hand%22%20id%3D%22BLOGGER_PHOTO_ID_5526635933833391330%22%20border%3D%220%22%20alt%3D%22%22%20src%3D%22https://blogger.googleusercontent.com/img/b/R29vZ2xl/AVvXsEiAI3PPkhahFF6Cf9u3c6gE1lY1cAtnq4tDE0MYtRF3BL25uPIT04q-_93MjL_CMxzcQ8Ku86Q59TeNkz7-wbzy0WNv7-MbyYSxn1GKtItsMje5xvm3jbSKAjz8yQCQMM5X82egG96vUArL/s400/wreath3.JPG%22%20/%3E%3C/a%3E%3Cbr%20/%3EThen%20top%20it%20with%20a%20simple%20bow.%20I%20used%20orange.%20'Cause%20it's%20Halloween%20and%20all.%3Cbr%20/%3E%3Cbr%20/%3E%3Ca%20href%3D%22https://blogger.googleusercontent.com/img/b/R29vZ2xl/AVvXsEgwo_taHl-fVOYVkra7bilJYqmAQWIXVnF41zd98mZci56ZtLIyhh4Scj_ex9B7TZi6VZ8aScMY5ENGWVGtS8551AIX07wGWxdlffGQ6xTYqsvndrZre6S8f3XualMWG9L9BrA9Y7zLccqN/s1600/wreath4.JPG%22%3E%3Cimg%20style%3D%22TEXT-ALIGN:%20center;%20MARGIN:%200px%20auto%2010px;%20WIDTH:%20400px;%20DISPLAY:%20block;%20HEIGHT:%20337px;%20CURSOR:%20hand%22%20id%3D%22BLOGGER_PHOTO_ID_5526635922887048306%22%20border%3D%220%22%20alt%3D%22%22%20src%3D%22https://blogger.googleusercontent.com/img/b/R29vZ2xl/AVvXsEgwo_taHl-fVOYVkra7bilJYqmAQWIXVnF41zd98mZci56ZtLIyhh4Scj_ex9B7TZi6VZ8aScMY5ENGWVGtS8551AIX07wGWxdlffGQ6xTYqsvndrZre6S8f3XualMWG9L9BrA9Y7zLccqN/s400/wreath4.JPG%22%20/%3E%3C/a%3E%3Cbr%20/%3EFor%20a%20%22This%20day%20did%20not%20go%20as%20I%20expected%22%20kind%20of%20craft,%20it%20still%20looks%20great,%20I%20think!%20Have%20you%20seen%20any%20Halloween%20wreaths%20you%20just%20love?%3Cbr%20/%3E%3Cimg%20src%3D%22http://i809.photobucket.com/albums/zz13/attemptingcreative/signature1.png%22%20/%3E%3Cbr%20/%3E%3Cbr%20/%3E%3C/p%3E%3Cp%3E%3Cbr%20/%3E%3C/p%3E%3Cp%3E%3Cbr%20/%3E%3Cspan%3E%3Cstrong%3ESee%20something%20you%20like?%20Print%20it.%20Share%20it.%20Email%20it.%20But%20please,%20link%20back%20here%20when%20you%20do.%3C/strong%3E%20%3C/span%3E%3C/p%3E)
All My Men 7 Oct 2010 10:16 AM (15 years ago)
Halloween's leading men: Jack, Drac, and Frank.
In pop art style.
I'm in love.


See something you like? Print it. Share it. Email it. But please, link back here when you do.

Spooky Art 5 Oct 2010 1:53 PM (15 years ago)
Spray paint is a cure-all.
It covers everything. Makes mismatched items look like they belong together. And makes dollar-store frames art!

I took down the normal art in the entryway and replaced it with this (temporary) spooky art.


Total cost for this art project: About $13. Everything is either from the dollar store or the dollar bins at Target.
See something you like? Print it. Share it. Email it. But please, link back here when you do.
%20spooky%20art.%3Cbr%20/%3E%3Cbr%20/%3E%3Ca%20href%3D%22https://blogger.googleusercontent.com/img/b/R29vZ2xl/AVvXsEjXtFZBAKrGgqQyFrlVwE6binG54O1YP1s-cW43uHjzP83HsbMxI1-pR6kMQdCzOP5ChvdpYBZvdq2xh1_nHy16_p7Mb0vyDhhEFus3iMKhUJ0ciZO6Tx4GZ4hspqrPcJfdFej7k36DYNfp/s1600/art2.JPG%22%3E%3Cimg%20style%3D%22TEXT-ALIGN:%20center;%20MARGIN:%200px%20auto%2010px;%20WIDTH:%20300px;%20DISPLAY:%20block;%20HEIGHT:%20400px;%20CURSOR:%20hand%22%20id%3D%22BLOGGER_PHOTO_ID_5524571446036404418%22%20border%3D%220%22%20alt%3D%22%22%20src%3D%22https://blogger.googleusercontent.com/img/b/R29vZ2xl/AVvXsEjXtFZBAKrGgqQyFrlVwE6binG54O1YP1s-cW43uHjzP83HsbMxI1-pR6kMQdCzOP5ChvdpYBZvdq2xh1_nHy16_p7Mb0vyDhhEFus3iMKhUJ0ciZO6Tx4GZ4hspqrPcJfdFej7k36DYNfp/s400/art2.JPG%22%20/%3E%3C/a%3E%3Cbr%20/%3E%3Ca%20href%3D%22https://blogger.googleusercontent.com/img/b/R29vZ2xl/AVvXsEjlXcglaYJwqmrSEYsEPxYRSnwEw2F4CR4-Kc6FvyHFOxvaUl4k6sXI2H6n3E82RG38yYNLkKowUAFQZrEisSzGvjLdu_hYVEvUJNwjagtKW3LT9c0176ZlwXLNbL-oH44cid8BmsiO9UR7/s1600/art3.JPG%22%3E%3Cimg%20style%3D%22TEXT-ALIGN:%20center;%20MARGIN:%200px%20auto%2010px;%20WIDTH:%20400px;%20DISPLAY:%20block;%20HEIGHT:%20300px;%20CURSOR:%20hand%22%20id%3D%22BLOGGER_PHOTO_ID_5524571438520182482%22%20border%3D%220%22%20alt%3D%22%22%20src%3D%22https://blogger.googleusercontent.com/img/b/R29vZ2xl/AVvXsEjlXcglaYJwqmrSEYsEPxYRSnwEw2F4CR4-Kc6FvyHFOxvaUl4k6sXI2H6n3E82RG38yYNLkKowUAFQZrEisSzGvjLdu_hYVEvUJNwjagtKW3LT9c0176ZlwXLNbL-oH44cid8BmsiO9UR7/s400/art3.JPG%22%20/%3E%3C/a%3E%3Cbr%20/%3E%3Ca%20href%3D%22https://blogger.googleusercontent.com/img/b/R29vZ2xl/AVvXsEiJVXGp6LT6buBGIJzWIyZO92U-lyjN5oNGvxbXBU0ScvoBsSLDDTZNS7sm1eOIggyNcHPCz9PsQ7pkZGI25Wu4WxFtTTClj0phDvRV3SgYeYOUGwC6MX-qJvW07NHggrLqYzhMJExLAIIU/s1600/art4.JPG%22%3E%3Cimg%20style%3D%22TEXT-ALIGN:%20center;%20MARGIN:%200px%20auto%2010px;%20WIDTH:%20300px;%20DISPLAY:%20block;%20HEIGHT:%20400px;%20CURSOR:%20hand%22%20id%3D%22BLOGGER_PHOTO_ID_5524571425988723618%22%20border%3D%220%22%20alt%3D%22%22%20src%3D%22https://blogger.googleusercontent.com/img/b/R29vZ2xl/AVvXsEiJVXGp6LT6buBGIJzWIyZO92U-lyjN5oNGvxbXBU0ScvoBsSLDDTZNS7sm1eOIggyNcHPCz9PsQ7pkZGI25Wu4WxFtTTClj0phDvRV3SgYeYOUGwC6MX-qJvW07NHggrLqYzhMJExLAIIU/s400/art4.JPG%22%20/%3E%3C/a%3E%3Cbr%20/%3E%3Ca%20href%3D%22https://blogger.googleusercontent.com/img/b/R29vZ2xl/AVvXsEi_NHl8i81tsDmnjGeK6jWNnw06H2LPfo-aUtinCum-fNoBGNk0AgNv7BEuEmjhSt8tmk6EbmEmRH4mg5hdF5_7C7QQa6zAOZPPNZAUBHgnxqGLW92ivn2RzU-kA8RBal4x7ZWadedgyPoa/s1600/art5.JPG%22%3E%3Cimg%20style%3D%22TEXT-ALIGN:%20center;%20MARGIN:%200px%20auto%2010px;%20WIDTH:%20400px;%20DISPLAY:%20block;%20HEIGHT:%20300px;%20CURSOR:%20hand%22%20id%3D%22BLOGGER_PHOTO_ID_5524571403723058466%22%20border%3D%220%22%20alt%3D%22%22%20src%3D%22https://blogger.googleusercontent.com/img/b/R29vZ2xl/AVvXsEi_NHl8i81tsDmnjGeK6jWNnw06H2LPfo-aUtinCum-fNoBGNk0AgNv7BEuEmjhSt8tmk6EbmEmRH4mg5hdF5_7C7QQa6zAOZPPNZAUBHgnxqGLW92ivn2RzU-kA8RBal4x7ZWadedgyPoa/s400/art5.JPG%22%20/%3E%3C/a%3E%3Cbr%20/%3E%3Cimg%20style%3D%22TEXT-ALIGN:%20center;%20MARGIN:%200px%20auto%2010px;%20WIDTH:%20300px;%20DISPLAY:%20block;%20HEIGHT:%20400px;%20CURSOR:%20hand%22%20id%3D%22BLOGGER_PHOTO_ID_5524571391308163666%22%20border%3D%220%22%20alt%3D%22%22%20src%3D%22https://blogger.googleusercontent.com/img/b/R29vZ2xl/AVvXsEiPMSMgtYFuyRPTeBqH1NC79mz_X3-BAokpLpe2x6dekDVLuR1K0D6aRaJ32OIjFixNjHnDqIhoJO4qpwrRKByZ10uD8q8Flal2BDSqAecI9FHxa2bkEey80V0qmLWxXArvZ523jdeuN191/s400/art6.JPG%22%20/%3E%3Cbr%20/%3ETotal%20cost%20for%20this%20art%20project:%20About%20$13.%20Everything%20is%20either%20from%20the%20dollar%20store%20or%20the%20dollar%20bins%20at%20Target.%3C/p%3E%3Cimg%20src%3D%22http://i809.photobucket.com/albums/zz13/attemptingcreative/signature1.png%22%20/%3E%3Cbr%20/%3E%3Cp%3E%3C/p%3E%3Cp%3E%3Cbr%20/%3E%3Cstrong%3E%3Cspan%3ESee%20something%20you%20like?%20Print%20it.%20Share%20it.%20Email%20it.%20But%20please,%20link%20back%20here%20when%20you%20do.%3C/span%3E%3C/strong%3E%20%3C/p%3E)
Door Handle Decoration Tutorial 4 Oct 2010 10:09 AM (15 years ago)
Did everyone have a good weekend? I spent the entire weekend with my mom and my brother. We toured the University of Alabama-Birmingham, relaxed, watched some football, and took in this beautiful fall weather we're finally having down here. We also did some crafting, and I can't wait to share with you what all we came up with.
For now, here's a tutorial for the door handle jack o' lanterns I posted Friday. It would be so fun to make ghosts, monsters, or witches like I made these jack o' lanterns.


See something you like? Print it. Share it. Email it. But please, link back here when you do.
,%20cut%20out%20a%20jack%20o'%20lantern%20face.%20Use%20the%20internet%20for%20inspiration,%20as%20there%20are%20lots%20of%20fun%20faces%20out%20there.%3C/div%3E%3Cdiv%3E%3Cbr%20/%3E%3C/div%3E%3Cdiv%3EThen%20hot%20glue%20(or%20craft%20glue)%20the%20pieces%20of%20face%20onto%20the%20popsicle%20stick%20background.%3C/div%3E%3Cdiv%3E%3Cbr%20/%3E%3Ca%20href%3D%22https://blogger.googleusercontent.com/img/b/R29vZ2xl/AVvXsEhDXDI-PHF9RHK0dd210irP6F5ri59a6Hlv0BsYH6NVfbeyw3w6aPvkARa3XQcaEF9oGXzg9lRWIuXU2pA1tEjIAeFlUe_eqolRUzi1gNL5pQvVzo1leBNl_h_YjNVuqx8JZf0Zsnlr3J1r/s1600/tutorial5.jpg%22%3E%3Cimg%20style%3D%22display:block;%20margin:0px%20auto%2010px;%20text-align:center;cursor:pointer;%20cursor:hand;width:%20400px;%20height:%20300px;%22%20src%3D%22https://blogger.googleusercontent.com/img/b/R29vZ2xl/AVvXsEhDXDI-PHF9RHK0dd210irP6F5ri59a6Hlv0BsYH6NVfbeyw3w6aPvkARa3XQcaEF9oGXzg9lRWIuXU2pA1tEjIAeFlUe_eqolRUzi1gNL5pQvVzo1leBNl_h_YjNVuqx8JZf0Zsnlr3J1r/s400/tutorial5.jpg%22%20border%3D%220%22%20alt%3D%22%22%20id%3D%22BLOGGER_PHOTO_ID_5524251561971037506%22%20/%3E%3C/a%3E%3Cbr%20/%3E%3C/div%3E%3Cdiv%3ECut%20a%20longer%20piece%20of%20felt%20(or%20ribbon),%20hot%20glue%20it%20to%20the%20back,%20and%20let%20cool/harden.%3C/div%3E%3Cdiv%3E%3Cbr%20/%3E%3Ca%20href%3D%22https://blogger.googleusercontent.com/img/b/R29vZ2xl/AVvXsEjf_H7K9TADQF9FnYhcekkJXJDuykWdLGBIItj6yeeHAELADrprMtFm_Xv59teC0BgTWUVHvw_st3VahxC0R7W6Xaxf60UKZBcwqvFa67I2deFhA1SHSH4m-HEAetj7d0CDLjKZY7fk6lB9/s1600/tutorial6.jpg%22%3E%3Cimg%20style%3D%22display:block;%20margin:0px%20auto%2010px;%20text-align:center;cursor:pointer;%20cursor:hand;width:%20400px;%20height:%20324px;%22%20src%3D%22https://blogger.googleusercontent.com/img/b/R29vZ2xl/AVvXsEjf_H7K9TADQF9FnYhcekkJXJDuykWdLGBIItj6yeeHAELADrprMtFm_Xv59teC0BgTWUVHvw_st3VahxC0R7W6Xaxf60UKZBcwqvFa67I2deFhA1SHSH4m-HEAetj7d0CDLjKZY7fk6lB9/s400/tutorial6.jpg%22%20border%3D%220%22%20alt%3D%22%22%20id%3D%22BLOGGER_PHOTO_ID_5524251556043306066%22%20/%3E%3C/a%3E%3Cbr%20/%3E%3C/div%3E%3Cdiv%3EThen%20you're%20all%20done.%20So%20simple%20and%20fun!%3Cbr%20/%3E%3Cimg%20src%3D%22http://i809.photobucket.com/albums/zz13/attemptingcreative/signature1.png%22%20/%3E%3Cbr%20/%3E%3Cbr%20/%3E%3Cbr%20/%3E%3Cbr%20/%3E%3Cbr%20/%3E%3Cb%3E%3Cspan%3ESee%20something%20you%20like?%20Print%20it.%20Share%20it.%20Email%20it.%20But%20please,%20link%20back%20here%20when%20you%20do.%3C/span%3E%3C/b%3E%3C/div%3E)
How do you like the new look? 1 Oct 2010 7:04 AM (15 years ago)
If you're on Google reader (or any reader) click this post's title. And take a look at the new attempting creative!!!
The title was designed by my colleague and designer extraordinaire Lauren Wade. She and a friend just started an amazing paperie Pinwheel Press.
Wanna see some of their work?


I love everything they do! And I promise you will, too. Stop over and take a look at their shop. And let them know I sent you.
See something you like? Print it. Share it. Email it. But please, link back here when you do.
%20click%20this%20post's%20title.%20And%20take%20a%20look%20at%20the%20new%20%3Cem%3Eattempting%20creative%3C/em%3E!!!%3Cbr%20/%3E%3Cbr%20/%3EThe%20title%20was%20designed%20by%20my%20colleague%20and%20designer%20extraordinaire%20Lauren%20Wade.%20She%20and%20a%20friend%20just%20started%20an%20amazing%20paperie%20%3Ca%20href%3D%22http://www.etsy.com/shop/thepinwheelpress%22%20target%3D%22blank%22%3EPinwheel%20Press%3C/a%3E.%3Cbr%20/%3E%3Cbr%20/%3EWanna%20see%20some%20of%20their%20work?%3Cbr%20/%3E%3Cbr%20/%3E%3Ca%20href%3D%22https://blogger.googleusercontent.com/img/b/R29vZ2xl/AVvXsEg_gxosEGsIWznQp2_ezzUhqHk8hOkJ661wpkccYa03AEhsm7XdU0KV5TjtyDbGTTdryMcXgwgELvM7oArqfFj6HARVPlrsrboYIKsxR1W_dnHeLbJ2oFfmsOJrpD7Jn1u1ONLDBdPyRzzz/s1600/pinwheel2.jpg%22%3E%3Cimg%20style%3D%22TEXT-ALIGN:%20center;%20MARGIN:%200px%20auto%2010px;%20WIDTH:%20229px;%20DISPLAY:%20block;%20HEIGHT:%20400px;%20CURSOR:%20hand%22%20id%3D%22BLOGGER_PHOTO_ID_5522913454914529554%22%20border%3D%220%22%20alt%3D%22%22%20src%3D%22https://blogger.googleusercontent.com/img/b/R29vZ2xl/AVvXsEg_gxosEGsIWznQp2_ezzUhqHk8hOkJ661wpkccYa03AEhsm7XdU0KV5TjtyDbGTTdryMcXgwgELvM7oArqfFj6HARVPlrsrboYIKsxR1W_dnHeLbJ2oFfmsOJrpD7Jn1u1ONLDBdPyRzzz/s400/pinwheel2.jpg%22%20/%3E%3C/a%3E%3Cbr%20/%3E%3Ca%20href%3D%22https://blogger.googleusercontent.com/img/b/R29vZ2xl/AVvXsEjVJ4vWgDZvLSimCzqAfAO4MiJFKSMIV_LgXHyKi39yrXRKvVzvBAb4O3IuZjcTocfSOh-JWeAOKPp_ZZUuwz27n6wKf-Qq_e18qv9fEh6icTaxD79RiOuDCXTEFbT_bFxL3g12i2Fc-4gE/s1600/pinwheel3.jpg%22%3E%3Cimg%20style%3D%22TEXT-ALIGN:%20center;%20MARGIN:%200px%20auto%2010px;%20WIDTH:%20400px;%20DISPLAY:%20block;%20HEIGHT:%20229px;%20CURSOR:%20hand%22%20id%3D%22BLOGGER_PHOTO_ID_5522913455789271570%22%20border%3D%220%22%20alt%3D%22%22%20src%3D%22https://blogger.googleusercontent.com/img/b/R29vZ2xl/AVvXsEjVJ4vWgDZvLSimCzqAfAO4MiJFKSMIV_LgXHyKi39yrXRKvVzvBAb4O3IuZjcTocfSOh-JWeAOKPp_ZZUuwz27n6wKf-Qq_e18qv9fEh6icTaxD79RiOuDCXTEFbT_bFxL3g12i2Fc-4gE/s400/pinwheel3.jpg%22%20/%3E%3C/a%3E%3Cbr%20/%3E%3Ca%20href%3D%22https://blogger.googleusercontent.com/img/b/R29vZ2xl/AVvXsEhYxV0cz5QALbSAtP8ln-ycC0Cq3SGdpdFSapF3JyOHydPtMic76p_HM97ZJYsMkVbjydMC0p1UHUm80utHGW0P-3vj9ZTzzTSpfrNoslI6v5pATmYxmYVmOD7bMPMoT6tjyUqLVHt3Q_7j/s1600/pinwheel4.jpg%22%3E%3Cimg%20style%3D%22TEXT-ALIGN:%20center;%20MARGIN:%200px%20auto%2010px;%20WIDTH:%20400px;%20DISPLAY:%20block;%20HEIGHT:%20229px;%20CURSOR:%20hand%22%20id%3D%22BLOGGER_PHOTO_ID_5522913446637414466%22%20border%3D%220%22%20alt%3D%22%22%20src%3D%22https://blogger.googleusercontent.com/img/b/R29vZ2xl/AVvXsEhYxV0cz5QALbSAtP8ln-ycC0Cq3SGdpdFSapF3JyOHydPtMic76p_HM97ZJYsMkVbjydMC0p1UHUm80utHGW0P-3vj9ZTzzTSpfrNoslI6v5pATmYxmYVmOD7bMPMoT6tjyUqLVHt3Q_7j/s400/pinwheel4.jpg%22%20/%3E%3C/a%3E%3Cbr%20/%3E%3Ca%20href%3D%22https://blogger.googleusercontent.com/img/b/R29vZ2xl/AVvXsEjes2PetIXfVtvocsDwZnwU56rOkJYZ7org6o6GuzQI3mg9gazSApzVDyhYXqE1ltxh_qjNY4ionwQBA77RwEy42obS0g5du_Sl1XPIidfXOIKu5oEf3gCtAVOGUzlDDeoPIFQThh9acW6k/s1600/pinwheel1.jpg%22%3E%3Cimg%20style%3D%22TEXT-ALIGN:%20center;%20MARGIN:%200px%20auto%2010px;%20WIDTH:%20172px;%20DISPLAY:%20block;%20HEIGHT:%20400px;%20CURSOR:%20hand%22%20id%3D%22BLOGGER_PHOTO_ID_5522913441852831218%22%20border%3D%220%22%20alt%3D%22%22%20src%3D%22https://blogger.googleusercontent.com/img/b/R29vZ2xl/AVvXsEjes2PetIXfVtvocsDwZnwU56rOkJYZ7org6o6GuzQI3mg9gazSApzVDyhYXqE1ltxh_qjNY4ionwQBA77RwEy42obS0g5du_Sl1XPIidfXOIKu5oEf3gCtAVOGUzlDDeoPIFQThh9acW6k/s400/pinwheel1.jpg%22%20/%3E%3C/a%3E%3Cbr%20/%3EI%20love%20everything%20they%20do!%20And%20I%20promise%20you%20will,%20too.%20Stop%20over%20and%20take%20a%20look%20at%20their%20%3Ca%20href%3D%22http://www.etsy.com/shop/thepinwheelpress%22%20target%3D%22blank%22%3Eshop%3C/a%3E.%20And%20let%20them%20know%20I%20sent%20you.%3Cbr%20/%3E%3Cimg%20src%3D%22http://i809.photobucket.com/albums/zz13/attemptingcreative/signature1.png%22%20/%3E%3Cbr%20/%3E%3Cbr%20/%3E%3Cbr%20/%3E%3Cstrong%3E%3Cspan%3ESee%20something%20you%20like?%20Print%20it.%20Share%20it.%20Email%20it.%20But%20please,%20link%20back%20here%20when%20you%20do.%3C/span%3E%3C/strong%3E)
There's a Jack o' Lantern on Your Door 1 Oct 2010 4:01 AM (15 years ago)
Popsicle sticks + orange paint + felt = jack o' lantern door handle love
It's October. Every inch of my little apartment is about to be Halloween-ed out. I can't wait to share more with you guys.


A tutorial for this tomorrow!
See something you like? Print it. Share it. Email it. But please, link back here when you do.

You know what time it is? 30 Sep 2010 1:24 PM (15 years ago)
 It's almost October.
And you know what that means?
Pumpkins.


See something you like? Print it. Share it. Email it. But please, link back here when you do.

While I was Halloween-ing... 28 Sep 2010 4:19 AM (15 years ago)
 I did another sewing project. This is a Bible cover/tote. I know, I know. More sewing. But September is National Sewing Month, so that makes it cool, right?
Besides, I found this fabric while I was digging up fun Halloween fabric, and I just fell in love. It's delicious, and I wish I had like 50 yards of it to make over-night bags and garment bags and all kinds of fun things.
Meanwhile, I really am working on Halloween projects. In fact, my first one will be Thursday! And my second one will be Friday! (I'll have a tutorial for this tomorrow.)


See something you like? Print it. Share it. Email it. But please, link back here when you do.
%3Cbr%20/%3E%3Cbr%20/%3E%3Cbr%20/%3E%3Cp%3E%3Ca%20href%3D%22https://blogger.googleusercontent.com/img/b/R29vZ2xl/AVvXsEg-lPbqHNaUcNbclmsGTnBXr_9cChM2rWvHkcln-KBLaIA-fAz05D5V85nwZJ7xIHEvsPYZaO2rJYRhwEHSXqG8YU1vuqGk_3IIS5Srxi3Y_17gzIARCow5NWv3jWxv0UknFxIxfhj4cK_w/s1600/bible1.JPG%22%3E%3Cimg%20style%3D%22TEXT-ALIGN:%20center;%20MARGIN:%200px%20auto%2010px;%20WIDTH:%20400px;%20DISPLAY:%20block;%20HEIGHT:%20300px;%20CURSOR:%20hand%22%20id%3D%22BLOGGER_PHOTO_ID_5521784488367444818%22%20border%3D%220%22%20alt%3D%22%22%20src%3D%22https://blogger.googleusercontent.com/img/b/R29vZ2xl/AVvXsEg-lPbqHNaUcNbclmsGTnBXr_9cChM2rWvHkcln-KBLaIA-fAz05D5V85nwZJ7xIHEvsPYZaO2rJYRhwEHSXqG8YU1vuqGk_3IIS5Srxi3Y_17gzIARCow5NWv3jWxv0UknFxIxfhj4cK_w/s400/bible1.JPG%22%20/%3E%3C/a%3E%3Cbr%20/%3E%3Ca%20href%3D%22https://blogger.googleusercontent.com/img/b/R29vZ2xl/AVvXsEgxbYP-JNWMOlrf8EWfNEZjOqvLzZyLuRfqDjUefBA-V9UTmmAmvNqrejcYWzZxD41_Gkb4RPU3BwTg_L9jTPtvUoQBN8cDpl6U0j-ppS1lxQMgJ2W4tIQvaFJvZH6py8vwhHXFXLq8MfuG/s1600/bible2.JPG%22%3E%3Cimg%20style%3D%22TEXT-ALIGN:%20center;%20MARGIN:%200px%20auto%2010px;%20WIDTH:%20300px;%20DISPLAY:%20block;%20HEIGHT:%20400px;%20CURSOR:%20hand%22%20id%3D%22BLOGGER_PHOTO_ID_5521783591564026306%22%20border%3D%220%22%20alt%3D%22%22%20src%3D%22https://blogger.googleusercontent.com/img/b/R29vZ2xl/AVvXsEgxbYP-JNWMOlrf8EWfNEZjOqvLzZyLuRfqDjUefBA-V9UTmmAmvNqrejcYWzZxD41_Gkb4RPU3BwTg_L9jTPtvUoQBN8cDpl6U0j-ppS1lxQMgJ2W4tIQvaFJvZH6py8vwhHXFXLq8MfuG/s400/bible2.JPG%22%20/%3E%3C/a%3E%3Cbr%20/%3E%3Ca%20href%3D%22https://blogger.googleusercontent.com/img/b/R29vZ2xl/AVvXsEg-ubwb5P_YGuU06WaP1gKdbTIzpHjIjuFTvuKksF70NOSbNub7jMfifEiN5gH0ZbTqhvjH3QpcovAV5I2jDLO28eUBCxGPYlOu4fH4ICvjVBoSSlksHJ6Z9J5dTCVDM2vqgtu_knUIHsRT/s1600/bible3.JPG%22%3E%3Cimg%20style%3D%22TEXT-ALIGN:%20center;%20MARGIN:%200px%20auto%2010px;%20WIDTH:%20400px;%20DISPLAY:%20block;%20HEIGHT:%20300px;%20CURSOR:%20hand%22%20id%3D%22BLOGGER_PHOTO_ID_5521784484662988338%22%20border%3D%220%22%20alt%3D%22%22%20src%3D%22https://blogger.googleusercontent.com/img/b/R29vZ2xl/AVvXsEg-ubwb5P_YGuU06WaP1gKdbTIzpHjIjuFTvuKksF70NOSbNub7jMfifEiN5gH0ZbTqhvjH3QpcovAV5I2jDLO28eUBCxGPYlOu4fH4ICvjVBoSSlksHJ6Z9J5dTCVDM2vqgtu_knUIHsRT/s400/bible3.JPG%22%20/%3E%3C/a%3E%3Cbr%20/%3E%3Ca%20href%3D%22https://blogger.googleusercontent.com/img/b/R29vZ2xl/AVvXsEg5WORf-GmgwopCDyHs-SdFakZdQgsCKbIw7llDbrSRumWbWrG3LeKRz8UMHY7ZcmMjzisQitnw821JFVtqBHq_3eNBzWShLfYZ_ccpCUAf2qCXcFDpapDBSjf9-OQxUWJzWi5l1mW6sCvD/s1600/bible4.JPG%22%3E%3Cimg%20style%3D%22TEXT-ALIGN:%20center;%20MARGIN:%200px%20auto%2010px;%20WIDTH:%20400px;%20DISPLAY:%20block;%20HEIGHT:%20300px;%20CURSOR:%20hand%22%20id%3D%22BLOGGER_PHOTO_ID_5521783581540741458%22%20border%3D%220%22%20alt%3D%22%22%20src%3D%22https://blogger.googleusercontent.com/img/b/R29vZ2xl/AVvXsEg5WORf-GmgwopCDyHs-SdFakZdQgsCKbIw7llDbrSRumWbWrG3LeKRz8UMHY7ZcmMjzisQitnw821JFVtqBHq_3eNBzWShLfYZ_ccpCUAf2qCXcFDpapDBSjf9-OQxUWJzWi5l1mW6sCvD/s400/bible4.JPG%22%20/%3E%3C/a%3E%3Cbr%20/%3E%3Ca%20href%3D%22https://blogger.googleusercontent.com/img/b/R29vZ2xl/AVvXsEhj-fxluhA4n-4JSEU7cbVJdDXQ_j2lmBzI0hticG2QUU7vtNylvLavCLM-IoBI7xuaU_0XdULJuWOrjMz4xKXpCJWTFKscCZEuEkIQm2v-u1vwm0RFUS6vlWELbSr3kTh4jy5grRL8o5AG/s1600/bible5.JPG%22%3E%3Cimg%20style%3D%22TEXT-ALIGN:%20center;%20MARGIN:%200px%20auto%2010px;%20WIDTH:%20400px;%20DISPLAY:%20block;%20HEIGHT:%20300px;%20CURSOR:%20hand%22%20id%3D%22BLOGGER_PHOTO_ID_5521783572746057042%22%20border%3D%220%22%20alt%3D%22%22%20src%3D%22https://blogger.googleusercontent.com/img/b/R29vZ2xl/AVvXsEhj-fxluhA4n-4JSEU7cbVJdDXQ_j2lmBzI0hticG2QUU7vtNylvLavCLM-IoBI7xuaU_0XdULJuWOrjMz4xKXpCJWTFKscCZEuEkIQm2v-u1vwm0RFUS6vlWELbSr3kTh4jy5grRL8o5AG/s400/bible5.JPG%22%20/%3E%3C/a%3E%3Cbr%20/%3E%3Ca%20href%3D%22https://blogger.googleusercontent.com/img/b/R29vZ2xl/AVvXsEhTufb2kf91LS60bJ3n45_RvO9oqFm8B27C4so5_IZg4dKUERDo0nb4z5Q5DHvw4lsCyD1YS8V4q8mHvhdgHlk0RqP25HF5fbbrUp2TKU4CdveG-bNH7CstX_6enZeosdV-6GaTiNxynadI/s1600/bible6.JPG%22%3E%3Cimg%20style%3D%22TEXT-ALIGN:%20center;%20MARGIN:%200px%20auto%2010px;%20WIDTH:%20300px;%20DISPLAY:%20block;%20HEIGHT:%20400px;%20CURSOR:%20hand%22%20id%3D%22BLOGGER_PHOTO_ID_5521783564028649186%22%20border%3D%220%22%20alt%3D%22%22%20src%3D%22https://blogger.googleusercontent.com/img/b/R29vZ2xl/AVvXsEhTufb2kf91LS60bJ3n45_RvO9oqFm8B27C4so5_IZg4dKUERDo0nb4z5Q5DHvw4lsCyD1YS8V4q8mHvhdgHlk0RqP25HF5fbbrUp2TKU4CdveG-bNH7CstX_6enZeosdV-6GaTiNxynadI/s400/bible6.JPG%22%20/%3E%3C/a%3E%3Cimg%20border%3D%220%22%20alt%3D%22Photobucket%22%20src%3D%22http://i809.photobucket.com/albums/zz13/attemptingcreative/signature.png%22%20/%3E%3C/p%3E%3Cp%3E%3Cbr%20/%3E%3Cstrong%3E%3Cspan%3ESee%20something%20you%20like?%20Print%20it.%20Share%20it.%20Email%20it.%20But%20please,%20link%20back%20here%20when%20you%20do.%3C/span%3E%3C/strong%3E%20%3C/p%3E)
Team Spirit Headband 23 Sep 2010 10:40 AM (15 years ago)
 Friday Night Loves: football, friends, food.


See something you like? Print it. Share it. Email it. But please, link back here when you do.

The Big Sister That Brags 21 Sep 2010 9:10 AM (15 years ago)
 My little brother isn't so little. In fact, he's about 6 inches taller than me. But he's still my baby bubba.
William is a senior in high school this year. That means I'm on an emotional roller-coaster for the next few months.
("He shouldn't be this old! I don't know what happened!")
This past weekend was his last homecoming as a student in high school. (Tear.) So naturally, I loaded up and headed north to spend the weekend with him.


See something you like? Print it. Share it. Email it. But please, link back here when you do.
Peaceful Pudding Pops 16 Sep 2010 5:38 AM (15 years ago)
 Peace be with you, pudding pops! These were so fun to make. My friend's little girl came over for a night of Candy Land and pudding pops. What a colorful night!

If you make your own, use popsicle sticks. These toothpicks were a baaaad idea.

Here's how you can make your own colorful pudding pops.
What You'll Need
White chocolate pudding (This gets you the best colors.)
Mini cups (Like the kind you keep by your sink)
6 small containers (For mixing pudding)
Food coloring
Popsicle sticks
Aluminum foil
1) Mix the pudding according to package directions. Then divide it into six small containers to add food coloring.
2) Add several drops of food coloring. This took more than I expected, so just keep adding until you get a color you like.


3) Scoop spoonfuls of the pudding pops into your cups to create individual layers.

4) When you've added all your layers, place your popsicle stick (here, a toothpick) in the center. Tear a small piece of aluminum foil off the larger roll, and slide it over the popsicle stick and press around the top of the cup.
5) Freeze for several hours. Slide out of cups and enjoy!
See something you like? Print it. Share it. Email it. But please, link back here when you do.
Everyone is a little bit hippie 15 Sep 2010 4:02 AM (15 years ago)
 What's peace week without tie-dye shirts? My favorite thing bout tie-dye shirts: no two are ever the same. Ever. Like try. You can never make two the exact same.


You've probably seen all the tie-dye kits in craft stores and supermarkets. You can buy those. I'm sure they work. But I have a secret weapon in my tie-dye shirt making. And here it is.... Shhh....
It's airbrush paint! Yeah, airbrush paint! Like the paint airbrush artists use on those crazy boardwalk/beach shirts we all have.
Admit it. You have one (or three). And I bet they have your name on it. And maybe your best friend's name. Or your spouse's. I know you do.
I do... :)
Okay, so here's why I like these paints better than kits. 1) You can pick whatever colors you want. Most kits come with pre-determined colors. Boo. 2) This paint goes a long, long, long way. I painted five shirts and a bag and still had almost all of the paint I mixed up in the beginning.
And here's what you do to make your own.
What You'll Need
100% cotton t-shirts
Water
Airbrush paint
Glass jars
Inexpensive brushes
Rubber bands
Disposable gloves
Old clothes
Styrofoam plates
Clothes line (or place to hang up shirts)
Plastic garbage bags
The disposable gloves are to prevent staining your skin. Because trust me--it takes a while to wash this paint off. Which reminds me - wear old clothes with this project.
Pour about a 1/2 cup of water into a mason jar or glass cup. (Baby food jars are great for this! You can do plastic cups if you want, but I keep the paint I mix up for other tie-dye, so I use glass.) Then pour about a tablespoon of color into the water, and mix well. When you begin painting your shirts, feel free to add more paint until you get the color you want. The more paint, the richer the color.

Now here's where you get to determine your tie-dye pattern. If you Google how to tie-dye, you'll run across tons and tons of tutorials. But I'll offer my quick (and humble) tutorial.
You'll see we did this outside. That's because I'm great at ruining things, so I wanted to prevent as much damage as possible.
1) Soak your shirt in water. Cool water is fine. Then squeeze all the water out, as best you can, and lay out your shirt on a flat surface.

2) Pinch together the center of your shirt (or off center if you want that look) and twist the shirt clockwise.
3) Continue twisting the shirt clockwise, wrapping the sleeves and longer sides up as you go.
Wrap until you have this cinnamon-bun-looking finished product.
4) Divide the shirt into quarters by sliding rubber bands over the shirt like so. The center of your shirt--where you pinched originally--is at the very center of the intersecting rubber bands.
5) Then paint!
This style of tie dye is great for kids because they have four "sections" to work with. They can do like I did and color two of the quarters one color and the other two quarters another color. Each quarter can be a different color, or whatever their creative little hearts desire.
You want to get a lot of paint on your shirt. I didn't get as much on this one as I should have (see finished shirt), so there is a lot of white. If you like that look, great! If not, just add some more paint.
When you paint one side, don't forget to flip the rolled-up shirt over and paint the other side.

6) Let the shirt sit for about 10 minutes. Then remove the rubber bands and unwrap. Ta-da! Somewhere a hippie got her wings.
7) Be sure to lay the shirt flat to dry for about 45 minutes (to keep the colors from running). Then you can hang it up on a clothes line to completely dry.
8) Before you wear this shirt, you'll want to wash it to remove any excess color. Each person has a different style on the first wash. I just throw mine straight into the washing machine (by itself so I don't risk ruining anything else) after it's completely dry. Others first run water over the shirt before washing. So I'm not much help here.
This is called the concentric circles pattern. You can start your center circle anywhere you want on your shirt, and it'll still be awesome!
1) Follow step 1 from above--wet the shirt and squeeze out all the water. Then lay out the shirt on a flat surface.
2) Decide where you want the center of your tie dye to be. In this case, it's in the center of the shirt. Pinch the shirt at that point, and pull it up, off the ground.
3) Wrap rubber bands around the shirt, starting just below the tip--which will be the center of your shirt. Continue wrapping rubber bands around the shirt at various distances from one another. Be sure to wrap the rubber bands as tightly as you can, as this is what makes the "lines" between each ring.
4) Then paint! Again, put a lot of paint on the shirt. Your goal isn't to saturate the shirt, but you're doing more than just coloring the top part of the shirt. You really want it to soak through the layers.
5) When you've painted all your rings, let the shirt sit for 10 minutes. Then unwrap the rubber bands and unroll the shirt. (You may have to use scissors to cut some of the rubber bands. We did.)
Then follow steps 7 and 8 from above--laying out the shirt to dry, then hanging it up to completely dry.
So there you go, tie dye the attempting creative way!
Have you ever tie dyed?
See something you like? Print it. Share it. Email it. But please, link back here when you do.
Sweet Cupcakes, Man! 14 Sep 2010 4:40 AM (15 years ago)
 Next Tuesday is the International Day of Peace, and though I'm pretty sure tie dye and hippie peace signs aren't the idea behind the day, I can't help but do some totally rad, hippie things this week. Like.... this!


Tie dye cupcakes! These were so totally fun to make and even more fun to eat! (P.S. No, I'm not eating left-over frosting/icing from the jar as I type this. Promise!) :)


So wanna know how to make some for you and your little Woodstock-ettes? Alright, here we go.
First, get a box of cake mix or make a basica vanilla cake. I used yellow cake mix. (The red layer was slightly orange because of this, so if you want, use white cake mix for better colors. Though to be honest, these colors were pretty rad.) Then divide the already-mixed batter into six containers--or however many colors you want. Add a small dallop of icing color gel and mix well.
I chose to use the gel because the color is much better than food coloring--as in I can't mix food coloring well. Also, food coloring is liquid and may make your cake batter too runny. Yes, even those drops. It takes quite a few to get a good color.

Layer the batter, one color at a time. One box of cake mix makes 24 cupcakes, so I did one pan of cupcakes that started with purple and went to red on top and another pan of cupcakes that started with red and went to purple on top.

Here's the cool thing about these cupcakes. You don't have to mix them. Actually, you shouldn't mix them or you'll just have brown cupcakes. As they cook, batter from the bottom rises slightly along the sides, giving these cupcakes their awesome tie dye look.
See? Some of the green has come up, and if you bite into it, you'll notice the blue and purple are also lining the sides of the cupcakes.

Then let the cupcakes cool, frost them up, cover with some sprinkles... and enjoy!
Okay, so that was totally rad! And tomorrow - tie-dye shirts!
See something you like? Print it. Share it. Email it. But please, link back here when you do.