Barbecued Mackerel with Ginger, Chilli and Lime and Grilled Asparagus 26 May 2015 3:26 PM (10 years ago)

After not having enough Asparagus last year, I have maybe gone out of my way to ensure I get some every weekend this season. But I also really wanted to utilise my barbecue on another semi-fine day, so decided to try and do some mackerel. So far, the only time I've cooked fish on my Weber is either in a paella, or using fillets on a cedar plank, but this time, I wanted to try and do a whole fish, straight on the grill, using direct cooking. I'm far more comfortable with more slow cooked barbecue stuff, although using my phone for a count-down timer, I've got better at not overcooking things that just need minutes and seconds, or at least need to be checked every couple of minutes.
A number of places talk about having your grill squeaky clean to do this. I'm guessing this is for people that don't use their grill much. Personally, I clean my grill by getting some hot coals under it, closing the lid for 15 minutes or so, then giving it a good brushing with a decent, wire grill brush. I'm sure a perfectly new, squeaky clean grill will work really well, but it doesn't have the character of one that shows real use. It's like woks. The blacker the wok, the better the chef. But like also like woks, just because it's black, it doesn't mean it should have large amounts of grease, and leftover foodstuff hanging to it.
This recipe was good for two Whole Mackerel, a really good value, but nice meal for two.
Recipe for the Marinade
- 3-4 tablespoons Olive Oil
- 1 Lime (zest and juice)
- 1 Red Chilli (finely chopped)
- 1 thumb of Ginger (finely chopped or grated)
- 1-2 cloves of Garlic (crushed)
- 2 teaspoons of Honey
- 1 tablespoon Fish Sauce
Recipe for the Grilled Asparagus
- 12 or so big, thick pieces of local Asparagus (if it's too thin, it will cook too quickly on the grill)
- 1 tablespoon of Olive Oil
- Salt and Fresh Ground Black Pepper
Serve the Mackerel with the Asparagus, drizzling any remaining marinade over the fish.


%3C/li%3E%0A%3Cli%3E1%20Red%20Chilli%20(finely%20chopped)%3C/li%3E%0A%3Cli%3E1%20thumb%20of%20Ginger%20(finely%20chopped%20or%20grated)%3C/li%3E%0A%3Cli%3E1-2%20cloves%20of%20Garlic%20(crushed)%3C/li%3E%0A%3Cli%3E2%20teaspoons%20of%20Honey%3C/li%3E%0A%3Cli%3E1%20tablespoon%20Fish%20Sauce%3C/li%3E%0A%3C/ul%3E%0A%3C/div%3E%0A%3Cdiv%3E%0A%3Ch3%3E%0ARecipe%20for%20the%20Grilled%20Asparagus%3C/h3%3E%0A%3C/div%3E%0A%3Cdiv%3E%0A%3Cul%3E%0A%3Cli%3E12%20or%20so%20big,%20thick%20pieces%20of%20local%20Asparagus%20(if%20it's%20too%20thin,%20it%20will%20cook%20too%20quickly%20on%20the%20grill)%3C/li%3E%0A%3Cli%3E1%20tablespoon%20of%20Olive%20Oil%3C/li%3E%0A%3Cli%3ESalt%20and%20Fresh%20Ground%20Black%20Pepper%3C/li%3E%0A%3C/ul%3E%0A%3C/div%3E%0A%3Cdiv%3E%0A%3Cbr%20/%3E%3C/div%3E%0A%3Cdiv%3E%0AMix%20all%20the%20marinade%20ingredients%20together.%20%26nbsp;Adjust%20amount%20of%20lime,%20honey%20and%20fish%20sauce%20to%20taste.%20%26nbsp;If%20too%20salty,%20add%20a%20little%20more%20lime%20juice.%20%26nbsp;If%20too%20sour,%20add%20a%20little%20more%20honey.%20%26nbsp;Balance%20to%20taste.%20%26nbsp;Maybe%20add%20some%20finely%20chopped%20Fresh%20Parsley%20too.%3C/div%3E%0A%3Cdiv%3E%0A%3Cbr%20/%3E%3C/div%3E%0A%3Cdiv%3E%0A%3Cdiv%3E%0AMake%206%20deep%20slits%20on%20both%20sides%20of%20the%20Mackerel%20with%20a%20sharp%20knife.%20%26nbsp;Massage%20the%20marinade%20all%20over%20the%20fish,%20into%20the%20slits%20and%20the%20body%20cavity.%20%26nbsp;Wrap%20them%20in%20cling%20film,%20and%20keep%20in%20the%20fridge%20for%2020%20minutes%20or%20so%20while%20you%20get%20your%20barbecue%20going.%20%26nbsp;Keep%20any%20remaining%20marinade%20to%20drizzle%20over%20the%20Mackerel%20after%20grilling.%3C/div%3E%0A%3Cdiv%3E%0A%3Cbr%20/%3E%3C/div%3E%0A%3Cdiv%3E%0ACut%20away%20any%20woody%20bit%20at%20the%20end%20of%20the%20Asparagus.%20%26nbsp;If%20it's%20in%20season,%20fresh%20and%20local,%20there%20shouldn't%20be%20much%20to%20cut%20away%20at%20the%20base.%20%26nbsp;Rub%20in%20Olive%20Oil,%20then%20season%20with%20Salt%20and%20Fresh%20Ground%20Black%20Pepper.%20%26nbsp;Keep%20aside%20to%20grill%20towards%20the%20end%20of%20the%20Mackerel%20cooking,%20or%20while%20the%20Mackerel%20is%20resting.%20%26nbsp;%3C/div%3E%0A%3Cdiv%3E%0A%3Cbr%20/%3E%3C/div%3E%0A%3Cdiv%3E%0AGet%20your%20barbecue%20(grill)%20ready%20for%20moderate%20direct%20cooking.%20%26nbsp;Depending%20on%20your%20lighting%20method,%20this%20could%20take%20about%2040-45%20minutes%20to%20get%20the%20coals%20to%20their%20optimum.%20%26nbsp;Ensure%20your%20grill%20is%20as%20clean%20as%20possible.%20%26nbsp;A%20lidded%20barbecue%20(such%20as%20a%20Weber%20kettle%20barbecue)%20helps%20to%20ensure%20coals%20don%E2%80%99t%20flame%20up%20too%20much%20as%20the%20marinade%20and%20oil%20drips%20from%20the%20fish.%3C/div%3E%0A%3Cdiv%3E%0A%3Cbr%20/%3E%3C/div%3E%0A%3Cdiv%3E%0APlace%20the%20fish%20on%20the%20grill%20for%205-6%20minutes%20per%20side,%20only%20moving%20when%20turning%20over.%20%26nbsp;When%20done,%20the%20eyes%20should%20look%20milky%20and%20the%20middle%20of%20the%20fish%20should%20be%20warm%20(about%2052-55%C2%B0C%20near%20the%20spine%20with%20an%20instant%20read%20thermometer,%20or%20fairly%20warm,%20but%20not%20burning%20to%20the%20touch).%20Leave%20to%20rest%20for%202-3%20minutes.%3C/div%3E%0A%3C/div%3E%0A%3Cdiv%3E%0A%3Cbr%20/%3E%3C/div%3E%0A%3Cdiv%3E%0AWhile%20the%20fish%20is%20resting,%20grill%20the%20Asparagus,%20turning%20fairly%20frequently.%20%26nbsp;Again,%20use%20the%20lid%20to%20calm%20any%20flames%20from%20small%20amounts%20of%20Olive%20Oil%20dripping%20on%20the%20coals.%3Cbr%20/%3E%0A%3Cbr%20/%3E%0AServe%20the%20Mackerel%20with%20the%20Asparagus,%20drizzling%20any%20remaining%20marinade%20over%20the%20fish.%3Cbr%20/%3E%0A%3Cbr%20/%3E%0A%3Cdiv%3E%0A%3Ca%20href%3D%22https://farm8.staticflickr.com/7796/18083856455_6a6fb2a859_o_d.jpg%22%20imageanchor%3D%221%22%3E%3Cimg%20border%3D%220%22%20height%3D%22426%22%20src%3D%22https://farm8.staticflickr.com/7796/18083856455_6a6fb2a859_o_d.jpg%22%20width%3D%22640%22%20/%3E%3C/a%3E%3C/div%3E%0A%3Cbr%20/%3E%3C/div%3E%0A%3Cbr%20/%3E)


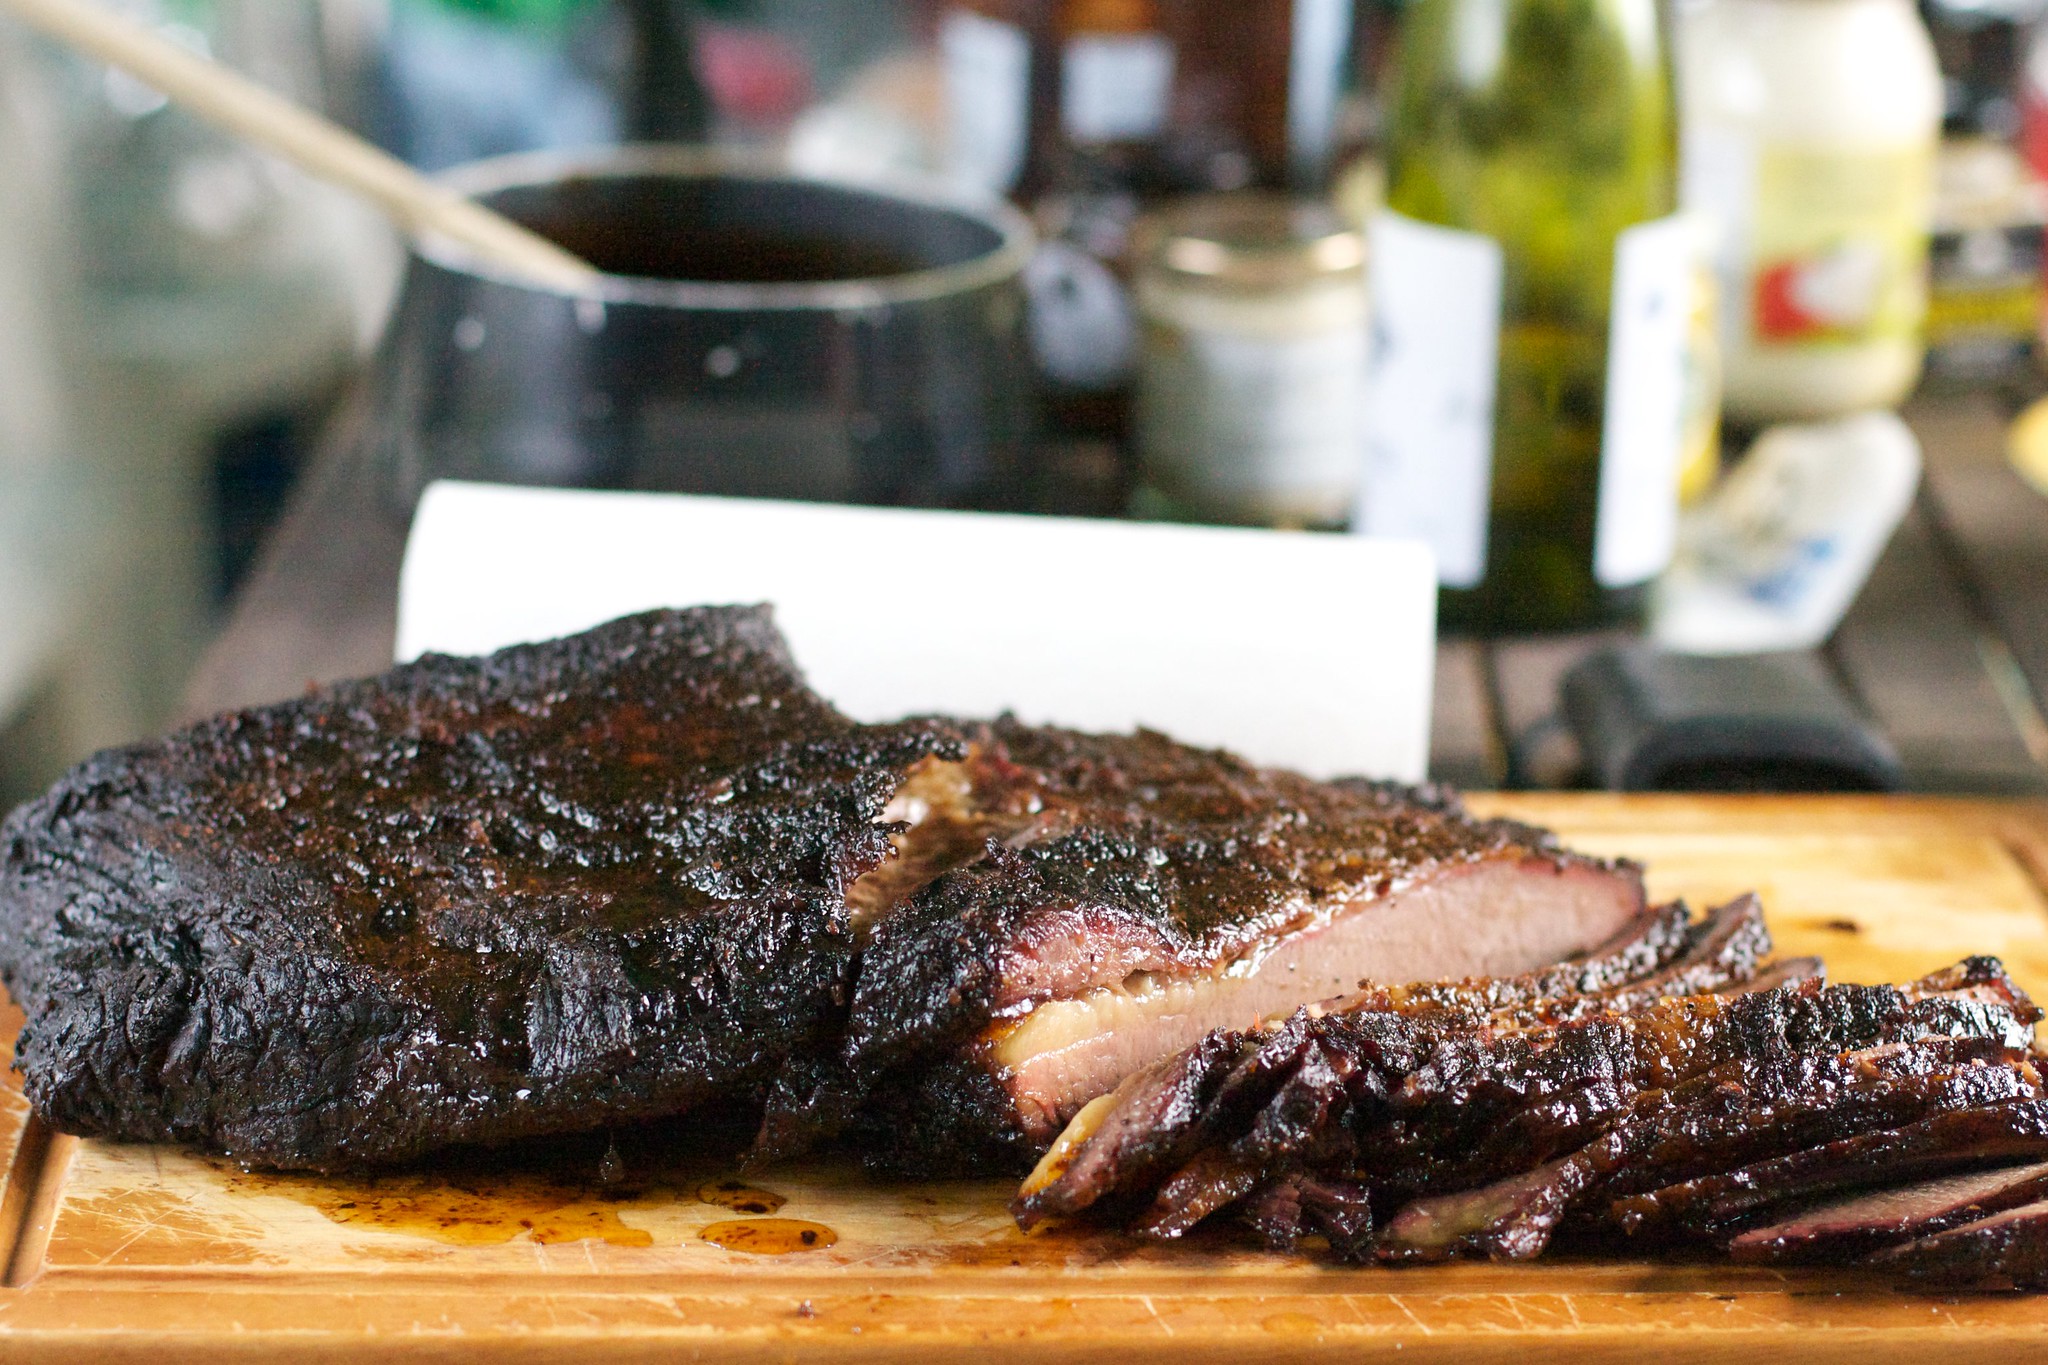
Packer Cut Brisket, Low and Slow 30 Jun 2014 4:18 PM (11 years ago)

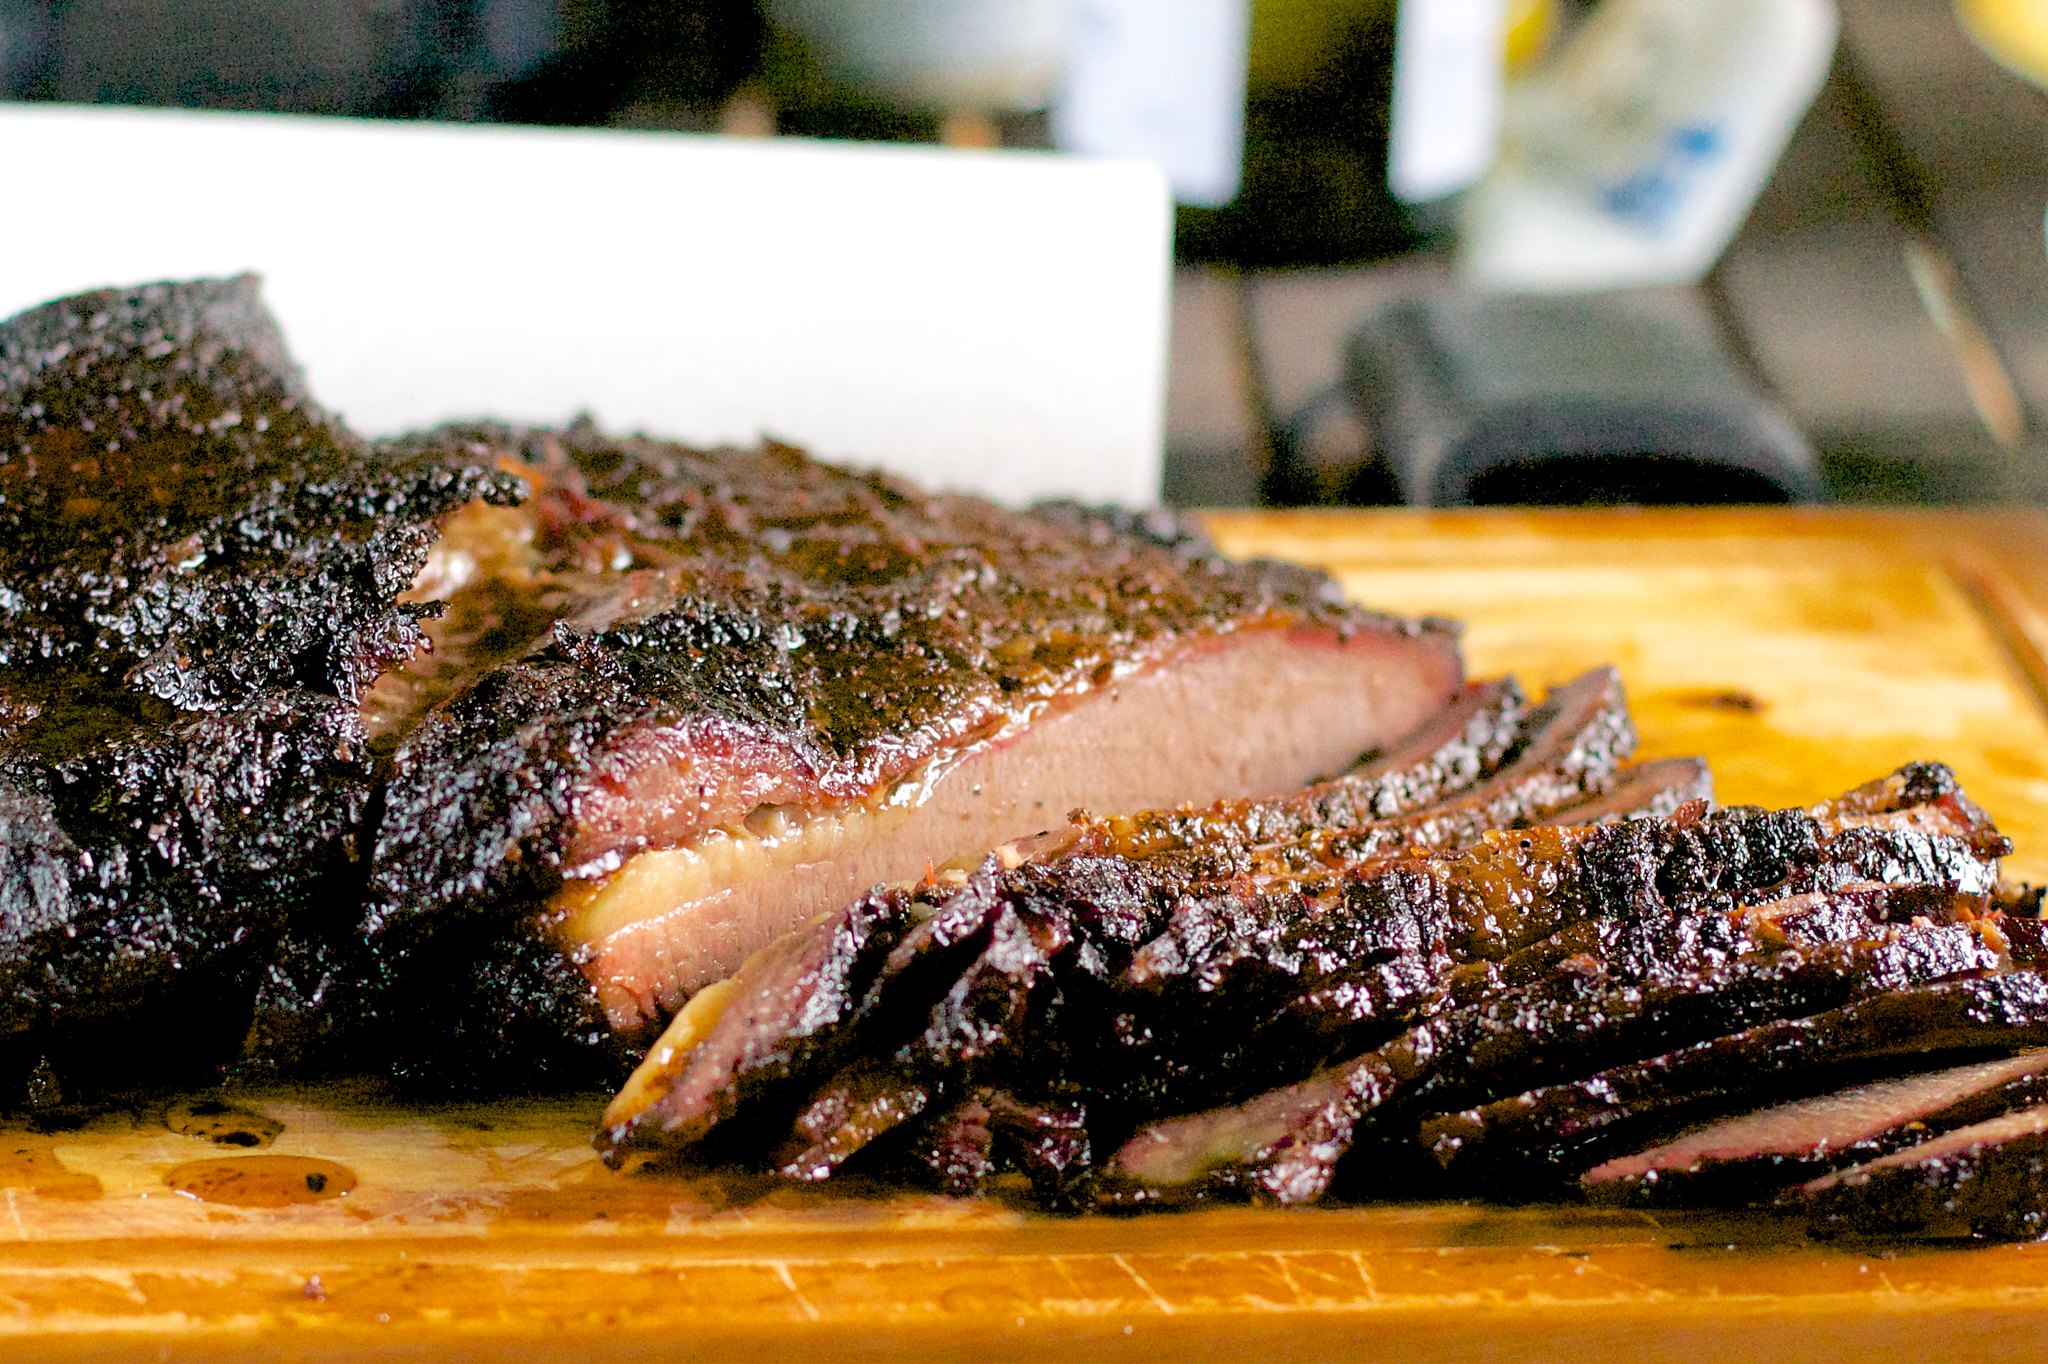
I've done a few briskets on the barbecue the last year or so, but being in the UK, the brisket cut we get isn't the same as the one we see of all these US based pit-masters smoking. When I get a brisket from my local Irish butcher, it generally comes with bones (which are useful for stock), and is a totally different shape to those I see on US barbecue websites. A quick scout for the wikipedia entry on brisket shows why.
However, there is at least one butcher in London that will sell a really nice quality Packer Cut Brisket, and for this particular barbecue, I went to Turner & George. The 6.425kg hunk of beef that arrived early Friday morning was something to behold.

The photos just don't do it justice (plus I should've also taken a few shots of the other side). A lovely, properly aged, piece of brisket, just needing trimming and rubbing, leaving for about 12 hours, and then putting onto the Weber, for another 12 or so hours. I thought about injecting Veal Stock into it, but once I realised that I'd run out of stock anyway, I decided to just to let the meat speak for itself.
Rub Recipe
- 50g Maldon Sea Salt
- 25g Light Muscavado Sugar
- 15g Black Pepper
- 10g Whole Chipotle
- 5g Smoked Paprika
- 5g English Mustard Powder
Put into a spice blender and blend until powdered.
Smoked Brisket Recipe (Serves 8-12)
- 1 Packer Cut Brisket (around 6kg)
- 1 Portion of Rub
- 2 Tablespoons of Light Rapeseed Oil
- Long-Lasting Charcoal Briquettes
- Mesquite Chunks
- Remote Thermometer
- Kettle Barbecue or other Smoker
Trim your brisket to get rid of some of the excess fat. There are many videos on Youtube showing how to do this. Depending on where you get yours from, there may be more or less to trim off. If it's not an aged piece of brisket, probably leave more fat on, to help maintain moisture. Once trimmed, rub the meat in the Light Rapeseed Oil, and apply the rub liberally all over the meat. Wrap the meat in cling film and leave in the fridge for a few hours at least. Remove the meat from the fridge an hour or two before you intend to start smoking.
If you're using a Kettle Barbecue, try arranging your coals using the "Snake Method", with chunks of Mesquite lined side by side on top of the unlit coals to last for the first 5-6 hours of cooking (half a dozen fist sized pieces perhaps). Put a drip tray filled will water under where the meat will be, and another above the hot coals. I've used this a couple of times now with great results. However, if using a remote thermometer, position the grill thermometer to get an accurate reading can be tricky. I think I just need to mount it near the one on the lid of the barbecue. Having the remote thermometer probe permanently in the meat does help in not prodding too many holes in it and losing precious moisture.
Get the barbecue/smoker going at 110°C (around 225°F) and put on the brisket, close the lid, and keep and eye on your temperatures. You need to maintain the same temperature for about 12 hours. Unless you see the barbecue is not smoking when you think it should be, or the temperature gauges have gone way high or low, then you shouldn't be tempted to open it at all.
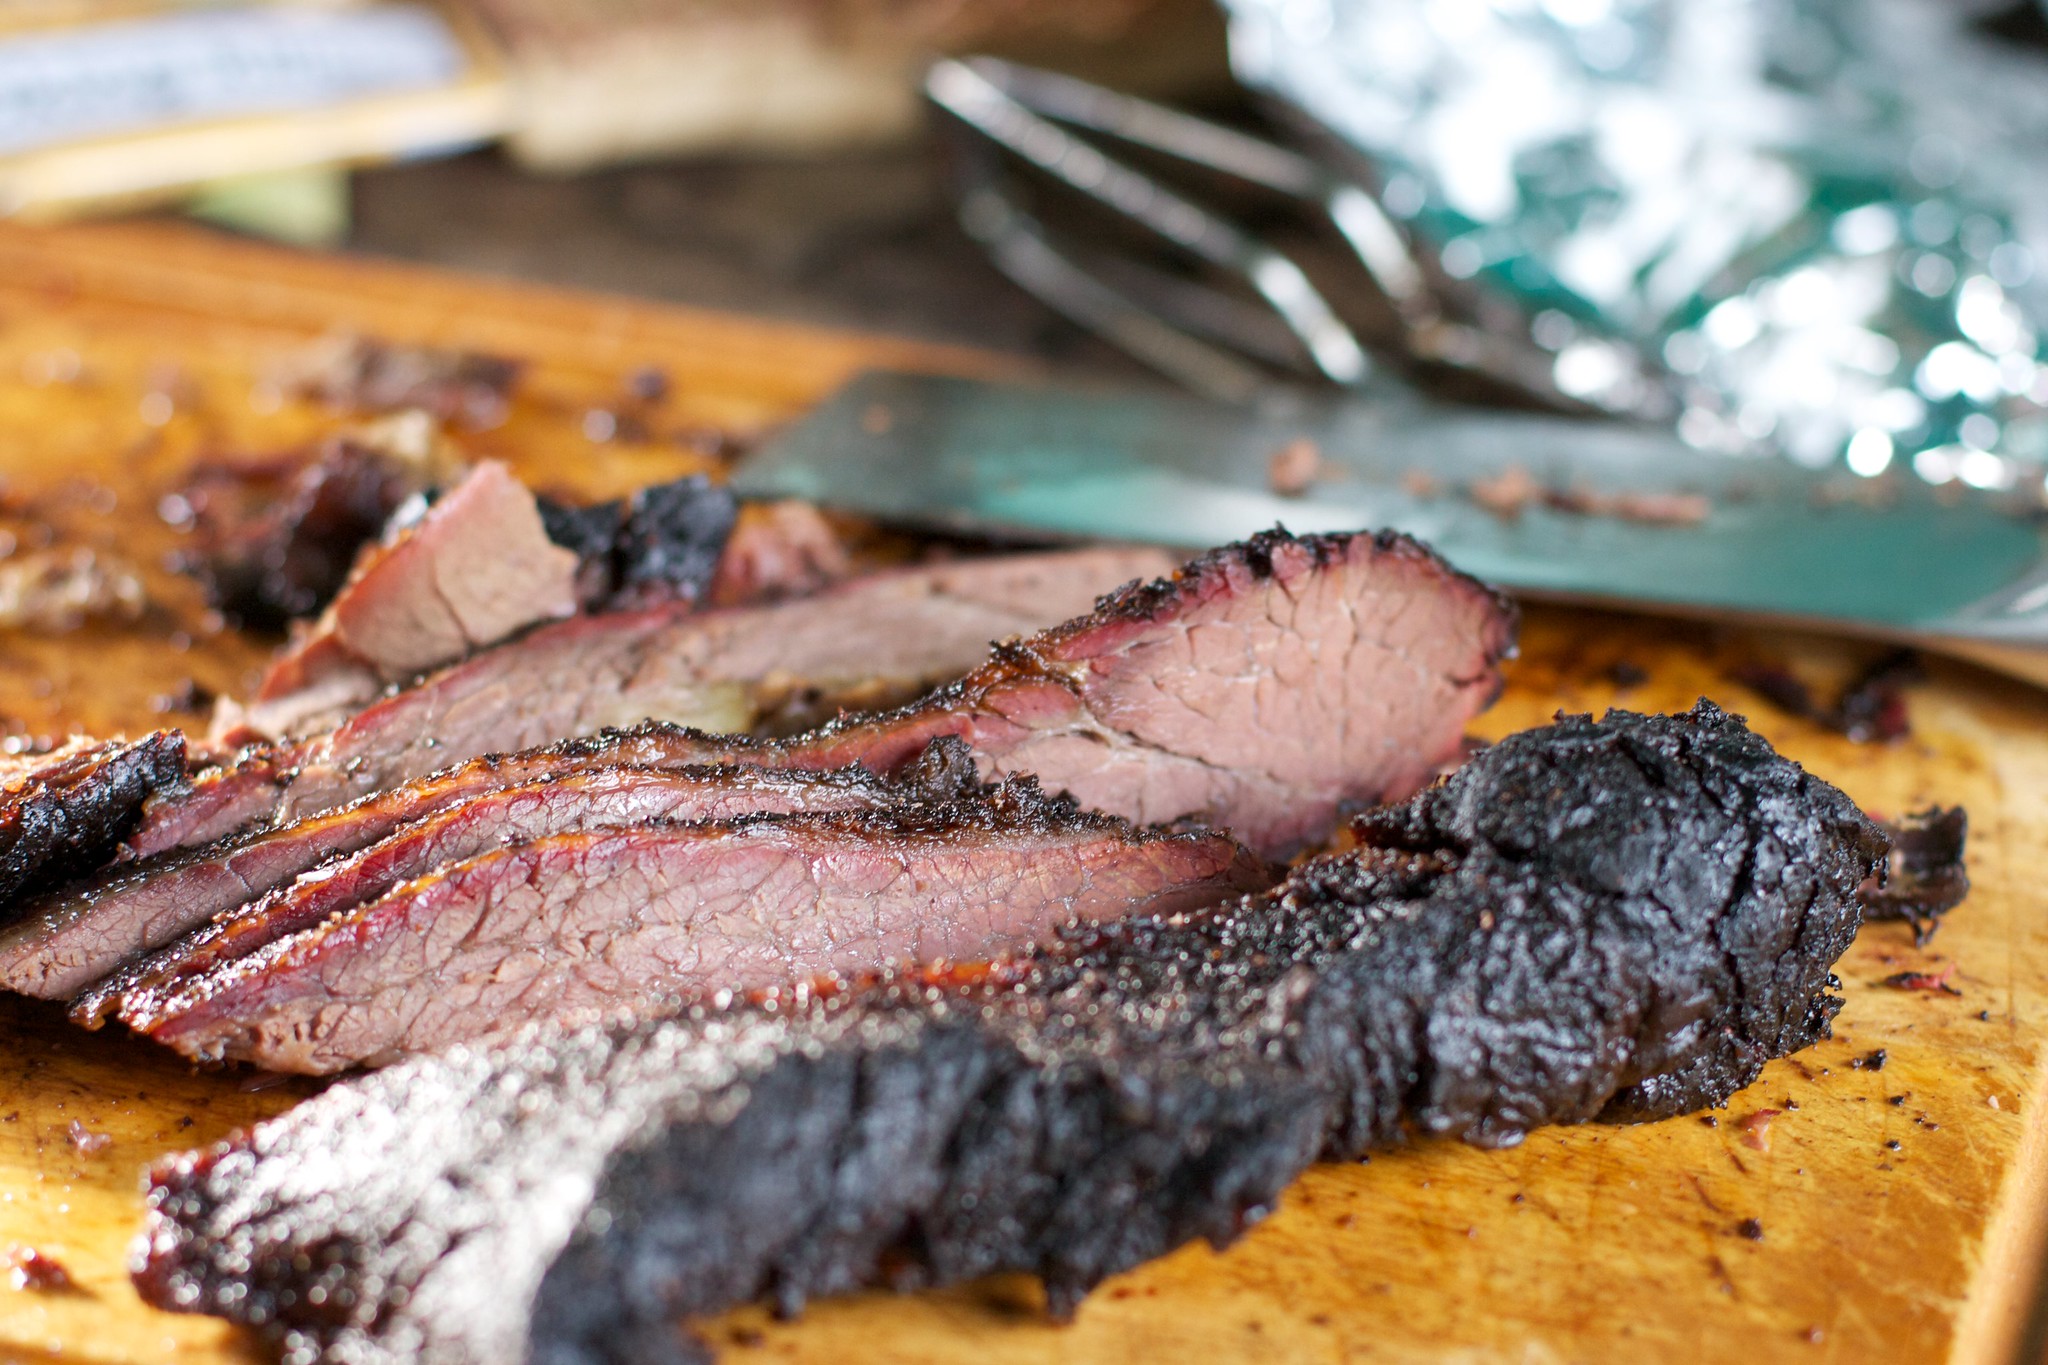
As many websites will say, once the temperature of the thickest part of the meat reaches 70°C, the heating will 'stall', literally for hours as some of the moisture evaporates. Depending on the age of your beef, etc., at this point, you might want to wrap the brisket in two layers of foil and return to the grill/smoker. With a properly aged piece of beef, or a well regulated smoker, than might not be necessarily, but if you're short of time, and don't mind not having a great bark, then wrap away. Also, if you have issues towards then end of your smoke and the meat loses temperature, wrapping with foil can help out to get it up to the 84-88°C you want before you take it off the heat.
Once the meat gets to between 84-88°C, if it's not already wrapped in foil, wrap it in at least 2 layers of reasonably heavy foil, then wrap a couple of towels around that, and leave it for at least an hour (I normally leave it two). Then unwrap it, lift it out of the foil onto a chopping board, and pour the juices out of the foil, either into your pre-prepared barbecue sauce, into a separate jug, or just straight back over the meat. Depending on the result, sauce may not be necessary.
The two pieces of meat in the packet cut should separate easily at this point, so pull them apart so that you can carve them separately. If it's not immediately obvious which way the grain is in the meat, cut off a corner to see, then carve the whole thing into slice that will stay mostly together, but will almost melt in the mouth when eaten.
I understand why people have electric smokers now, but still, it's nice to get at one with your coals and grill.

Strawberry and Chocolate Tarts 3 Jul 2011 8:23 AM (14 years ago)


Recipe for the Pâte Sucrée
- 250g Plain Flour
- 100g Icing Sugar, sifted
- Pinch of Salt
- 100g Butter, cubed
- 2 Large Eggs
Recipe for the Chocolate Crème Pâtissière filling
- 4 Large Egg Yolks
- 85g Caster Sugar
- 25g Plain Flour
- 330ml Milk
- 1 Vanilla Pod
- 50g Dark Chocolate, chopped into chips
- Icing Sugar for dusting
- 400g Strawberries, hulled and halved
Mini Lemon Meringues 3 Jul 2011 8:23 AM (14 years ago)


Bacon and Asparagus Quiche 3 Jul 2011 8:23 AM (14 years ago)


Most times when I've cooked quiche, I've tended to blind-bake the pastry first, then fill and bake again. However, a foodie friend of mine said that he never bothered, especially as you're cooking for 45 minutes. Having tried one of his quiches, without soggy pastry, I've decided to give this a try myself on the last couple of occasions, and I have to say, he's pretty much right. I suppose, if you have the time, and you want to blind bake the pastry first with a quiche, it does no harm, but it not 100% necessary.
For the Short Crust Pastry
- 100g Butter, cubed and chilled
- 200g Plain Flour
- 1 Egg
- Pinch Salt
Once chilled, roll out to about 3mm thickness, then line a greased 24cm Flan Dish, and put back into the fridge to chill. At this point, you could prick all over with a fork, line with baking parchment, fill with baking beans, and bake in a 180°C oven for 15 minutes. Or you could leave that step out. Phillip would leave it out. I'm undecided.
For the Filling
- 200g Free-Range Bacon Lardons
- 1 Large Onion, finely chopped
- 450g Asparagus, chopped to 5cm pieces
- 150ml Creme Fraiche
- 50ml Milk
- 5 Large, Free-Range Eggs
- 200g Gruyere Cheese
- Freshly Ground Black Pepper
- Freshly Grated Nutmeg
Gently fry the Bacon Lardons in a dry pan. If it releases some additional water, wait until this has evaporated and then add the onion, continue to fry in the fat released from the Bacon until softened and translucent.
In a small mixing bowl, whisk the Eggs with the Creme Fraiche and Milk. Add a good helping of Freshly Ground Black Pepper. Pour in the Bacon Lardons and Onion.
Put half of the grated cheese in the bottom of the prepared pastry in the flan dish. Add the non-tips over the cheese. Pour in the Egg, Creme Fraiche, Milk, Bacon and Onion mixture. Arrange the tips over the top, so that they're still mostly submerged. Put the remainder of the grated cheese over the top, along with the grated Nutmeg.
Bake in a pre-heated 180°C oven for around 45 mins.


Cherry and Coconut Flap-Jack 9 Jul 2010 6:37 PM (15 years ago)


Recipe for Cherry and Coconut Flapjack
- 130g Unsalted Butter
- 80g Granulated White Sugar
- 40g Demerara Sugar
- 2 tablespoons Golden Syrup
- 1 tablespoon Honey
- 300g Porridge Oats
- 70g Desiccated Coconut
- 200g Glacé Cherries (halved)
%3C/li%3E%3C/ul%3E%3Cdiv%3EGently%20melt%20the%20Butter,%20Sugars,%20Syrup%20and%20Golden%20Syrup%20together%20in%20a%20pan%20until%20you%20have%20a%20smooth%20mixture.%20%20In%20a%20bowl,%20mix%20the%20Oats%20and%20Coconut%20and%20Cherries,%20then%20mix%20in%20the%20Butter/Sugar%20mixture.%3C/div%3E%3Cdiv%3E%3Cbr%20/%3E%3C/div%3E%3Cdiv%3ELine%20a%20tray%20(or%20in%20my%20case,%20Lasagne%20dish)%20with%20baking%20parchment,%20then%20add%20in%20the%20flapjack%20mixture,%20and%20flatten%20out.%20%20Bake%20in%20the%20oven%20at%20180%C2%B0C%20for%20about%2030%20minutes,%20until%20the%20top%20is%20nicely%20golden.%3C/div%3E%3Cdiv%3E%3Cbr%20/%3E%3C/div%3E%3Cdiv%3ELeave%20to%20cool%20before%20removing%20from%20the%20tin.%20%20Use%20a%20sharp%20knife%20to%20cut%20into%20squares,%20ensure%20to%20wipe%20the%20blade%20between%20slices%20to%20help%20make%20each%20slice%20clean.%3C/div%3E)
Banana and Strawberry Loaf Cake 3 Jul 2010 5:52 PM (15 years ago)


The cake definitely went down well with most people that tried it. The strawberries seem to add a little extra moisture as they sort of disintegrate to a certain extent, plus the cake was fairly light. So that the texture isn't too open, I suggest cubing the strawberries that you mix directly into mixture fairly small, then just keep a couple of good looking strawberries back to slice and put on the top before putting in the oven.
Recipe for Banana and Strawberry Loaf Cake
- 50g Soya Butter or Unsalted Butter
- 80g Granulated Sugar
- 2 Eggs, beaten
- 1 teaspoon Vanilla Essence
- 2 teaspoon Ground Cinnamon
- 1 teaspoon Ground Ginger
- 1 teaspoon Baking Powder
- Half teaspoon Bicarbonate of Soda
- 3 Large Ripe Bananas, mashed
- 1.5 cups of Plain White Flour
- 1.5 cups of Fresh Strawberries, cut into smallish pieces
Preheat the oven to 180°C. Beat Sugar and Butter together in a bowl until smooth. Add the beaten eggs and mix together. Add the Vanilla, Cinnamon, Ginger, Baking Powder, Bicarbonate of Soda and mix. Mix in the mashed Banana and Flour until you have a smooth mixture, then finally add most of the strawberries, keeping a few back to drop on the top if there are none showing after you pour the mixture into the loaf tin.
Pour the mixture into a greased 400g (half pound) loaf tin (lining with some baking parchment makes it really easy to extract afterwards). If there aren't any strawberries showing on the top, drop a few of the reserved ones on the top and half poke then in, so that you get a nice display of them on top when it's cooked.
Put in the oven for 45 mins, then lower the temperature to 160°C for another 45 minutes. You should probably check it with a skewer after about an hour's total cooking time, but for me, 45 mins at 180° followed by 45 mins at 160°C works perfectly, and still results in a nice moist cake. Leave to rest in the tin for a few minutes, then carefully transfer to a wire rack to cool down.
%20loaf%20tin%20(lining%20with%20some%20baking%20parchment%20makes%20it%20really%20easy%20to%20extract%20afterwards).%20%20If%20there%20aren't%20any%20strawberries%20showing%20on%20the%20top,%20drop%20a%20few%20of%20the%20reserved%20ones%20on%20the%20top%20and%20half%20poke%20then%20in,%20so%20that%20you%20get%20a%20nice%20display%20of%20them%20on%20top%20when%20it's%20cooked.%3Cbr%20/%3E%3Cbr%20/%3EPut%20in%20the%20oven%20for%2045%20mins,%20then%20lower%20the%20temperature%20to%20160%C2%B0C%20for%20another%2045%20minutes.%20%20You%20should%20probably%20check%20it%20with%20a%20skewer%20after%20about%20an%20hour's%20total%20cooking%20time,%20but%20for%20me,%2045%20mins%20at%20180%C2%B0%20followed%20by%2045%20mins%20at%20160%C2%B0C%20works%20perfectly,%20and%20still%20results%20in%20a%20nice%20moist%20cake.%20%20Leave%20to%20rest%20in%20the%20tin%20for%20a%20few%20minutes,%20then%20carefully%20transfer%20to%20a%20wire%20rack%20to%20cool%20down.%3C/div%3E%3C/div%3E)
Lancashire Hotpot 10 Nov 2008 2:35 AM (16 years ago)


Lancashire Hotpot Recipe (serves 4)
- 8 Lamb Neck Chops (about a kilo)
- 2 Large Onions, chopped
- 1 kilo King Edward Potatoes (peeled and thinly sliced)
- A handful of Chantaney Carrots (optional)
- A small glass of Red Wine
- A few sprigs of Fresh Thyme and Rosemary (leaves only, finely chopped)
- 1 Pint of Lamb Stock
- Salt and Freshly Ground Pepper
- 1 tablespoon Plain Flour
- 30g Butter
%3C/h2%3E%3Cdiv%3E%3Cul%3E%3Cli%3E8%20Lamb%20Neck%20Chops%20(about%20a%20kilo)%3Cbr%20/%3E%3C/li%3E%3Cli%3E2%20Large%20Onions,%20chopped%3Cbr%20/%3E%3C/li%3E%3Cli%3E1%20kilo%20King%20Edward%20Potatoes%20(peeled%20and%20thinly%20sliced)%3Cbr%20/%3E%3C/li%3E%3Cli%3EA%20handful%20of%20Chantaney%20Carrots%20(optional)%3Cbr%20/%3E%3C/li%3E%3Cli%3EA%20small%20glass%20of%20Red%20Wine%3Cbr%20/%3E%3C/li%3E%3Cli%3EA%20few%20sprigs%20of%20Fresh%20Thyme%20and%20Rosemary%20(leaves%20only,%20finely%20chopped)%3Cbr%20/%3E%3C/li%3E%3Cli%3E1%20Pint%20of%20Lamb%20Stock%3Cbr%20/%3E%3C/li%3E%3Cli%3ESalt%20and%20Freshly%20Ground%20Pepper%3Cbr%20/%3E%3C/li%3E%3Cli%3E1%20tablespoon%20Plain%20Flour%3Cbr%20/%3E%3C/li%3E%3Cli%3E30g%20Butter%3Cbr%20/%3E%3C/li%3E%3C/ul%3E%3C/div%3E%3Cdiv%3E%3Cbr%20/%3E%3C/div%3E%3Cdiv%3EFirst,%20season%20the%20Flour%20in%20a%20bowl%20with%20Salt%20and%20Pepper,%20then%20mix%20the%20Lamb%20Neck%20Chops%20in%20the%20Flour%20to%20give%20it%20a%20light%20coating.%20%C2%A0Heat%20up%20a%20little%20of%20the%20butter%20in%20a%20pan%20with%20a%20little%20vegetable%20oil,%20and%20lightly%20brown%20each%20piece%20of%20Lamb%20and%20set%20aside.%20%C2%A0If%20you%20are%20using%20Kidneys%20or%20Black%20Pudding,%20you%20should%20lightly%20brown%20these%20now%20as%20well%20and%20set%20aside.%20%C2%A0Next%20add%20the%20Onions,%20adding%20a%20little%20more%20Butter%20if%20the%20pan%20is%20becoming%20dry,%20and%20cook%20these%20for%20about%205%20minutes%20to%20soften.%20%C2%A0Then%20add%20the%20fresh%20Herbs%20and%20the%20Wine,%20and%20reduce%20until%20it%20becomes%20a%20bit%20syrupy.%20%C2%A0Pour%20in%20the%20Stock,%20season%20with%20Salt%20and%20Pepper%20as%20necessary%20and%20bring%20to%20the%20boil.%3C/div%3E%3Cdiv%3E%3Cbr%20/%3E%3C/div%3E%3Cdiv%3ENow,%20lightly%20grease%20the%20pan%20or%20deep%20casserole%20you%20are%20going%20to%20make%20the%20hotpot%20in.%20%C2%A0Put%20a%20lining%20of%20Potato%20slices%20at%20the%20bottom%20of%20the%20pan,%20then%20a%20layer%20of%204%20overlapping%20Lamb%20Chops,%20maybe%20a%20few%20Carrot%20pieces%20and%20onions%20from%20the%20stock.%20%C2%A0Add%20another%20layer%20of%20Potato%20slices,%20with%20the%20remaining%20Chops%20on%20top,%20a%20few%20Carrots,%20etc,%20then,%20pour%20the%20stock%20over%20the%20top.%20%C2%A0Melt%20the%20remaining%20Butter%20in%20a%20small%20pan,%20and%20use%20it%20to%20brush%20over%20and%20between%20the%20last%20layers%20of%20sliced%20Potato%20which%20top%20the%20hotpot.%C2%A0%3C/div%3E%3Cdiv%3E%3Cbr%20/%3E%3C/div%3E%3Cdiv%3ECover,%20and%20put%20in%20a%20170%20degree%20Celsius%20oven%20for%20about%20one%20and%20a%20half%20hours.%20%C2%A0After%20this%20time,%20uncover%20the%20pan,%20brush%20a%20little%20more%20melted%20butter%20over%20the%20top,%20then%20cook,%20uncovered,%20for%20about%2045%20minutes%20until%20the%20top%20is%20golden.%20%C2%A0Serve%20with%20some%20seasonal%20vegetables%20of%20your%20choice.%3C/div%3E)
Gong Bao Ji Ding (Kung Pao Chicken and Peanuts) 27 Oct 2008 4:01 AM (17 years ago)


Recipe for Gung Bao Ji Ding (serves 2)
- 2 Chicken Breasts (cut into 2cm cubes)
- 6-10 Spring Onions (white parts only, cut into 2cm pieces)
- 3 Cloves of Garlic (thinly sliced)
- 2cm piece of Ginger (thinly sliced)
- Half cup or so of Peanuts (roasted, unsalted)
- 1-2 teaspoons Whole Sichuan Peppercorns
- 10 Dried Red Chillies (seeded and cut into 2cm pieces)
- Groundnut Oil, for stir-frying
- 2 Teaspoons Corn Flour
- 2 Teaspoons Light Soy Sauce
- 2 Teaspoons Shaoxing Rice Wine
- 1 Teaspoon Corn Flour
- 1 Teaspoon Chinkiang or Black Rice Vinegar
- 1 Teaspoon Light Soy Sauce
- 1 Teaspoon Dark Soy Sauce
- 1 Teaspoon Sesame Oil
- 1 Tablespoon Water
- 2 Teaspoons Sugar
Hara Shorva (Green Soup) 23 Sep 2008 8:10 AM (17 years ago)


I’d be planning on making some kind of pea soup for a couple of weeks, and when I stumbled upon the recipe for Green Soup in Madhur Jaffrey’s Illustrated Indian Cookbook, it sounded well worth a try. My only complaint with Madhur Jaffrey’s book is that many of the ingredients are measured by weight, and personally, I don’t tend to weigh anything (including myself), instead, I tend to go by rough volume for the various ingredients. So in choosing the potatoes to use, rather than going by the kilo weight that was suggested in the recipe, I just chose two huge baking potatoes, that I decided would take less time peel and cube for the soup.
I also skimped slightly on the amount of salt, and added some black pepper, as there is very little that I don’t add black pepper to.
The only other deviation I made from the recipe was with the Ginger. I put the thumb-sized piece in without a hitch. However, the recipe said to remove it after the first 30 minutes of cooking, something I forgot to do, and so it got blended with the other ingredients a bit later on. To be honest, I don’t think it spoilt the flavour at all. There was definitely a noticeable Ginger flavour, but it didn’t overpower the others. I suppose it depends on how much you like Ginger, and of the people who tasted it, nobody seemed to be complain.
Recipe for Green Soup (serves 4-6)
- 2 huge Baking Potatoes (peeled and cubed)
- 1 large Onion (roughly chopped)
- 2 inch thumb of Ginger (peeled)
- 2 pints of Chicken or Vegetable Stock
- Half teaspoon Ground Coriander
- 2 teaspoon Ground Cumin
- Half a Hot Green Chili, finely chopped
- 4 tablespoons of Fresh Coriander, finely chopped
- 1.5 cups Peas (fresh or frozen)
- Half teaspoon of Salt
- 1 teaspoon Pepper
- 1 tablespoon Lemon Juice
- Half cup of Double Cream
Put the Potatoes, Onion, Chicken Stock, Ground Coriander and Ground Cumin into a large pan, bring to the boil, then simmer for 30 minutes, so that the potatoes are cooked. Add the Chili, Fresh Coriander, Peas, Salt, Pepper and Lemon Juice, bring back to the boil, then simmer for a further 5 minutes. Once the peas are cooked, remove from the heat, then blend until smooth (personally, I used my usual hand-blender). Stir in the Double Cream while gently reheating and serve immediately.
%26bodytext%3D%3Ca%20href%3D%22https://blogger.googleusercontent.com/img/b/R29vZ2xl/AVvXsEj_Nkm4-uTmB63wt-UyxkrEAyWHlx6GDZ5MWNrkINqJ0ljlw5lo7QON3AoVrq1M097PgNaGDQLO1_uW6VJBDd5fuQB9cPymKrok-Tl6tPr15zDmcoikWFyDc3-l-W_uPLQZN98hncNhQiXj/s1600-h/Green_Soup.JPG%22%3E%3Cimg%20style%3D%22margin:%200px%20auto%2010px;%20display:%20block;%20text-align:%20center;%20cursor:%20pointer;%22%20src%3D%22https://blogger.googleusercontent.com/img/b/R29vZ2xl/AVvXsEj_Nkm4-uTmB63wt-UyxkrEAyWHlx6GDZ5MWNrkINqJ0ljlw5lo7QON3AoVrq1M097PgNaGDQLO1_uW6VJBDd5fuQB9cPymKrok-Tl6tPr15zDmcoikWFyDc3-l-W_uPLQZN98hncNhQiXj/s400/Green_Soup.JPG%22%20alt%3D%22%22%20id%3D%22BLOGGER_PHOTO_ID_5250390051104698290%22%20border%3D%220%22%20/%3E%3C/a%3E%3Cbr%20/%3EI%E2%80%99d%20be%20planning%20on%20making%20some%20kind%20of%20pea%20soup%20for%20a%20couple%20of%20weeks,%20and%20when%20I%20stumbled%20upon%20the%20recipe%20for%20Green%20Soup%20in%20Madhur%20Jaffrey%E2%80%99s%20Illustrated%20Indian%20Cookbook,%20it%20sounded%20well%20worth%20a%20try.%20%20My%20only%20complaint%20with%20Madhur%20Jaffrey%E2%80%99s%20book%20is%20that%20many%20of%20the%20ingredients%20are%20measured%20by%20weight,%20and%20personally,%20I%20don%E2%80%99t%20tend%20to%20weigh%20anything%20(including%20myself),%20instead,%20I%20tend%20to%20go%20by%20rough%20volume%20for%20the%20various%20ingredients.%20%20So%20in%20choosing%20the%20potatoes%20to%20use,%20rather%20than%20going%20by%20the%20kilo%20weight%20that%20was%20suggested%20in%20the%20recipe,%20I%20just%20chose%20two%20huge%20baking%20potatoes,%20that%20I%20decided%20would%20take%20less%20time%20peel%20and%20cube%20for%20the%20soup.%3Cbr%20/%3E%3Cbr%20/%3EI%20also%20skimped%20slightly%20on%20the%20amount%20of%20salt,%20and%20added%20some%20black%20pepper,%20as%20there%20is%20very%20little%20that%20I%20don%E2%80%99t%20add%20black%20pepper%20to.%3Cbr%20/%3E%3Cbr%20/%3EThe%20only%20other%20deviation%20I%20made%20from%20the%20recipe%20was%20with%20the%20Ginger.%20%20I%20put%20the%20thumb-sized%20piece%20in%20without%20a%20hitch.%20%20However,%20the%20recipe%20said%20to%20remove%20it%20after%20the%20first%2030%20minutes%20of%20cooking,%20something%20I%20forgot%20to%20do,%20and%20so%20it%20got%20blended%20with%20the%20other%20ingredients%20a%20bit%20later%20on.%20%20To%20be%20honest,%20I%20don%E2%80%99t%20think%20it%20spoilt%20the%20flavour%20at%20all.%20%20There%20was%20definitely%20a%20noticeable%20Ginger%20flavour,%20but%20it%20didn%E2%80%99t%20overpower%20the%20others.%20%20I%20suppose%20it%20depends%20on%20how%20much%20you%20like%20Ginger,%20and%20of%20the%20people%20who%20tasted%20it,%20nobody%20seemed%20to%20be%20complain.%3Cbr%20/%3E%3Cbr%20/%3E%3Ch2%3ERecipe%20for%20Green%20Soup%20(serves%204-6)%3C/h2%3E%3Cbr%20/%3E%3Cul%3E%3Cli%3E2%20huge%20Baking%20Potatoes%20(peeled%20and%20cubed)%3C/li%3E%3Cli%3E1%20large%20Onion%20(roughly%20chopped)%3C/li%3E%3Cli%3E2%20inch%20thumb%20of%20Ginger%20(peeled)%3C/li%3E%3Cli%3E2%20pints%20of%20Chicken%20or%20Vegetable%20Stock%3C/li%3E%3Cli%3EHalf%20teaspoon%20Ground%20Coriander%3C/li%3E%3Cli%3E2%20teaspoon%20Ground%20Cumin%3C/li%3E%3Cli%3EHalf%20a%20Hot%20Green%20Chili,%20finely%20chopped%3C/li%3E%3Cli%3E4%20tablespoons%20of%20Fresh%20Coriander,%20finely%20chopped%3C/li%3E%3Cli%3E1.5%20cups%20Peas%20(fresh%20or%20frozen)%3C/li%3E%3Cli%3EHalf%20teaspoon%20of%20Salt%3C/li%3E%3Cli%3E1%20teaspoon%20Pepper%3C/li%3E%3Cli%3E1%20tablespoon%20Lemon%20Juice%3C/li%3E%3Cli%3EHalf%20cup%20of%20Double%20Cream%3C/li%3E%3C/ul%3E%3Cbr%20/%3EPut%20the%20Potatoes,%20Onion,%20Chicken%20Stock,%20Ground%20Coriander%20and%20Ground%20Cumin%20into%20a%20large%20pan,%20bring%20to%20the%20boil,%20then%20simmer%20for%2030%20minutes,%20so%20that%20the%20potatoes%20are%20cooked.%20%20Add%20the%20Chili,%20Fresh%20Coriander,%20Peas,%20Salt,%20Pepper%20and%20Lemon%20Juice,%20bring%20back%20to%20the%20boil,%20then%20simmer%20for%20a%20further%205%20minutes.%20%20Once%20the%20peas%20are%20cooked,%20remove%20from%20the%20heat,%20then%20blend%20until%20smooth%20(personally,%20I%20used%20my%20usual%20hand-blender).%20%20Stir%20in%20the%20Double%20Cream%20while%20gently%20reheating%20and%20serve%20immediately.)
Chicken and Chorizo Risotto 13 Mar 2008 5:43 PM (17 years ago)


Risotto is a bit of a recent discovery for me, and since Andrew got me the Silver Spoon, I've experimented with a few different varieties. Lots of people seem to think that it's really difficult to make, but so far, that's not the experience I've had, although not all of my efforts have been tasted by anyone but myself. One of the things which tends to put me off Risotto in restaurants is the fact that they always tend to be some form of Mushroom Risotto, and with me being pretty much allergic to Mushrooms, it's not something I'm every likely to order. However, there seems to be an almost limitless variety to what you can have in a Risotto, and so I tend to use what I have to hand.
One of the things I like about Risotto is that with minimal ingredients in the house, I can quickly cook a simple meal in a small pan which is pretty tasty. I have tried using Chorizo in a Risotto before (as I was told it was illegal to use it in Paella) as I find it adds a nice flavour and texture to the dish when in small cubes, but this time, my creation ended up being somewhere between a Risotto and a Jambalaya. Not particularly traditional, but very tasty all the same. I made enough so that I could take some and reheat it at work the next day, and although it's definitely at its best when fresh from the pan, it was still very tasty. The boys in the office who had some all gave it the thumbs up.
Recipe Chicken and Chorizo Risotto (serves 2-3)
- 1 Chicken Breast, cut into cubes
- 1 Round of Chorizo, cut into cubes
- 2 cloves of Garlic, finely chopped
- 1 Onion, chopped
- 1 Red Pepper, chopped
- A knob of Butter
- 1 cup of Arborio Risotto Rice
- 1 cup of White Wine
- 1 pint of Chicken Stock
- 1 teaspoon Tabasco Sauce
- 1 teaspoon Worcestershire Sauce
- 1 cup Peas
- 1 cup Sweet corn
- 50g Parmigiano Reggiano, finely grated
- Freshly grated Black Pepper
Add the Chorizo cubes to a pan over a medium heat and as it starts to release some of the fats, add the Chicken pieces, and stir and cook for about 5 minutes. Remove the Chicken and Chorizo with a slotted spoon and keep to one side.
In the same pan, add the Garlic, Onion and Red Pepper and cook for about 5 minutes or so, until the Onion is turning transparent. If the pan is quite dry, add in a knob of Butter, turn the heat up a bit, and once melted, pour in the Risotto Rice and stir into the Onion and Pepper. Cook for about 3 or 4 minutes, stirring to ensure it doesn't stick or burn, then pour in the White Wine. This should help de-glaze the pan, and you should let cook until it is almost all evaporated.
Now you should add the Tabasco and Worcestershire Sauce, and then you can start to add the stock, about a ladleful at a time. Stir occasionally to ensure the Risotto doesn't stick, and as the Stock is absorbed by the Rice, add in another ladleful. After about 20 minutes, just as the rice is becoming al-dente, add the Chicken, Chorizo, Sweet corn and Peas into the mixture. Add a little more stock if necessary and continue cooking on a low heat for a few minutes. Finally, stir in the Cheese and Black Pepper, then cover for 5 minutes before serving.
%20as%20I%20find%20it%20adds%20a%20nice%20flavour%20and%20texture%20to%20the%20dish%20when%20in%20small%20cubes,%20but%20this%20time,%20my%20creation%20ended%20up%20being%20somewhere%20between%20a%20Risotto%20and%20a%20Jambalaya.%20%20Not%20particularly%20traditional,%20but%20very%20tasty%20all%20the%20same.%20%20I%20made%20enough%20so%20that%20I%20could%20take%20some%20and%20reheat%20it%20at%20work%20the%20next%20day,%20and%20although%20it's%20definitely%20at%20its%20best%20when%20fresh%20from%20the%20pan,%20it%20was%20still%20very%20tasty.%20%20The%20boys%20in%20the%20office%20who%20had%20some%20all%20gave%20it%20the%20thumbs%20up.%3Cbr%20/%3E%3Cbr%20/%3E%3Ca%20href%3D%22https://blogger.googleusercontent.com/img/b/R29vZ2xl/AVvXsEhLCJ_vXlq9UGZaOwejHU05kdpA39kwA9XjBmAx2QrB1frb5e_1cihpJJMOIhN8wfcHgFaCAyEqHNroFh-TgjKJTZPIDpH8Sg-3KbuJ_EU2KkiBMovbvDhmHa1Ly1nNCCCHByX4LKkW4fhZ/s1600-h/Chicken+and+Chorizo+Risotto.JPG%22%3E%3Cimg%20style%3D%22margin:%200px%20auto%2010px;%20display:%20block;%20text-align:%20center;%20cursor:%20pointer;%22%20src%3D%22https://blogger.googleusercontent.com/img/b/R29vZ2xl/AVvXsEhLCJ_vXlq9UGZaOwejHU05kdpA39kwA9XjBmAx2QrB1frb5e_1cihpJJMOIhN8wfcHgFaCAyEqHNroFh-TgjKJTZPIDpH8Sg-3KbuJ_EU2KkiBMovbvDhmHa1Ly1nNCCCHByX4LKkW4fhZ/s400/Chicken+and+Chorizo+Risotto.JPG%22%20alt%3D%22%22%20id%3D%22BLOGGER_PHOTO_ID_5177409047173302818%22%20border%3D%220%22%20/%3E%3C/a%3E%3Ch2%3ERecipe%20Chicken%20and%20Chorizo%20Risotto%20(serves%202-3)%3C/h2%3E%3Cul%3E%3Cli%3E1%20Chicken%20Breast,%20cut%20into%20cubes%3C/li%3E%3Cli%3E1%20Round%20of%20Chorizo,%20cut%20into%20cubes%3C/li%3E%3Cli%3E2%20cloves%20of%20Garlic,%20finely%20chopped%3C/li%3E%3Cli%3E1%20Onion,%20chopped%3C/li%3E%3Cli%3E1%20Red%20Pepper,%20chopped%3C/li%3E%3Cli%3EA%20knob%20of%20Butter%3C/li%3E%3Cli%3E1%20cup%20of%20Arborio%20Risotto%20Rice%3C/li%3E%3Cli%3E1%20cup%20of%20White%20Wine%3C/li%3E%3Cli%3E1%20pint%20of%20Chicken%20Stock%3C/li%3E%3Cli%3E1%20teaspoon%20Tabasco%20Sauce%3C/li%3E%3Cli%3E1%20teaspoon%20Worcestershire%20Sauce%3C/li%3E%3Cli%3E1%20cup%20Peas%3C/li%3E%3Cli%3E1%20cup%20Sweet%20corn%3C/li%3E%3Cli%3E50g%20Parmigiano%20Reggiano,%20finely%20grated%3C/li%3E%3Cli%3EFreshly%20grated%20Black%20Pepper%3C/li%3E%3C/ul%3E%3Cbr%20/%3EAdd%20the%20Chorizo%20cubes%20to%20a%20pan%20over%20a%20medium%20heat%20and%20as%20it%20starts%20to%20release%20some%20of%20the%20fats,%20add%20the%20Chicken%20pieces,%20and%20stir%20and%20cook%20for%20about%205%20minutes.%20%20Remove%20the%20Chicken%20and%20Chorizo%20with%20a%20slotted%20spoon%20and%20keep%20to%20one%20side.%3Cbr%20/%3E%3Cbr%20/%3EIn%20the%20same%20pan,%20add%20the%20Garlic,%20Onion%20and%20Red%20Pepper%20and%20cook%20for%20about%205%20minutes%20or%20so,%20until%20the%20Onion%20is%20turning%20transparent.%20%20If%20the%20pan%20is%20quite%20dry,%20add%20in%20a%20knob%20of%20Butter,%20turn%20the%20heat%20up%20a%20bit,%20and%20once%20melted,%20pour%20in%20the%20Risotto%20Rice%20and%20stir%20into%20the%20Onion%20and%20Pepper.%20%20Cook%20for%20about%203%20or%204%20minutes,%20stirring%20to%20ensure%20it%20doesn't%20stick%20or%20burn,%20then%20pour%20in%20the%20White%20Wine.%20%20This%20should%20help%20de-glaze%20the%20pan,%20and%20you%20should%20let%20cook%20until%20it%20is%20almost%20all%20evaporated.%3Cbr%20/%3E%3Cbr%20/%3ENow%20you%20should%20add%20the%20Tabasco%20and%20Worcestershire%20Sauce,%20and%20then%20you%20can%20start%20to%20add%20the%20stock,%20about%20a%20ladleful%20at%20a%20time.%20%20Stir%20occasionally%20to%20ensure%20the%20Risotto%20doesn't%20stick,%20and%20as%20the%20Stock%20is%20absorbed%20by%20the%20Rice,%20add%20in%20another%20ladleful.%20%20After%20about%2020%20minutes,%20just%20as%20the%20rice%20is%20becoming%20al-dente,%20add%20the%20Chicken,%20Chorizo,%20Sweet%20corn%20and%20Peas%20into%20the%20mixture.%20%20Add%20a%20little%20more%20stock%20if%20necessary%20and%20continue%20cooking%20on%20a%20low%20heat%20for%20a%20few%20minutes.%20%20Finally,%20stir%20in%20the%20Cheese%20and%20Black%20Pepper,%20then%20cover%20for%205%20minutes%20before%20serving.)
Leek and Potato Soup 10 Mar 2008 7:04 AM (17 years ago)


I've already got two other variations of this recipe on this site, but this weekend, with one of my local shops having some enormous leeks that looked perfect for the job, I decided to make the plain old simple version of it. I always find that leeks from the supermarket are always over-trimmed for making this soup as you get none of the green part of the leek and so the soup can look a little pale. The previous photo of Leek, Potato and Carrot soup definitely highlights this fact.
This was probably the first soup I ever tried to make, and I remember asking my Mum for the recipe and thinking that it just sounded far too simple to taste as good as I remembered. The recipe she gave me is the same as below, although in those days, she just told me to use Water instead of the Bouillon. This still tastes good, but a little Bouillon definitely enhances the flavour.
It has been pretty cold and wet over the weekend, so I wanted to make the soup nice and thick, especially as I wasn't having any bread with it. It also helped in the detox process which was needed after the excessive alcohol consumption during and after the Rugby on Saturday. For the final day of the Six Nations, with all games being on the same day, I think I'm going to cook the night before (like last year) so that there is something here that I can easily reheat. With Wales looking good for the Championship, I'm sure there will be more excesses.
Recipe for the Leek and Potato Soup (Serves 4)
- 25g Lightly Salted Butter
- 2 huge Leeks, green bits and all, roughly chopped
- 2 Baking Potatoes, cut into 1cm cubes
- 3 Bay Leaves
- 0.5 Litre Swiss Marigold Vegetable Bouillon
- 0.5 Litre Water
- Fresh Ground Black Pepper
Add the butter to a heavy bottom pan, and gently soften the leek in the butter for about 10 minutes. Add in the potato cubes and continue to gently cook for another 5 minutes. Add in the Vegetable Bouillon, Bay Leaves and lots of Fresh Ground Black Pepper and simmer for 40 minutes until the Potato is fully cooked. Add a little salt to taste, but personally, with there being Salt in the Butter and Bouillon, I prefer to just add Black Pepper myself.
You can serve the soup immediately, or blend to make completely smooth. Personally, I like to blend just half of it so that you get a nice thick soup with nice big chunks in it.
%20so%20that%20there%20is%20something%20here%20that%20I%20can%20easily%20reheat.%20%20With%20Wales%20looking%20good%20for%20the%20Championship,%20I'm%20sure%20there%20will%20be%20more%20excesses.%3Cbr%20/%3E%3Cbr%20/%3E%3Ch2%3ERecipe%20for%20the%20Leek%20and%20Potato%20Soup%20(Serves%204)%3C/h2%3E%3Cul%3E%3Cli%3E25g%20Lightly%20Salted%20Butter%3C/li%3E%3Cli%3E2%20huge%20Leeks,%20green%20bits%20and%20all,%20roughly%20chopped%3C/li%3E%3Cli%3E2%20Baking%20Potatoes,%20cut%20into%201cm%20cubes%3C/li%3E%3Cli%3E3%20Bay%20Leaves%3C/li%3E%3Cli%3E0.5%20Litre%20Swiss%20Marigold%20Vegetable%20Bouillon%3C/li%3E%3Cli%3E0.5%20Litre%20Water%3C/li%3E%3Cli%3EFresh%20Ground%20Black%20Pepper%3C/li%3E%3C/ul%3E%3Cbr%20/%3EAdd%20the%20butter%20to%20a%20heavy%20bottom%20pan,%20and%20gently%20soften%20the%20leek%20in%20the%20butter%20for%20about%2010%20minutes.%20%20Add%20in%20the%20potato%20cubes%20and%20continue%20to%20gently%20cook%20for%20another%205%20minutes.%20%20Add%20in%20the%20Vegetable%20Bouillon,%20Bay%20Leaves%20and%20lots%20of%20Fresh%20Ground%20Black%20Pepper%20and%20simmer%20for%2040%20minutes%20until%20the%20Potato%20is%20fully%20cooked.%20%20Add%20a%20little%20salt%20to%20taste,%20but%20personally,%20with%20there%20being%20Salt%20in%20the%20Butter%20and%20Bouillon,%20I%20prefer%20to%20just%20add%20Black%20Pepper%20myself.%3Cbr%20/%3E%3Cbr%20/%3EYou%20can%20serve%20the%20soup%20immediately,%20or%20blend%20to%20make%20completely%20smooth.%20%20Personally,%20I%20like%20to%20blend%20just%20half%20of%20it%20so%20that%20you%20get%20a%20nice%20thick%20soup%20with%20nice%20big%20chunks%20in%20it.)
Lamb Korma and Masoor Dahl 2 Mar 2008 9:49 AM (17 years ago)


The last time I made a Korma, it went down very well with my sister, so I decided to try again, only using Lamb this time. I modified the recipe a little after reading a few others on the internet, but it's basically the same technique. I also had another go at making Masoor Dahl (Red Lentil Dahl), and although I didn't use Sandra's technique of frying the spices, then adding the lentils and water to that, it did come out a lot better than the previous effort and had a lot more flavour. The main reason I think is because I made a lot less, but used the same amount of spices as last time.
Another reason for the difference with the Dahl could have been that I used Asafoetida for the first time in my cooking. Many Madhur Jaffrey recipes list it as an optional ingredient, however, in the Monisha Bharadwaj book I have, she often lists it as an ingredient and has two pages of the book devoted to it. It wasn't the easiest thing to find, although, I eventually found it in Waitrose, and I have to say, it's got one of the worst smells of anything in my spice drawer. It's kind of sulphurous, perhaps something like the worse pair of trainers worn without socks during a long hot summer. However, once a pinch is dropped into the hot oil, it doesn't smell nearly as bad. Monisha Bharadwaj says that it can make a dish. I'm not sure about that, but the Dahl was good, so I'm going to stick with it in future, although just a pinch. It really doesn't smell like something you should be putting into your food though, although, funnily enough, it's supposed to reduce flatulence among other things!
Although the Korma wasn't as hot as I would have liked, it was still pretty nice. I think I probably got the amount of Chili about right, but next time, I will leave the seeds in, or perhaps add a little more Cayenne Pepper. During cooking it really smelled like it was going to be a hot one, but the Coconut Milk really cools it down.
The nice thing about both recipes is that they taste just as good, if not better, the next day, and in fact, the photos were taken of my reheated curry lunch as the ones I took on the evening just weren't that great, and I much prefer shooting in daylight.
Recipe for the Masoor Dahl (Serves 4)
- 1 Cup of Red Lentils, washed
- 1.5 Pints of Water
- A few thin slices of Ginger
- 1 teaspoon of Turmeric
- 2 tablespoons Vegetable Oil
- A pinch of Asafoetida
- 1 teaspoon of Cumin Seeds
- 1 teaspoon of Mustard Seeds
- 1 teaspoon of Ground Coriander
- Half teaspoon of Cayenne Pepper
- 1 teaspoon of Salt
After washing the lentils, put them into a heavy pan along with the Water, Ginger Slices and Turmeric. Bring the pan to a simmer, then cook for an hour and a half, making sure to stir in the last half hour to make sure it doesn't stick. Remove the slices of Ginger.
Heat up some oil in another pan and drop in the Pinch of Asafoetida, Cumin Seeds and Mustard Seeds and once they start popping, add in the Ground Coriander and Cayenne Pepper, stir a couple more times, then pour into the Lentils. Finally add Salt to taste, and garnish with Fresh Chopped Coriander.

Recipe for the Lamb Korma (Serves 3)
- 500g Lamb Pieces
- 6 Tablespoons of Natural Yoghurt
- 5cm Piece of Ginger, grated
- 4 cloves of Garlic, chopped fine
- 1 Medium Onion, roughly chopped
- 4 cloves of Garlic
- 4 Green Chilies, seeds removed
- 3-4 Tablespoons Vegetable Oil
- 1 Large Onion, finely sliced
- 5cm Cinnamon Stick
- 4 Green Cardamoms, broken
- 1 teaspoon of Ground Coriander
- 1 teaspoon Turmeric
- Half teaspoon of Cayenne Pepper
- Half teaspoon Freshly Ground Black Pepper
- Half cup of Hot Water
- 1 can of Coconut Milk
- 1 teaspoon Salt
- 1 teaspoon Garam Masala
- 2 tablespoons Almonds, finely chopped
- Handful Fresh Coriander, chopped
- Juice of half a Lemon
Marinate the Lamb pieces in the Yoghurt, Grated Ginger and Chopped Garlic for a few hours at least (preferably overnight). Put the roughly chopped Onion, Garlic Cloves and Chilies into a blender, blend to a fine paste and set to one side.
Heat up the oil in a heavy bottom pan and fry the onion slices for about 5 minutes, until turning golden. Remove from the pan with a slotted spoon and set to one side. Add a little more oil to the pan and add the Cinnamon Stick, Cardamoms, Ground Coriander, Turmeric, Cayenne Pepper and Black Pepper and stir. Now put the lamb and marinade into the pan, stir to ensure they are coated in the spices and cook for about 10 minutes. Next, add the paste and cook for a further 10 minutes. Add a little hot water to help de-glaze the pan a little, and add the Coconut Milk and the fried Onions. Cook for another 30-40 minutes, or until the Lamb is tender. Stir last of the ingredients and serve.
Lamb Rogan Josh (Red Lamb Stew) 17 Feb 2008 7:25 PM (17 years ago)

I've cooked at Eduardo's flat a few times, but recently he got a new kitchen fitted, and finally has a half decent gas stove and had been trying to get me to come around and cook for a while. As it was a new-ish kitchen, I couldn't think of anything better than letting it have that cooked-in smell of doing a good curry.
The last time I cooked at Ed's place, his girlfriend reckoned she had a reaction to the coconut milk in the Thai curry I cooked, so I decided that this time I would cook an Indian using yoghurt instead. I had wanted to cook something with Lamb, and after flicking through the Madhur Jaffery book, I settled on doing a Lamb Rogan Josh, as it seemed nice and simple, and I wouldn't have to carry too many ingredients with me (knowing that Ed was unlikely to have most of the necessary spices for even the simplest curry). Also, Lamb Rogan Josh is one of those dishes that I would regularly order in a restaurant, so I really wanted to have a go at doing it myself.
To be honest, I think I made it a little hot, so the recipe I'm writing is how I would do it if I made it the same again. This was partly because I was cooking less due to Katia being ill and not wanting to eat any, and so I didn't buy as much Lamb as I would have done if everyone was hungry. Also, it really could have done with a vegetable dish to go with it, but I forgot that I had considerably better cooking facilities, so concentrated on the main dish and forget to get together a vegetable dish to go with it. Due to the hour long simmering time, there is plenty of time to get something else together while waiting for the lamb to become tender.
Recipe for Lamb Rogan Josh (serves 2-3)
- 3 tablespoons Vegetable Oil
- 8 Cloves of Garlic
- 5cm Piece of Ginger (roughly chopped)
- 500g Lamb Shoulder Cubes
- 2 Bay Leaves
- 5cm Cinnamon Stick
- 10 Peppercorns
- 10 Cloves
- 8 Green Cardamoms (Broken)
- 2 Onions (finely chopped)
- 1 Teaspoon Ground Coriander
- 2 Teaspoons Ground Cumin
- 3 Teaspoons Paprika
- Half Teaspoon Cayenne Pepper
- 1 Teaspoon Salt
- 5 Tablespoons Natural Yoghurt
- 200ml Water
- Half Teaspoon Garam Masala
Put the Garlic, Ginger and a few tablespoons of water into a blender, and blend to a smooth paste. Heat the oil in a heavy bottom pan and then lightly brown the Lamb in batches, and remove to a bowl.
Drop in the Bay Leaves, Cinnamon Stick, Cardamom Pods, Peppercorns and Cloves into the pan and stir for about 30 seconds, then add the Onion and fry until lightly browned for about 5 minutes. Add the Garlic and Ginger Paste and stir and fry for about 30 seconds before adding the Ground Coriander, Cumin, Paprika, Cayenne Pepper and Salt. Stir these in well. The mixture will probably be fairly dry at this point, but then add the Lamb and juices back into the pan, and it should start to moisten up again.
Next start adding the Yoghurt, a tablespoon at a time, stirring it into the mixture and ensure that it's fully combined before adding the next tablespoon. Cook for a further 4 minutes, then add in the water, stir and bring to the boil, then reduce the meat to a simmer. Cover and simmer for an hour, or until the Lamb is tender, and the sauce has reduced to a nice Gravy. Finally stir in the Garam Masala.
Serve with Rice and ideally a nice vegetable dish.
%26bodytext%3D%3Ca%20href%3D%22https://blogger.googleusercontent.com/img/b/R29vZ2xl/AVvXsEiC0HzFxxEB_VtYdQcXLYZ8KnFsPEbLqUoVnarFB4uVoGuVyn9kkMcWNKKSOmRbCyX_K0YV82kkVy5hKK4NvKF2oNplBymmqClnABUee2sGb3z2cfZ6-wYK3xnByb7ksERZe0_gAo8CaXjq/s1600-h/Lamb-Rogan-Josh.jpg%22%3E%3Cimg%20style%3D%22margin:%200px%20auto%2010px;%20display:%20block;%20text-align:%20center;%20cursor:%20pointer;%22%20src%3D%22https://blogger.googleusercontent.com/img/b/R29vZ2xl/AVvXsEiC0HzFxxEB_VtYdQcXLYZ8KnFsPEbLqUoVnarFB4uVoGuVyn9kkMcWNKKSOmRbCyX_K0YV82kkVy5hKK4NvKF2oNplBymmqClnABUee2sGb3z2cfZ6-wYK3xnByb7ksERZe0_gAo8CaXjq/s400/Lamb-Rogan-Josh.jpg%22%20alt%3D%22%22%20id%3D%22BLOGGER_PHOTO_ID_5168284539747847570%22%20border%3D%220%22%20/%3E%3C/a%3E%3Cbr%20/%3EI've%20cooked%20at%20Eduardo's%20flat%20a%20few%20times,%20but%20recently%20he%20got%20a%20new%20kitchen%20fitted,%20and%20finally%20has%20a%20half%20decent%20gas%20stove%20and%20had%20been%20trying%20to%20get%20me%20to%20come%20around%20and%20cook%20for%20a%20while.%20%20As%20it%20was%20a%20new-ish%20kitchen,%20I%20couldn't%20think%20of%20anything%20better%20than%20letting%20it%20have%20that%20cooked-in%20smell%20of%20doing%20a%20good%20curry.%3Cbr%20/%3E%3Cbr%20/%3EThe%20last%20time%20I%20cooked%20at%20Ed's%20place,%20his%20girlfriend%20reckoned%20she%20had%20a%20reaction%20to%20the%20coconut%20milk%20in%20the%20Thai%20curry%20I%20cooked,%20so%20I%20decided%20that%20this%20time%20I%20would%20cook%20an%20Indian%20using%20yoghurt%20instead.%20%20I%20had%20wanted%20to%20cook%20something%20with%20Lamb,%20and%20after%20flicking%20through%20the%20%3Ca%20href%3D%22http://www.amazon.co.uk/gp/redirect.html?ie%253DUTF8%2526location%253Dhttp://www.amazon.co.uk/Madhur-Jaffreys-Illustrated-Indian-Cookery/dp/0563383038?ie%253DUTF8%2526s%253Dbooks%2526qid%253D1203342673%2526sr%253D1-2%2526tag%253Dmitchcomthedatab%2526linkCode%253Dur2%2526camp%253D1634%2526creative%253D6738%22%3EMadhur%20Jaffery%20book%3C/a%3E,%20I%20settled%20on%20doing%20a%20Lamb%20Rogan%20Josh,%20as%20it%20seemed%20nice%20and%20simple,%20and%20I%20wouldn't%20have%20to%20carry%20too%20many%20ingredients%20with%20me%20(knowing%20that%20Ed%20was%20unlikely%20to%20have%20most%20of%20the%20necessary%20spices%20for%20even%20the%20simplest%20curry).%20Also,%20Lamb%20Rogan%20Josh%20is%20one%20of%20those%20dishes%20that%20I%20would%20regularly%20order%20in%20a%20restaurant,%20so%20I%20really%20wanted%20to%20have%20a%20go%20at%20doing%20it%20myself.%3Cimg%20src%3D%22http://www.assoc-amazon.co.uk/e/ir?t%253Dmitchcomthedatab%2526l%253Dur2%2526o%253D2%22%20width%3D%221%22%20height%3D%221%22%20border%3D%220%22%20alt%3D%22%22%20style%3D%22border:none%20!important;%20margin:0px%20!important;%22%20/%3E%3Cbr%20/%3E%3Cbr%20/%3ETo%20be%20honest,%20I%20think%20I%20made%20it%20a%20little%20hot,%20so%20the%20recipe%20I'm%20writing%20is%20how%20I%20would%20do%20it%20if%20I%20made%20it%20the%20same%20again.%20%20This%20was%20partly%20because%20I%20was%20cooking%20less%20due%20to%20Katia%20being%20ill%20and%20not%20wanting%20to%20eat%20any,%20and%20so%20I%20didn't%20buy%20as%20much%20Lamb%20as%20I%20would%20have%20done%20if%20everyone%20was%20hungry.%20%20Also,%20it%20really%20could%20have%20done%20with%20a%20vegetable%20dish%20to%20go%20with%20it,%20but%20I%20forgot%20that%20I%20had%20considerably%20better%20cooking%20facilities,%20so%20concentrated%20on%20the%20main%20dish%20and%20forget%20to%20get%20together%20a%20vegetable%20dish%20to%20go%20with%20it.%20Due%20to%20the%20hour%20long%20simmering%20time,%20there%20is%20plenty%20of%20time%20to%20get%20something%20else%20together%20while%20waiting%20for%20the%20lamb%20to%20become%20tender.%3Cbr%20/%3E%3Ch2%3ERecipe%20for%20Lamb%20Rogan%20Josh%20(serves%202-3)%3C/h2%3E%3Cul%3E%3Cli%3E3%20tablespoons%20Vegetable%20Oil%3C/li%3E%3Cli%3E8%20Cloves%20of%20Garlic%3C/li%3E%3Cli%3E5cm%20Piece%20of%20Ginger%20(roughly%20chopped)%3C/li%3E%3Cli%3E500g%20Lamb%20Shoulder%20Cubes%3C/li%3E%3Cli%3E2%20Bay%20Leaves%3C/li%3E%3Cli%3E5cm%20Cinnamon%20Stick%3C/li%3E%3Cli%3E10%20Peppercorns%3C/li%3E%3Cli%3E10%20Cloves%3C/li%3E%3Cli%3E8%20Green%20Cardamoms%20(Broken)%3C/li%3E%3Cli%3E2%20Onions%20(finely%20chopped)%3C/li%3E%3Cli%3E1%20Teaspoon%20Ground%20Coriander%3C/li%3E%3Cli%3E2%20Teaspoons%20Ground%20Cumin%3C/li%3E%3Cli%3E3%20Teaspoons%20Paprika%3C/li%3E%3Cli%3EHalf%20Teaspoon%20Cayenne%20Pepper%3C/li%3E%3Cli%3E1%20Teaspoon%20Salt%3C/li%3E%3Cli%3E5%20Tablespoons%20Natural%20Yoghurt%3C/li%3E%3Cli%3E200ml%20Water%3C/li%3E%3Cli%3EHalf%20Teaspoon%20Garam%20Masala%3C/li%3E%3C/ul%3E%3Cbr%20/%3EPut%20the%20Garlic,%20Ginger%20and%20a%20few%20tablespoons%20of%20water%20into%20a%20blender,%20and%20blend%20to%20a%20smooth%20paste.%20%20Heat%20the%20oil%20in%20a%20heavy%20bottom%20pan%20and%20then%20lightly%20brown%20the%20Lamb%20in%20batches,%20and%20remove%20to%20a%20bowl.%3Cbr%20/%3E%3Cbr%20/%3EDrop%20in%20the%20Bay%20Leaves,%20Cinnamon%20Stick,%20Cardamom%20Pods,%20Peppercorns%20and%20Cloves%20into%20the%20pan%20and%20stir%20for%20about%2030%20seconds,%20then%20add%20the%20Onion%20and%20fry%20until%20lightly%20browned%20for%20about%205%20minutes.%20%20Add%20the%20Garlic%20and%20Ginger%20Paste%20and%20stir%20and%20fry%20for%20about%2030%20seconds%20before%20adding%20the%20Ground%20Coriander,%20Cumin,%20Paprika,%20Cayenne%20Pepper%20and%20Salt.%20%20Stir%20these%20in%20well.%20%20The%20mixture%20will%20probably%20be%20fairly%20dry%20at%20this%20point,%20but%20then%20add%20the%20Lamb%20and%20juices%20back%20into%20the%20pan,%20and%20it%20should%20start%20to%20moisten%20up%20again.%3Cbr%20/%3E%3Cbr%20/%3ENext%20start%20adding%20the%20Yoghurt,%20a%20tablespoon%20at%20a%20time,%20stirring%20it%20into%20the%20mixture%20and%20ensure%20that%20it's%20fully%20combined%20before%20adding%20the%20next%20tablespoon.%20%20Cook%20for%20a%20further%204%20minutes,%20then%20add%20in%20the%20water,%20stir%20and%20bring%20to%20the%20boil,%20then%20reduce%20the%20meat%20to%20a%20simmer.%20%20Cover%20and%20simmer%20for%20an%20hour,%20or%20until%20the%20Lamb%20is%20tender,%20and%20the%20sauce%20has%20reduced%20to%20a%20nice%20Gravy.%20%20Finally%20stir%20in%20the%20Garam%20Masala.%3Cbr%20/%3E%3Cbr%20/%3EServe%20with%20Rice%20and%20ideally%20a%20nice%20vegetable%20dish.)
Beef Bourguignon 29 Jan 2008 2:18 AM (17 years ago)


I remember this dish being a regular instalment on the Tower Restaurant menu at South Bank University in the days when I used to type up menus for the day, but it was never anything I had thought of making myself until reading Pille's post at Nami-Nami. Her version looked really tasty, so I decided I just had to have a go myself. The only problem was that I mentioned this to my friends, Natalia and Gosia, making the further mistake of saying I'd cook it for them one day, and now, about a year later, we finally made the date, and I have finally made it.
The biggest obstacle to making this in the past is that most recipes I've seen require preparing the Beef in the marinade the night before, so if there is any chance that diners won't appear the next day, one may be lumbered with a large amount of food which will never be eaten. Most stews I make require a good few hours to cook, but with Bourguignon, I figured the overnight marinating was something which really had to be done.
There seems to be a couple of different camps when it comes to making Beef Bourguignon. Some cook the stew the night before, then store overnight and reheat before serving. Others seem to go for either a cold or cook marinade, leave overnight, then, cook for 3 or 4 hours the next day. Gordon Ramsay even has a same day recipe, but that feels like cheating to me. Personally, I went for the cook marinade method, although I couldn't fit it in the fridge, so I just left it near the window overnight.
Recipe for Beef Bourguignon (serves 6)
- 1kg Braising Steak, cut into nice chunks
- 1 large Onion, roughly chopped
- 2 ribs of Celery, roughly chopped
- 2 large Carrots, roughly chopped
- 1 bottle of Red Wine (preferably Burgundy)
- A few sprigs of Fresh Thyme
- A bunch of Fresh Flat-Leaf Parsley
- 5 Bay Leaves
- A bulb of Garlic, cut in half across the cloves
- 25g Butter
- 250g Smoked Bacon Lardons
- 400g Shallots, peeled
- 2 tablespoons Olive Oil
- 400g Chantaney Carrots
- 1 tablespoon Dijon Mustard
- 1 tablespoon Plain Flour
- Half pint of Beef Stock
- Salt and Black Pepper
First fry the Onion, Celery and Carrot together in a little oil for about 2-3 minutes. Then add the Wine, Thyme, Bay Leaves, Parsley and Garlic, remove from the heat, drop in the Beef, cover and keep in a cool place overnight.
The following day, drain the vegetables and Beef, reserving the marinade. Put the vegetables into a large casserole dish, and pat the Beef dry using kitchen roll. In another pan, add butter and fry the Bacon until golden, adding the shallots about halfway through. Remove from the pan and add to the Casserole. Next, add a little oil and brown the pieces of Beef in a couple of batches in the pan. Remove and add to the Casserole. Now add a little of the reserve marinade to the pan to de-glaze it, followed by the Mustard and Flour, stirring continuously to ensure there are no lumps as you add the remaining marinade and beef stock. Pour, this into the casserole, cover, and cook in a preheated 160 degree Celsius oven for about 4 hours.
If you want the gravy a little thicker, you can mix more flour with a little of the existing gravy, then add back into the casserole an hour before the end of the cooking time.
Garnish with Freshly Chopped Flat Parsley and serve with Potatoes, Rice or French Bread. In my case, Mash Potato with Chopped Spring Onions was requested, so that was what I cooked.
%3C/h2%3E%3Cul%3E%3Cli%3E1kg%20Braising%20Steak,%20cut%20into%20nice%20chunks%3C/li%3E%3Cli%3E1%20large%20Onion,%20roughly%20chopped%3C/li%3E%3Cli%3E2%20ribs%20of%20Celery,%20roughly%20chopped%3C/li%3E%3Cli%3E2%20large%20Carrots,%20roughly%20chopped%3C/li%3E%3Cli%3E1%20bottle%20of%20Red%20Wine%20(preferably%20Burgundy)%3C/li%3E%3Cli%3EA%20few%20sprigs%20of%20Fresh%20Thyme%3C/li%3E%3Cli%3EA%20bunch%20of%20Fresh%20Flat-Leaf%20Parsley%3C/li%3E%3Cli%3E5%20Bay%20Leaves%3C/li%3E%3Cli%3EA%20bulb%20of%20Garlic,%20cut%20in%20half%20across%20the%20cloves%3C/li%3E%3Cli%3E25g%20Butter%3C/li%3E%3Cli%3E250g%20Smoked%20Bacon%20Lardons%3C/li%3E%3Cli%3E400g%20Shallots,%20peeled%3C/li%3E%3Cli%3E2%20tablespoons%20Olive%20Oil%3C/li%3E%3Cli%3E400g%20Chantaney%20Carrots%3C/li%3E%3Cli%3E1%20tablespoon%20Dijon%20Mustard%3C/li%3E%3Cli%3E1%20tablespoon%20%20Plain%20Flour%3C/li%3E%3Cli%3EHalf%20pint%20of%20Beef%20Stock%3C/li%3E%3Cli%3ESalt%20and%20Black%20Pepper%3C/li%3E%3C/ul%3E%3Cbr%20/%3EFirst%20fry%20the%20Onion,%20Celery%20and%20Carrot%20together%20in%20a%20little%20oil%20for%20about%202-3%20minutes.%20%20Then%20add%20the%20Wine,%20Thyme,%20Bay%20Leaves,%20Parsley%20and%20Garlic,%20remove%20from%20the%20heat,%20drop%20in%20the%20Beef,%20cover%20and%20keep%20in%20a%20cool%20place%20overnight.%3Cbr%20/%3E%3Cbr%20/%3EThe%20following%20day,%20drain%20the%20vegetables%20and%20Beef,%20reserving%20the%20marinade.%20%20Put%20the%20vegetables%20into%20a%20large%20casserole%20dish,%20and%20pat%20the%20Beef%20dry%20using%20kitchen%20roll.%20%20In%20another%20pan,%20add%20butter%20and%20fry%20the%20Bacon%20until%20golden,%20adding%20the%20shallots%20about%20halfway%20through.%20%20Remove%20from%20the%20pan%20and%20add%20to%20the%20Casserole.%20%20Next,%20add%20a%20little%20oil%20and%20brown%20the%20pieces%20of%20Beef%20in%20a%20couple%20of%20batches%20in%20the%20pan.%20%20Remove%20and%20add%20to%20the%20Casserole.%20%20Now%20add%20a%20little%20of%20the%20reserve%20marinade%20to%20the%20pan%20to%20de-glaze%20it,%20followed%20by%20the%20Mustard%20and%20Flour,%20stirring%20continuously%20to%20ensure%20there%20are%20no%20lumps%20as%20you%20add%20the%20remaining%20marinade%20and%20beef%20stock.%20%20Pour,%20this%20into%20the%20casserole,%20cover,%20and%20cook%20in%20a%20preheated%20160%20degree%20Celsius%20oven%20for%20about%204%20hours.%3Cbr%20/%3E%3Cbr%20/%3EIf%20you%20want%20the%20gravy%20a%20little%20thicker,%20you%20can%20mix%20more%20flour%20with%20a%20little%20of%20the%20existing%20gravy,%20then%20add%20back%20into%20the%20casserole%20an%20hour%20before%20the%20end%20of%20the%20cooking%20time.%3Cbr%20/%3E%3Cbr%20/%3EGarnish%20with%20Freshly%20Chopped%20Flat%20Parsley%20and%20serve%20with%20Potatoes,%20Rice%20or%20French%20Bread.%20%20In%20my%20case,%20Mash%20Potato%20with%20Chopped%20Spring%20Onions%20was%20requested,%20so%20that%20was%20what%20I%20cooked.)
Roast Chicken with Sage, Onion and Apple Stuffing 21 Jan 2008 2:30 AM (17 years ago)


With all the publicity that Free Range Chickens are getting at the moment due to Hugh Fearnley-Whittingstall's Chicken Out campaign, I really fancied a Roast Chicken myself this weekend. I wasn't planning on cooking for anyone except myself, but I wanted the leftover chicken for other recipes, and wanted the carcass to make the stock, too. However, I was slightly upset to find that none of the chickens in my local Waitrose came with Giblets. This was definitely mildly annoying as I wanted to use the Giblets to make the stock for the gravy at the very least.
Still, it was a nice Chicken which I managed to cook just right so that the breast was still nice and moist without being undercooked at all. I think it's definitely worthwhile getting a chicken larger than you need so that there are enough leftovers for another meal or two as it's definitely cheaper than buying in smaller pieces of Free Range Chicken.
With or without Hugh's Chicken Run, I'd been put off mass produced, Non-Free Range Chicken for a while after a documentary highlighting the fact that the burns often seen on the legs of these birds are due to them sitting around in their own filth all day long as they can barely stand up. Also, my Mum has bought free-range since we were kids, and I remember everyone commenting on the difference the first time she did. It is more expensive, but then, more recently, I have tended to go for more expensive pieces of meat, but just eat less of it, or at least, less often.
To go with the Chicken, I made a few Roast Potatoes, plus some Carrots and Sprouts. I reckon that most years I probably have sprouts only for Christmas Dinner, and very occasionally at someone else's house. I never cook them myself, even though I absolutely love them. I really didn't need all the stuffing I made, and ended up keeping most of it for sandwiches, but I wanted to make it simply because I'd never bothered in the past. I based the recipe on lots of similar stuffing recipes which I found searching on Google, and for me, it tasted great, so I'd definitely follow a similar route with that another time.
Recipe for the Roast Chicken
- 1 Free Range Chicken
- 25g Lightly Salted Butter
- Freshly Ground Salt and Black Pepper
Recipe for Sage, Onion and Apple Stuffing
- 3-4 slices of Whole Meal Bread, with Crusts
- 454g Sausage Meat, or peeled Sausages (not low fat)
- 1 Large Onion, finely chopped
- 2 Granny Smith Apples, peeled, cored and finely cubed
- 2 tablespoons of Fresh Sage Leaves, finely chopped
- Fresh Ground Black Pepper
In a food processor/blender, convert the bread to breadcrumbs. In a frying pan, cook and break up the Sausage Meat, until no longer pink. Remove with a slotted spoon and add to the breadcrumbs. If there is a lot of oil in the pan, pour away most of it, leaving a little to fry the Onion, Apple and Sage. Fry gently for about 5 minutes, then add to the breadcrumbs and Sausage Meat. Either blend together in the food processor, or simply mix by hand, ensuring all the ingredients are well mixed together.
Put stuffing into the cavity of the Chicken. Any remaining stuffing can be cooked in a casserole dish, or rolled into balls and cooked for 30 minutes at 200 degrees Celsius.
Cut the butter into two thin slices, then from the neck of the chicken, carefully lift the skin from the breast and insert the two slices of butter under the skin, on top of the breast. Sprinkle Freshly Ground Salt and Black Pepper over the skin, then cover with foil and cook in a preheated oven at 200 degrees Celsius, following the pack instructions (normally around 45 minutes per kilo of chicken, plus an additional 20 minutes). Remove the foil covering for the last 40 minutes of cooking.
%3C/li%3E%3Cli%3E1%20Large%20Onion,%20finely%20chopped%3C/li%3E%3Cli%3E2%20Granny%20Smith%20Apples,%20peeled,%20cored%20and%20finely%20cubed%3C/li%3E%3Cli%3E2%20tablespoons%20of%20Fresh%20Sage%20Leaves,%20finely%20chopped%3C/li%3E%3Cli%3EFresh%20Ground%20Black%20Pepper%3C/li%3E%3C/ul%3E%3Cbr%20/%3EIn%20a%20food%20processor/blender,%20convert%20the%20bread%20to%20breadcrumbs.%20%20In%20a%20frying%20pan,%20cook%20and%20break%20up%20the%20Sausage%20Meat,%20until%20no%20longer%20pink.%20%20Remove%20with%20a%20slotted%20spoon%20and%20add%20to%20the%20breadcrumbs.%20%20If%20there%20is%20a%20lot%20of%20oil%20in%20the%20pan,%20pour%20away%20most%20of%20it,%20leaving%20a%20little%20to%20fry%20the%20Onion,%20Apple%20and%20Sage.%20%20Fry%20gently%20for%20about%205%20minutes,%20then%20add%20to%20the%20breadcrumbs%20and%20Sausage%20Meat.%20%20Either%20blend%20together%20in%20the%20food%20processor,%20or%20simply%20mix%20by%20hand,%20ensuring%20all%20the%20ingredients%20are%20well%20mixed%20together.%3Cbr%20/%3E%3Cbr%20/%3EPut%20stuffing%20into%20the%20cavity%20of%20the%20Chicken.%20%20Any%20remaining%20stuffing%20can%20be%20cooked%20in%20a%20casserole%20dish,%20or%20rolled%20into%20balls%20and%20cooked%20for%2030%20minutes%20at%20200%20degrees%20Celsius.%3Cbr%20/%3E%3Cbr%20/%3ECut%20the%20butter%20into%20two%20thin%20slices,%20then%20from%20the%20neck%20of%20the%20chicken,%20carefully%20lift%20the%20skin%20from%20the%20breast%20and%20insert%20the%20two%20slices%20of%20butter%20under%20the%20skin,%20on%20top%20of%20the%20breast.%20%20Sprinkle%20Freshly%20Ground%20Salt%20and%20Black%20Pepper%20over%20the%20skin,%20then%20cover%20with%20foil%20and%20cook%20in%20a%20preheated%20oven%20at%20200%20degrees%20Celsius,%20following%20the%20pack%20instructions%20(normally%20around%2045%20minutes%20per%20kilo%20of%20chicken,%20plus%20an%20additional%2020%20minutes).%20%20Remove%20the%20foil%20covering%20for%20the%20last%2040%20minutes%20of%20cooking.)
Carrot and Coriander Soup 11 Jan 2008 3:43 AM (17 years ago)


This is another one of those recipes that I've wanted to make for a long time, but have somehow never got around to it. A few times, I've gone to the shop with the express reason of getting the ingredients, only to find there wasn't any nice looking Fresh Coriander, and so have ended up buying a couple of Leeks and Potatoes and making that soup instead.
I don't ever remember having this soup as a child, so couldn't just steal my mum's recipe on this one. In fact, I think the first time I ever tried this soup was when a friend had a carton of the Covent Garden Soup Company version in the fridge. Searching for a recipe on Google revealed lots of different variations on ingredients and preparation methods. A lot of the more 'British' sounding recipes seemed to keep things relatively simple, and just have the one clove of Garlic and relatively small quantities of Fresh Coriander (obviously from people who buy their Coriander in the Supermarket, rather than getting big cheap bunches from alternative retail outlets). Recipes from sites with a more Asian flare seemed to go for a lot more Garlic and Coriander, plus a few additional ingredients and in some cases, a much more complex preparation method.
There were also versions which included Tomatoes, others used Sweet Potatoes instead of Potatoes (and some no potato at all) and lots which called for the addition of Single or Double Cream, something I would maybe do if cooking it as a starter for a meal where health factors are not an issue, but as I predominantly made this Soup to take into work in a Flask for a healthy lunch, it was left out this time. However, I did add a little Semi-Skimmed Milk at the end as the soup was quite dark in colour and I wanted to lighten it up a bit.
With so many variations, I decided to try and go somewhere in the middle of them with my version, but with Coriander being one of my favourite herbs, there would definitely be a lot of it in there. I did think about using Sweet Potato rather than normal Potato, but I didn't want to make it too sweet, so for this first attempt at this soup, they're just normal white potatoes (in this case, a few small Vivaldi Potatoes).
Recipe for Carrot and Coriander Soup Serves 4
- 1 tablespoon Olive Oil
- 1 large Onion (chopped)
- 1 rib of Celery (finely chopped)
- 6 cloves of Garlic (chopped fine)
- 5 medium Carrots (chopped)
- 3 small Potatoes (cubed)
- Half a cup of Fresh Coriander Stalks (finely chopped)
- 2 teaspoons Ground Coriander
- 1 teaspoon Ground Cumin
- Half teaspoon of Cayenne Pepper
- Half teaspoon of Black Pepper
- 1 litre Swiss Marigold Vegetable Stock
- 2 Bay Leaves
- 1 cup Fresh Coriander Leaves (chopped)
- Half cup of Semi-Skimmed Milk (optional)
Heat the Oil in a heavy based pan, then fry the Onion, Celery and Garlic on a medium heat for about 5 minutes, until the Onion is translucent. Next add the Carrot, Fresh Coriander Stalks and Potato and continue to cook for another 5 minutes. Add the dried Spices and stir into the vegetables so that they're all nicely coated, then add the Stock and Bay Leaves, bring to the boil, then simmer for about 30 minutes, until the vegetables are tender.
Let it cool down a bit, then blend until you have a nice smooth soup. Add the remaining Fresh Coriander Leaves and gently reheat the soup (without boiling). My soup was darker than I'd like, so added about half a cup of Semi-Skimmed Milk at the end to lighten the colour a little, but this is definitely optional.
.%20%20Recipes%20from%20sites%20with%20a%20more%20Asian%20flare%20seemed%20to%20go%20for%20a%20lot%20more%20Garlic%20and%20Coriander,%20plus%20a%20few%20additional%20ingredients%20and%20in%20some%20cases,%20a%20much%20more%20complex%20preparation%20method.%3Cbr%20/%3E%3Cbr%20/%3EThere%20were%20also%20versions%20which%20included%20Tomatoes,%20others%20used%20Sweet%20Potatoes%20instead%20of%20Potatoes%20(and%20some%20no%20potato%20at%20all)%20and%20lots%20which%20called%20for%20the%20addition%20of%20Single%20or%20Double%20Cream,%20something%20I%20would%20maybe%20do%20if%20cooking%20it%20as%20a%20starter%20for%20a%20meal%20where%20health%20factors%20are%20not%20an%20issue,%20but%20as%20I%20predominantly%20made%20this%20Soup%20to%20take%20into%20work%20in%20a%20Flask%20for%20a%20healthy%20lunch,%20it%20was%20left%20out%20this%20time.%20%20However,%20I%20did%20add%20a%20little%20Semi-Skimmed%20Milk%20at%20the%20end%20as%20the%20soup%20was%20quite%20dark%20in%20colour%20and%20I%20wanted%20to%20lighten%20it%20up%20a%20bit.%3Cbr%20/%3E%3Cbr%20/%3EWith%20so%20many%20variations,%20I%20decided%20to%20try%20and%20go%20somewhere%20in%20the%20middle%20of%20them%20with%20my%20version,%20but%20with%20Coriander%20being%20one%20of%20my%20favourite%20herbs,%20there%20would%20definitely%20be%20a%20lot%20of%20it%20in%20there.%20%20I%20did%20think%20about%20using%20Sweet%20Potato%20rather%20than%20normal%20Potato,%20but%20I%20didn't%20want%20to%20make%20it%20too%20sweet,%20so%20for%20this%20first%20attempt%20at%20this%20soup,%20they're%20just%20normal%20white%20potatoes%20(in%20this%20case,%20a%20few%20small%20Vivaldi%20Potatoes).%3Cbr%20/%3E%3Cbr%20/%3E%3Ch2%3ERecipe%20for%20Carrot%20and%20Coriander%20Soup%20Serves%204%3C/h2%3E%3Cul%3E%3Cli%3E1%20tablespoon%20Olive%20Oil%3C/li%3E%3Cli%3E1%20large%20Onion%20(chopped)%3C/li%3E%3Cli%3E1%20rib%20of%20Celery%20(finely%20chopped)%3C/li%3E%3Cli%3E6%20cloves%20of%20Garlic%20(chopped%20fine)%3C/li%3E%3Cli%3E5%20medium%20Carrots%20(chopped)%3C/li%3E%3Cli%3E3%20small%20Potatoes%20(cubed)%3C/li%3E%3Cli%3EHalf%20a%20cup%20of%20Fresh%20Coriander%20Stalks%20(finely%20chopped)%3C/li%3E%3Cli%3E2%20teaspoons%20Ground%20Coriander%3C/li%3E%3Cli%3E1%20teaspoon%20Ground%20Cumin%3C/li%3E%3Cli%3EHalf%20teaspoon%20of%20Cayenne%20Pepper%3C/li%3E%3Cli%3EHalf%20teaspoon%20of%20Black%20Pepper%3C/li%3E%3Cli%3E1%20litre%20Swiss%20Marigold%20Vegetable%20Stock%3C/li%3E%3Cli%3E2%20Bay%20Leaves%3C/li%3E%3Cli%3E1%20cup%20Fresh%20Coriander%20Leaves%20(chopped)%3C/li%3E%3Cli%3EHalf%20cup%20of%20Semi-Skimmed%20Milk%20(optional)%3C/li%3E%3C/ul%3E%3Cbr%20/%3EHeat%20the%20Oil%20in%20a%20heavy%20based%20pan,%20then%20fry%20the%20Onion,%20Celery%20and%20Garlic%20on%20a%20medium%20heat%20for%20about%205%20minutes,%20until%20the%20Onion%20is%20translucent.%20%20Next%20add%20the%20Carrot,%20Fresh%20Coriander%20Stalks%20and%20Potato%20and%20continue%20to%20cook%20for%20another%205%20minutes.%20%20Add%20the%20dried%20Spices%20and%20stir%20into%20the%20vegetables%20so%20that%20they're%20all%20nicely%20coated,%20then%20add%20the%20Stock%20and%20Bay%20Leaves,%20bring%20to%20the%20boil,%20then%20simmer%20for%20about%2030%20minutes,%20until%20the%20vegetables%20are%20tender.%3Cbr%20/%3E%3Cbr%20/%3ELet%20it%20cool%20down%20a%20bit,%20then%20blend%20until%20you%20have%20a%20nice%20smooth%20soup.%20%20Add%20the%20remaining%20Fresh%20Coriander%20Leaves%20and%20gently%20reheat%20the%20soup%20(without%20boiling).%20%20My%20soup%20was%20darker%20than%20I'd%20like,%20so%20added%20about%20half%20a%20cup%20of%20Semi-Skimmed%20Milk%20at%20the%20end%20to%20lighten%20the%20colour%20a%20little,%20but%20this%20is%20definitely%20optional.)
Guinness Shepherd's Pie (Guinness Cottage Pie for the Pedants) 6 Jan 2008 8:41 AM (17 years ago)


I'm not going to be drawn into any arguments of whether something is Shepherd's Pie or Cottage Pie. For me, if it is made from mince from either lamb or beef, with a few vegetables perhaps, and covered with mash potato, it is Shepherd's Pie, and I'm one of the biggest pedants around.
I don't make Shepherd's Pie that often, although it is definitely a favourite of mine. I'm not sure where I learnt how to make it, although it's like that I got it from my mum. However, the other day I saw one of the super-quick Gordon Ramsay recipes on the 'F-Word' compilation they put on over Christmas, and was interested in his alternative methods to the way I make it. Plus, I thought it would definitely make a nice, warming dish with it feeling like snow will fall at any minute.
There are a lot of things I like about Gordon Ramsay, and probably as much that I dislike about him. I haven't had the opportunity to sample his cooking first hand, but he does make a good TV series and provide welcome entertainment along with his annoying quirks. 'Yes?' Still, looking at the results of his Shepherd's Pie, I thought I might try something similar, although where he used Red Wine, I used Guinness. I'm thinking that next time I might try both together as it was such a good combination in the past, but still, I was very satisfied with the result, although I did probably add a few more ingredients than Gordon Ramsay suggested after careful tasting during cooking.
The main differences between his and my version were that with his, the mince was cooked first with the garlic, without the addition of any oil or anything, then, the grated onion and carrot added once it was lightly browned. I quite like little cubes of carrot and peas in my Shepherd's Pie (although Ramsay didn't even bother adding peas, and so he's obviously a bit of a peasant), but this time, I went with grating the carrot along with the onion just to see how the texture of the finished filling differed. I must say, it was nice, but probably immensely improved because of the peas which I added. Ramsay also stuck a couple of egg yolks into his mash, something I've seen other chefs do also, but have no idea why. All the same, I added them myself, just to see if I could work out what the difference was. I'm still not sure, but the mash was good. I pushed the potatoes through my sieve for a change, and the resultant mash was probably the smoothest I've ever made.
Recipe for Guinness Shepherd's Pie (Serves 4)
For the Filling- 454g Lean Steak Mince
- 2 cloves of Garlic, finely chopped
- 2 large Onions, grated
- 3 large Carrots, grated
- 1 tablespoon Concentrated Tomato Purée
- 1 tablespoon Tomato Ketchup
- 2 tablespoons Worcestershire Sauce
- 1 teaspoon Dijon Mustard
- 2 teaspoons Dried Thyme
- 1 teaspoon Dried Oregano
- 1 Beef Stock Cube
- 1 bottle of Guinness
- 1 cup Peas
- Salt and Fresh Ground Pepper
For the Mash
- 1.5kg Vivaldi Potatoes (or other potatoes suitable for mash)
- 100g Parmesan Cheese
- 25g Butter
- 2 Egg Yolks
- Black Pepper
So, discarding my previous recipes on Shepherd's Pie, take a heavy bottom pan and brown off the Mince at a medium heat. There should be enough fat and liquid still in the mince to let this cook easily without additional oil, etc. Once there is a little liquid in the pan from the Mince, add the Garlic and continue to cook and stir until the mince is lightly browned all over. Then add the Onion and Carrot and continue cook for a further 5 minutes, stirring occasionally. Next add the Tomato Purée, Ketchup, Worcestershire Sauce, Dijon Mustard, Thyme and Oregano and crumble in the Stock Cube. Stir well and cooking for a further few minutes before adding the Bottle of Guinness. The Guinness should help you de-glaze the pan of any burnt pieces of Mince from the bottom. Stir in the peas, then, cover the pan and leave to simmer until nearly all the liquid has disappeared.
While the filling is simmering, peel, boil and drain the potatoes. Mash the potato with the Butter and most of the Parmesan, reserving some to be sprinkled over the top of the Shepherd's Pie before the final cooking in the oven.
Once the filling is nice and thick, with the Onions and Carrot almost completely disintegrated into the Mince, and nearly all the liquid disappeared, put it into the bottom of roasting dish, then leave to cool for about 20 minutes, so that the filling has solidified slightly. Then cover with the Mash Potato, stripe with a fork and put the final layer of Parmesan and Fresh Ground Black Pepper over the top. Put in a preheated 200 degree Celsius oven for about 25 minutes until the top is golden, then serve.
Jhinge Ka Pulao (Spicy Prawns and Rice) 31 Dec 2007 9:24 AM (17 years ago)


Since discovering the wealth of recipes to be found on the web, especially those published on many of the food blogs I now regularly read, I find that I hardly ever feel to the need to seek out a recipe book. That said, I do like to occasionally flick through one of my few recipe books at the weekend to get ideas for meals. This Christmas, I received another two books, both with good flick-through properties and today, I decided to give one of the recipes I found a try.
My sister got me The Indian Kitchen by Monisha Bharadwaj, a really interesting book, with more emphasis on the ingredients, rather than the recipes themselves. Definitely a nice format for a book of this kind, and with lots of nice photos and illustrations too. There’s more than one ingredient mentioned that I’d never even heard of, and so I decided to make one of the easiest recipes, for which I had all the required spices already, just to be on the safe side. I also added some peas which weren’t in the original recipe.
This really was a quick and easy recipe, and I can definitely see myself making this one fairly often. Still, I’m going to have to go ingredient hunting soon to try out some of the others.
Recipe for Jhinge Ka Pulao (Serves 2)
- 2 tablespoons of Sunflower Oil
- 1 teaspoon Cumin Seeds
- 1 medium Onion, finely chopped
- 4 cloves of Garlic, minced
- Thumb of Ginger, minced
- 200g Uncooked Prawns, shelled and de-veined
- 1 cup of Basmati Rice
- 3 tablespoons of Tomato Ketchup
- 1 teaspoon of Turmeric
- 1 teaspoon of Chili Powder
- 1 teaspoon of Ground Coriander
- Half teaspoon of Salt
- 1.5 cups of Hot Water
- 1 cup of Peas
- 3 tablespoons of Fresh Coriander, finely chopped
Using a heavy bottomed pan (with a lid), heat up the oil, add the Cumin Seeds, and when they begin to pop, add the Onion, Garlic and Ginger. Fry for about 5 minutes until starting to brown. Then add the prawns and cook until translucent. Next put in the rice and stir in until all the rice is shiny. Drop in the powdered spices, salt and Tomato Ketchup and stir in well before adding a little water to help deglaze the pan, then the rest of it. The whole thing should be brought to a simmer, then covered until the rice is cooked and has absorbed the liquid. Stir once or twice using a wooden spoon during this time. Finally, stir in the Fresh Coriander and serve.
%26bodytext%3D%3Ca%20href%3D%22https://blogger.googleusercontent.com/img/b/R29vZ2xl/AVvXsEgRrHk55LPrQAlND9YcPVqQVxQUk-MdtInPKhVeh9_3Fk4va0JP5qKlz7IMyLugunlCC2ZKzetNrAN0QO_yAGpQIw9ySil7TbFb2FQBDhQ2Cvp3fnsaBm27PHTI0vHrFpKQeyqDKIiKd7JJ/s1600-h/IMG_0894_2.jpg%22%3E%3Cimg%20style%3D%22margin:%200px%20auto%2010px;%20display:%20block;%20text-align:%20center;%20cursor:%20pointer;%22%20src%3D%22https://blogger.googleusercontent.com/img/b/R29vZ2xl/AVvXsEgRrHk55LPrQAlND9YcPVqQVxQUk-MdtInPKhVeh9_3Fk4va0JP5qKlz7IMyLugunlCC2ZKzetNrAN0QO_yAGpQIw9ySil7TbFb2FQBDhQ2Cvp3fnsaBm27PHTI0vHrFpKQeyqDKIiKd7JJ/s400/IMG_0894_2.jpg%22%20alt%3D%22%22%20id%3D%22BLOGGER_PHOTO_ID_5150205584251028882%22%20border%3D%220%22%20/%3E%3C/a%3E%3Cbr%20/%3ESince%20discovering%20the%20wealth%20of%20recipes%20to%20be%20found%20on%20the%20web,%20especially%20those%20published%20on%20many%20of%20the%20food%20blogs%20I%20now%20regularly%20read,%20I%20find%20that%20I%20hardly%20ever%20feel%20to%20the%20need%20to%20seek%20out%20a%20recipe%20book.%20%20That%20said,%20I%20do%20like%20to%20occasionally%20flick%20through%20one%20of%20my%20few%20recipe%20books%20at%20the%20weekend%20to%20get%20ideas%20for%20meals.%20This%20Christmas,%20I%20received%20another%20two%20books,%20both%20with%20good%20flick-through%20properties%20and%20today,%20I%20decided%20to%20give%20one%20of%20the%20recipes%20I%20found%20a%20try.%3Cbr%20/%3E%3Cbr%20/%3EMy%20sister%20got%20me%20%3Ca%20type%3D%22amzn%22%20asin%3D%221856266591%22%3EThe%20Indian%20Kitchen%20by%20Monisha%20Bharadwaj%3C/a%3E,%20a%20really%20interesting%20book,%20with%20more%20emphasis%20on%20the%20ingredients,%20rather%20than%20the%20recipes%20themselves.%20%20Definitely%20a%20nice%20format%20for%20a%20book%20of%20this%20kind,%20and%20with%20lots%20of%20nice%20photos%20and%20illustrations%20too.%20%20There%E2%80%99s%20more%20than%20one%20ingredient%20mentioned%20that%20I%E2%80%99d%20never%20even%20heard%20of,%20and%20so%20I%20decided%20to%20make%20one%20of%20the%20easiest%20recipes,%20for%20which%20I%20had%20all%20the%20required%20spices%20already,%20just%20to%20be%20on%20the%20safe%20side.%20%20I%20also%20added%20some%20peas%20which%20weren%E2%80%99t%20in%20the%20original%20recipe.%20%3Cbr%20/%3E%3Cbr%20/%3EThis%20really%20was%20a%20quick%20and%20easy%20recipe,%20and%20I%20can%20definitely%20see%20myself%20making%20this%20one%20fairly%20often.%20%20Still,%20I%E2%80%99m%20going%20to%20have%20to%20go%20ingredient%20hunting%20soon%20to%20try%20out%20some%20of%20the%20others.%3Cbr%20/%3E%3Ch2%3ERecipe%20for%20Jhinge%20Ka%20Pulao%20(Serves%202)%3C/h2%3E%3Cul%3E%3Cli%3E2%20tablespoons%20of%20Sunflower%20Oil%3C/li%3E%3Cli%3E1%20teaspoon%20Cumin%20Seeds%3C/li%3E%3Cli%3E1%20medium%20Onion,%20finely%20chopped%3C/li%3E%3Cli%3E4%20cloves%20of%20Garlic,%20minced%3C/li%3E%3Cli%3EThumb%20of%20Ginger,%20minced%3C/li%3E%3Cli%3E200g%20Uncooked%20Prawns,%20shelled%20and%20de-veined%3C/li%3E%3Cli%3E1%20cup%20of%20Basmati%20Rice%3C/li%3E%3Cli%3E3%20tablespoons%20of%20Tomato%20Ketchup%3C/li%3E%3Cli%3E1%20teaspoon%20of%20Turmeric%3C/li%3E%3Cli%3E1%20teaspoon%20of%20Chili%20Powder%3C/li%3E%3Cli%3E1%20teaspoon%20of%20Ground%20Coriander%3C/li%3E%3Cli%3EHalf%20teaspoon%20of%20Salt%3C/li%3E%3Cli%3E1.5%20cups%20of%20Hot%20Water%3C/li%3E%3Cli%3E1%20cup%20of%20Peas%3C/li%3E%3Cli%3E3%20tablespoons%20of%20Fresh%20Coriander,%20finely%20chopped%3C/li%3E%3C/ul%3E%3Cbr%20/%3EUsing%20a%20heavy%20bottomed%20pan%20(with%20a%20lid),%20heat%20up%20the%20oil,%20add%20the%20Cumin%20Seeds,%20and%20when%20they%20begin%20to%20pop,%20add%20the%20Onion,%20Garlic%20and%20Ginger.%20%20Fry%20for%20about%205%20minutes%20until%20starting%20to%20brown.%20%20Then%20add%20the%20prawns%20and%20cook%20until%20translucent.%20%20Next%20put%20in%20the%20rice%20and%20stir%20in%20until%20all%20the%20rice%20is%20shiny.%20%20Drop%20in%20the%20powdered%20spices,%20salt%20and%20Tomato%20Ketchup%20and%20stir%20in%20well%20before%20adding%20a%20little%20water%20to%20help%20deglaze%20the%20pan,%20then%20the%20rest%20of%20it.%20%20The%20whole%20thing%20should%20be%20brought%20to%20a%20simmer,%20then%20covered%20until%20the%20rice%20is%20cooked%20and%20has%20absorbed%20the%20liquid.%20%20Stir%20once%20or%20twice%20using%20a%20wooden%20spoon%20during%20this%20time.%20%20Finally,%20stir%20in%20the%20Fresh%20Coriander%20and%20serve.)
Beef Kerala, or maybe just Beef Curry Stew 3 Dec 2007 5:03 AM (17 years ago)

 I had various plans for cooking this weekend, but in the end, I decided I wanted something nice and warming, and with a bit of red meat for a change. Laura was going to come for dinner and didn't want to eat Lamb, so Beef it was. I really liked the Chicken Kerala recipe I made a few weeks ago, so decided to hunt the web for some ideas for a Beef equivalent.
I found a number of slightly different recipes, but which tended to follow the same theme, with one of the common differences between the Beef and Chicken variety being the addition of Black Mustard Seeds and Green Cardamom Pods. Also, none of them seemed to have as much in the way of vegetables, so I decided to add a bit of what I had, in this case, some Fresh Peas, a bit of Cauliflower, Carrots and Potatoes. This is where it tended towards a stew I think. This and the fact that after normal cooking time had completed, and after a little taste, I decided that the beef wasn't anything like as tender as I like it, so I decided to keep slow cooking it in the oven for a couple more hours which worked great.
The resulting dish was definitely a cross between a curry and one of my more traditional stews, but with a very different flavour. Still, it was missing something on the flavour front, but I'm just not sure what, so I will have to have a little of the leftovers later to try and figure it out. The taste was fine, but just something missing.
Recipe for Beef Kerala (Serves 6)
- 900g Casserole Steak (cubed)
- 8 cloves of Garlic (minced)
- 2" piece of Fresh Ginger (grated/minced)
- Half teaspoon of Salt
- Half teaspoon of Black Pepper
- 2 tablespoons of Vegetable Oil
- 4 Green Cardamom Pods (crushed)
- 1 teaspoon Black Mustard Seeds
- 5-6 Curry Leaves
- 3 Green Chillies (sliced)
- 3 Red Onions (sliced)
- 1 teaspoon of Ground Coriander
- 1 teaspoon of Ground Cumin
- 1 teaspoon of Chilli Powder
- Half teaspoon of Ground Turmeric
- 4 Tomatoes (chopped)
- 4 Potatoes (cubed)
- Half Head of Cauliflower (cut into small florets)
- 3 Carrots (julienned)
- 1 Cup Fresh Peas
- 400g Can of Coconut Milk
- 1 Teaspoon Garam Masala
First marinate the Beef in the Ginger, Garlic, Salt and Pepper for about an hour.
Heat up the oil in a heavy pan and add the Cardamom and Mustard Seeds. When they start popping, add in the Curry Leaves, stir for a minute, then the Chilli, stir for a minute, then the Onion and continue to cook until going golden. Put the Coriander, Cumin, Chilli and Turmeric into a small bowl and mix with some hot water to make a thin paste, then add this to the pan and stir well.
Next, add the Beef and continue to stir for about 10 minutes until the beef is browned all over, then throw in the tomatoes and continue to cook for a few minutes. At this point, I added the rest of the vegetables and a cup of hot water, covered, and allowed to cook for about 40 minutes at a simmer. Next add the Coconut Milk and Garam Masala. Stir in and simmer for a further 5 minutes without letting it boil.
At this point, most of the recipes said to serve it, but after finding a fairly tough piece of beef at the top, I decided to put it into a 150 degree Celsius cover for the next few hours and see how it came out. For me, this worked well, and the resulting curry/stew was definitely one to keep you warm in winter, plus I could imagine up a number of variations. I'm pretty sure none of the other recipes added much in the way of vegetables other than the Onion and Chilli, but the tomatoes I added as the Chicken version I'd made had used them, and as I wasn't doing any other vegetable side dishes to go with it, I felt it necessary to add some other vegetables in there.
Definitely a recipe I'm going to make again in future, even if only to see if I can figure out what the missing flavour was, if indeed there was any. I could just have been my imagination.
%3C/h2%3E%3Cul%3E%3Cli%3E900g%20Casserole%20Steak%20(cubed)%3C/li%3E%3Cli%3E8%20cloves%20of%20Garlic%20(minced)%3C/li%3E%3Cli%3E2%22%20piece%20of%20Fresh%20Ginger%20(grated/minced)%3C/li%3E%3Cli%3EHalf%20teaspoon%20of%20Salt%3C/li%3E%3Cli%3EHalf%20teaspoon%20of%20Black%20Pepper%3C/li%3E%3Cli%3E2%20tablespoons%20of%20Vegetable%20Oil%3C/li%3E%3Cli%3E4%20Green%20Cardamom%20Pods%20(crushed)%3C/li%3E%3Cli%3E1%20teaspoon%20Black%20Mustard%20Seeds%3C/li%3E%3Cli%3E5-6%20Curry%20Leaves%3C/li%3E%3Cli%3E3%20Green%20Chillies%20(sliced)%3C/li%3E%3Cli%3E3%20Red%20Onions%20(sliced)%3C/li%3E%3Cli%3E1%20teaspoon%20of%20Ground%20Coriander%3C/li%3E%3Cli%3E1%20teaspoon%20of%20Ground%20Cumin%3C/li%3E%3Cli%3E1%20teaspoon%20of%20Chilli%20Powder%3C/li%3E%3Cli%3EHalf%20teaspoon%20of%20Ground%20Turmeric%3C/li%3E%3Cli%3E4%20Tomatoes%20(chopped)%3C/li%3E%3Cli%3E4%20Potatoes%20(cubed)%3C/li%3E%3Cli%3EHalf%20Head%20of%20Cauliflower%20(cut%20into%20small%20florets)%3C/li%3E%3Cli%3E3%20Carrots%20(julienned)%3C/li%3E%3Cli%3E1%20Cup%20Fresh%20Peas%3C/li%3E%3Cli%3E400g%20Can%20of%20Coconut%20Milk%3C/li%3E%3Cli%3E1%20Teaspoon%20Garam%20Masala%3C/li%3E%3C/ul%3E%3Cbr%20/%3EFirst%20marinate%20the%20Beef%20in%20the%20Ginger,%20Garlic,%20Salt%20and%20Pepper%20for%20about%20an%20hour.%3Cbr%20/%3E%3Cbr%20/%3EHeat%20up%20the%20oil%20in%20a%20heavy%20pan%20and%20add%20the%20Cardamom%20and%20Mustard%20Seeds.%20%20When%20they%20start%20popping,%20add%20in%20the%20Curry%20Leaves,%20stir%20for%20a%20minute,%20then%20the%20Chilli,%20stir%20for%20a%20minute,%20then%20the%20Onion%20and%20continue%20to%20cook%20until%20going%20golden.%20%20Put%20the%20Coriander,%20Cumin,%20Chilli%20and%20Turmeric%20into%20a%20small%20bowl%20and%20mix%20with%20some%20hot%20water%20to%20make%20a%20thin%20paste,%20then%20add%20this%20to%20the%20pan%20and%20stir%20well.%3Cbr%20/%3E%3Cbr%20/%3ENext,%20add%20the%20Beef%20and%20continue%20to%20stir%20for%20about%2010%20minutes%20until%20the%20beef%20is%20browned%20all%20over,%20then%20throw%20in%20the%20tomatoes%20and%20continue%20to%20cook%20for%20a%20few%20minutes.%20%20At%20this%20point,%20I%20added%20the%20rest%20of%20the%20vegetables%20and%20a%20cup%20of%20hot%20water,%20covered,%20and%20allowed%20to%20cook%20for%20about%2040%20minutes%20at%20a%20simmer.%20%20Next%20add%20the%20Coconut%20Milk%20and%20Garam%20Masala.%20%20Stir%20in%20and%20simmer%20for%20a%20further%205%20minutes%20without%20letting%20it%20boil.%3Cbr%20/%3E%3Cbr%20/%3EAt%20this%20point,%20most%20of%20the%20recipes%20said%20to%20serve%20it,%20but%20after%20finding%20a%20fairly%20tough%20piece%20of%20beef%20at%20the%20top,%20I%20decided%20to%20put%20it%20into%20a%20150%20degree%20Celsius%20cover%20for%20the%20next%20few%20hours%20and%20see%20how%20it%20came%20out.%20%20For%20me,%20this%20worked%20well,%20and%20the%20resulting%20curry/stew%20was%20definitely%20one%20to%20keep%20you%20warm%20in%20winter,%20plus%20I%20could%20imagine%20up%20a%20number%20of%20variations.%20%20I'm%20pretty%20sure%20none%20of%20the%20other%20recipes%20added%20much%20in%20the%20way%20of%20vegetables%20other%20than%20the%20Onion%20and%20Chilli,%20but%20the%20tomatoes%20I%20added%20as%20the%20Chicken%20version%20I'd%20made%20had%20used%20them,%20and%20as%20I%20wasn't%20doing%20any%20other%20vegetable%20side%20dishes%20to%20go%20with%20it,%20I%20felt%20it%20necessary%20to%20add%20some%20other%20vegetables%20in%20there.%3Cbr%20/%3E%3Cbr%20/%3EDefinitely%20a%20recipe%20I'm%20going%20to%20make%20again%20in%20future,%20even%20if%20only%20to%20see%20if%20I%20can%20figure%20out%20what%20the%20missing%20flavour%20was,%20if%20indeed%20there%20was%20any.%20%20I%20could%20just%20have%20been%20my%20imagination.)
Thai Turkey Curry and Jasmin Rice 23 Nov 2007 4:27 AM (17 years ago)


I was going to title this "Thai Red Turkey Curry" due to the Red Curry Paste recipe I used, however, Dave reckoned my paste look nearly a green as the Green Thai Curry Paste which he had bought in Wing Yip. Personally, being slighltly colour blind, I'm probably not a good judge, but mine definitely looked more Red than Green. If anything, I would say that the bought Green Curry Paste was more Red (but I could be wrong).

Recipe for the Red Thai Curry Paste (enought for 2-3 curries)
- 50-60 Dried Bird Eye Red Chillies (whole)
- 1 tablespoon Coriander Seeds (toasted and crushed)
- 1 tablespoon Cumin Seeds (toasted and crushed)
- 3 stalks of Lemon Grass (chopped fine)
- 2" piece of Galangal (or Ginger if not available)
- 8 cloves of Garlic (chopped fine)
- 6 small shallots (chopped fine)
- 2 tablespoons Coriander Root, or white part at base of the stem (chopped fine)
- 6 Kaffir Lime Leaves
- Half teaspoon Turmeric
- 1 tablespoon Fish Sauce
- 1 teaspoon Shrimp Paste

Recipe for the Thai Turkey Curry (serves 4)
- 400g Turkey Steak (about 4 steaks, cut into bit-sized pieces)
- 1 Cauliflower (cut into small florets)
- 250g Fine Beans
- 1 Red Pepper
- 1 x 400g can of Coconut Milk
- 1-2 tablespoons Fish Sauce
- 1 tablespoon Palm Sugar
- The juice of half a Lime
- Fresh Coriander to Garnish
Chicken Kerala 11 Nov 2007 9:44 AM (17 years ago)


I have been craving curry recently. It has been a while since I made a curry of any description, although I have made few spicy soups. When searching around for recipes, I found this one on the BBC website by Manju Malhi which caught my attention, mainly because I had pretty much all the ingredients already to hand, and also because it looked particularly quick and easy to make.
This recipe tasted great, and was extremely easy to do. I tend to do all the preparations before I start cooking, that way I can just empty the various bowls of ingredients in, TV-style, as I'm going along. It means I have more bowls to wash up, but it helps me to not forget any ingredients and make sure things go into the pot when they're supposed to.
Recipe for Chicken Kerala (Serves 3-4)
- 4 tablespoons Groundnut Oil
- 1 Onion, sliced
- 3 Green Chillies, finely chopped, seeds and all
- 2" Root Ginger, finely grated
- 2 cloves of Garlic
- ¼ teaspoon Hot Chilli Powder
- 1 teaspoon Ground Coriander
- ½ teaspoon Ground Turmeric
- ½ teaspoon Salt
- 400g Skinless Chicken Breasts, cut into bite sized pieces
- 2 medium Tomatoes, roughly chopped
- 3-4 Potatos, cut into 3cm cubes
- 330ml Coconut Milk
- pinch of Garam Masala
I served this with Basmati Rice and garnished with some, maybe, overly browned shallots and curry leaves, however, for the photo, I just stuck a couple of Coriander leaves on top, because the shots with the onion just didn't look as nice.
%3C/h2%3E%3Cul%3E%3Cli%3E%20%20%20%20%20%20%204%20tablespoons%20Groundnut%20Oil%3C/li%3E%3Cli%3E1%20Onion,%20sliced%3C/li%3E%3Cli%3E3%20Green%20Chillies,%20finely%20chopped,%20seeds%20and%20all%3C/li%3E%3Cli%3E2%22%20Root%20Ginger,%20finely%20grated%3C/li%3E%3Cli%3E2%20cloves%20of%20Garlic%3C/li%3E%3Cli%3E%C2%BC%20teaspoon%20Hot%20Chilli%20Powder%3C/li%3E%3Cli%3E1%20teaspoon%20Ground%20Coriander%3C/li%3E%3Cli%3E%C2%BD%20teaspoon%20Ground%20Turmeric%3C/li%3E%3Cli%3E%C2%BD%20teaspoon%20Salt%3C/li%3E%3Cli%3E400g%20Skinless%20Chicken%20Breasts,%20cut%20into%20bite%20sized%20pieces%3C/li%3E%3Cli%3E2%20medium%20Tomatoes,%20roughly%20chopped%3C/li%3E%3Cli%3E3-4%20Potatos,%20cut%20into%203cm%20cubes%3C/li%3E%3Cli%3E330ml%20Coconut%20Milk%3C/li%3E%3Cli%3Epinch%20of%20Garam%20Masala%3C/li%3E%3C/ul%3EHeat%20up%203%20tablespoons%20of%20the%20oil%20in%20a%20heavy%20based%20pan%20and%20saute%20the%20Onion%20and%20Chilli%20for%20a%20few%20minutes.%20%20Then%20add%20the%20Ginger,%20Garlic,%20Chilli%20Powder,%20Coriander,%20Turmeric%20and%20Salt%20and%20stir%20into%20the%20Onions%20and%20once%20all%20covered,%20add%20the%20Chicken%20and%20fry%20gently%20for%20about%208-10%20minutes.%20%20If%20the%20pan%20gets%20too%20dry%20and%20stuff%20starts%20to%20stick%20to%20the%20bottom,%20add%20a%20dash%20of%20water.%20%20Next%20add%20the%20Tomato%20and%20Potato%20and%20stir%20in%20for%20another%20couple%20of%20minutes%20before%20adding%20about%20a%20third%20of%20the%20Coconut%C2%A0Milk%C2%A0along%20with%20about%20200ml%20of%20boiling%20water.%20%20Leave%20to%20simmer%20for%20about%206%20minutes,%20then%20add%20the%20remaining%20Coconut%20Milk%20and%20further%20simmer%20for%20about%2010%20minutes%20until%20the%20potato%20and%20chicken%20are%20cooked.%20%20Then%20sprinkle%20of%20the%20pinch%20of%20Garam%20Masala.%3Cbr%20/%3E%3Cbr%20/%3EI%20served%20this%20with%20Basmati%20Rice%20and%20garnished%20with%20some,%20maybe,%20overly%20browned%20shallots%20and%20curry%20leaves,%20however,%20for%20the%20photo,%20I%20just%20stuck%20a%20couple%20of%20Coriander%20leaves%20on%20top,%20because%20the%20shots%20with%20the%20onion%20just%20didn't%20look%20as%20nice.)
Lasagne Bolognese 3 Nov 2007 8:02 AM (17 years ago)

I made my first ever Lasagne only a few months ago, and it was a great success with those who tasted it, although improvements could be made. For one, I think there was too much pasta in the last one. I had some dried Lasagne in the cupboard this time, so decided to give that a try, even though the Lasagne recipe in The Silver Spoon places it firmly in the Fresh Pasta section. The stuff I had claimed that it did not need any pre-preparation, however, this was not the case, and the top layer which was made with this stuff just didn't work properly at all, which was a shame, because the Bechamel topped with a generous amount of Parmesan on the top tasted great. Just slightly spoilt by the hard pieces of pasta underneath.
 When talking with friends about making Lasagne over the last week, it seems that everyone has their way of doing it, but you can divide most of them into two camps: those who pre-cook the pasta, then put a layer on the bottom of the dish, and those who don't pre-cook the pasta, and put a layer of Ragu on the bottom. After the way mine went today, I'm definitely going to stick with using Fresh Pasta, slightly pre-cooked and with a layer at the bottom of the dish.
The Ragu was my pretty much standard recipe, i.e. St Paddy's Bolognese but without the Guinness, although the Silver Spoon suggests uses Passata rather than Chopped Tomatoes. I did this last time, but I forgot to get some in this time, so the Chopped Tomatoes had to do. The length of time I cook the Ragu, I doubt it makes much of a difference.
Recipe for the Ragu Alla Bolognese
- 400g Lean Minced Beef
- 200g Pancetta, cubed (Smoked bacon, normal or streaky, can also be used as long as it's cut into small pieces)
- 1-2 tablespoons Olive Oil
- 1 ½ large onions, chopped
- 3 ribs of celery finely diced
- 3 carrots finely diced
- 2 cloves of garlic, crushed
- 1 glass of Red Wine
- 1 tablespoon Worcestershire sauce
- 1 x 400g can of Chopped Tomatoes
- 1 tablespoon Concentrated Tomato Puree
- 1 teaspoon Fish Sauce
- 1 teaspoon Oregano
- 1 teaspoon Thyme
- ½ teaspoon Hot Chili Powder
- 2 Bay Leaves
- Freshly ground Black Pepper (to taste)
Recipe for the Bechamel Sauce
- 3 Tablespoons Butter
- 3 Tablespoons Plain Flour
- 1.5 Pints of Milk
- Half an Onion
- 6 Black Peppercorns
- Pinch of Freshly Grated Nutmeg
- Salt and Pepper to Taste
First simmer the milk for about 20 minutes with the Onion, Peppercorns and Nutmeg, then strain it through a sieve to remove the bits. Next melt the butter in a pan, add the floor and cook briefly before gradually adding the milk, stirring all the time. Using a whisk later on helps keep the lumps out, but you shouldn't stop stirring until the floor is properly cooked. Add a little Salt and Pepper to taste.

Now, in a greased roasting dish, arrange a layer of Pasta on the bottom of the dish, then spread over a layer of Ragu, more Pasta, layer of Bechamel Sauce with a little Fresh Mozzarella if you wish, then Pasta, Ragu, etc. Keep layering until all the ingredients are used, finishing with a layer of Bechamel Sauce on the top. Next add a good covering of Parmesan Cheese and a little Freshly Ground Black Pepper.
The Lasagne should then be cooked in a pre-heated oven at about 200 degree Celsius for about 30-40 minutes. Let it rest for about 10 minutes before cutting and serving.

Chicken, Bacon and Vegetable Soup 1 Nov 2007 12:13 PM (17 years ago)


This recipe came about because I had bought 10 very cheap chicken drumsticks, plus had promised I'd bring Rich some soup into the office once I had a flask to bring it in. It possibly wasn't the best soup to take to work in a flask, but it did go down well.
I had simply roasted the Drumsticks in my new combination oven for 30 minutes or so, then stripped the best of the meat off them, and put the remains and bones into a large pan of water with some celery leaves, onion, carrot and bay leaves and simmered for a few hours to make a stock. Half the chicken I used a Pasta Bake, saving the other half for this soup.
I pretty much did exactly what I did with my Leek and Potato Soup Recipe, only adding Celery and more Carrot than I would normally use, plus the Home-Made Stock, Chicken and Bacon. The Bacon was a bit of an afterthought as I discovered a few rashers which needed using up, but it definitely added nicely to the flavour.
Recipe for Chicken, Bacon and Vegetable Soup (Serves 4-6)
- 5 Roasted Chicken Drumsticks (Skin and Bone removed, or equivalent amount of Chicken Breast)
- 4 Thick Rashers of Smoked Bacon (Cut into small pieces)
- 2 Leeks (Chopped)
- 2 Stalks of Celery (Cubbed)
- 3-4 Carrots (Cubbed)
- 2 Potatoes (Cubbed)
- 2 Bay Leaves
- Salt and Black Pepper to Taste
- 1 Pint Chicken Stock
- 0.5 Pint Swiss Marigold Vegetable Bouillon
Melt a little butter in a pan and add the vegetables, keeping the heat low so that they soften without burning. After about 15-20 minutes add the Stock, Chicken, Bacon and Bay Leaves and bring to a simmer. Personally, I like quite a bit of Black Pepper, so I add quite a bit at this time so that it gets time to flavour the soup. Cover and let simmer for about 40 minutes. Taste the soup and season with more Salt and Pepper if necessary.
%3C/h2%3E%3Cul%3E%3Cli%3E5%20Roasted%20Chicken%20Drumsticks%20(Skin%20and%20Bone%20removed,%20or%20equivalent%20amount%20of%20Chicken%20Breast)%3C/li%3E%3Cli%3E4%20Thick%20Rashers%20of%20Smoked%20Bacon%20(Cut%20into%20small%20pieces)%3C/li%3E%3Cli%3E2%20Leeks%20(Chopped)%3C/li%3E%3Cli%3E2%20Stalks%20of%20Celery%20(Cubbed)%3C/li%3E%3Cli%3E3-4%20Carrots%20(Cubbed)%3C/li%3E%3Cli%3E2%20Potatoes%20(Cubbed)%3C/li%3E%3Cli%3E2%20Bay%20Leaves%3C/li%3E%3Cli%3ESalt%20and%20Black%20Pepper%20to%20Taste%3C/li%3E%3Cli%3E1%20Pint%20Chicken%20Stock%3C/li%3E%3Cli%3E0.5%20Pint%20Swiss%20Marigold%20Vegetable%20Bouillon%3C/li%3E%3C/ul%3E%3Cbr%20/%3EMelt%20a%20little%20butter%20in%20a%20pan%20and%20add%20the%20vegetables,%20keeping%20the%20heat%20low%20so%20that%20they%20soften%20without%20burning.%20%20After%20about%2015-20%20minutes%20add%20the%20Stock,%20Chicken,%20Bacon%20and%20Bay%20Leaves%20and%20bring%20to%20a%20simmer.%20%20Personally,%20I%20like%20quite%20a%20bit%20of%20Black%20Pepper,%20so%20I%20add%20quite%20a%20bit%20at%20this%20time%20so%20that%20it%20gets%20time%20to%20flavour%20the%20soup.%20%20Cover%20and%20let%20simmer%20for%20about%2040%20minutes.%20%20Taste%20the%20soup%20and%20season%20with%20more%20Salt%20and%20Pepper%20if%20necessary.)
Toad in the Hole with Browned Onion Gravy 14 Oct 2007 10:58 AM (18 years ago)


This is not a recipe I make very often, but it's one of those meals I loved during childhood. I've never really had a problem making it, except last time, when my oven wasn't great. This weekend, I had some chipolatas to use up and decided I'd give it a try with them. Not the healthiest of meals by any stretch, but for me, definitely comfort food. So as to not be disappointed like last time, I went about things slightly differently.
For one thing, I used a much better oven, and took a lot more care over the batter mix (sifted the flour, and whisked rather than blended it). I also spent longer over making the onion gravy, getting the onions really browned and cooking that bit longer.
The Batter Mix was modified after reading Nigel Slater's recipe as the idea of adding Wholegrain Mustard to it sounded appealing, although peeling the sausages and wrapping them in thinly sliced ham seemed to be taking it a little too far, especially considering the sausages I was using.
All in all, it came out pretty nicely I think. The gravy was especially nice, and definitely worth the additional time I spent on browning the Onions well.
Recipe for the Browned Onion Gravy
- 2 Large Onions, finely sliced
- 2 Tablespoons Butter
- 2 Tablespoons Plain Flour
- 2 Tablespoons Worcester Sauce
- 2 Teaspoons Dijon Mustard
- 1 Pint Swiss Marigold Vegetable Stock
- 1 Glass Red Wine
- Fresh Ground Black Pepper
Browning the Onions nicely takes a while, so I started making the Gravy before making the Toad in the Hole, then reheated when everything was ready. Using a large heavy based pan (with a lid), melt the butter at a fairly low heat and add the sliced Onion. Continue to cook uncovered until they turn golden, then cover and continue to cook at a low heat until they go brown. Covering them keeps in the moisture so that they can caramelize nicely without drying out.
Once they are nicely browned, add the flour and stir into the onions. Then stir in the mustard and start adding the liquid ingredients. Gently bring to the boil, then simmer, stirring occasionally for about another 15-20 minutes. Taste and adjust seasonings as necessary.
Recipe for the Toad in the Hole
- 454g Sausages (preferably nice Lincolnshire or Cumberland)
- 4 Rashers Smoked Bacon, cubed
- 1 Cup Plain Flour
- 2/3 Cup Milk
- 2/3 Cup Cold Water
- 2 Eggs
- 2 Teaspoons Wholegrain Mustard
- Salt and Fresh Ground Black Pepper
Preheat the oven to 230 degrees Celsius, put the sausages and bacon into your roasting tin/dish and cook for 10 minutes. At this point, you can sift the flour and mix together the ingredients for the Batter. Whisk until you have a smooth batter with no lumps except for the grains from the Mustard and there is a layer of fine bubbles on the top.
Remove the sausages from the dish, leaving the fat which has come out from them, add a little more oil so that you have about 4 tablespoons in total, then return to the oven until the oil is smoking. Depending on what you're using to cook it in, you could do this directly on a stove. Once it is really hot, pour in the batter, then add the Sausages and Bacon and put straight in the oven and cook for about 30 minutes, so that the Batter has risen nicely and is golden brown.
Serve immediately, with Mash Potato and some other vegetables, and, of course, the Onion Gravy.

.%20I%20also%20spent%20longer%20over%20making%20the%20onion%20gravy,%20getting%20the%20onions%20really%20browned%20and%20cooking%20that%20bit%20longer.%20%3C/p%3E%3Cp%3EThe%20Batter%20Mix%20was%20modified%20after%20reading%20%3Ca%20href%3D%22http://www.west175productions.com/Great_Food/recipes/recipe033.htm%22%3ENigel%20Slater's%20recipe%3C/a%3E%20as%20the%20idea%20of%20adding%20Wholegrain%20Mustard%20to%20it%20sounded%20appealing,%20although%20peeling%20the%20sausages%20and%20wrapping%20them%20in%20thinly%20sliced%20ham%20seemed%20to%20be%20taking%20it%20a%20little%20too%20far,%20especially%20considering%20the%20sausages%20I%20was%20using.%3C/p%3E%3Cp%3EAll%20in%20all,%20it%20came%20out%20pretty%20nicely%20I%20think.%20The%20gravy%20was%20especially%20nice,%20and%20definitely%20worth%20the%20additional%20time%20I%20spent%20on%20browning%20the%20Onions%20well.%20%3C/p%3E%3Ch2%3ERecipe%20for%20the%20Browned%20Onion%20Gravy%3C/h2%3E%3Cul%3E%3Cli%3E2%20Large%20Onions,%20finely%20sliced%3C/li%3E%3Cli%3E2%20Tablespoons%20Butter%3C/li%3E%3Cli%3E2%20Tablespoons%20Plain%20Flour%3C/li%3E%3Cli%3E2%20Tablespoons%20Worcester%20Sauce%3C/li%3E%3Cli%3E2%20Teaspoons%20Dijon%20Mustard%3C/li%3E%3Cli%3E1%20Pint%20Swiss%20Marigold%20Vegetable%20Stock%3C/li%3E%3Cli%3E1%20Glass%20Red%20Wine%3C/li%3E%3Cli%3EFresh%20Ground%20Black%20Pepper%3C/li%3E%3C/ul%3E%3Cp%3EBrowning%20the%20Onions%20nicely%20takes%20a%20while,%20so%20I%20started%20making%20the%20Gravy%20before%20making%20the%20Toad%20in%20the%20Hole,%20then%20reheated%20when%20everything%20was%20ready.%20Using%20a%20large%20heavy%20based%20pan%20(with%20a%20lid),%20melt%20the%20butter%20at%20a%20fairly%20low%20heat%20and%20add%20the%20sliced%20Onion.%20Continue%20to%20cook%20uncovered%20until%20they%20turn%20golden,%20then%20cover%20and%20continue%20to%20cook%20at%20a%20low%20heat%20until%20they%20go%20brown.%20Covering%20them%20keeps%20in%20the%20moisture%20so%20that%20they%20can%20caramelize%20nicely%20without%20drying%20out.%3C/p%3E%3Cp%3EOnce%20they%20are%20nicely%20browned,%20add%20the%20flour%20and%20stir%20into%20the%20onions.%20Then%20stir%20in%20the%20mustard%20and%20start%20adding%20the%20liquid%20ingredients.%20Gently%20bring%20to%20the%20boil,%20then%20simmer,%20stirring%20occasionally%20for%20about%20another%2015-20%20minutes.%20Taste%20and%20adjust%20seasonings%20as%20necessary.%3C/p%3E%3Ch2%3ERecipe%20for%20the%20Toad%20in%20the%20Hole%3C/h2%3E%3Cul%3E%3Cli%3E454g%20Sausages%20(preferably%20nice%20Lincolnshire%20or%20Cumberland)%3C/li%3E%3Cli%3E4%20Rashers%20Smoked%20Bacon,%20cubed%3C/li%3E%3Cli%3E1%20Cup%20Plain%20Flour%3C/li%3E%3Cli%3E2/3%20Cup%20Milk%3C/li%3E%3Cli%3E2/3%20Cup%20Cold%20Water%3C/li%3E%3Cli%3E2%20Eggs%3C/li%3E%3Cli%3E2%20Teaspoons%20Wholegrain%20Mustard%3C/li%3E%3Cli%3ESalt%20and%20Fresh%20Ground%20Black%20Pepper%3C/li%3E%3Cbr%20/%3E%3C/ul%3E%3Cp%3EPreheat%20the%20oven%20to%20230%20degrees%20Celsius,%20put%20the%20sausages%20and%20bacon%20into%20your%20roasting%20tin/dish%20and%20cook%20for%2010%20minutes.%20At%20this%20point,%20you%20can%20sift%20the%20flour%20and%20mix%20together%20the%20ingredients%20for%20the%20Batter.%20Whisk%20until%20you%20have%20a%20smooth%20batter%20with%20no%20lumps%20except%20for%20the%20grains%20from%20the%20Mustard%20and%20there%20is%20a%20layer%20of%20fine%20bubbles%20on%20the%20top.%3C/p%3E%3Cp%3ERemove%20the%20sausages%20from%20the%20dish,%20leaving%20the%20fat%20which%20has%20come%20out%20from%20them,%20add%20a%20little%20more%20oil%20so%20that%20you%20have%20about%204%20tablespoons%20in%20total,%20then%20return%20to%20the%20oven%20until%20the%20oil%20is%20smoking.%20Depending%20on%20what%20you're%20using%20to%20cook%20it%20in,%20you%20could%20do%20this%20directly%20on%20a%20stove.%20Once%20it%20is%20really%20hot,%20pour%20in%20the%20batter,%20then%20add%20the%20Sausages%20and%20Bacon%20and%20put%20straight%20in%20the%20oven%20and%20cook%20for%20about%2030%20minutes,%20so%20that%20the%20Batter%20has%20risen%20nicely%20and%20is%20golden%20brown.%20%3C/p%3E%3Cp%3EServe%20immediately,%20with%20Mash%20Potato%20and%20some%20other%20vegetables,%20and,%20of%20course,%20the%20Onion%20Gravy.%3Cbr%20/%3E%3C/p%3E%3Cbr%20/%3E%3Cbr%20/%3E%3Ca%20href%3D%22https://blogger.googleusercontent.com/img/b/R29vZ2xl/AVvXsEgxQRoc9AE8PQ90x3QnKwl2eeoKvc_lZSF4x9NY1T3ViO5fco1v-QAWDeLkExxWoURNu6qURP99WQ6bAramwMiQ5-qbRapuk7u-aC8qlSnmJaUhU-Th2QA9pPsrRVuL8emPnCTvYR7E5WcT/s1600-h/IMG_1061.JPG%22%3E%3Cimg%20id%3D%22BLOGGER_PHOTO_ID_5121274304747576946%22%20style%3D%22DISPLAY:%20block;%20MARGIN:%200px%20auto%2010px;%20CURSOR:%20hand;%20TEXT-ALIGN:%20center%22%20alt%3D%22%22%20src%3D%22https://blogger.googleusercontent.com/img/b/R29vZ2xl/AVvXsEgxQRoc9AE8PQ90x3QnKwl2eeoKvc_lZSF4x9NY1T3ViO5fco1v-QAWDeLkExxWoURNu6qURP99WQ6bAramwMiQ5-qbRapuk7u-aC8qlSnmJaUhU-Th2QA9pPsrRVuL8emPnCTvYR7E5WcT/s400/IMG_1061.JPG%22%20border%3D%220%22%20/%3E%3C/a%3E)