Paint Cute Pumpkin Pie Wall Art 28 Oct 6:24 PM (2 days ago)
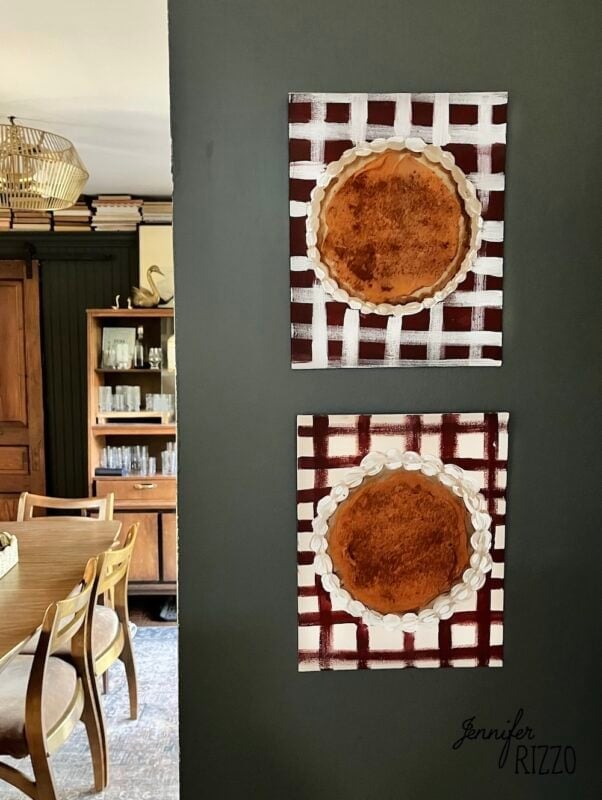
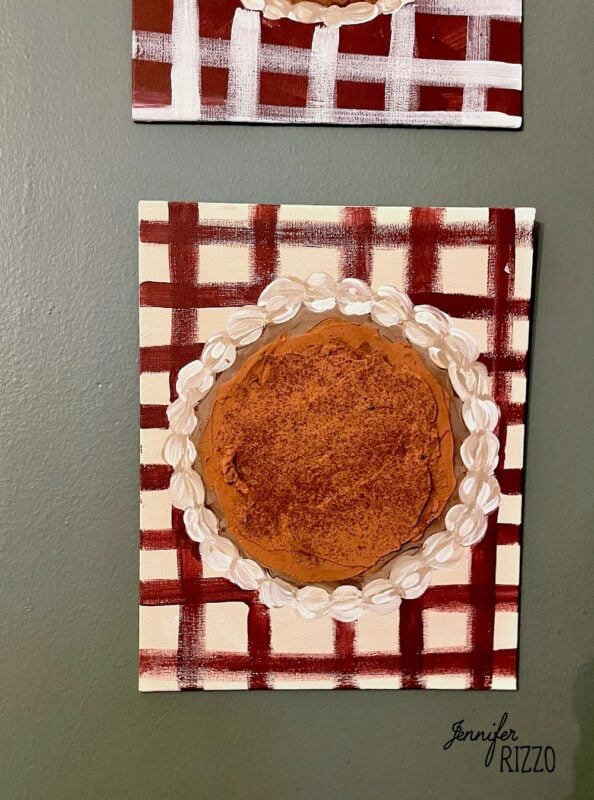
Who doesn’t love really cute wall art? I know I do! Once Halloween is over, everyone seems to jump right on Christmas and forget all about Fall and Thanksgiving. What if you could make really cute kitchen wall art for your Thanksgiving gathering? I gotcha! These pumpkin pie wall art canvases are textured and have 3-D element that are fun to make and hang. They are even finished off with a sprinkle of real cinnamon! The tutorial below for painting your pumpkin pie wall art will lead you through step by step! In this tutorial you are going to see me add the background afterwards in the example, but I recommend you paint it at the beginning and then draw the pie over the top.
This post contains affiliate links. See our sponsor and affiliate disclosure here.
Supplies to Create Your Own Pumpkin Pie Wall Art:
Find all of the supplies here on Amazon
–Love Frosting Dimensional Paint
–Acrylic Craft Paint. For these canvases I used DecoArt’s Americana Acrylics in Spiced Pumpkin, Titanium White, Fawn, Chocolate Brown, Heritage Brick, Oyster Beige
–Canvas Board (11 x 14 or 8 x 10)
–Paint Brushes
–Cinnamon (the ground spice)
–Saw Tooth Hangers
–Angled Palette Knife
–Low Temp Hot Glue Gun
–White craft glue
–Flat brush and angled paint brush
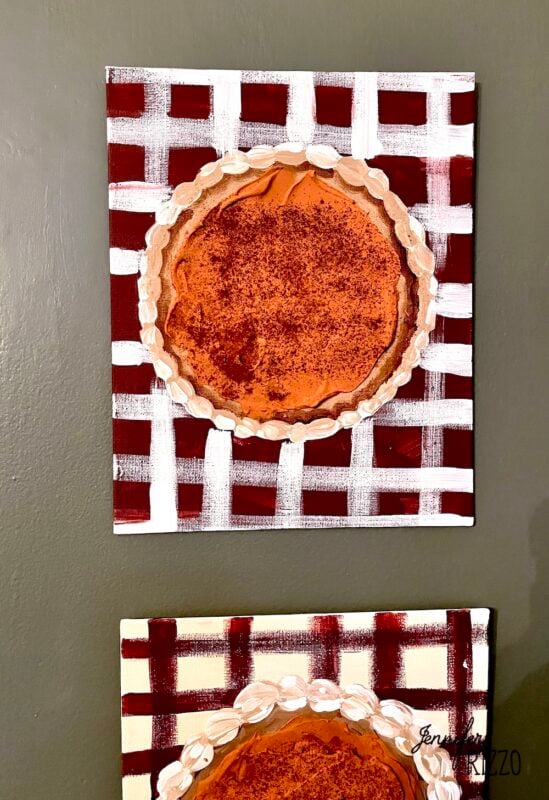
Base Coat The Canvases and Paint the Background
I wanted to paint two canvases with opposite plaid-style backgrounds, so I base coated one canvas board in Oyster beige paint and the other in Heritage brick. I made a mistake not painting the backgrounds first.
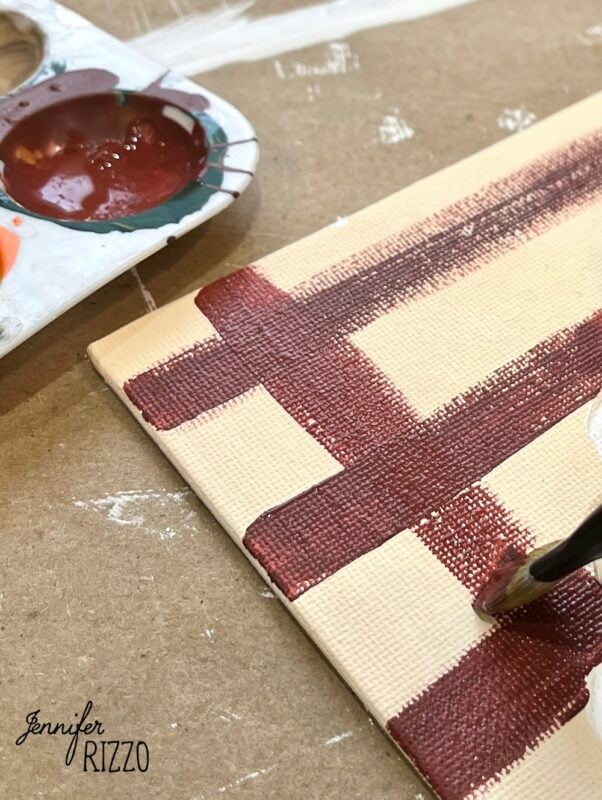
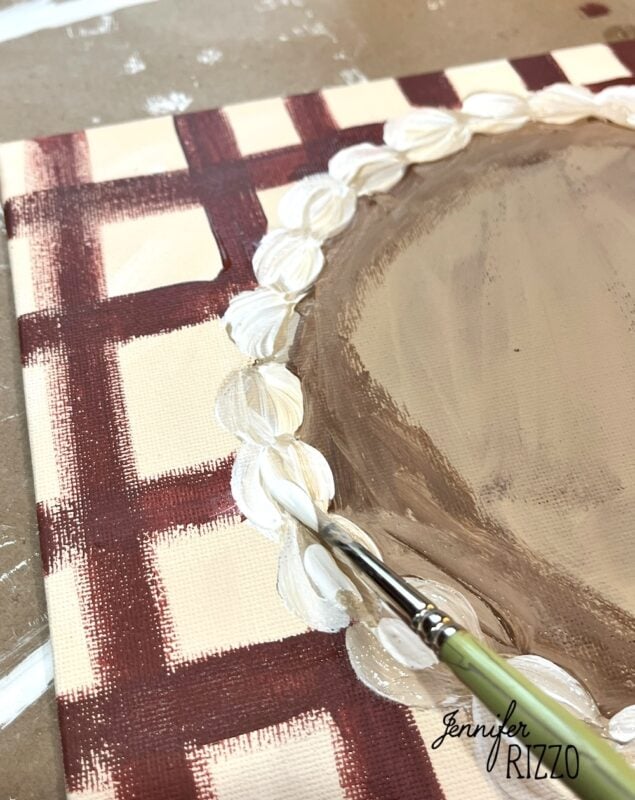
Once the canvases are base coated, use a flat paint brush and the oppose colors to paint stripes first horizontal then vertical to create a grid pattern as if it were a table cloth.
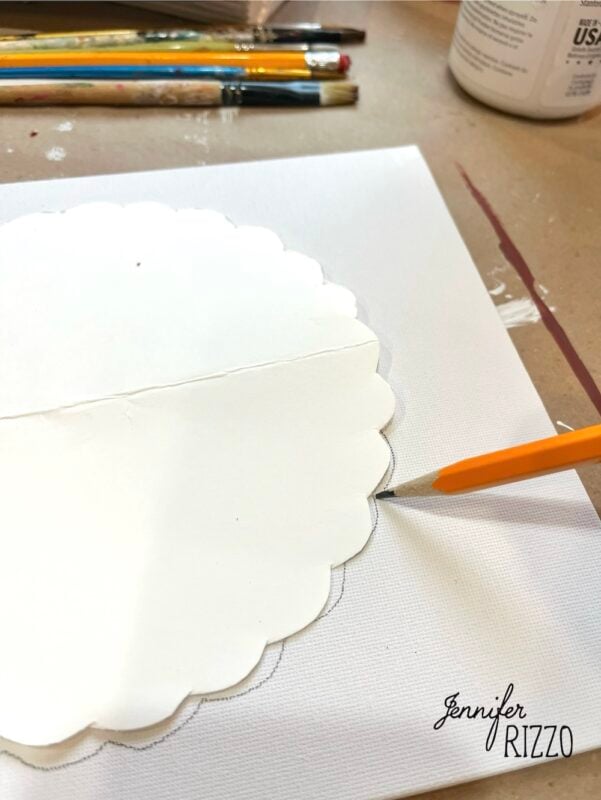
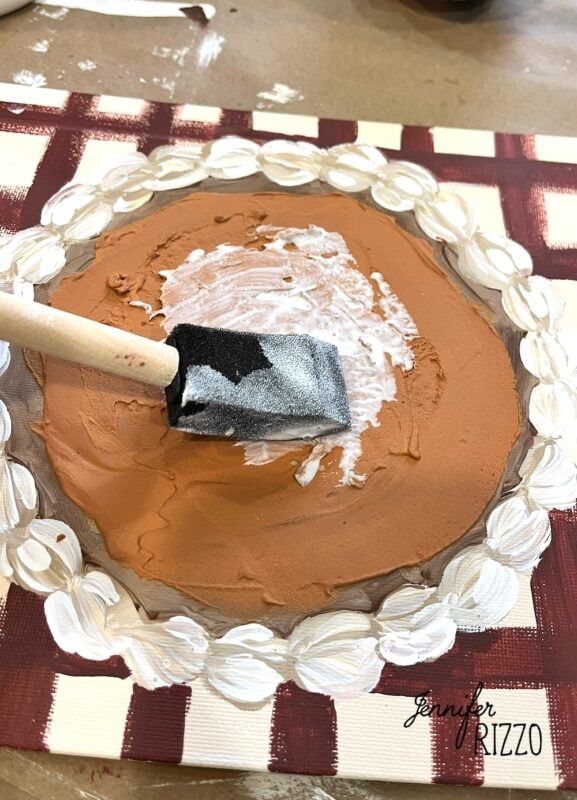
Outline and Fill in the Pie Shape
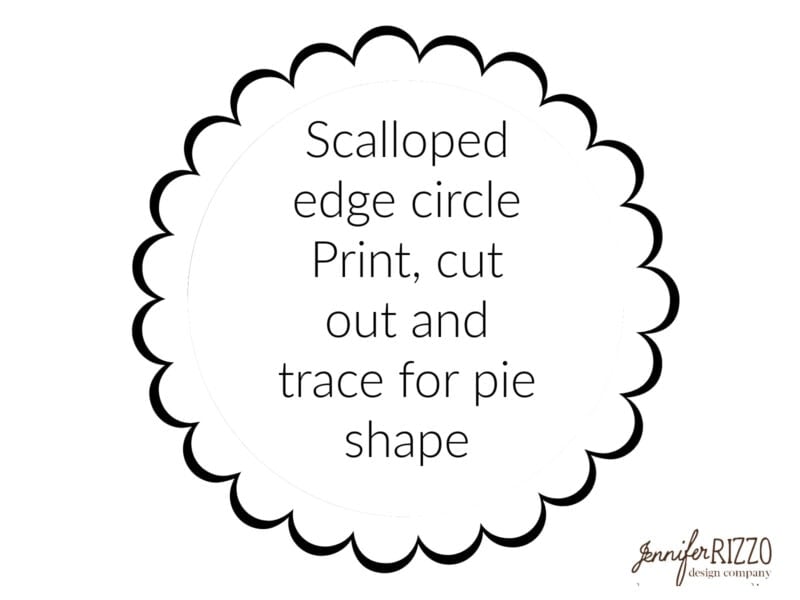
Use the template below to trace in the scalloped edged pie shape, then paint the entire inside of the shape in brown craft paint. This is undercoating your image, let dry.
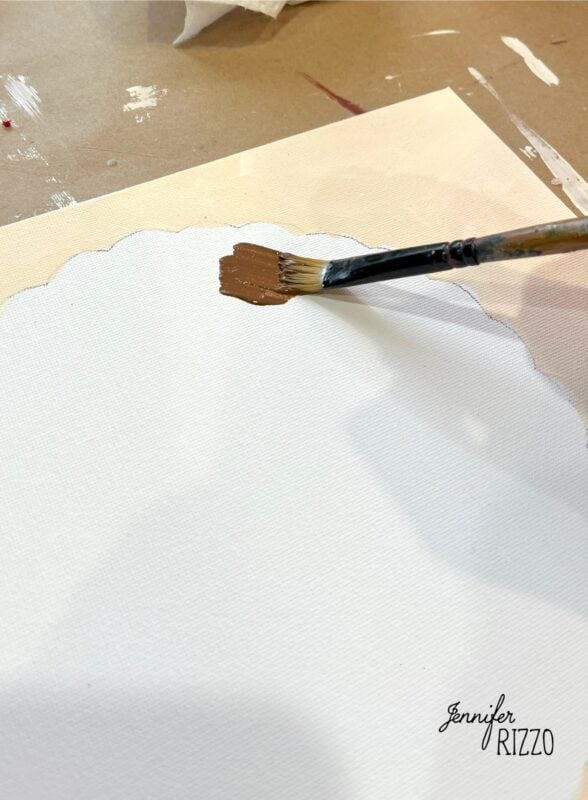
Paint in the Pie Shape
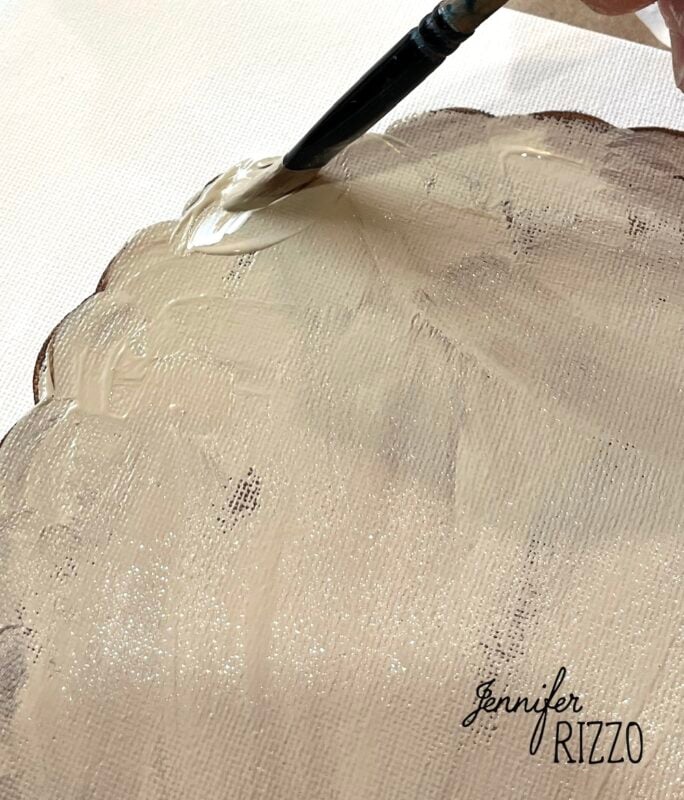
Once the brown paint is dry, use a brush to paint in the pie with Fawn acrylic paint. It’s ok to paint it in leaving bits of brown showing. This helps to give it texture.
Paint in the Pie Crust Edge
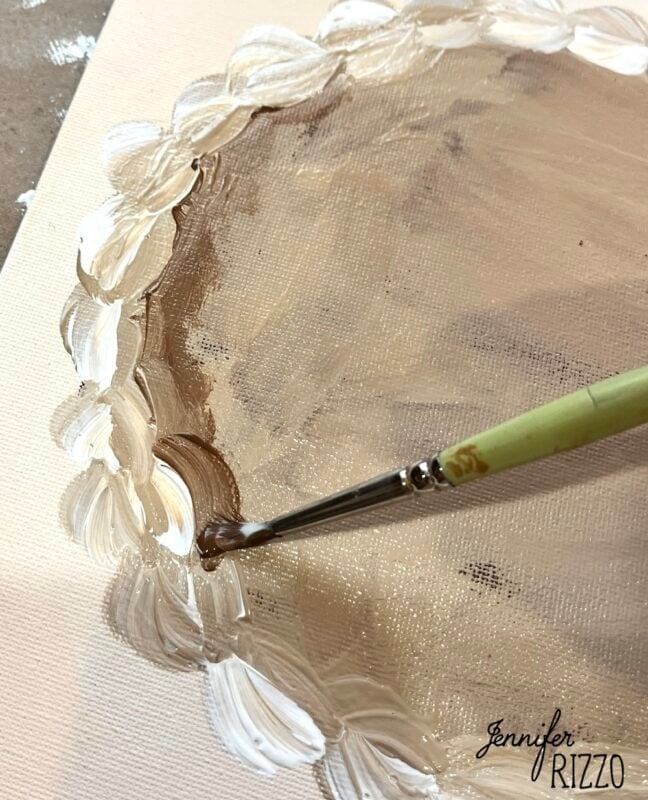
Place Titanium White and Fawn next to each other on a paint palette. Dip one side of your flat brush in Fawn and the other in Titanium White. With the brush on its side, Paint a half circle at the top of one of the fluted bumps and then another the opposite direction underneath it. Reload the brush with paint and continue around the edge.

Add a Shadow to the Pie Crust
Once the edge of the pie crust is painting, use the brown paint and an angled brush to create some shading, following the scalloped edge. Paint around the entire edge underneath and let dry.
Add additional white highlights on the painted pie crust edge if desired.
Mix the “Pie Filling”
Now comes the fun part! Mix 1/2 a can of Love Frosting dimensional paint with 1/2 a bottle of orange Pumpkin Spice acrylic paint and mix. Add more paint if needed for a deeper hue. If a darker color is desired add a small amount of Heritage Brick. Add this in very small drops, mixing as it’s added to get an accurate color. Once it’s mixed it’s ready to paint with (It looks like pie filling but of course is paint and is not edible, so make sure to keep it away from kiddos or pets and discard extra.)!
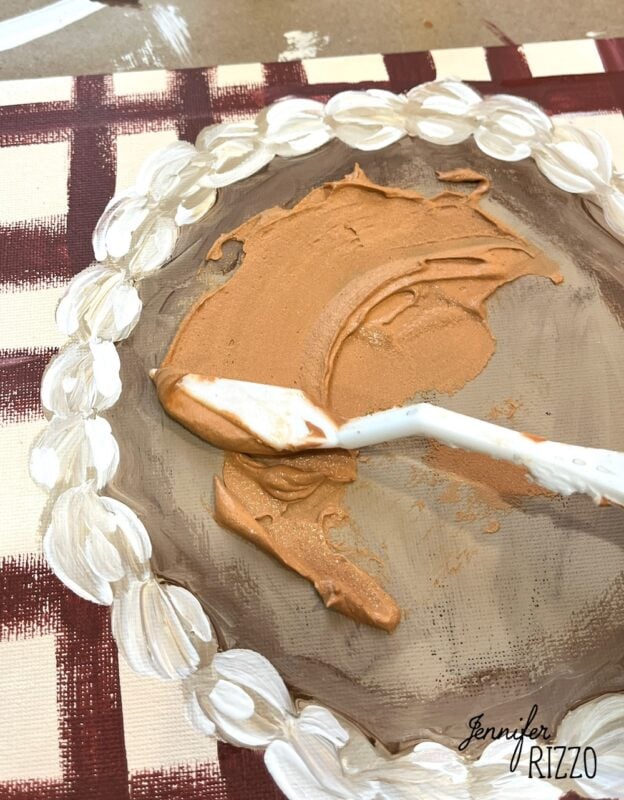
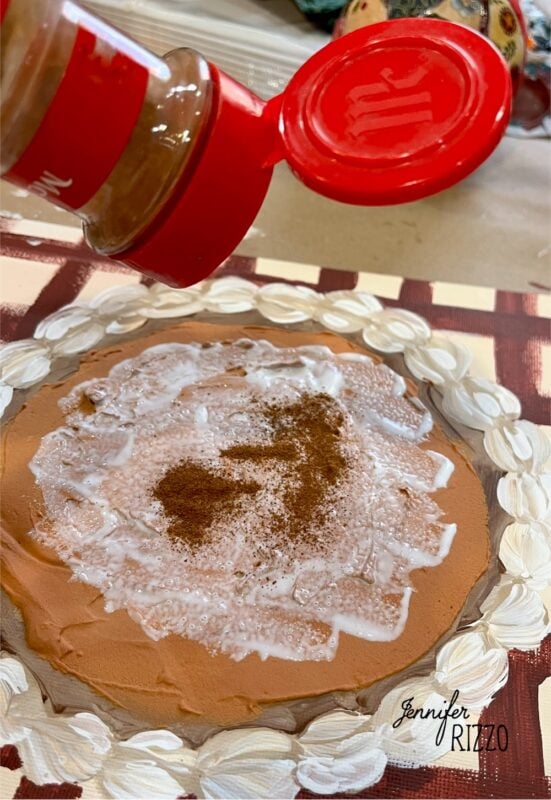
Paint on the Pie Filling
Scoop up a glob of the Love Frosting that is now tinted a light orange and spread it onto the part of the pie where the filling would go. Add it to the center circle and smooth. Once its all smoothed into place, let dry. Paint white craft glue over the pie top and lightly sprinkle cinnamon on top for a pumpkin pie look. You can pipe Love Frosting on with a frosting piping bag if you like as well to give it even more dimension.
Once it’s dry shake off any excess cinnamon over the garbage can.
Let Dry and Add a Hanging Element to Your Painted Pumpkin Pie Wall Art
Let dry flat for at least 24 hours. Once dry, flip over and glue saw tooth hangers with hot glue onto the top back of the canvas in the center or place in a cute frame or on a stand on the countertop. Your Custom pumpkin pie wall art is now ready to hang for Thanksgiving!
Grab the scalloped edge pie template here. It’s made to print out full page on a piece of printer paper and painted onto an 11 x 14 canvas board. Print at full size and borderless on the printer and cut out.

The post Paint Cute Pumpkin Pie Wall Art appeared first on Jennifer Rizzo.


Make Mini BooQuet Ghost Vases 27 Oct 3:58 PM (3 days ago)
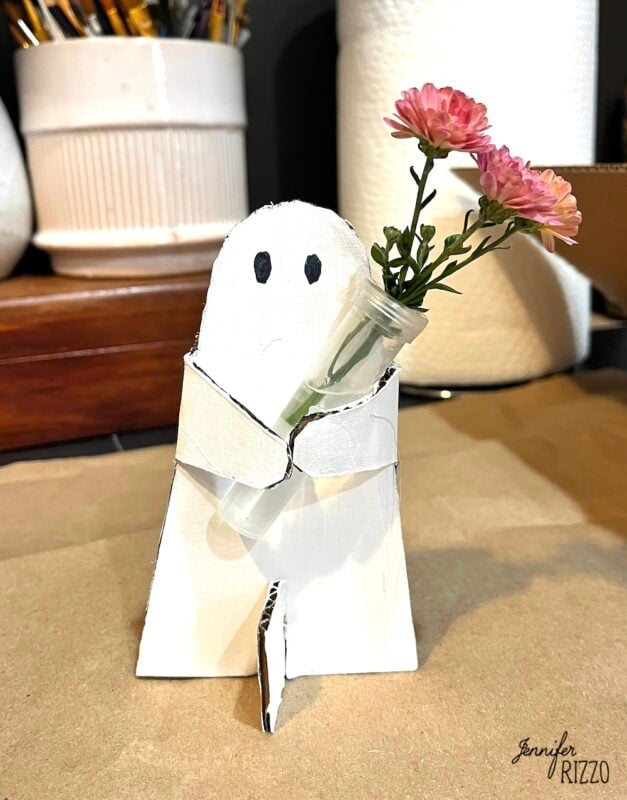
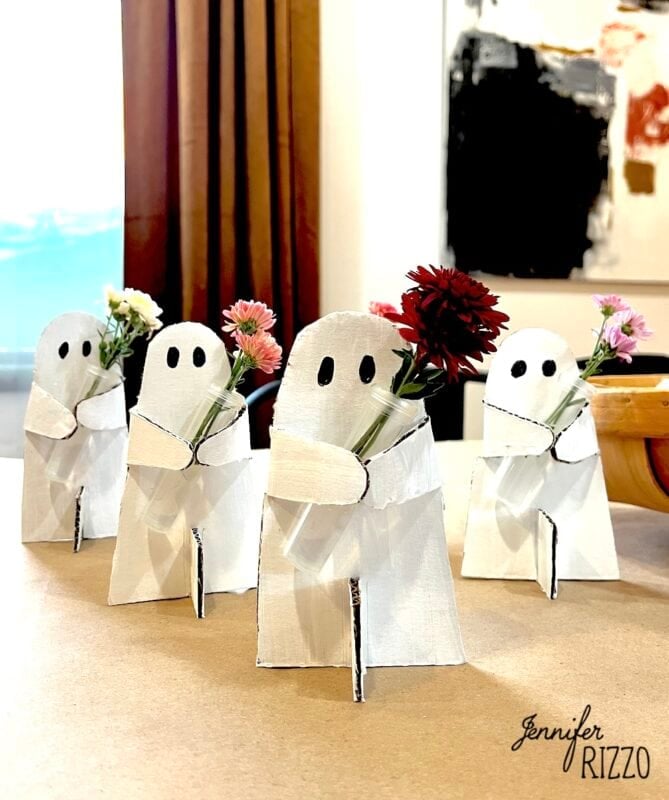
We wanted a cute, little favor to give out to customers at the store. We decided to create some little boo-quets to give out to everyone who came to the open house. This project was so easy to make, and I love that it reuses recycled cardboard boxes, because who doesn’t have a bunch of those hanging around?! These mini ghost flower vases just took a few supplies and a little time to make them. Everyone was just delighted in them when we passed them out because they were so cute!
Supplies:
To make your sweet little boo-quet ghost vases, you just need a few supplies
-Recycled cardboard boxes
-Low temp hot glue
-White craft paint
-Small floral tubes
-Small flower sprigs
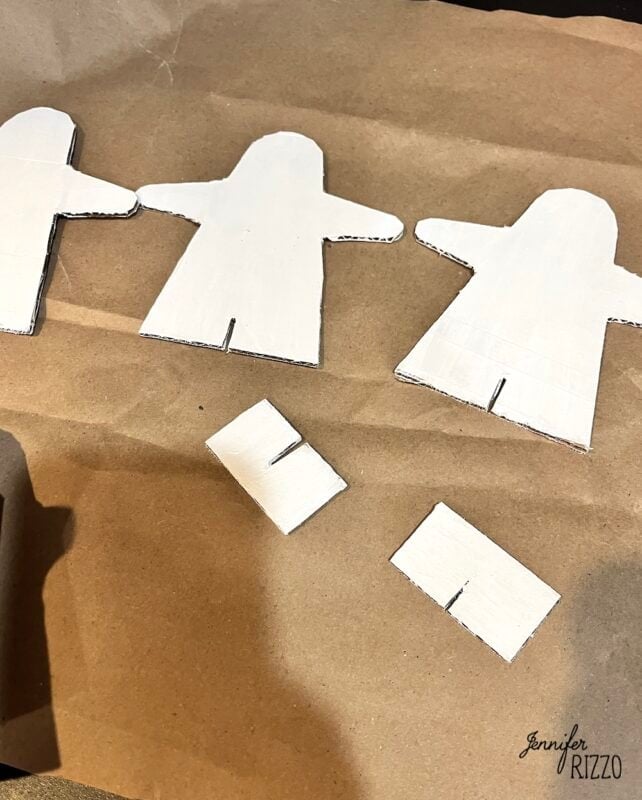
Trace and Cut The Ghost Shapes Out of Cardboard
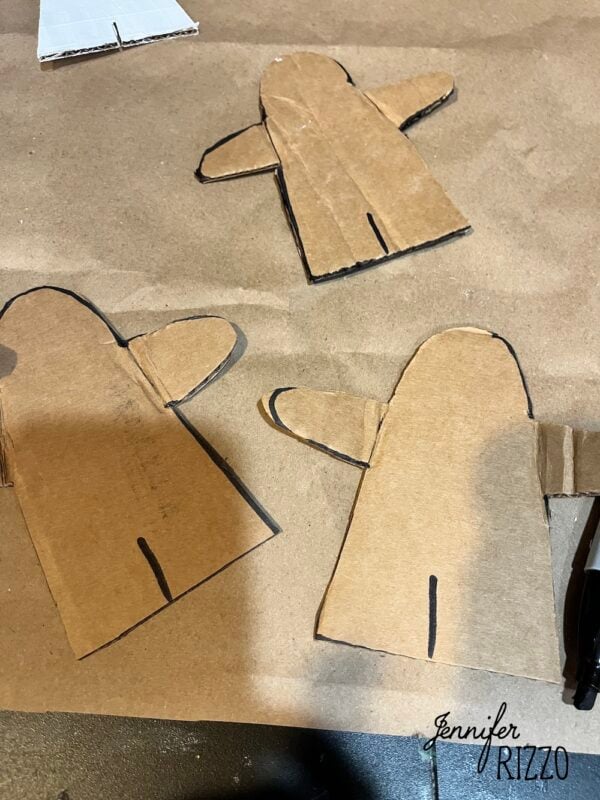
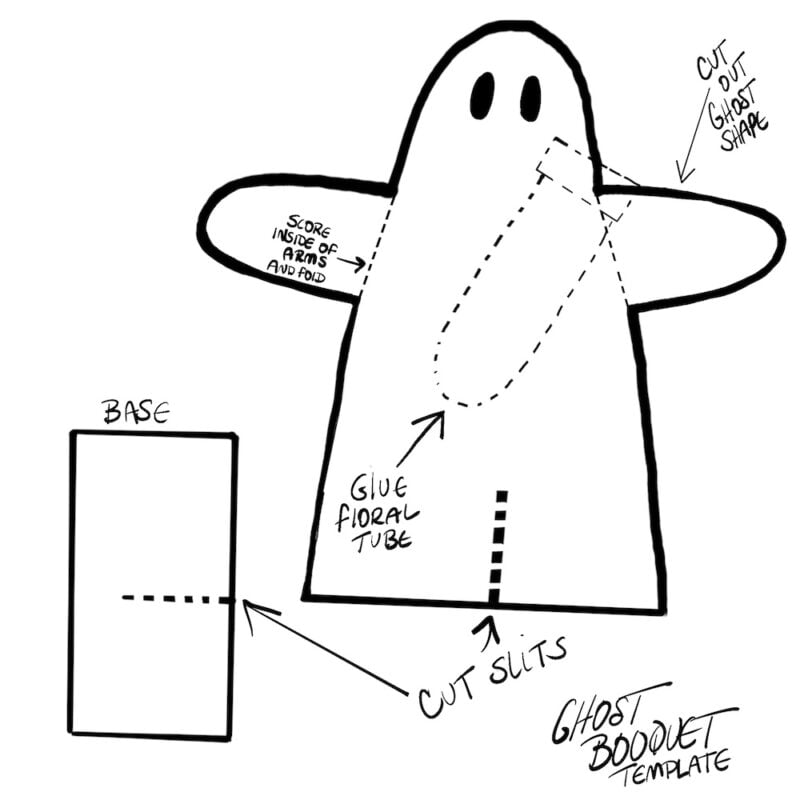
Use the provided template to trace the ghost and the base onto the cardboard and cut the ghost shapes out. Once the ghost shapes are cut out score the arms where they attach to the body and cut a slit in the bottom where the base will fit in. Also cut a slit in the rectangular base where it will go to the bottom of the ghost. This is better to do before painting.
We love recycled cardboard crafts around here such as these awesome cardboard star ornaments.
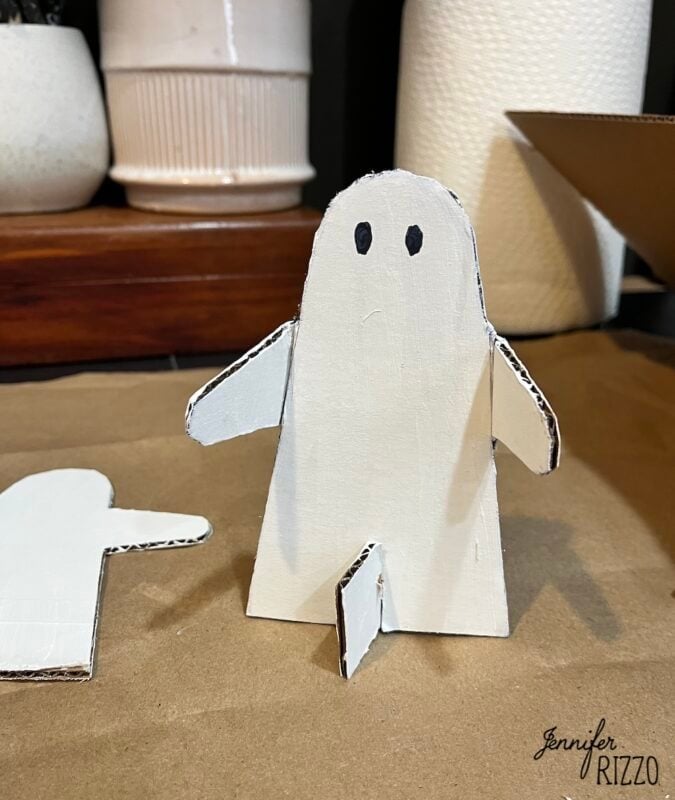
Paint the Ghost Shapes with White Craft Paint
Paint the ghost cut outs and the base on the front and back with white craft paint. Let dry. Multiple coats may be needed depending on coverage.
Add the Base and Fold in the Arms
Fold in the arms along the score lines while it is still flat. Match up the cuts on the bottom of the ghost and the top of the rectangle base and slide them into each other. Make sure they are square so the ghost stands. Now you could leave it now as just a cute, little stand up ghost, or continue onto the next step to create the cute ghost vase for your boo-quet.
Add the Floral Tubes
Add water to the tubes. Use a small amount of low temp hot glue on the ends of the arms and pinch them together around the floral tube (with the top removed). Once glued in place, add water with a small dropper and place the top back on the floral tube. If you don’t want to use floral tubes, you can just use dried flowers and glue those in place.
Add the Flowers
Add a cute floral sprig of a long lasting flower like mums or baby’s breath. Use difference color flowers to make them cute in a grouping. With fresh flowers that means they will last a little longer with out having to change them out or the water. When it’s time to change the flowers, just remove the tube, change the water and refresh!
Grab the template here to make your own, just add it as an image to your computer and print from there:
The post Make Mini BooQuet Ghost Vases appeared first on Jennifer Rizzo.
Carve Your Own Rubber Stamps 20 Oct 8:00 AM (11 days ago)

How much does it cost to make a rubber stamp at home?
Initial investment is about $6 for the stamp blank to carve and $12 for a carving kit. Once the kit is purchased, the stamp carving material is the main expense.It’s till cheaper than buying a custom stamp on Etsy or another platform.

Choose the new, softer carving blocks for your stamp

When carving your own rubber stamps, it’s ideal to choose bold graphics as images and fonts with clear lines

Once you pick your tip, start carving! Just make sure you keep your hand behind your tool. Sometimes it works better to make small scoops instead of large long ones.


Glue it onto the wood block with permanent glue and it is ready to go! You can use this like a regular stamp, and depending on the ink you use, can be used on paper, fabric, lamp shades or even glass. Or, what a great way to make holiday cards and matching envelopes. I used an ordinary stamp ink pad to make my prints on paper.
If you are reading this post at any other sites or blogs besides Jenniferrizzo.com, your rss feed,e-mail or in your reader this is stolen content.
*This was posted Via Jennifer Rizzo. com
The post Carve Your Own Rubber Stamps appeared first on Jennifer Rizzo.
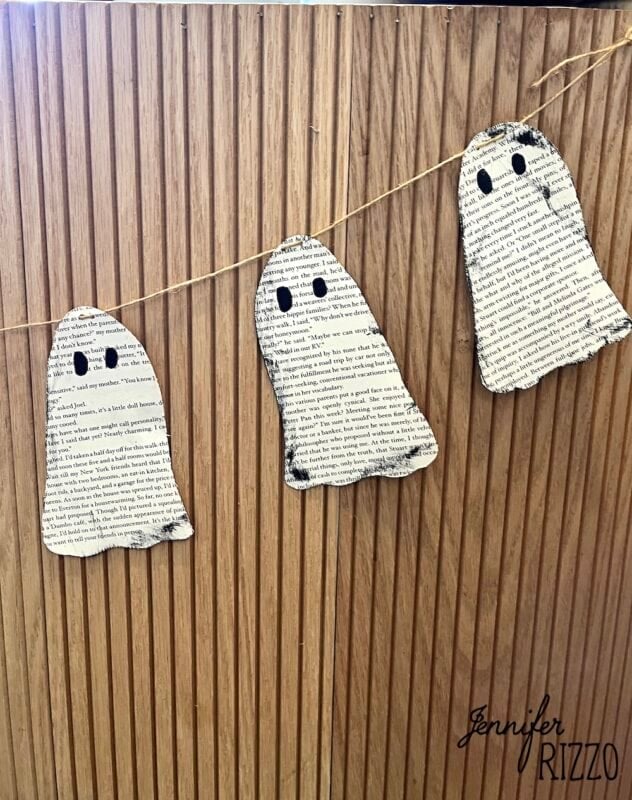
Create a Paper Book Page Ghost Garland 14 Oct 11:29 AM (16 days ago)
I recently had a tunnel book workshop in the studio and had lots of cut out book pages left over that I needed a project for. Making a cute ghost garland from the old book pages seemed like the perfect way to create some really cute Halloween decor and use the pages. It was so easy to put together and even the kids will love making this simple project.
I know many people hate the idea of cutting a part an old book. When I create book projects, I either use hardcovers that aren’t that old, or I’ll use books from the dollar store that are mass produced. That way I don’t have to feel guilty about cutting a part a book that might have some value to it.
Supplies to create a book page ghost garland
For this project, you’ll need:
Loose book pages
Scissors
Black Marker
Hole punch
Ghost template
Twine or ribbon to hang banner
Brown stamp ink pad
Matte Clear tape(if needed)
Trace Ghost Outline
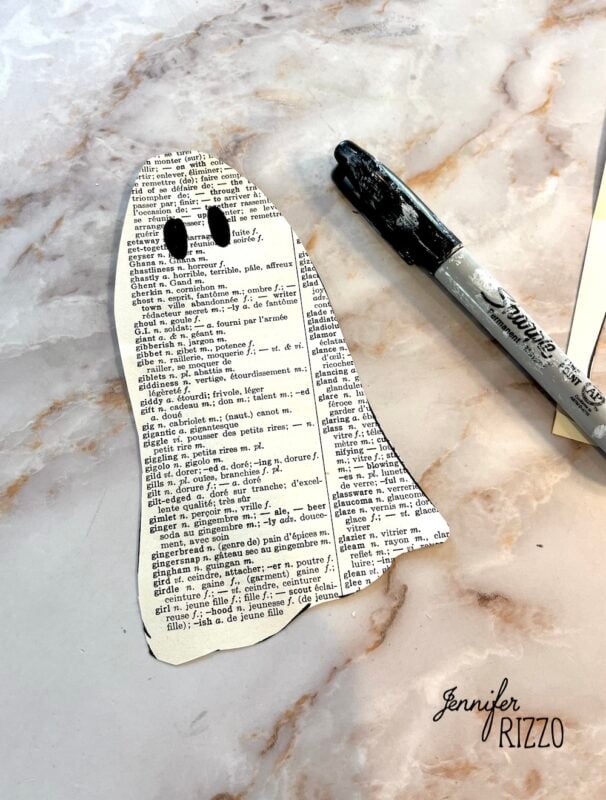
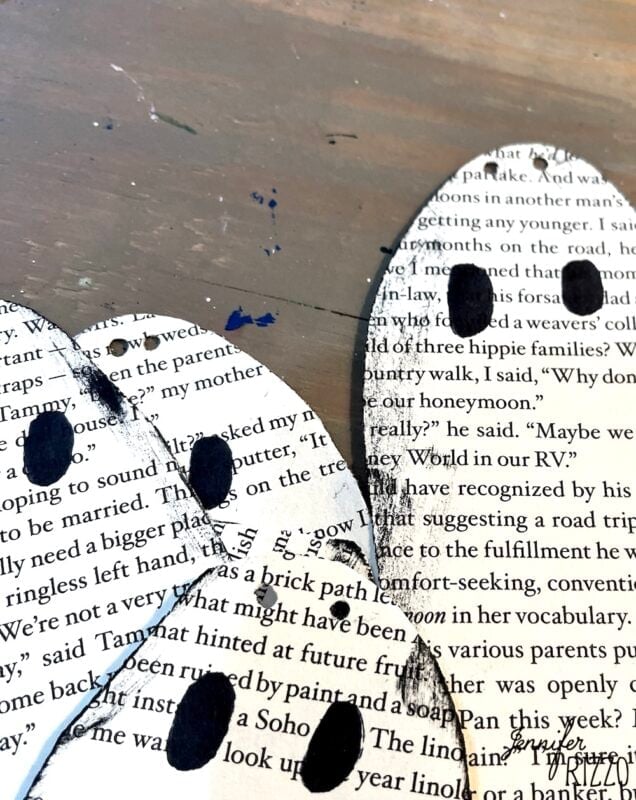
Start by tracing out the ghostly silhouette onto the book pages with the black marker. These can all be the same size or they can be varied. The template is at the end of the post.

Cut out Ghosts
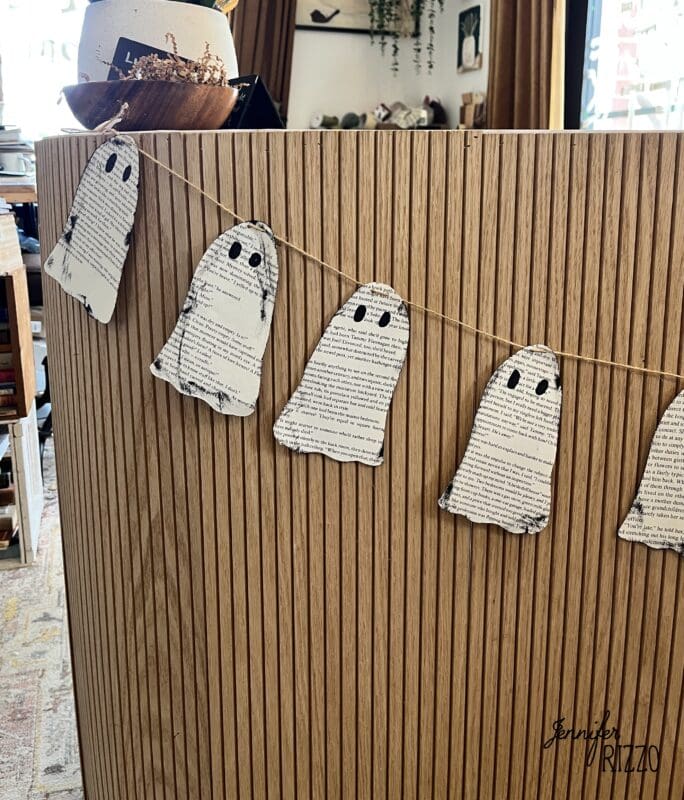
Cut the ghosts out following the outlines. It’s OK if they don’t follow the outline perfectly. The amount of ghosts to cut out depends on how long the garland will be. We cut out about 10 to go across the length of the shop desk.
Add Ghost Eyes and Aging
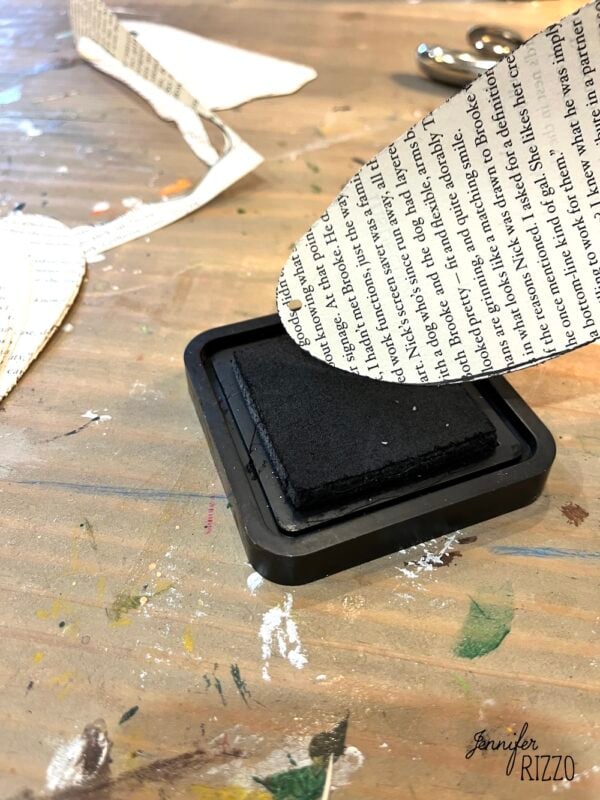
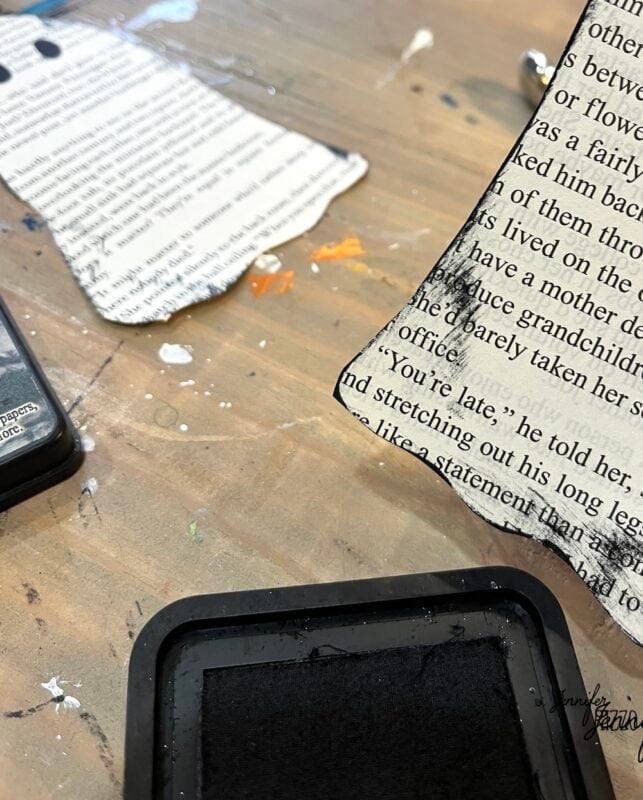
Use the black marker to draw on two eyes. You can see this article for a guide on different styles of eyes to draw. Now is a good time to use the brown/black stamp pad to add a little aging to the edge of the ghosts by rubbing the paper on the stamp pad.
Punch Holes in the Top of the Ghost Cut Outs
Once the eyes (or face) are drawn onto the ghost, use the hole punch to punch two holes next to each other in the top. Make sure to leave enough paper on the top so the paper doesn’t rip.
If it seems flimsy or if you would like extra reinforcement, add a piece of clear tape to the front and back and punch through that.

Add Twine to the Ghosts

String the twine or ribbon though the punched holes, coming in from the back side of the ghost and exiting the second hole. If it’s difficult to place through the hole, try adding a piece of tape around the tip of the twine to create a pointed end to push through.

Once the ghosts are all hung on the twine, it’s ready to hang! This is such a cute and inexpensive bit of Halloween decor! Make sure to keep it out of reach of kids, pets and open flame.
Just grab this ghost template below to start creating!

The post Create a Paper Book Page Ghost Garland appeared first on Jennifer Rizzo.
Halloween Mantel Decor with Pumpkins,Spiders and More 14 Oct 7:33 AM (17 days ago)
Creating a spooky and fun Halloween mantel with pumpkins , spiders and more is easier than you think! It’s all about adding layers and height! This was a mantel I styled a few years ago and still is one of my favorites. I’ve added a few tips below so you can also create your own!

My other favorite mantel was the flying bats vintage mantel. It is fun to combine items from the floral and Halloween aisles, and some decor I already had around the house to make a fun and spooky mantel. Even if you only have a faux mantel, it’s a great place to decorate and add vignettes, like this mantel I did a few years ago,
Or this one with a fun ghostly garland for Halloween mantel decor!
Tip 1: Layer Different Textures
As a decorating base,I started with grapevine wreath roll in the floral section and layered some fun faux spider webbing. The two texures play well off of each other. This is a better decor item for inside than outside. Outside birds and other pollinators can get caught in the webbing. Though I did add a few faux spiders or two to add to the creepiness!

I love how the grapevine has some naturally awkward twists and turns that lend very well to looking a bit creepy.

Tip 2: Add Lighting for Day and Night
With more Layering, added battery operated fairy lights looks really cool and spooky at night. Buying ones that are on a timer save the battery too so you don’t forget to shut them off!
I love using books for height. These spooky book covers that I made a few years ago would have worked well.

Tip 2: Add Height
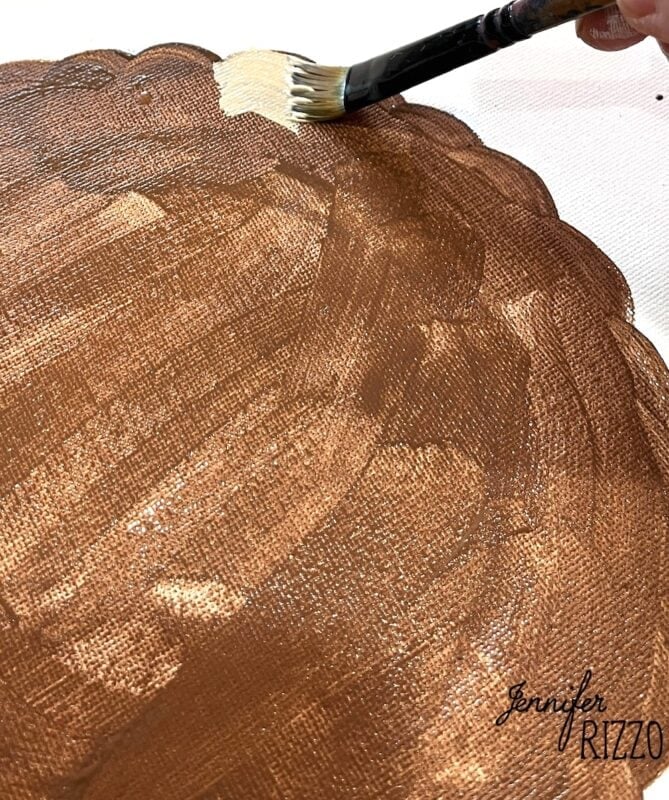
On the left side, I added a felt cat cut-out, and some vintage books, and copper painted pumpkins.

Tip 4: Don’t Be Afraid to Add Paint to What Doesn’t Work
Yes, I painted real pumpkins with copper craft paint to give them that metallic glow. If you don’t want to paint real pumpkins, faux pumpkins work well to use year after year.

There were other felt cut outs like bats there as well. Fun glittery crows add a cute and fun touch ,and I ended up getting two so I had one for each side. I really love how the fairy lights look, even during the day they add something extra!

I used a gold metallic craft paint to paint a birch section from the wood section to use as a place for him to perch on.

Tip 5: Use Items to Add Height Such as Books or Boxes
On the other side, I used a vintage metal box for height, and put the other crow and some cute glass bottles from the Halloween aisle. I like how the glass glows with the fairy lights behind them for Halloween mantel decor.

On the floor, I placed a trio of pumpkins on some vintage and new suitcases and a pumpkin on an urn for added height.

And the other side I placed lanterns with a few lanterns from the Halloween aisle.

Tip 6: Repeat Items and Themes
Repeating items such as pumpkins at varying heights across the mantelscape creates cohesion and is pleasing to the eye. Remember that using odd numbers is a great rule of thumb to go by!
If you loved this Halloween mantel decorating idea, and whether you’re into spooky sights, playful pumpkins or giggling ghouls!

The post Halloween Mantel Decor with Pumpkins,Spiders and More appeared first on Jennifer Rizzo.
Easy Mad as a Hatter Halloween Costume 2 Oct 5:22 AM (29 days ago)
When my Little read Lewis Carroll’s Alice in Wonderland for school, she loved the idea of a Mad as a Hatter Halloween costume. The one issue I had is all of the Mad Hatter costumes I found were just either really cheap looking, or a little bit too “spicy” for a young tween. I think for kids, Halloween costumes should be about fun and comfort. Plus, I wanted her to be able to go trick or treating and be able to add and subtract clothing layers if needed (it can get cold here in October)… We’ve had Halloweens that were a hot 85 degrees, and some that were almost a frozen 20 degrees. So, we made a fun costume inspired by the book Charlotte’s Web. I love T-shirt costumes, and It’s so easy to create costume ideas with T-shirts!

How to Dress Up as Mad as a Hatter for Halloween
With creating T-shirt costumes it’s more about creating a mood and and the idea of a costume. For something like the Mad as a Hatter you can go with a classic storybook character look. Our version took key ideas of the Mad Hatter from Lewis Carroll’s original work as shown in his illustrations… the large bow, the hat and mix and matched patterns. Really, the hat and bow are the key pieces (and don’t forget a little tag that says 10/6 in the brim of the hat.). For a more movie version, a fun red wig can be added and a vest or fitted suit jacket can be added or subtracted for the more steampunk Mad as a Hatter look.
Have you ever wondered what the 10/6 means on the actual Mad Hatter’s hat? It is a price tag! It’s the price of the hat meaning 10 shillings and 6 pence! And did you know that National Mad Hatter day is celebrated on October 6th? And if you’ve wondered what Mad as a Hatter means, it refers to a mercury poisoning they used to get when creating hats. It was definitely not a safe job in the 1800’s.

For this version of a Mad as a Hatter costume, we used a black t-shirt (comfort!), a cute, purple tulle skirt, and a fun hat attached to a headband, a mask, and even fun patterned socks (and regular sneakers for easy trick or treating!)!
Create the Look of a Bow and Coat Lapel with Felt
To create the lapel/bow shapes (pattern below!) I grabbed some purple and bright pink felt and glue to dress up the black t-shirt. It was traced it onto large felt sheets, one smaller than the other, and we glued those together with felt glue. Over the top add two kind-of triangles were made to make the bow ribbons and then the circle. These can be increased or decreased in size depending on the size of the shirt.After gluing, let dry completely. The most complicated part was figuring out how to cut the felt so it kind of looked like a big bow.

The socks were so cute. Fun patterned pants can also we worn as well if its’ cooler out or for someone who doesn’t want to wear a skirt! We just had her wear her black and white sneakers with it. Priorities! You need to be comfortable to get all of that candy for Mama!


She was to go trick or treating in her fun and easy Mad as a Hatter costume! If you love storybook costumes, see how to make this costume inspired by Charlotte’s Web.
Mad as a Hatter Felt Lapel and Bow Template
To save the template below just save as an image and print out as a full page when it’s ready to be used.

Save
Save
The post Easy Mad as a Hatter Halloween Costume appeared first on Jennifer Rizzo.
Air-Drying Hydrangeas for Arrangements 20 Sep 9:26 AM (last month)
One of the trends that I’ve noticed popping up is dried flower arrangements. I love drying flowers for my own arrangements, and recently dried yarrow from my garden. Now that the weather is turning colder, it’s the perfect time of year to preserve thier gorgeous petals and create stunning dried bouquets. Air-drying hydrangeas is really easy and they turn such a pretty golden color over time. They also make such a nice accent all year long ( I once decorated a Christmas tree with some). Some people like to dry them naturally in a vase of water. I personally don’t like that method because many times the hydrangea stems can go moldy.

You can also just let them dry naturally on the bush and clip them later too, but again, there’s a higher risk of them getting moldy over time.I have a fun video I put together of how to dry hydrangeas. the post below has some tips on successfully drying hydrangeas.
-Hydrangeas are considered poisonous to people and pets, and the sap can be irritating to some people, if you have concerns, always make sure to wear gloves, or wash your hands thoroughly, especially before eating and drinking, our touching your face.
-Clip the hydrangeas with a good length of stem, and remove leaves. These don’t dry super well, and just end up crumbling all over the place. The best thing is to preserve the hydrangea blooms to create wreaths and garlands.

-You can either dry them upright in a vase as a bouquet with no water, or tie them in a bundle and hang them upside down in a cool area out of direct sunlight. I prefer the vase method so I can enjoy them while they slowly change color. You can also place them in a basket and enjoy their natural beauty.
-They are going to get dusty. You can give them a gentle shake, or use a feather duster gently on them, or do what I do. When they get too dusty for me, I just throw then out, knowing there will be more next year. Dried properly, hydrangeas will last a year or two.

-Dried hydrangeas can also be spray painted fun colors like gold to add a bit of zest to arrangements.
-Individual hydrangea flowerettes off of a larger hydrangea flower head can be pressed to make dried pressed flowers. See how here.
-Different varieties of hydrangeas like Oak Leaf Hydrangeas , Pinky Winky, and Lace Cap all look different when dried, mixed bunches of different varieties are really pretty together.
If you have hydrangeas in your yard, I hope you give it a try so you can also enjoy them all year long!
The post Air-Drying Hydrangeas for Arrangements appeared first on Jennifer Rizzo.
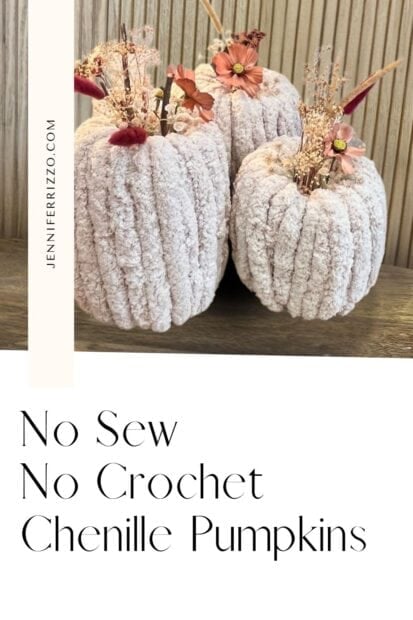
No Sew or Crochet DIY Yarn Chenille Pumpkin 17 Sep 1:04 PM (last month)
Chenille pumpkins are not only super cute but really easy to make! They can be made to not only any size desired but color as well! The best part is this version is completely no sew and no crochet and use chunky blanket yarn to create a cute and soft pumpkin. And, it’s a great way to recycle and use your cardboard delivery boxes. We just led this workshop in the Lisle studio and they were such a cute project!
this post contains affiliate links. See our sponsor and affiliate disclosure here.
Supplies to Make A DIY Chenille Pumpkin
Find the Supplies here at Michaels
Chunky blanket bulky chenille yarn(from Michaels)
Recycled cardboard boxes
Low temp. hot glue gun and hot glue
Dried or faux flowers
Small stick or branch for the stem
Cut Out the Cardboard Pieces
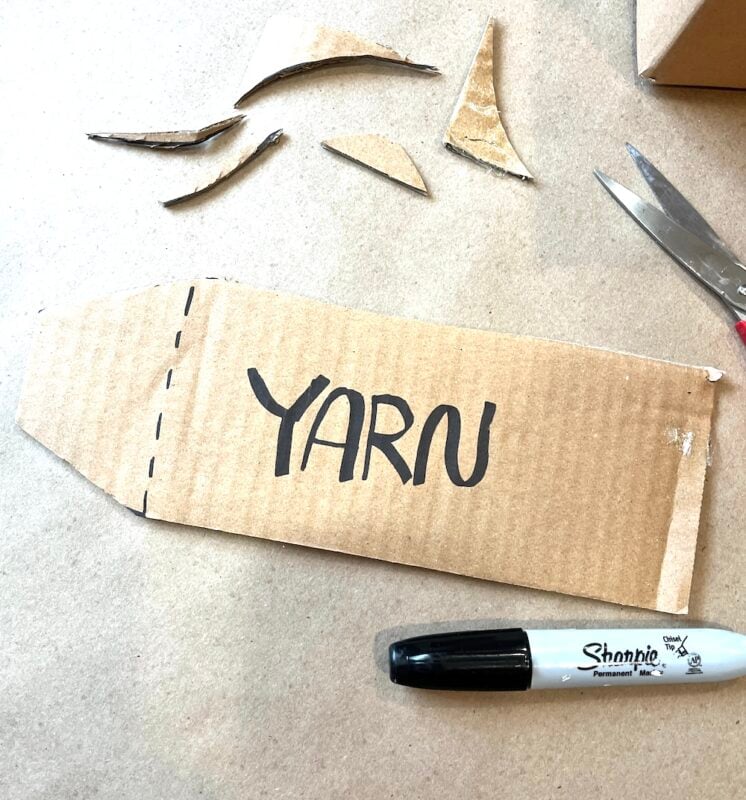
Using an old cardboard box, cut out two to three long rectangles. For a small pumpkin cut one piece 3 inches tall by 15 inches long, and for a larger pumpkin cut the piece 6 inches tall by 20 inches long. At the end of each piece of cardboard, cut the corners off to make a point. This will be your “tab” to glue the pumpkin together when its completed.
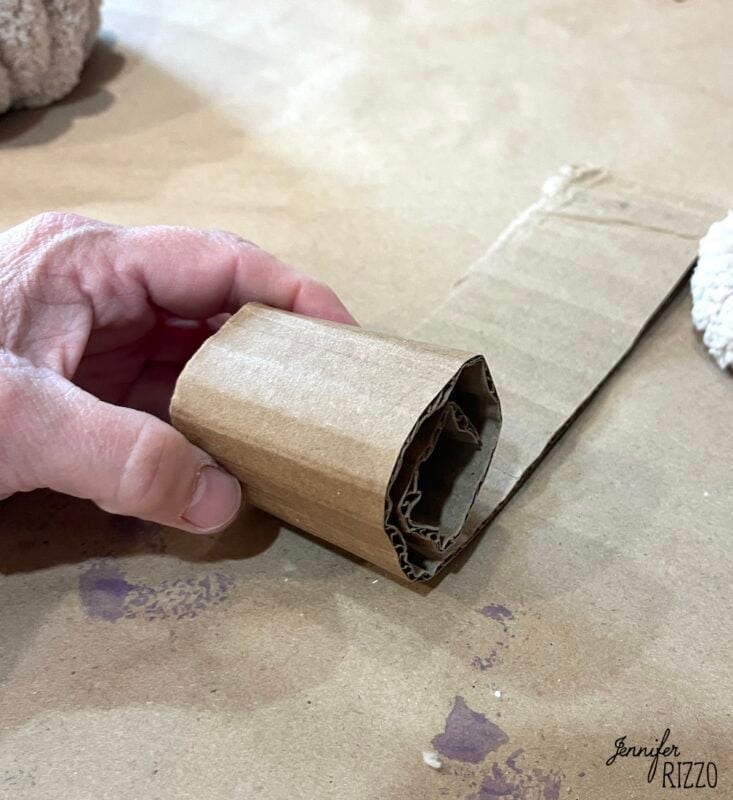
Pre-Roll the Cardboard Pieces
This step is important to not miss to get that full and round pumpkin look. Starting at the and opposite of the tab, fold over the end of the cardboard onto itself and then continue to roll the cardboard on itself
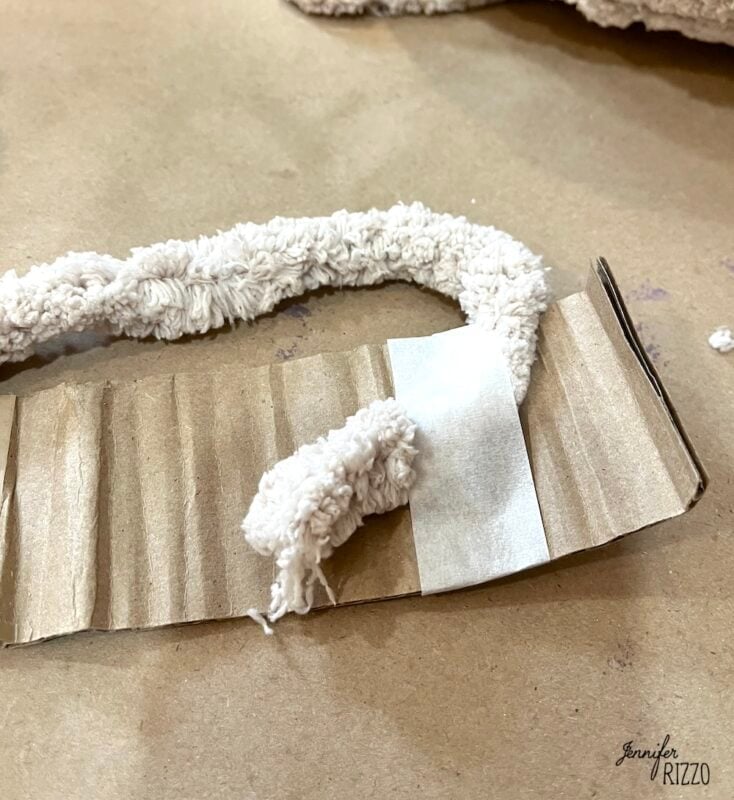
Tape the Chenille to the Cardboard
Tape the end of the chenille yarn to what would be considered the inside of the pumpkin at the end opposite of the “tab.”

Start wrapping the Yarn Around the Cardboard
Start wrapping the chenille yarn around the cardboard moving down the cardboard until the tab is reached and then wrap back toward the starting point. Do NOT wrap over the tab. Repeat this process until the yarn covers the cardboard. It will probably take 3-4 wraps of the yarn. When an end it reached, bring both ends together and make sure the pumpkin will close. If both ends don’t touch, then some of the yarn needs to be unwound. Use the tail end of the yarn top tie a knot on the “inside” of the pumpkin before closing.

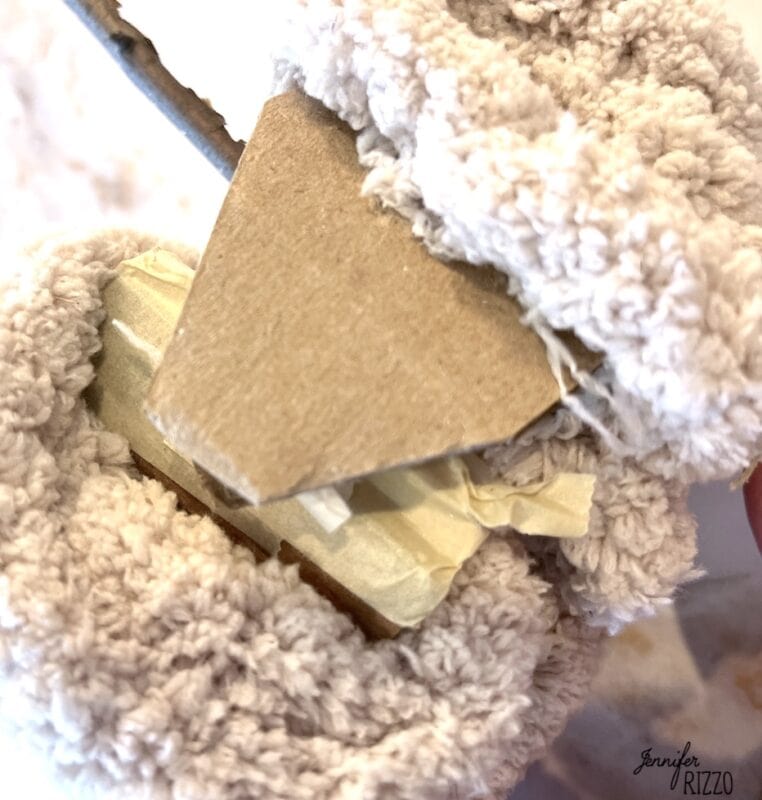
Use the Hot Glue to Bring the Pumpkin Together
When gluing the chenille pumpkin with the hot glue gun, it’s important to make sure that the hot glue gun doesn’t ever touch the yarn, otherwise it could melt. The hot glue should only be applied to the cardboard. To glue the pumpkin together, apply the low temperature hot glue to the inside of the cardboard tab and close the pumpkin, sliding it between the cardboard and yarn on the opposite side. Press the two pieces of cardboard together and hold, being careful to not touch any of the hot glue with fingers. Once the glue is set pressure can be removed from the cardboard. Slide some of the chenille yarn over the glued cardboard to hide it.
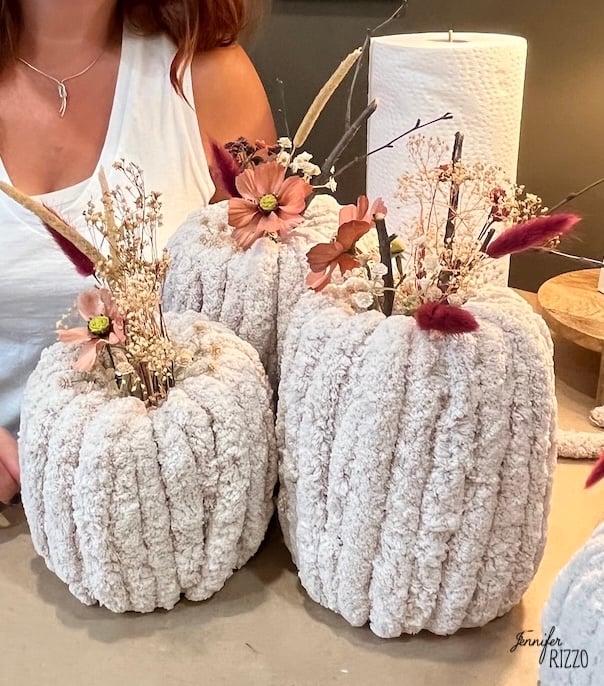
Add the Stem and Flowers
A simple stick from the yard works well as a rustic stem. Grab one that is free of pests and is long enough to go into the center of the pumpkin and look kind of fun and cool. Add a few drops of hot glue to the end of the stick before pushing in to the center of the pumpkin to help keep it in place.

Once the stem is set, add various dried flowers and faux flowers to create a pretty fall pumpkin that can be left out until the holiday decorations come out!
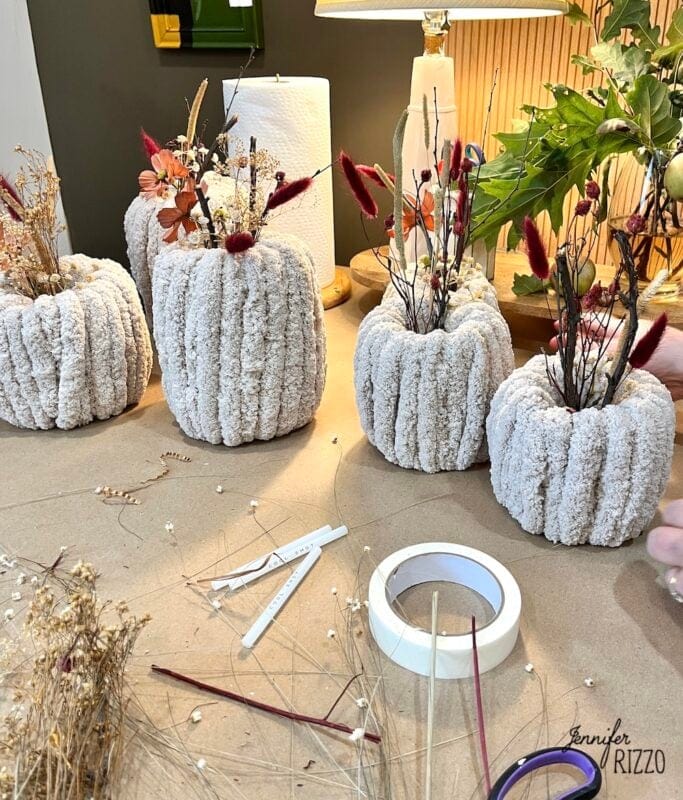
These are so much fun to make in various sizes and shapes as well. Just vary the height and length of the cardboard and start wrapping making cute DIY chenille pumkpins! For more fux pumpkin decorating ideas, see how to make this air dry clay decorative pumpkin.
The post No Sew or Crochet DIY Yarn Chenille Pumpkin appeared first on Jennifer Rizzo.
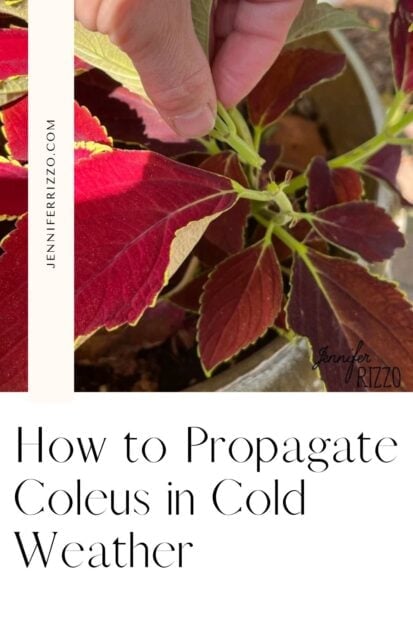
Propagate and Grow Coleus 17 Sep 2:32 AM (last month)
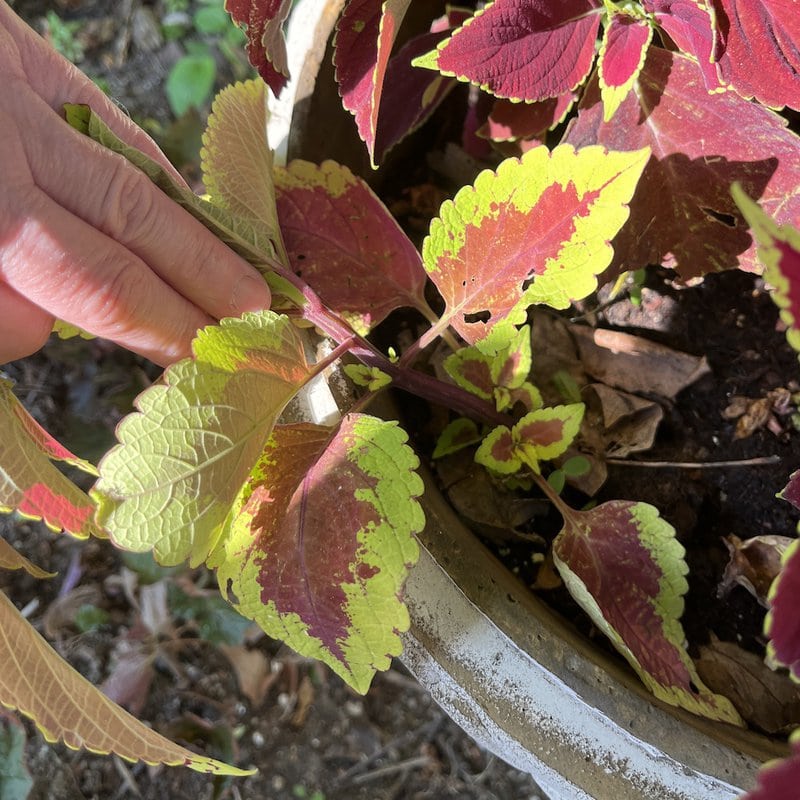
It’s also one of those amazing, forgiving plants that you can snap a piece off for use a cutting and it will grow roots easily in water if you don’t live in a hardiness zone where it can live outside all year. The trick to propagating your Coleus successfully is to take a large juicy part of the stems and pinch it off just above a joint (leaf node) where two leaflets are. I use my fingers, but you can also use scissors. The sap can cause skin irritation, so wear gloves if you have any question at all. I always wash my hands right away after handing it. Also, from what I understand the plant is toxic to pets, so use caution in your yard if you have pets.

When taking a cutting , even though if you pinch the coleus plant off too high, it will still form those leaves underneath, you’ll just have some ugly stems sticking up.
By doing this, not only will you be able to make new plants over and over again, but it will stimulate your Coleus plant to grow huge and full! Depending on your coleus varieties (and there are so many of them with amazing foliage colors!), they may need shade or can even tolerate full sun.

TIP: when you see those $5 baskets of coleus with 10 plants in them, make sure to buy them and break them a part! You can use them to fill in all over your garden! In fact when coleus get too tall and leggy, they are on their way to setting seed. This is a great time to snap a good inch or two off and they will branch out and become denser and fuller.
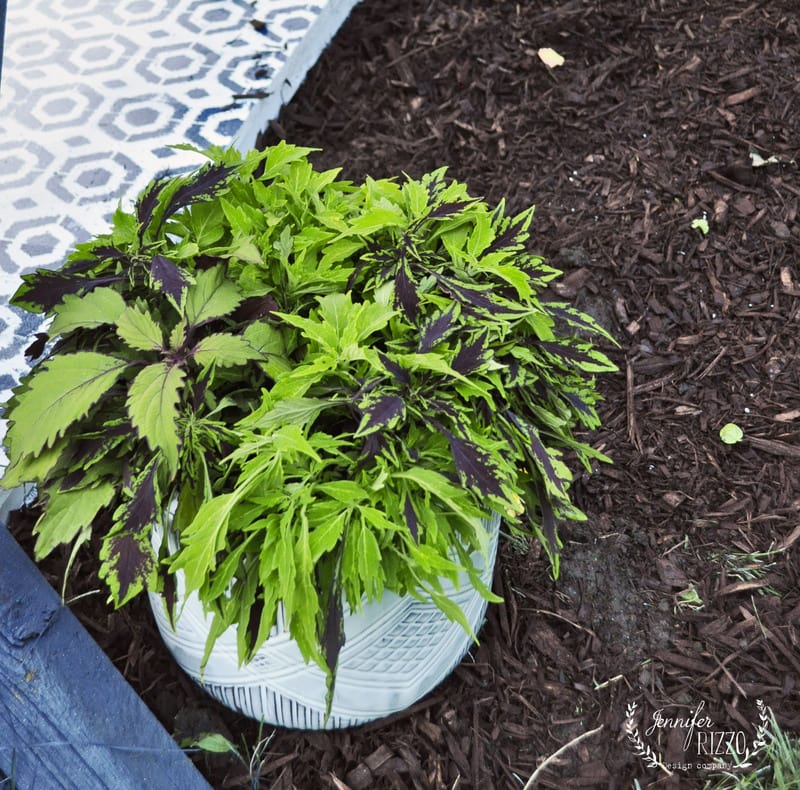
You can see how our front walk looks here all filled out for Fall. I know some of you are lucky that they are either a year round plants or will come back, but our frigid winters take care of that, so they are one of my favorite annuals here.

Also, giving it an aggressive pinching back will cause it to fill out beautifully, as you can see in the above picture.
Growing Coleus in Water
Did you know coleus cutting will readily root right in plant water, no rooting hormone needed! Simply strip off the lower leaves and place your stem cuttings it in water in a jar or bottle in room temperature water a bright window with indirect sunlight.

Once the Coleus roots start appearing, you can plop it in some well-watered soil and let it grow. When your propagate and grow Coleus, don’t let the roots get too long, or it won’t transplant well. Did you know Coleus is in the mint family (Lamiaceae)? That explains not only it’s square stem, but ability to root so easily!


Coleus Plant Care


*This was posted Via Jennifer Rizzo. com
Save
Save
The post Propagate and Grow Coleus appeared first on Jennifer Rizzo.
How to Paint a Poinsettia Flower Acrylic Painting 15 Sep 1:45 PM (last month)
When I think about Christmas and flowers, there is one flower that always comes to mind… the Poinsettia flower (which for years I called and spelled a Pointsetta). It screams Christmas time to me, which as an adult I now find that funny because at this point in my life, because I’ve learned that not only is it a native flower from Mexico, but it is a perennial shrub that can grow as much as 10 feet tall, and the images are stunning! With the holidays, I thought it would be the perfect time to learn How to Paint a Poinsettia Flower acrylic painting, and there is a step by step directions below including a video lesson. This is an easy poinsettia to paint for beginners and would be fun for the kids to try too!

This post contains affiliate links, see our sponsor and affiliate disclosure here.
This flower is actually so much easier to paint than it looks! The red “petals” are actually leaves of the plant called bracts, and the real flowers are the tiny, yellow buds in the center, but we’ll still refer to the red parts as petals interchangeably when painting, it makes it much easier. A good place to start is by sketching out the flower layout on the blank canvas first. There is a template of this exact flower petal layout at the end of the post.

Supplies to paint easy poinsettias with acrylic paint: The craft paint colors I used were Deep Burgundy, Hauser Dark Green, Burnt Umber, Hauser Medium Green, Light Buttermilk, and Antique Gold (Yellow Ochre), White Titanium. A round brush and a liner brush, water, paper towel to dry your brushes and a primed canvas… or Find them here.

When I sketch an image or outline for a painting, I use a watercolor pencil. It easily blends into the paint and there are no residual pencil lines. If you want to try free-hand, the petal and leaf shapes are basic teardrop shapes of difference sizes. Once your poinsettia outline is sketched, you are ready to start painting in the largest red bracts.

I used craft paint for this Poinsettia acrylic painting because it’s accessible to everyone…however, you can also use regular artist acrylic paint as well. While I picked Deep Burgundy for my red petals; feel free to use a cadmium red or even naphthol crimson in artist acrylic, or a bright red hue in craft paint. You can use any paint brush, but using a larger brush will show less paint strokes.
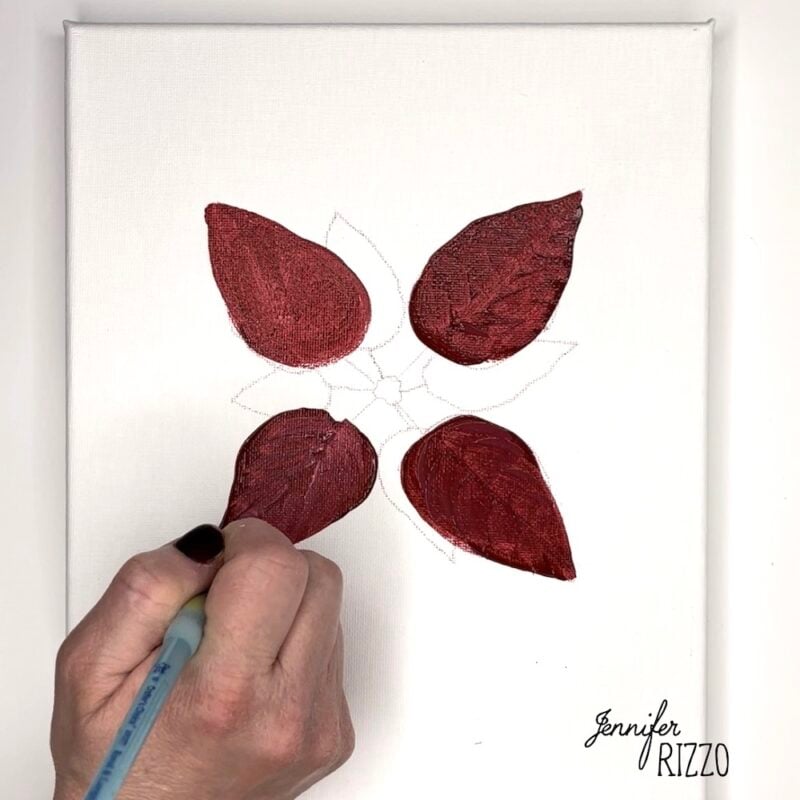
Paint the largest red petals first with a 50/50 mixture of Deep Burgundy and Burnt Umber. This will serve as a darker shade of red. After painting in the larger set of petals, load the round brush up with paint and make short strokes moving from the inside in a diagonal line from the center of the petal to the outside. This will add texture and the appearance of veins to the bracts.
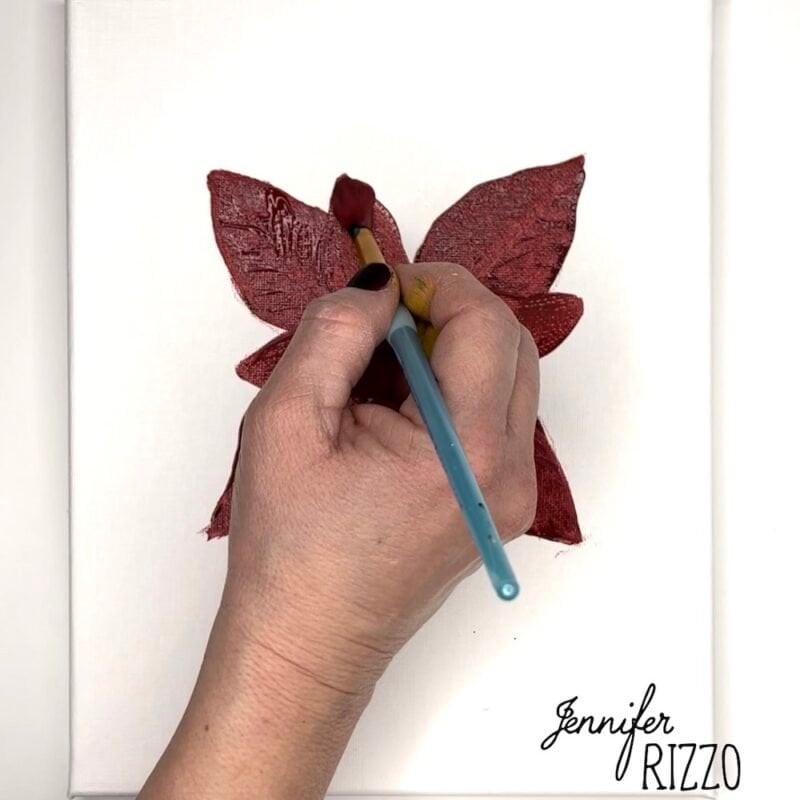
Step two is painting the petals that are the next size down. Paint these with straight Deep Burgundy as a red medium hue. I used the tip of my brush to paint the red, skinny part of the petal from the base of the bract to the center, but you can also use an angle brush or liner brush if you are more comfortable.
Love painting flowers? See how to paint a Sunflower

While the red petals dry, use a brush and the Burnt Umber paint to make a slight stippling motion to create small circles in the center as a base for the flower center. Make sure to use a dry brush when changing colors, especially with craft paint.

Dot over that with Yellow Ochre (Antique Gold) which is a yellow medium hue. To make the dots more defined, flip the brush over and dip the end of the brush in paint and lightly touch the canvas with the yellow paint.

You can repeat the same painting technique with the dark green paint and white paint. This creates the flower center and adds dimension to the center of the flower.

Mix 3 parts red and 1 part white paint to create a lighter red color, it will be almost a dark pink shade. Paint smaller petals around the top of the flower head with the lighter color. The Light Buttermilk can also be sued at this time to create some diffuse highlights on the petals in a diagonal pattern.

While all of the petals and center are drying, now is a good time to add some green leaves. I used Hauser Dark Green but you can also use Green Hue Permanent to paint in the leaves. To paint poinsettia leaves, basically make squiggly triangles with a little bend to them. Leaves in nature aren’t perfect, and so ours won’t be either, and that’s a good thing! Use the same paint technique that was used to create the texture on the petals to create texture on the leaves. Once they are painted, paint the background of your canvas. I used Hauser Medium Green for a vintage look, but straight (Mars) black paint would also be striking with these beautiful Christmas flowers.

The center should be not as wet at this point. Fill in any white spaces with a thin liner brush with Burnt Umber. This will help create a shadow in the center.

This is where the white paint and detail work comes in to make your poinsettia flower really pop. Using white paint, take your liner brush with a little paint on the tip, and line the edges of the poinsettia to create highlights. If you look at the flower bract, I lined one edge and or a center line, on the lower petals, and on the smaller petals I created curved lines to mimic flower petal veining.
I also went back with a little Burnt Umber and added a shadow at the base of the larger petals and on the leaves. The shading helps it to look dimensional and add depth. don’t be afraid to try variations of adding more or less white and red. There are so many gorgeous colors of poinsettia flowers from creamy white, speckled and pink to an almost green color.
Once you master painting one Poinsettia flower, you are ready to paint a bunch of them! The cluster in nature, so don’t be afraid to place your flowers too close together. You can also paint other pine branches or painted embellishments to create a Christmas bouquet as well. Once you get the hang of How to Paint a Poinsettia Flower acrylic painting, they would be gorgeous on a handmade Christmas card!
To transfer the poinsettia template, you can use either graphite paper, or rub a watercolor pencil across the back and trace over it to transfer it to the surface of the canvas.


The post How to Paint a Poinsettia Flower Acrylic Painting appeared first on Jennifer Rizzo.