Interfacing the Novation Launchpad S with a Windows Store app 5 Jan 2015 11:59 PM (10 years ago)
In this post, I use the NuGet MIDI Preview package to show in Windows 8.1 an early look of what we're doing in Windows 10 for MIDI. I also create an early version of a Launchpad wrapper class to make it easy to use the Launchpad from your own apps.
Following on from my earlier post on MIDI device enumeration (and add/remove detection) I've started building the code to interface with the Novation Launchpad S.
Test app
Here's a screen shot of the app. This is the same app as the previous article. Only the Launchpads are shown, but that's because I'm moving my office and have all my other equipment in storage.
You select an input port and an output port, and then click the "Connect to Launchpad" button. That then calls code that handles MIDI initialization, and event handler wireup.

(The MIDI device names are not helpful right now. We're working on that for Windows 10.)
Once you've connected to the Launchpad, you click "Do Cool Stuff". Static images don't help here, so this is a brief video showing the results of the code:
The Launchpad actually includes a sysex routing for animating a string of text. Pretty nifty!
Now to the meat of the project, the Launchpad class.
Launchpad class
There's a lot here.
using System;
using System.Collections.Generic;
using System.IO;
using System.Linq;
using System.Text;
using System.Threading.Tasks;
using Windows.Devices.Enumeration;
using WindowsPreview.Devices.Midi;
using System.Runtime.InteropServices.WindowsRuntime;

namespace LaunchpadTest.Devices
{
    abstract class PadEventArgs : EventArgs
    {
        public byte PadNumber { get; private set; }
        public IMidiMessage Message { get; private set; }

        public PadEventArgs(byte padNumber, IMidiMessage message)
        {
            PadNumber = padNumber;
            Message = message;
        }
    }

    class PadPressedEventArgs : PadEventArgs
    {
        public byte Velocity { get; private set; }

        public PadPressedEventArgs(byte padNumber, byte velocity, IMidiMessage message)
            : base(padNumber, message)
        {
            Velocity = velocity;
        }
    }

    class PadReleasedEventArgs : PadEventArgs
    {
        public PadReleasedEventArgs(byte padNumber, IMidiMessage message)
            : base(padNumber, message)
        {
        }
    }

    enum PadMappingMode
    {
        XY = 0x00,
        DrumRack = 0x01
    }

    enum BufferingMode
    {
        Simple = 0x20,
        Buffered0 = 0x24,
        Buffered1 = 0x21,
        Buffered0PlusCopy = 0x34,
        Buffered1PlusCopy = 0x31,
        Flash = 0x28
    }

    enum LedIntensity
    {
        Dim = 0x7D,
        Normal = 0x7E,
        Brightest = 0x7F
    }

    enum KnownPadColors
    {
        Off = 0x0C,
        DimRed = 0x0D,
        MediumRed = 0x0E,
        FullRed = 0x0F,
        DimAmber = 0x1D,
        Yellow = 0x3E,
        FullAmber = 0x3F,
        DimGreen = 0x1C,
        MediumGreen = 0x2C,
        FullGreen = 0x3C,
    }

    // yes, I just mangled the English language for these
    enum TextScrollingSpeed
    {
        Slowest = 0x01,
        Slower = 0x02,
        Slow = 0x03,
        Normal = 0x04,
        Fast = 0x05,
        Faster = 0x06,
        Fastest = 0x07
    }

    /// <summary>
    /// NOTE: Works with Launchpad S, not original Launchpad
    /// TBD if works with Launchpad Mini. Not tested.
    /// </summary>
    class LaunchpadInterface :IDisposable
    {
        public event EventHandler<PadPressedEventArgs> PadPressed;
        public event EventHandler<PadReleasedEventArgs> PadReleased;
        public event EventHandler TextScrollingComplete;

        private const byte InputMidiChannel = 0;
        private const byte OutputMidiChannel = 0;

        private MidiInPort _midiIn;
        private MidiOutPort _midiOut;

        private PadMappingMode _currentMappingMode;

        public void InitializeMidi(MidiDeviceInformation midiInToPC, MidiDeviceInformation midiOutToLaunchpad)
        {
            InitializeMidi(midiInToPC.Id, midiOutToLaunchpad.Id);
        }

        public void InitializeMidi(DeviceInformation midiInToPC, DeviceInformation midiOutToLaunchpad)
        {
            InitializeMidi(midiInToPC.Id, midiOutToLaunchpad.Id);
        }

        public async void InitializeMidi(string midiInToPCDeviceId, string midiOutToLaunchpadDeviceId)
        {
            // acquire the MIDI ports

            // TODO: Exception handling

            _midiIn = await MidiInPort.FromIdAsync(midiInToPCDeviceId);
            _midiIn.MessageReceived += OnMidiInMessageReceived;

            _midiOut = await MidiOutPort.FromIdAsync(midiOutToLaunchpadDeviceId);

            SetPadMappingMode(PadMappingMode.XY);
        }

        private void OnMidiInMessageReceived(MidiInPort sender, MidiMessageReceivedEventArgs args)
        {
            // handle incoming messages
            // these are USB single-device connections, so we're not going to do any filtering

            if (args.Message is MidiNoteOnMessage)
            {

                var msg = args.Message as MidiNoteOnMessage;

                if (msg.Velocity == 0)
                {
                    // note off
                    if (PadReleased != null)
                        PadReleased(this, new PadReleasedEventArgs(msg.Note, msg));
                }
                else
                {
                    // velocity is always 127 on the novation, but still passing it along here
                    // in case they add touch sensitivity in the future

                    // note on
                    if (PadPressed != null)
                        PadPressed(this, new PadPressedEventArgs(msg.Note, msg.Velocity, msg));
                }
            }
            else if (args.Message is MidiControlChangeMessage)
            {
                var msg = args.Message as MidiControlChangeMessage;

                if (msg.Controller == 0 && msg.ControlValue == 3)
                {
                    // this is the notification that text has stopped scrolling
                    if (TextScrollingComplete != null)
                        TextScrollingComplete(this, EventArgs.Empty);
                }
                else
                {
                    System.Diagnostics.Debug.WriteLine("Unhandled MIDI-IN control change message controller: " + msg.Controller + ", value: " + msg.ControlValue);
                }
            }
            else
            {
                System.Diagnostics.Debug.WriteLine("Unhandled MIDI-IN message " + args.Message.GetType().ToString());
            }

        }

        public void ReleaseMidi()
        {
            if (_midiIn != null)
            {
                _midiIn.MessageReceived -= OnMidiInMessageReceived;
                _midiIn.Dispose();
            }

            if (_midiOut != null)
            {
                _midiOut.Dispose();
            }
        }


        // http://d19ulaff0trnck.cloudfront.net/sites/default/files/novation/downloads/4700/launchpad-s-prm.pdf

        /// <summary>
        /// Assumes launchpad is in XY layout mode
        /// </summary>
        /// <param name="row"></param>
        /// <param name="column"></param>
        /// <param name="color"></param>
        public void TurnOnPad(int row, int column, byte color)
        {
            TurnOnPad((byte)(row * 16 + column), color);
        }

        public void TurnOnPad(int row, int column, KnownPadColors color)
        {
            TurnOnPad((byte)(row * 16 + column), color);
        }

        public void TurnOnPad(byte padNumber, byte color)
        {
            if (MidiOutPortValid())
            {
                _midiOut.SendMessage(new MidiNoteOnMessage(OutputMidiChannel, padNumber, color));
            }
        }

        public void TurnOnPad(byte padNumber, KnownPadColors color)
        {
            TurnOnPad(padNumber, (byte)color);
        }


        public static byte RedGreenToColorByte(byte red, byte green, byte flags=0x0C)
        {
            byte color = (byte)(0x10 * (green & 0x03) + (red & 0x03) + flags);

            //System.Diagnostics.Debug.WriteLine("Red: 0x{0:x2}, Green: 0x{1:x2}, Color: 0x{2:x2}", red, green, color);

            return color;
        }

        public void TurnOffPad(byte row, byte column)
        {
            TurnOnPad(row, column, KnownPadColors.Off);
        }

        public void TurnOffPad(byte padNumber)
        {
            TurnOnPad(padNumber, KnownPadColors.Off);
        }

        public void ScrollText(string text, KnownPadColors color, TextScrollingSpeed speed = TextScrollingSpeed.Normal, bool loop = false)
        {
            ScrollText(text, (byte)color, speed, loop);
        }

        public void ScrollText(string text, byte color, TextScrollingSpeed speed = TextScrollingSpeed.Normal, bool loop = false)
        {
            if (MidiOutPortValid())
            {
                var encoding = Encoding.GetEncoding("us-ascii");
                var characters = encoding.GetBytes(text);

                if (loop)
                    color += 64;        // set bit 4 to set looping

                //
                var header = new byte[] { 0xF0, 0x00, 0x20, 0x29, 0x09, color, (byte)speed};
                var fullData = new byte[characters.Length + header.Length];

                header.CopyTo(fullData, 0);                     // header info, including color
                characters.CopyTo(fullData, header.Length);     // actual text
                fullData[fullData.Length - 1] = 0xF7;           // sysex terminator

                _midiOut.SendMessage(new MidiSystemExclusiveMessage(fullData.AsBuffer()));
            }
        }

        public void StopScrollingText()
        {
            var data = new byte[] { 0xF0, 0x00, 0x20, 0x29, 0x09, 0x00, 0xF7};

            _midiOut.SendMessage(new MidiSystemExclusiveMessage(data.AsBuffer()));

        }


        public void Reset()
        {
            // NOTE: this also changes the mapping mode to the default power-on value
            // We'll have a real problem keeping that in sync

            if (MidiOutPortValid())
            {
                _midiOut.SendMessage(new MidiControlChangeMessage(OutputMidiChannel, 0x00, 0x00));

                _currentMappingMode = PadMappingMode.XY;
            }
        }

        public void TurnOnAllPads(LedIntensity intensity)
        {
            if (MidiOutPortValid())
            {
                _midiOut.SendMessage(new MidiControlChangeMessage(OutputMidiChannel, 0x00, (byte)intensity));
            }
        }

        public void SetPadMappingMode(PadMappingMode mode)
        {
            if (MidiOutPortValid())
            {
                _midiOut.SendMessage(new MidiControlChangeMessage(OutputMidiChannel, 0x00, (byte)mode));

                _currentMappingMode = mode;
            }
        }

        public void SetBufferingMode(BufferingMode mode)
        {
            if (MidiOutPortValid())
            {
                _midiOut.SendMessage(new MidiControlChangeMessage(OutputMidiChannel, 0x00, (byte)mode));
            }
        }

        private bool MidiOutPortValid()
        {
            return _midiOut != null;
        }

        private bool MidiInPortValid()
        {
            return _midiIn != null;
        }
    }
}
This class is not complete. For example, I haven't yet implemented the code to light up the top row of buttons, or handle their presses. There's no exception handling, and I've done only minimal testing.
Here are some interesting parts of the code
Events: This class raises separate events for pad pressed and released. This just involves translating MIDI note on and off messages. When I include the code for handling the top row, I'll likely add two more events, or augment the args to include information as to what type of button/pad was pressed.
I also raise and event for the Text Scrolling completed. If you look in the OnMidiMessageReceived function, you can see that I handle a specific control change message specially. The Launchpad sends this specific control change when the text has finished scrolling on the pads.
The ScrollText function uses the MIDI API to send a sysex (System Exclusive) message formatted per the Novation documentation. To stop scrolling the text, you simply send it blank text.
Tip
Our MIDI API just passes through a raw buffer, so you need to add the standard 0xF0 to the start and 0xF7 to the end of the buffer.
Lighting pads: To light a pad on the Launchpad, you send a MIDI Note On message with the appropriate pad number. The Launchpad has bi-color red/green LEDs. Each color can have a two-bit intensity between 0 and 3. This information is packed into specific bit positions in the velocity argument. Here's the format:
| Bit | Use |
| 6 | Leave as 0 |
| 5..4 | Green LED brightness |
| 3..2 | Buffer management |
| 1..0 | Red LED brightness |
I've provided some constants for common colors, but you can also calculate the colors manually or use the static function I've included in this class. There are more details in the Launchpad S developer's guide.
MainPage Code-behind
In the main page, I've added some code to handle the three buttons, and the notification that text scrolling has completed.
private LaunchpadInterface _launchpad;

private void Connect_Click(object sender, RoutedEventArgs e)
{
    if (OutputDevices.SelectedItem != null && InputDevices.SelectedItem != null)
    {
        if (_launchpad != null)
        {
            _launchpad.Dispose();
            _launchpad = null;
        }

        _launchpad = new LaunchpadInterface();

        _launchpad.PadPressed += _launchpad_PadPressed;
        _launchpad.PadReleased += _launchpad_PadReleased;
        _launchpad.TextScrollingComplete += _launchpad_TextScrollingComplete;

        _launchpad.InitializeMidi(
            (MidiDeviceInformation)InputDevices.SelectedItem,
            (MidiDeviceInformation)OutputDevices.SelectedItem);
    }
    else
    {
        var msg = new MessageDialog("Please select the appropriate input and output MIDI interfaces.");
        msg.ShowAsync();
    }

}

private void _launchpad_TextScrollingComplete(object sender, EventArgs e)
{
    for (int row = 0; row < 8; row++)
        for (int col = 0; col < 8; col++)
            _launchpad.TurnOnPad((byte)(row * 16 + col),
                LaunchpadInterface.RedGreenToColorByte((byte)(row % 4), (byte)(col % 4)));
}

private void _launchpad_PadReleased(object sender, PadReleasedEventArgs e)
{
    _launchpad.TurnOffPad(e.PadNumber);
}

private void _launchpad_PadPressed(object sender, PadPressedEventArgs e)
{
    _launchpad.TurnOnPad(e.PadNumber, KnownPadColors.FullRed);
}

private void Reset_Click(object sender, RoutedEventArgs e)
{
    if (_launchpad != null)
    {
        _launchpad.Reset();
    }
}

private void CoolStuff_Click(object sender, RoutedEventArgs e)
{
    if (_launchpad != null)
    {
        _launchpad.SetBufferingMode(BufferingMode.Simple);

        _launchpad.ScrollText("Hello World from Windows 8.1!",
                     KnownPadColors.FullRed, TextScrollingSpeed.Normal, false);
    }
}
This code creates an instance of the launch pad interface class, and wires up handlers. The MIDI interface selection code is identical to the previous blog post.
Note the TextScrollingComplete handler. The sequence of events is to display the scrolling text, and then display a gradient of sorts across the Launchpad pads. The text display happens in CoolStuff_Click, the gradient happens in the event handler.
Summary
Controlling the Launchpad from the Windows 8.1 app was pretty easy. As you can imagine, this is part of a larger project I have in mind. This app is just a test harness, but it has been good for proving out MIDI enumeration and the Launchpad interface.
This may work with the old Launchpad and the Launchpad Mini. I haven't yet tried them out, but will try out the Mini at least. I also intend to look at a couple of the other controllers (especially the Launch Control and Launch Control XL) to see if they make sense for what I plan to do with them.
When we release Windows 10 to developers, I'll make any updates to the Launchpad and MIDI enumeration code and then post it on GitHub for all to use.
The code for this project, in its current state, is available below. As before, you'll need Visual Studio 2015 to load and compile the project.
Links
- Download source code
- MIDI API overview from Build 2014
- Previous blog post on MIDI enumeration and add/removal detection
- Novation MIDI controllers
- Launchpad S developer's guide
- Original Launchpad developer's guide


Handling Device add/remove in Universal Apps (MIDI in this case) 28 Dec 2014 7:02 PM (10 years ago)
Many device-oriented apps (bluetooth, MIDI, etc.) require you to restart the app when you want to detect a new device. I've seen this both in Windows Store/Universal apps, and even in big desktop apps. Instead, these apps should detect changes during runtime, and respond gracefully.
Example:
You load up a synthesizer app. After it loads, you realize you forgot to plug in your keyboard controller. You then plug in the controller, but the app doesn't do anything.
Why does that happen? It happens because the app enumerates the devices at startup, but doesn't register for change notifications using the DeviceWatcher. The app likely enumerates devices using code similar to this:
var selector = MidiInPort.GetDeviceSelector();

var devices = await DeviceInformation.FindAllAsync(selector);

if (devices != null && devices.Count > 0)
{
    // MIDI devices returned
    foreach (var device in devices)
    {
        list.Items.Add(device);
    }
}
That's a nice and simply approach to listing devices, but it doesn't allow for change notification.
The rest of this post will show how to enumerate devices (using MIDI devices and the preview WinRT MIDI API on NuGet) and register to receive change notifications. The project will eventually be a test project for my Novation Launchpads, but for this post, we'll focus only on the specific problem of enumeration and change notification.
A custom device metadata class
First, rather than use the DeviceInformation class directly, I've used my own metadata class. This provides more flexibility for the future by decreasing reliance on the built-in class. It's also lighter weight, holding only the information we care about.
namespace LaunchpadTest.Devices
{
    class MidiDeviceInformation
    {
        public string Id { get; set; }
        public string Name { get; set; }
        public bool IsDefault { get; set; }
        public bool IsEnabled { get; set; }
    }
}
With that out of the way, let's look at the real code.
The MIDI class
Next, we'll create a class for interfacing with the MIDI device information in Windows. I'll list the entire source here and refer to it in the description that follows
using System;
using System.Collections.Generic;
using System.Linq;
using WindowsPreview.Devices.Midi;
using Windows.Devices.Enumeration;

namespace LaunchpadTest.Devices
{
    class Midi
    {
        public List<MidiDeviceInformation> ConnectedInputDevices { get; private set; }
        public List<MidiDeviceInformation> ConnectedOutputDevices { get; private set; }

        private DeviceWatcher _inputWatcher;
        private DeviceWatcher _outputWatcher;

        public event EventHandler InputDevicesEnumerated;
        public event EventHandler OutputDevicesEnumerated;

        public event EventHandler InputDevicesChanged;
        public event EventHandler OutputDevicesChanged;

        // using an Initialize method here instead of the constructor in order to
        // prevent a race condition between wiring up the event handlers and
        // finishing enumeration
        public void Initialize()
        {
            ConnectedInputDevices = new List<MidiDeviceInformation>();
            ConnectedOutputDevices = new List<MidiDeviceInformation>();

            // set up watchers so we know when input devices are added or removed
            _inputWatcher = DeviceInformation.CreateWatcher(MidiInPort.GetDeviceSelector());

            _inputWatcher.EnumerationCompleted += InputWatcher_EnumerationCompleted;
            _inputWatcher.Updated += InputWatcher_Updated;
            _inputWatcher.Removed += InputWatcher_Removed;
            _inputWatcher.Added += InputWatcher_Added;

            _inputWatcher.Start();

            // set up watcher so we know when output devices are added or removed
            _outputWatcher = DeviceInformation.CreateWatcher(MidiOutPort.GetDeviceSelector());

            _outputWatcher.EnumerationCompleted += OutputWatcher_EnumerationCompleted;
            _outputWatcher.Updated += OutputWatcher_Updated;
            _outputWatcher.Removed += OutputWatcher_Removed;
            _outputWatcher.Added += OutputWatcher_Added;

            _outputWatcher.Start();
        }


        private void OutputWatcher_EnumerationCompleted(DeviceWatcher sender, object args)
        {
            // let other classes know enumeration is complete
            if (OutputDevicesEnumerated != null)
                OutputDevicesEnumerated(this, new EventArgs());
        }

        private void OutputWatcher_Updated(DeviceWatcher sender, DeviceInformationUpdate args)
        {
            // this is where you capture changes to a specific ID
            // you could change this to be more specific and pass the changed ID
            if (OutputDevicesChanged != null)
                OutputDevicesChanged(this, new EventArgs());
        }

        private void OutputWatcher_Removed(DeviceWatcher sender, DeviceInformationUpdate args)
        {
            // remove from our collection the item with the specified ID

            var id = args.Id;

            var toRemove = (from MidiDeviceInformation mdi in ConnectedOutputDevices
                            where mdi.Id == id
                            select mdi).FirstOrDefault();

            if (toRemove != null)
            {
                ConnectedOutputDevices.Remove(toRemove);

                // notify clients
                if (OutputDevicesChanged != null)
                    OutputDevicesChanged(this, new EventArgs());
            }
        }

        private void OutputWatcher_Added(DeviceWatcher sender, DeviceInformation args)
        {
            var id = args.Id;

            // you could use DeviceInformation directly here, using the
            // CreateFromIdAsync method. However, that is an async method
            // and so adds a bit of delay. I'm using a trimmed down object
            // to hold MIDI information rather than using the DeviceInformation class

#if DEBUG
            // this is so you can see what the properties contain
            foreach (var p in args.Properties.Keys)
            {
                System.Diagnostics.Debug.WriteLine("Output: " + args.Name + " : " + p + " : " + args.Properties[p]);
            }
#endif

            var info = new MidiDeviceInformation();
            info.Id = id;
            info.Name = args.Name;
            info.IsDefault = args.IsDefault;
            info.IsEnabled = args.IsEnabled;

            ConnectedOutputDevices.Add(info);

            // notify clients
            if (OutputDevicesChanged != null)
                OutputDevicesChanged(this, new EventArgs());
        }


        // Input devices =============================================================

        private void InputWatcher_EnumerationCompleted(DeviceWatcher sender, object args)
        {
            // let other classes know enumeration is complete
            if (InputDevicesEnumerated != null)
                InputDevicesEnumerated(this, new EventArgs());
        }

        private async void InputWatcher_Updated(DeviceWatcher sender, DeviceInformationUpdate args)
        {
            // this is where you capture changes to a specific ID
            // you could change this to be more specific and pass the changed ID
            if (InputDevicesChanged != null)
                InputDevicesChanged(this, new EventArgs());
        }

        private void InputWatcher_Removed(DeviceWatcher sender, DeviceInformationUpdate args)
        {
            // remove from our collection the item with the specified ID

            var id = args.Id;

            var toRemove = (from MidiDeviceInformation mdi in ConnectedInputDevices
                            where mdi.Id == id
                            select mdi).FirstOrDefault();

            if (toRemove != null)
            {
                ConnectedInputDevices.Remove(toRemove);

                // notify clients
                if (InputDevicesChanged != null)
                    InputDevicesChanged(this, new EventArgs());
            }
        }

        private void InputWatcher_Added(DeviceWatcher sender, DeviceInformation args)
        {
            var id = args.Id;

            // you could use DeviceInformation directly here, using the
            // CreateFromIdAsync method. However, that is an async method
            // and so adds a bit of delay. I'm using a trimmed down object
            // to hold MIDI information rather than using the DeviceInformation class

#if DEBUG
            // this is so you can see what the properties contain
            foreach (var p in args.Properties.Keys)
            {
                System.Diagnostics.Debug.WriteLine("Input: " + args.Name + " : " + p + " : " + args.Properties[p]);
            }
#endif

            var info = new MidiDeviceInformation();
            info.Id = id;
            info.Name = args.Name;
            info.IsDefault = args.IsDefault;
            info.IsEnabled = args.IsEnabled;

            ConnectedInputDevices.Add(info);

            // notify clients
            if (InputDevicesChanged != null)
                InputDevicesChanged(this, new EventArgs());
        }
    }
}
There's some debug information in that class. You may find, when enumerating devices, that the properties contain information that will be useful to your app. So, I've added code to enumerate those properties and spit them out to the debug window. This code takes time, though, so make sure you don't include it in a production app.
The downloadable version of this class also implements IDisposable to unhook the events, and eventually dispose of other resources. This is a standard pattern implemented with code generated by Visual Studio 2015.
The DeviceWatcher class
The DeviceWatcher is the heart of this class. This is a Windows Runtime class that lets a developer listen for changes for any type of device in the system that they can normally find or enumerate using the DeviceInformation functions.
The developer simply creates a DeviceWatcher using the device selector for the devices they are interested in. A device selector can be thought of like a query or filter; it's used to filter the full device list down to only the ones you're interested in. Most device interfaces provide a way to easily get the selector for those devices. For example, MidiOutPort and MidiInPort both expose GetDeviceSelector methods which return the filter/query string.
_inputWatcher = DeviceInformation.CreateWatcher(MidiInPort.GetDeviceSelector());
_outputWatcher = DeviceInformation.CreateWatcher(MidiOutPort.GetDeviceSelector());
Once the watcher is created, the app should wire up the appropriate events and then start the watcher.
_outputWatcher.EnumerationCompleted += OutputWatcher_EnumerationCompleted;
_outputWatcher.Updated += OutputWatcher_Updated;
_outputWatcher.Removed += OutputWatcher_Removed;
_outputWatcher.Added += OutputWatcher_Added;

_outputWatcher.Start();
The events are important. The EnumerationCompleted event tells your app that all of the appropriate devices have had Added events fired. Typically you'd use this to then load the list into your UI, or notify the app to do so.
The Updated event tells your app that metadata about a device has been updated. For MIDI, this is typically not useful. Some other devices may use this, however.
The Added and Removed events tell the app when a device has been added or removed from the system. This is the most important part when it comes to change notifications. These are the two events that most apps do not pay attention to, and so require restarting to pick up device changes.
The Start method starts the watcher. Ensure you have wired up your events before calling this.
The test app
I built a little XAML/C# Universal app to test this out, using Visual Studio 2015. I unloaded the phone project as the preview MIDI API is available only for Windows (and only for 64 bit if you're on a 64 bit machine, or 32 bit if you're on a 32 bit machine -- "any CPU" is not supported for the preview.)
Here's a cropped version of the app on my PC
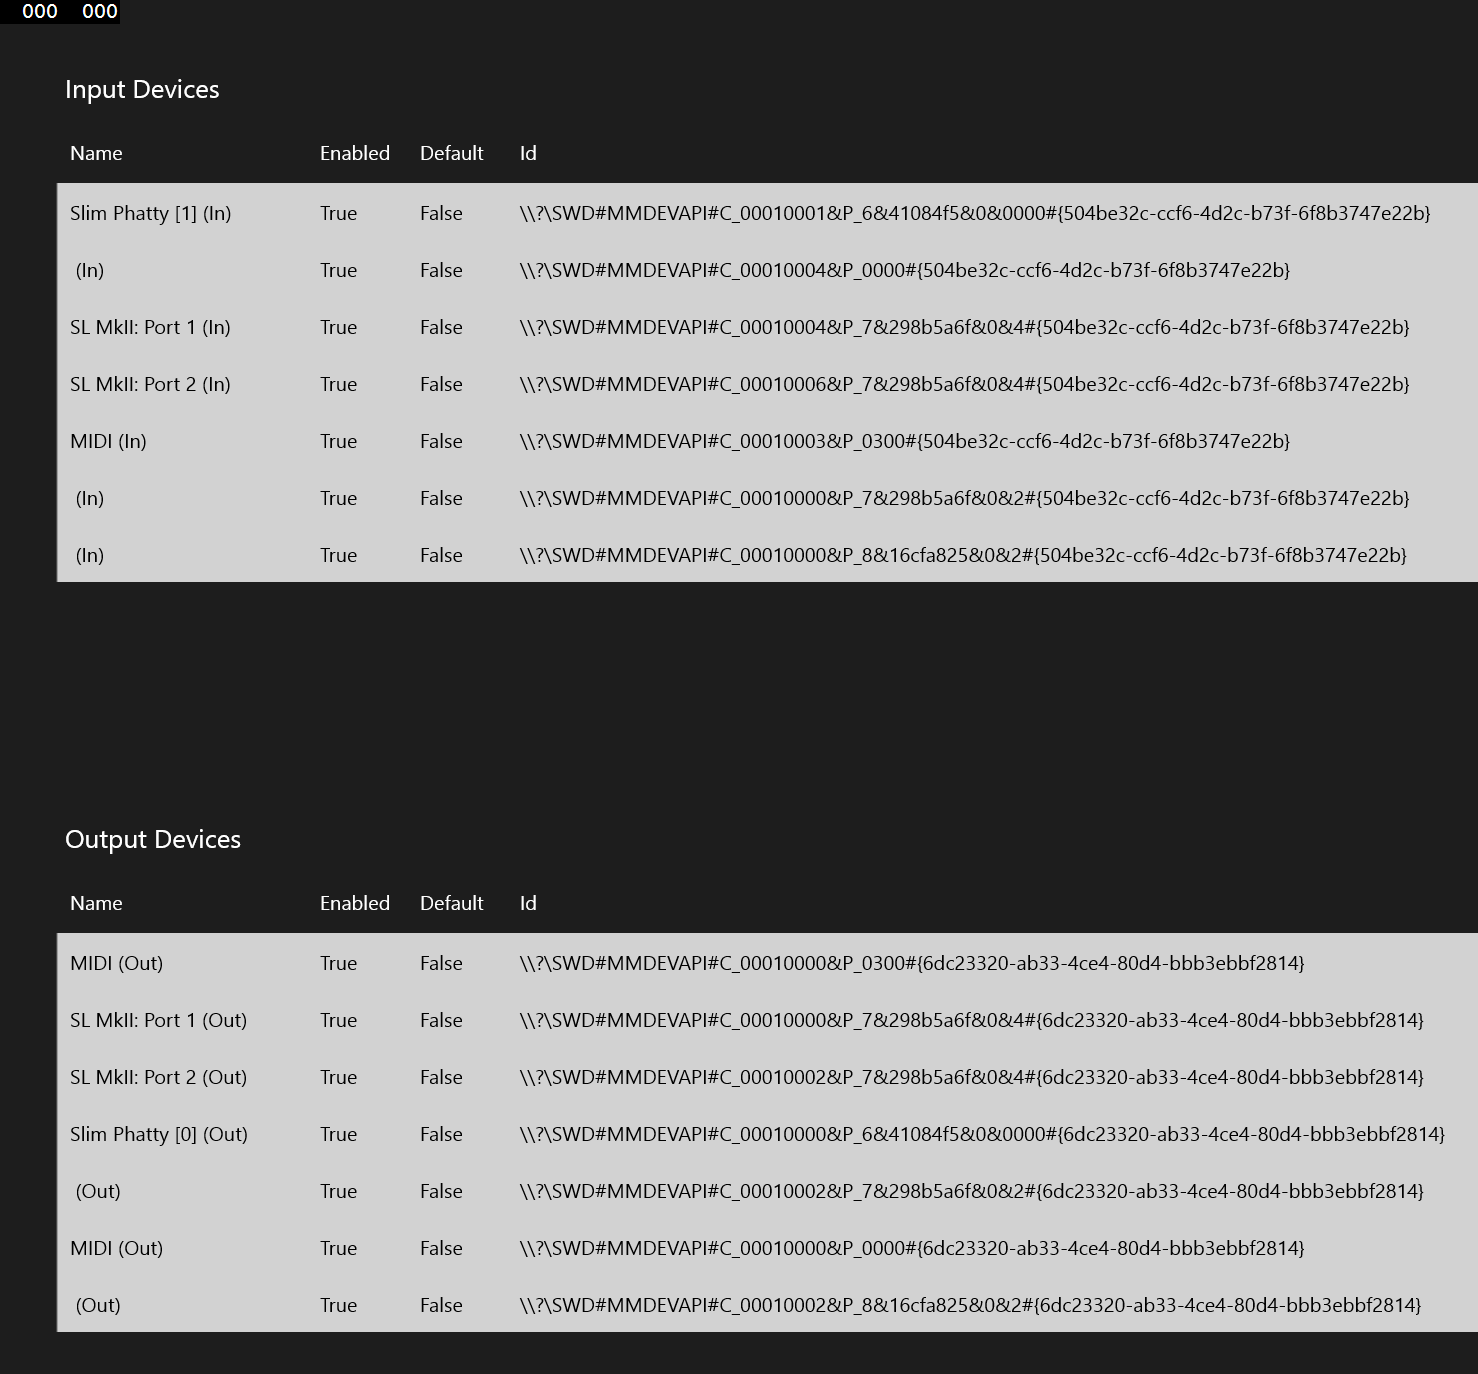
The UI is pretty simple. I have two list box controls which show the MIDI device names, IDs, whether they are enabled and whether or not they are the default device.
A note on MIDI device names
You may have noticed a few things.
1. The MIDI device names shown are not super helpful.
2. Not all MIDI devices on my system showed up in the list. You can see, for example, I have no default MIDI device listed.
We're working on both of those. The latter is being tracked as a bug for certain MOTU and Roland devices; our enumeration code missed those devices because of how they show up in the device tree. If you've used the preview MIDI API and have had one or more devices fail to enumerate, please let us know as soon as possible. We're testing a lot of devices, but I want to make sure we have this right when we launch Windows 10, and more data is better.
As for names, we're working on a proper scheme so the names are meaningful and consistent. Obviously blank names are not helpful. In my case, it's some of my Novation products (my two Launchpad S controllers in particular) that are coming up with blank names.
XAML:
The XAML is just two list box controls with a heading.
<Page
    x:Class="LaunchpadTest.MainPage"
    xmlns="http://schemas.microsoft.com/winfx/2006/xaml/presentation"
    xmlns:x="http://schemas.microsoft.com/winfx/2006/xaml"
    xmlns:local="using:LaunchpadTest"
    xmlns:d="http://schemas.microsoft.com/expression/blend/2008"
    xmlns:mc="http://schemas.openxmlformats.org/markup-compatibility/2006"
    mc:Ignorable="d">
    <Grid Background="{ThemeResource ApplicationPageBackgroundThemeBrush}">
        <Grid.Resources>
            <Style TargetType="TextBlock" x:Key="TextBlockStyle">
                <Setter Property="FontSize" Value="20" />
                <Setter Property="Margin" Value="5" />
            </Style>
            <Style TargetType="TextBlock" x:Key="HeaderTextBlockStyle">
                <Setter Property="FontSize" Value="26" />
                <Setter Property="Margin" Value="10,20,10,20" />
            </Style>
        </Grid.Resources>
        <Grid Margin="50">
            <Grid.RowDefinitions>
                <RowDefinition Height="*" />
                <RowDefinition Height="*" />
            </Grid.RowDefinitions>

            <StackPanel Grid.Row="0" Margin="5">
                <TextBlock Text="Input Devices" Style="{StaticResource HeaderTextBlockStyle}"/>
                <StackPanel Orientation="Horizontal" Margin="10">
                    <TextBlock Text="Name" Width="240" Style="{StaticResource TextBlockStyle}" />
                    <TextBlock Text="Enabled" Width="90" Style="{StaticResource TextBlockStyle}" />
                    <TextBlock Text="Default" Width="90" Style="{StaticResource TextBlockStyle}" />
                    <TextBlock Text="Id" Style="{StaticResource TextBlockStyle}" />
                </StackPanel>

                <ListBox x:Name="InputDevices">
                    <ListBox.ItemTemplate>
                        <DataTemplate>
                            <Grid>
                                <Grid.ColumnDefinitions>
                                    <ColumnDefinition Width="250" />
                                    <ColumnDefinition Width="100" />
                                    <ColumnDefinition Width="100" />
                                    <ColumnDefinition Width="*" />
                                </Grid.ColumnDefinitions>
                                <TextBlock Text="{Binding Name}" Grid.Column="0" Style="{StaticResource TextBlockStyle}"/>
                                <TextBlock Text="{Binding IsEnabled}" Grid.Column="1" Style="{StaticResource TextBlockStyle}"/>
                                <TextBlock Text="{Binding IsDefault}" Grid.Column="2" Style="{StaticResource TextBlockStyle}"/>
                                <TextBlock Text="{Binding Id}" Grid.Column="3" Style="{StaticResource TextBlockStyle}"/>
                            </Grid>
                        </DataTemplate>
                    </ListBox.ItemTemplate>
                </ListBox>
            </StackPanel>

            <StackPanel Grid.Row="1" Margin="5">
                <TextBlock Text="Output Devices" Style="{StaticResource HeaderTextBlockStyle}"/>
                <StackPanel Orientation="Horizontal" Margin="10">
                    <TextBlock Text="Name" Width="240" Style="{StaticResource TextBlockStyle}" />
                    <TextBlock Text="Enabled" Width="90" Style="{StaticResource TextBlockStyle}" />
                    <TextBlock Text="Default" Width="90" Style="{StaticResource TextBlockStyle}" />
                    <TextBlock Text="Id" Style="{StaticResource TextBlockStyle}" />
                </StackPanel>
                <ListBox x:Name="OutputDevices">
                    <ListBox.ItemTemplate>
                        <DataTemplate>
                            <Grid>
                                <Grid.ColumnDefinitions>
                                    <ColumnDefinition Width="250" />
                                    <ColumnDefinition Width="100" />
                                    <ColumnDefinition Width="100" />
                                    <ColumnDefinition Width="*" />
                                </Grid.ColumnDefinitions>
                                <TextBlock Text="{Binding Name}" Grid.Column="0" Style="{StaticResource TextBlockStyle}"/>
                                <TextBlock Text="{Binding IsEnabled}" Grid.Column="1" Style="{StaticResource TextBlockStyle}"/>
                                <TextBlock Text="{Binding IsDefault}" Grid.Column="2" Style="{StaticResource TextBlockStyle}"/>
                                <TextBlock Text="{Binding Id}" Grid.Column="3" Style="{StaticResource TextBlockStyle}"/>
                            </Grid>
                        </DataTemplate>
                    </ListBox.ItemTemplate>
                </ListBox>
            </StackPanel>
        </Grid>

    </Grid>
</Page>
x
Code-behind:
For purposes of this test, I put all the code in the main page's code-behind. The code here is responsible for creating the Midi class and listening to the events it fires off for device enumeration and device change.
using LaunchpadTest.Devices;
using System;
using Windows.UI.Xaml;
using Windows.UI.Xaml.Controls;

namespace LaunchpadTest
{
    public sealed partial class MainPage : Page
    {
        private Midi _midi;

        public MainPage()
        {
            Loaded += MainPage_Loaded;

            this.InitializeComponent();
        }

        private void MainPage_Loaded(object sender, RoutedEventArgs e)
        {
            _midi = new Midi();

            _midi.OutputDevicesEnumerated += _midi_OutputDevicesEnumerated;
            _midi.InputDevicesEnumerated += _midi_InputDevicesEnumerated;

            _midi.Initialize();
        }

        private async void _midi_InputDevicesEnumerated(object sender, EventArgs e)
        {
            if (!Dispatcher.HasThreadAccess)
            {
                await Dispatcher.RunAsync(Windows.UI.Core.CoreDispatcherPriority.Normal, () =>
                {
                    InputDevices.ItemsSource = _midi.ConnectedInputDevices;

                    // only wire up device changed event after enumeration has completed
                    _midi.InputDevicesChanged += _midi_InputDevicesChanged;

                });
            }
        }

        private async void _midi_InputDevicesChanged(object sender, EventArgs e)
        {
            if (!Dispatcher.HasThreadAccess)
            {
                await Dispatcher.RunAsync(Windows.UI.Core.CoreDispatcherPriority.Normal, () =>
                {
                    InputDevices.ItemsSource = null;
                    InputDevices.ItemsSource = _midi.ConnectedInputDevices;
                });
            }
        }

        // Output devices ------------------------------------------------

        private async void _midi_OutputDevicesEnumerated(object sender, EventArgs e)
        {
            if (!Dispatcher.HasThreadAccess)
            {
                await Dispatcher.RunAsync(Windows.UI.Core.CoreDispatcherPriority.Normal, ()=>
                {
                    OutputDevices.ItemsSource = _midi.ConnectedOutputDevices;

                    // only wire up device changed event after enumeration has completed
                    _midi.OutputDevicesChanged += _midi_OutputDevicesChanged;
                });
            }
        }

        private async void _midi_OutputDevicesChanged(object sender, EventArgs e)
        {
            if (!Dispatcher.HasThreadAccess)
            {
                await Dispatcher.RunAsync(Windows.UI.Core.CoreDispatcherPriority.Normal, () =>
                {
                    OutputDevices.ItemsSource = null;
                    OutputDevices.ItemsSource = _midi.ConnectedOutputDevices;
                });
            }
        }
    }
}
In the code-behind, you can see how I respond to the device change events by rebinding the data to the list box controls.
Also, you'll see that I do the initial binding only once I receive notification that the devices have been enumerated. At that time, I also wire up the device changed events. If you wire them up earlier, you'll get a bunch of events during enumeration, and that will be just noise for your app.
Run the app with a USB MIDI interface plugged in. Then, after the interface shows up in the list, unplug it from Windows. You should see it disappear from the list box(es).
Summary
I like to work with MIDI and synthesizers, but this approach will work for any of the WinRT recognized devices your apps can use. It's a good practice to respond properly to device add and removal to either show new devices, or ensure you stop communicating with disconnected ones.
This pattern wasn't exactly obvious from the materials we've supplied on MSDN, so I hope this post has helped clear up the usage of the DeviceWatcher.
Now go build some device apps, especially MIDI. :)
References
- Build 2014: Sequencers, Synthesizers, and Software, oh my! Building Great Music Creation Apps for the Windows Store
- WindowsPreview MIDI API
- DeviceWatcher class
- Windows Runtime API for MIDI Preview (NuGet)
- Visual Studio 2015 Preview Downloads
- Source code for this blog post
Running a simple .NET console app on the Intel Galileo with Windows 19 Aug 2014 10:34 PM (11 years ago)
A few weeks back, my friend Morten Neilsen tweeted that he was able to get a .NET console app running on the Intel Galileo with Windows. I was curious because that's not a scenario we thought would work. So, I thought I'd try it out myself.
Please note that .NET is not currently supported on the Intel Galileo, but it's still fun to experiment and see what works and what doesn't.
To join the Windows on Devices program and code for the Galileo, purchase an Intel Galileo Gen 1 from Amazon or another retailer and sign up at http://windowsondevices.com . From there, follow the machine setup and Galileo setup steps for people who have their own board.
Project setup
In Visual Studio 2013, I created a new C# Console Application project.
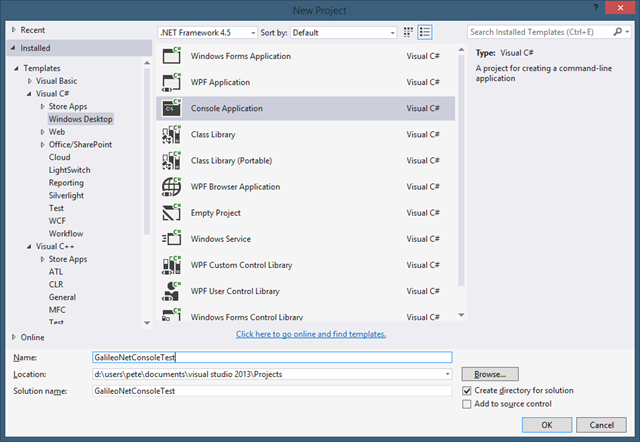
I left everything at the defaults. Once in the project, I wrote some simple code (most of .NET is unsupported and/or not present, so the code does need to be simple)
using System;

namespace GalileoNetConsoleTest
{
    class Program
    {
        static void Main(string[] args)
        {
            Console.WriteLine("This is a .NET Test");
        }
    }
}
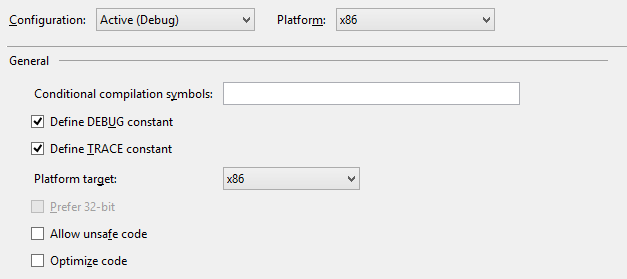
I then changed the build properties to compile only for x86. This may be an optional step, but the Galileo is 32 bit x86 only.
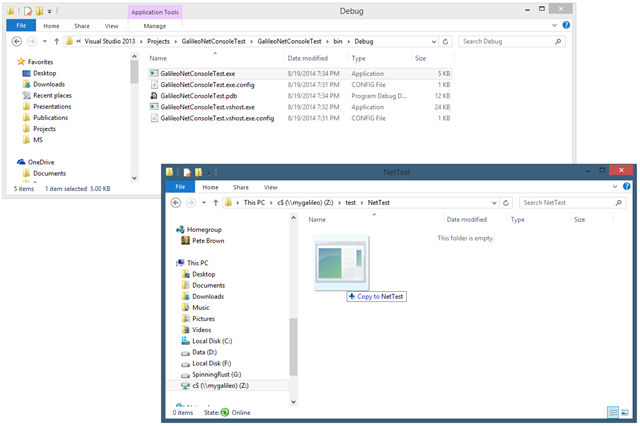
Then, I simply copied the file to my Galileo. I use a network drive mapped to C$ ; it is Windows afterall.
Then, in my open Telnet session, I ran the app.
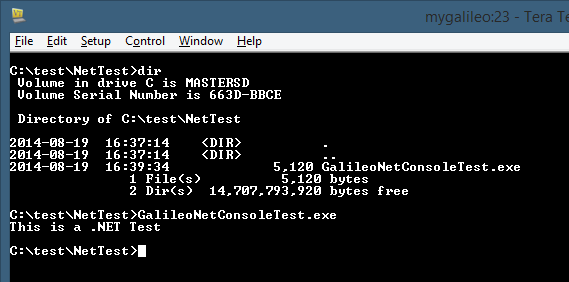
Success!
Granted, that was a super simple app, but it's nice to see that it works.
So what works?
You saw that the basic console output works. Similarly, the core language constructs work, as should most/all things in mscorlib/mscoree. The instruction set for the Galileo is missing some things that .NET generally relies upon, however, so most non-trivial code is not expected to work. For example. if you try to use System.Diagnostics.Debug, you'll get a TargetInvocationException saying that System is not present. Same thing with, say, Console.Beep().
You can do a lot of the same types of programs we used to write back when we first learned programming, however. Here's an example that includes a few things similar to the early programs many of us did on the C64.
using System;

namespace GalileoNetConsoleTest
{
    class Program
    {
        static void Main(string[] args)
        {
            Console.WriteLine("This is a .NET Test");

            for (int i = 0; i < 50; i++)
            {
                Console.Write(i + ", ");
            }

            Console.WriteLine();
            Console.Write("What is your name? ");
            var name = Console.ReadLine();

            Console.WriteLine();
            Console.WriteLine("Hello there, " + name);

            string rev = string.Empty;
            for (int i = name.Length - 1; i >= 0; i-- )
            {
                rev += name[i];
            }

            Console.WriteLine("Your name reversed is " + rev.ToLower());

            Console.WriteLine("It is now " + DateTime.Now.ToLongTimeString());

            var rand = new Random();
            var dieroll = rand.Next(5) + 1;

            Console.WriteLine("You rolled " + dieroll);
        }
    }
}
Copied it over as before, and ran it from the Telnet session window:
Beautiful. :)
Note that my Galileo is on Pacific time, not Eastern time. I didn't pay much attention to that until this little sample. It's easy to change the actual time using the Time command, but setting the time zone requires a bit more work with reg files, or an additional app.
I haven't gone through to figure out exactly what works and what doesn't. However, for now, you can make the assumption that if it's outside of System, it won't work, and if it's inside of System, it may work, depending on which DLL it's implemented in.
Next steps
This is all preliminary stuff. The Windows on Devices program is in its early stages, and as such, Wiring is your best bet in terms of the most mature part of the developer platform. That said, it's nice to see that we can sneak a little .NET on there if we want to :)
As mentioned in the FAQ, our goal with the Windows on Devices program is not just Wiring, but also the Universal App model (headless, of course). For now, it's fun to explore to see how far we can go with both the supported and unsupported features of the current platform.
Join us for Episode 0: The pilot episode of our new YouTube show! 4 Sep 2013 6:54 PM (12 years ago)
Tomorrow (Thursday) at 3:00pm Eastern Daylight Time (12:00 noon US West coast time, and 7:00pm GMT) G. Andrew Duthie and I are going to have the pilot episode of our new independent YouTube show!
We don't yet have a name, but we have enough topics to fill months worth of shows. In this show and others, we'll talk everything from microcontrollers, 3d printers, cool apps, synthesizers, embedded dev, 4k displays, electronics kits, embedded dev, *copters, games, and much more. Anything of interest to us is in scope, and we're pretty geeky.
Show URL:
http://www.youtube.com/watch?v=TXKurxv4vzI
Please join us live! This is an interactive show. Post your questions and topic ideas before and during the show on the YouTube page. We'll monitor the comments in real-time and answer questions, and take ideas for future topics.
Have questions or topic ideas? Post them on the YouTube page now and we'll get to them during the show.
Designing the hub experience for Windows Store creative (art, music, video) apps 2 Sep 2013 10:41 PM (12 years ago)
I've been working with a large number of musicials and creative music companies over the past two years. One which just launched an app is Image-Line with their awesome FL Studio Groove for Windows 8. A question I see time and again from these companies is related to the Windows Store app experience, and how something like a hub-based main screen fits in to music apps. I've explained it over skype and email, but this is something which really needs to be shown.
NOTE: Please keep in mind I'm not a user experience expert. Take the ideas you see here and adapt them based upon your own considered design approach and understanding of the experiences you're trying to create. For further information, refer to the guidance at http://design.windows.com.
Windows 8.1 and Visual Studio 2013 have further standardized on the idea of a main page for the app with a hub control on it. The "two rows of boxes" approach from Windows 8 was simply not flexible enough to create all the experiences you wanted to create.
The problem
Synthesizer and sequencer apps tend to be complex, and require a lot of domain knowledge before you can become productive using them. Many users ask for tutorials as part of the app package. These apps also tend to support in-app purchases, new project templates, and much more. In short, there's a fairly large amount of information, updated post-sale, which must be presented to the user in order to make the user's experience as good as possible.
For example, when I load up Cubase 7 on my Windows 8.1 desktop, this is what I see:

Similarly, when I load up FL Studio Groove, I see this:

In this 1.0 release, this doesn't do quite as much as a full hub, but Image-Line may add more here, including links to tutorials, content, etc. It also includes some functions which are more app-bar appropriate like "save groove" and "render to audio".
Here's Music Maker Jam on my desktop PC. As one of the early Windows 8 apps, it follows the earlier grouped GridView style of hub. Unlike the others here, you can see it also has a large section for in-app purchases of content.

So far, it seems, based on the above examples and my own experience, that a main page for a creative music app likely needs to include:
- Recent projects and example projects
- Templates for creating new projects
- Links to (or inline) tutorials and support
- In-app purchases for add-on content (project templates, patches, grooves, samples, more)
- Possible up-sell to larger product suites (like the desktop app)
- Possible ad-support (on the main page only, not on the performance surfaces)
In some cases, apps may be suites with a large number of synthesizers or effects available. Although I don't address that specifically here, you can easily represent them with a hub design (and appropriate navigation) as well.
A possible main page approach
Given the requirements, a hub or main page might look something like this:

This main page includes a hub with the recent and example songs, templates for creating new projects, in-app purchases, tutorials, and either an upsell or ad spot at the far right. As a hub for a synthesizer/sequencer or other creative music app, it could certainly work. There are a couple issues with this design, however:
- Presumably you want to get the promoted templates/content in front of the user during every session, without scrolling. In this case, that content is barely visible.
- It's a bunch of boxes.
The hub design popularized by the Bing apps, and formalized in the Windows 8.1 templates provides some other options. By default, the template looks like this

The big gray box on the left is for the hero image. The section on the right are entirely up to the designer. As built, there's no parallax scrolling or other similar features, but I've seen apps built with those features while still leveraging this control and template.
Let's say that having the promoted or sale item on screen is sufficient for in-app purchase support. We could then use the hero image for the in-app purchase promo image, and still show the remaining content on-screen. The resulting wireframe might look something like this:

Although still predominately "a bunch of boxes", I've modified two main areas to get to this example: the promotion and the recent projects. In some apps, it makes sense, as long as it doesn't impede horizontal panning, to have a small section of the hub scroll vertically. In this case, I use that capability to support showing a larger number of recent projects in less horizontal space. In most cases, a user will be interested only in the last two or three, so they would rarely need to scroll down. However, if they want to get to the 20th most recent, they can quickly find it here as well. Just don't overdo the vertical scrolling in something that is predominately a horizontal panning experience.
The second piece is the promotional section. I've trimmed down the in-app purchase hub section and also elevated the positioning of the promoted item. Through the use of an attractive hero image related to the app and to the item being promoted, it is more likely to catch the customer's eye. Additionally, since it's an attractive image, it feels more like an enhancement to the app rather than an ad.
Branding
In all of the above wireframes, I used simple wireframe branding. In practice, you may want the app name to be an appropriate logo with the name. You'll want to use fonts and colors appropriate to your app and your brand. The wireframes are not the final product here, so don't assume the app has to be as dry looking as that. In short, your app's hub design doesn't need to be a bunch of boxes as long as it is intuitive.
Navigation
Along with the main page with the hub, I recommend including navigation which reflects this design. If you notice above, the "New Project", "More templates and sounds" and "Tutorials" hub sections all have the ">" glyph, which indicates they navigate to another page when the header is clicked.
In most cases, those links will go to secondary hubs. That is, pages which are not the detail information, but are instead made up of more lists or groups. For example, the In-App Purchase Hub might be quite complex with a large number of pages for categories, previews, details, etc. The Tutorials page may have step-by-step instructions as well as pages with full-screen video.

Of course, those are not the only pages in the app. You'll have performance pages, settings, and all the other pages which support the main scenario for the app.
The top app bar (the "nav bar") should reflect this navigation as well, allowing a user to get to the home page as well as to each of these hubs pages.

(If you're looking for an example of an effective top nav bar, Bing News is a great example.)
That's a lot of work, isn't it?
After looking at all of this, you may be thinking "holy crap there are a lot of pages and navigation to implement in DirectX". Don't despair - we've made this really simple for you to accomplish. The hub design is one of the reasons that XAML is available in C++, and why it works so well in compositing with DirectX. You can focus on the main use cases for your app, and build that all in DirectX, using the lowest latency and highest performance techniques for touch, visuals, and sound generation, and then design the hub, app bars, nav bars, and navigation all using XAML and C++.

You can create a new DirectX App (XAML) project, and use the Hub control from within the XAML pages in that app. The pages which are the performance surfaces may include XAML for the app bar and nav bar, but otherwise are all DirectX.
Final Thoughts
Many of my app builder friends in the music industry come from an iOS background, where the hub is not a formalized concept. This post was written to help communicate how a hub design fits into a Windows Store app, and both increases visibility of in-app purchases and help content, but also makes the app friendly and easy to use. Not only that, but you can easily adapt the UI for varying amounts of information and varying sizes of display without a lot of complex DirectX layout logic. The formalized hub is a concept brand new to many developers and designers outside of Windows, but it's one of the most useful patterns we've put forth on our platform. I encourage you to see how you can make your experience better by implementing it in your own creative apps.
References
- Disney Fairies: The evolution of the hub screen box layout in Windows Store apps
- Windows Store Design Guidance
- Windows Store User Experience Patterns
- Navigation Design for Windows Store Apps
- Hub Control Documentation
- XAML Hub control sample (C#, but easily adapted to C++)
- XAML DirectX C++ 3D shooting game sample (shows XAML + DirectX Interop)
LEAP Motion on Windows 8.1 for MIDI control and more 25 Aug 2013 10:37 PM (12 years ago)
I stopped into Best Buy yesterday and picked up something I had been considering toying with: a LEAP Motion. This is an interesting little $79 device which turns the airspace at your computer into a live space for interaction. It recognizes all ten fingers on your hands, differentiates between left and right hand, open and closed, and can read the pitch, roll, and yaw of your hand, pinch and swipe gestures and more, all in meatspace.
I haven't yet torn it down to see what type of imagine sensors it is using to map the space around it. Of course, the folks at SparkFun already have, however, so feel free to look at their article if you want to see what's in this tiny box.
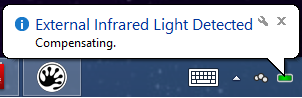
It appears to be sensitive to IR light, similar to how the Kinect is sensitive to too much sunlight in a room. I turned on a compact fluorescent to take a photo and this popped up:
Installation
For some reason, the LEAP Motion uses a proprietary USB connector. It's normal USB on one end and then what looks like a mini and micro next to each other on the other end. I have no idea why they did this, as there's no electrical reason given the standard single USB connector on the USB side. They did think to provide two lengths of USB cable, so that's a help. However, if the LEAP Motion is something you intend to travel with, you'll need to make doubly sure you have the right cable, as you can't just borrow one from a friend or pick up a spare locally.
CORRECTION: This is not a proprietary connector. It's a USB3.0 Micro-B connector -- the first I've seen in the wild. Still, good luck finding a cable in a store. At least it's a standard cable, however. Also, this suggests that plugging into a USB 3.0 port would be a good idea.
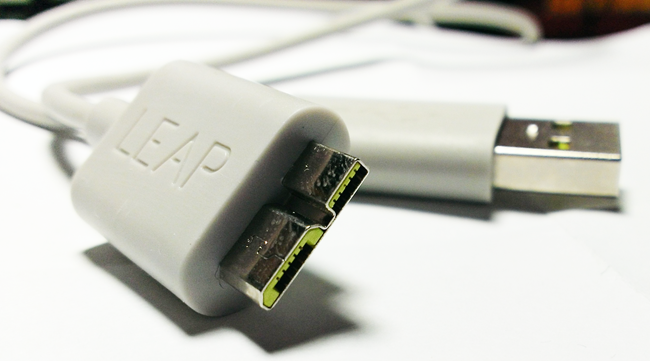
As a matter of taste, I prefer my USB cables on my desk to be black so I don't see them. White cables are distracting. Also, this cable is a bit stiff and tends to pull the LEAP Motion off-center.
Anyway, once plugged in, the firmware updated. Unfortunately, that bricked it and afterwards, it wasn't recognized. It showed up as "Westbridge" under "other devices" in the device manager. I searched on this, and ended up on the LEAP Motion site where they had a very helpful troubleshooting page and firmware reset utility to fix this exact problem.
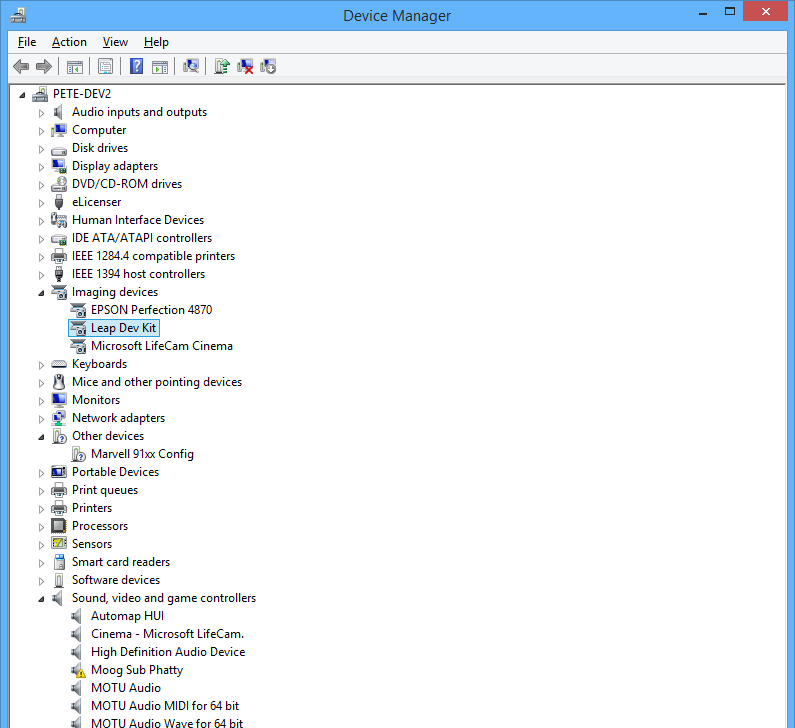
Once I saw "Leap Dev Kit" in the device manager, I knew it was working. It is interesting that it shows up as a "Dev Kit" and not a consumer device name. Perhaps the firmware fix download resets it to some sort of dev status, or was intended for developers.
As an aside, the LEAP Motion appears to be referred to both as "Leap Motion" and "LEAP Motion" on their website and by their employees. Not sure which is correct, but "Leap Motion" appears to be what shows up all over the PC after the installation. I'm surprised their branding folks didn't go crazy on them for mixing the two.
Testing with the Visualizer
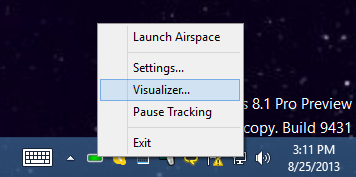
Now that the device was plugged in and recognized, and showing the green power LED, I wanted to test it out. I right-clicked the LEAP Motion icon in the tray and selected "Visualizer…" so that I could test the basic operation.
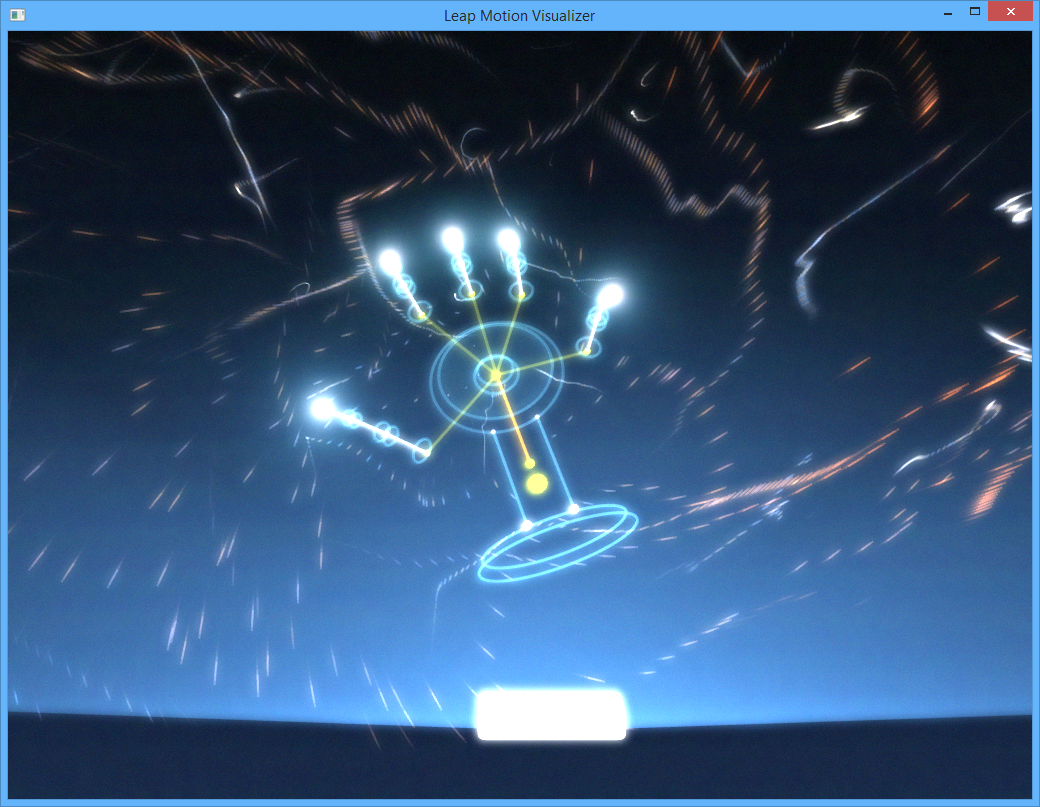
This launched the "Leap Motion Visualizer" program. Here you can see a screen shot of the visualization of a single hand. It works with both hands (but I needed one to hit print-screen), and also identifies the position of each finger. This was with zero training or setup other than completing the basic install.
Cool, so it's working. For grins, let's see if I can control Windows 8.1 with it.
Controlling Windows
LEAP Motion includes an app store. I hate that they have a separate app store with their own payment model, DRM, and more when each supported platform has its own story anyway. I would have preferred they listed their app in the Windows Store as a desktop app instead.
One of the apps in the app store is "Touchless". This is a free app, but you need to create a LEAP Motion store account to download it. (Really. I thought I bought a device, not an ecosystem. It makes me nervous to have yet another company with my account info and, as you'll see later, my payment info.)

Once I created an account (with a fake birthday - why is birthday required?) and clicked the button to get the app, I was then able to see it in the Airspace client. Note that the apps don't download from the store, you need to use the Airspace client app. However, the airspace client includes no provision for interacting with the store. Have I mentioned my annoyance at having yet another store?
I launched the Airpspace client:
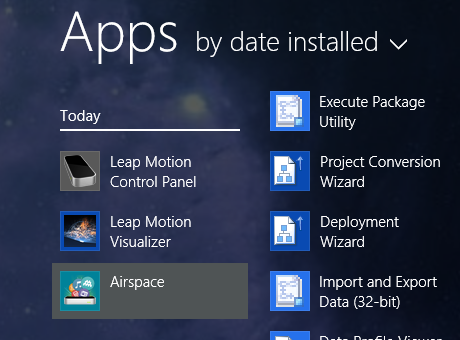
Which opened a full-screen window with the "Airspace Home", complete with all of the installed apps. It immediately started downloading the Touchless app I purchased on the web.
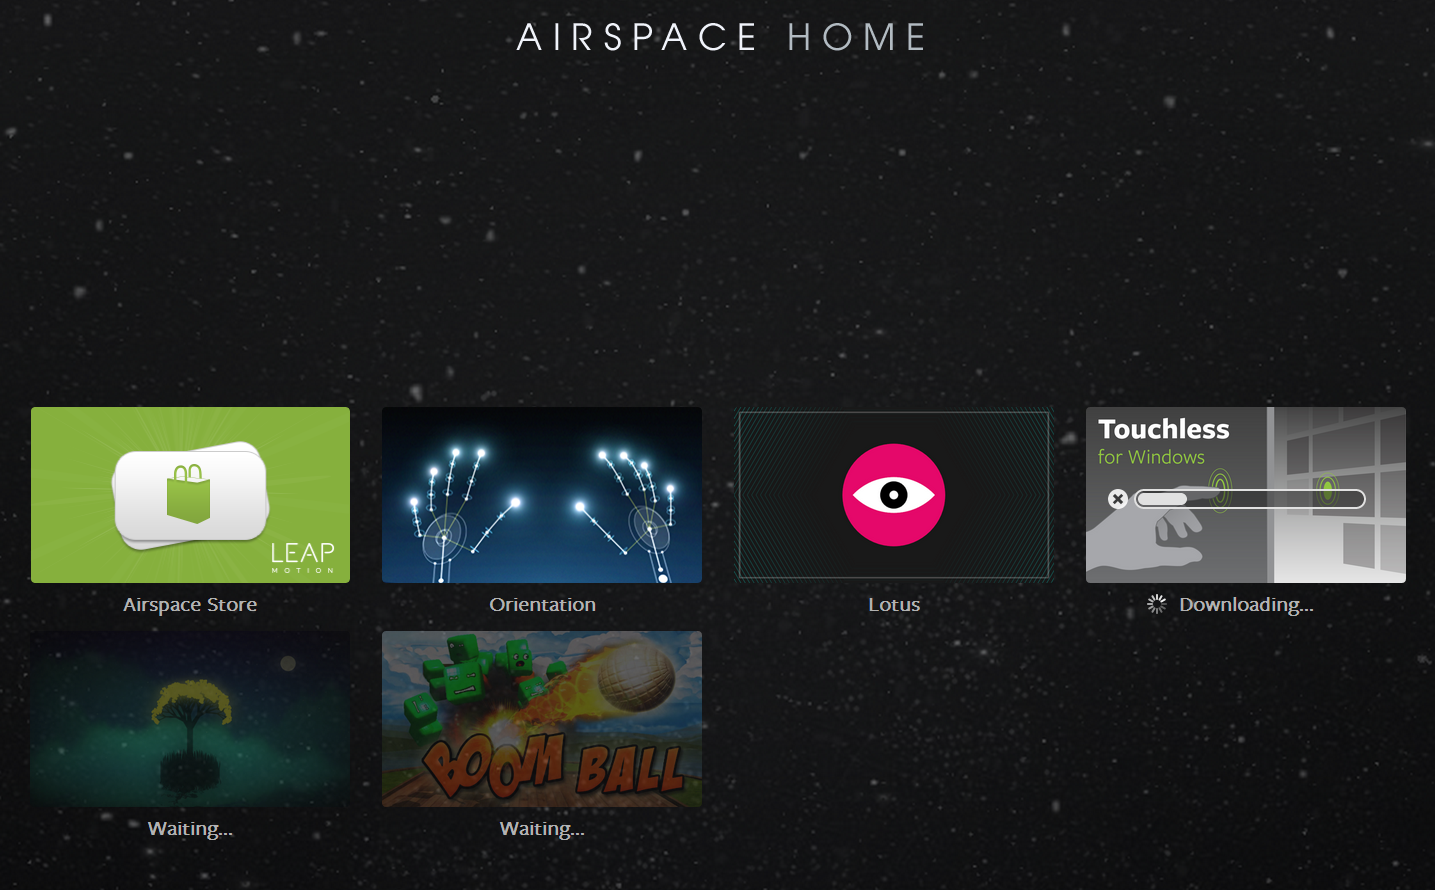
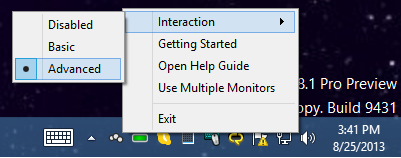
The touchless app is, by default, a single-point mouse replacement app. This is interesting, but not super useful. If you've ever tried to use your finger as a mouse using Kinect, you know there are more efficient ways to interact with your PC. I was more interested in the multi-touch side. To access multi-touch, right-click the Touchless tray app and select Interaction->Advanced.
Now the app sends each finger as discrete points. I test this out, I launched one of my favorite multi-touch Windows 8 apps: MorphWiz.
It takes some practice, but I was able to get the app to recognize from one to five touch points. I should be able to get it to recognize all ten, but I didn't have time to noodle with that much more. Note that MorphWiz was written without any knowledge of the LEAP Motion - it just saw it as touch input.
Not all apps worked like this, however. For example, I was unable to get the "Vintage Synth" app to recognize any of the finger inputs. In the future, I'll try the LEAP Motion with some of my own Windows 8.1 code to see if it's a question of how you use the pointer/mouse APIs.
LEAP Motion also have an interesting free app named "Kyoto" which lets you interact with a seed, tree, water, moon, meteors and other stuff while playing music reminiscent of Minecraft. It's free and you'll find it amusing for a few minutes.
Controlling a Synthesizer
When I bought this, I had no intention of using it to control Windows. I'm really happy with my Logitech Touchpad in that capacity. What I'm really interested in is how this could work for musicians and performers as another way to control dynamics.
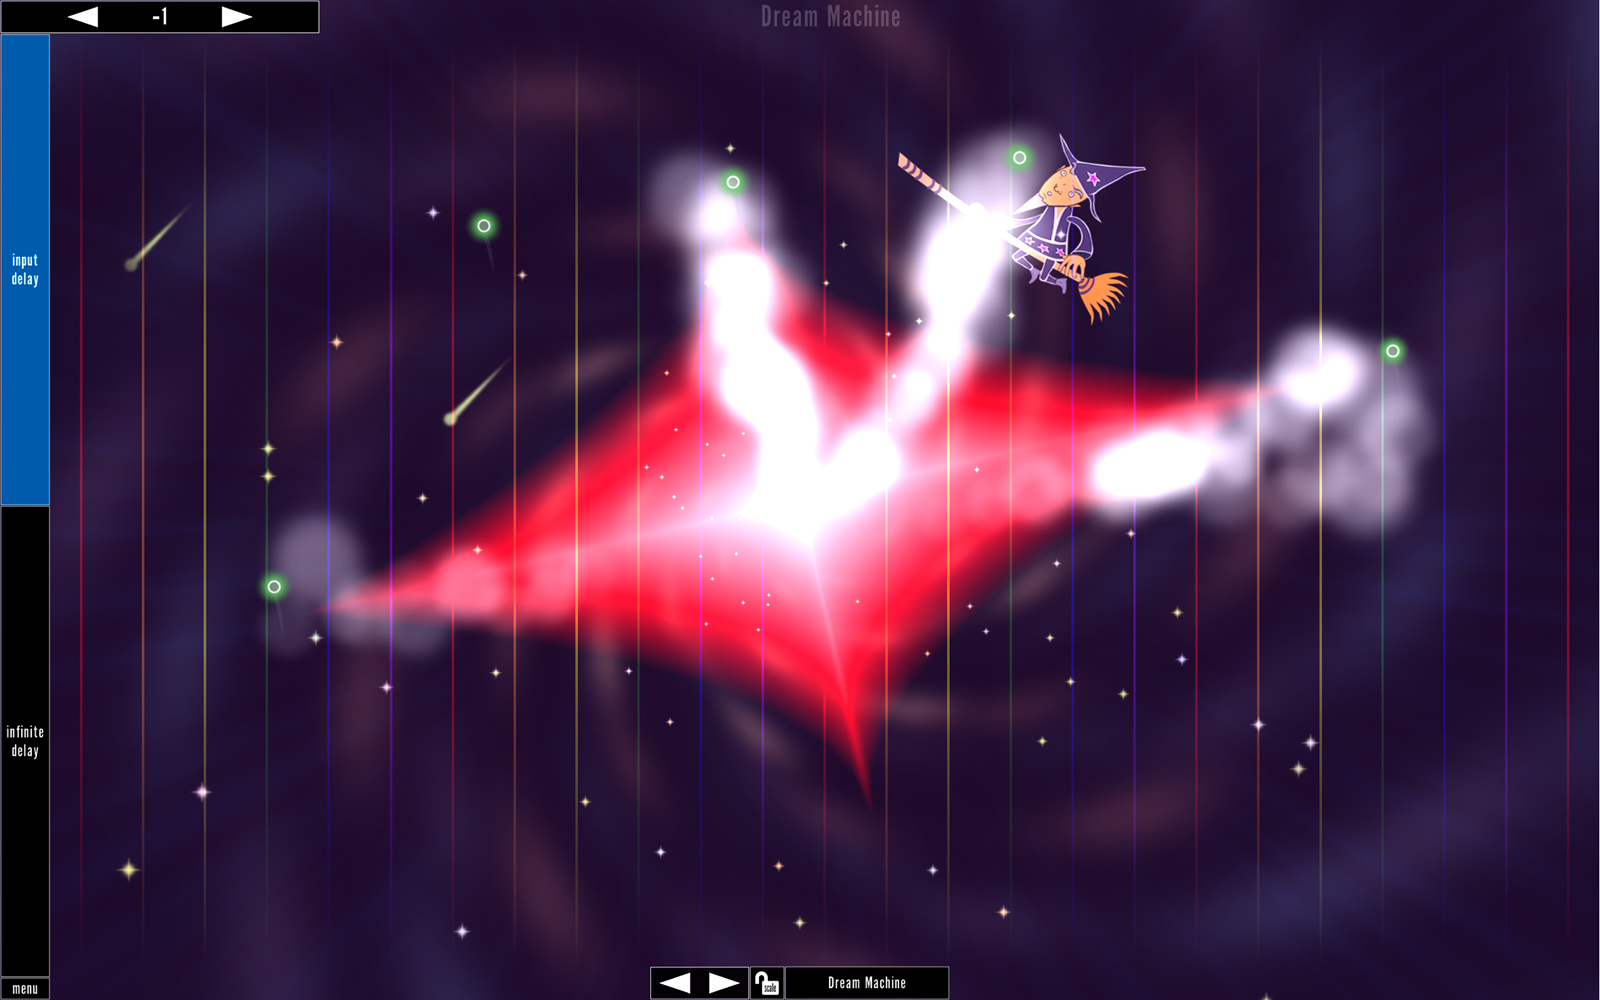
This seems to be a scenario of interest to the Leap folks as well, as one of the bundled Airspace store apps, Lotus, is all about music performance control. Once you poke the eye you get offered a set of musical experiments that you select by pointing with one, two, three, or four fingers at once. All are worth a try, but I find myself coming back to the one with a head in it. Using two hands to control, you can get some really interesting performance capabilities. For example, by closing your fist, you close the filter. By spreading your hands out, you increase the stereo width. Lots of other effects as well. Very neat.
I searched their store for "MIDI" to find some MIDI controller apps.
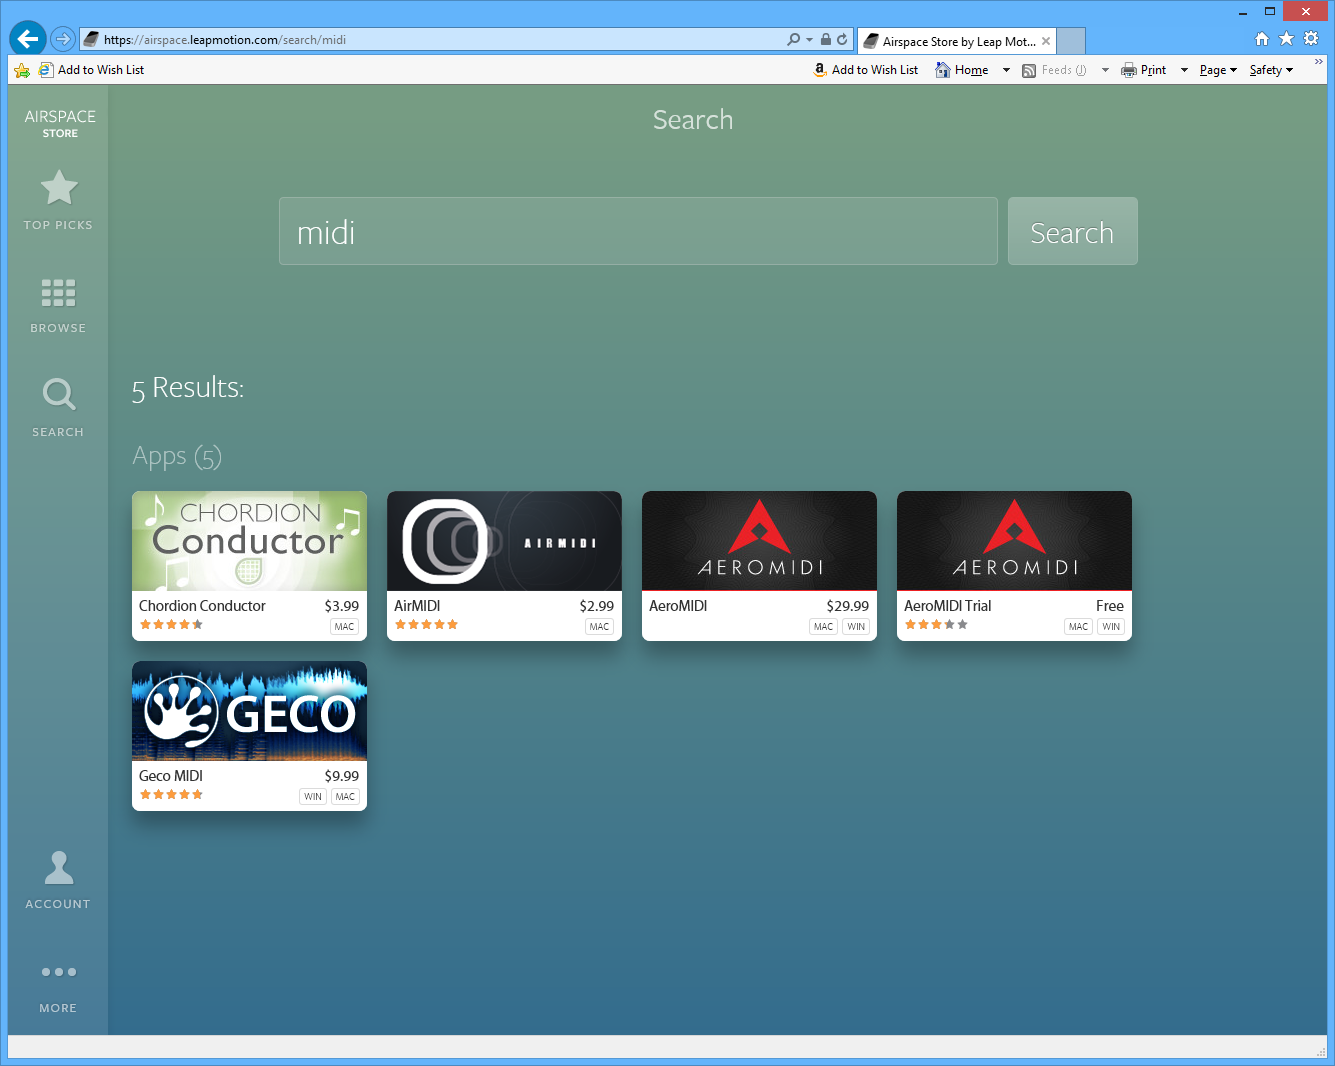
The prices are high. That's one problem with a niche market and a small app store. $30 is almost unheard of in app stores these days, especially for controller software that requires $80 in investment in specialized hardware. I didn't both with the AeroMIDI app, but did decide to try out the Geco MIDI app. It's relatively expensive as well ($10), and had no trial, but I was able to find decent information on its operation on their web site. Besides, $10 is like a few coffees. Purchased.
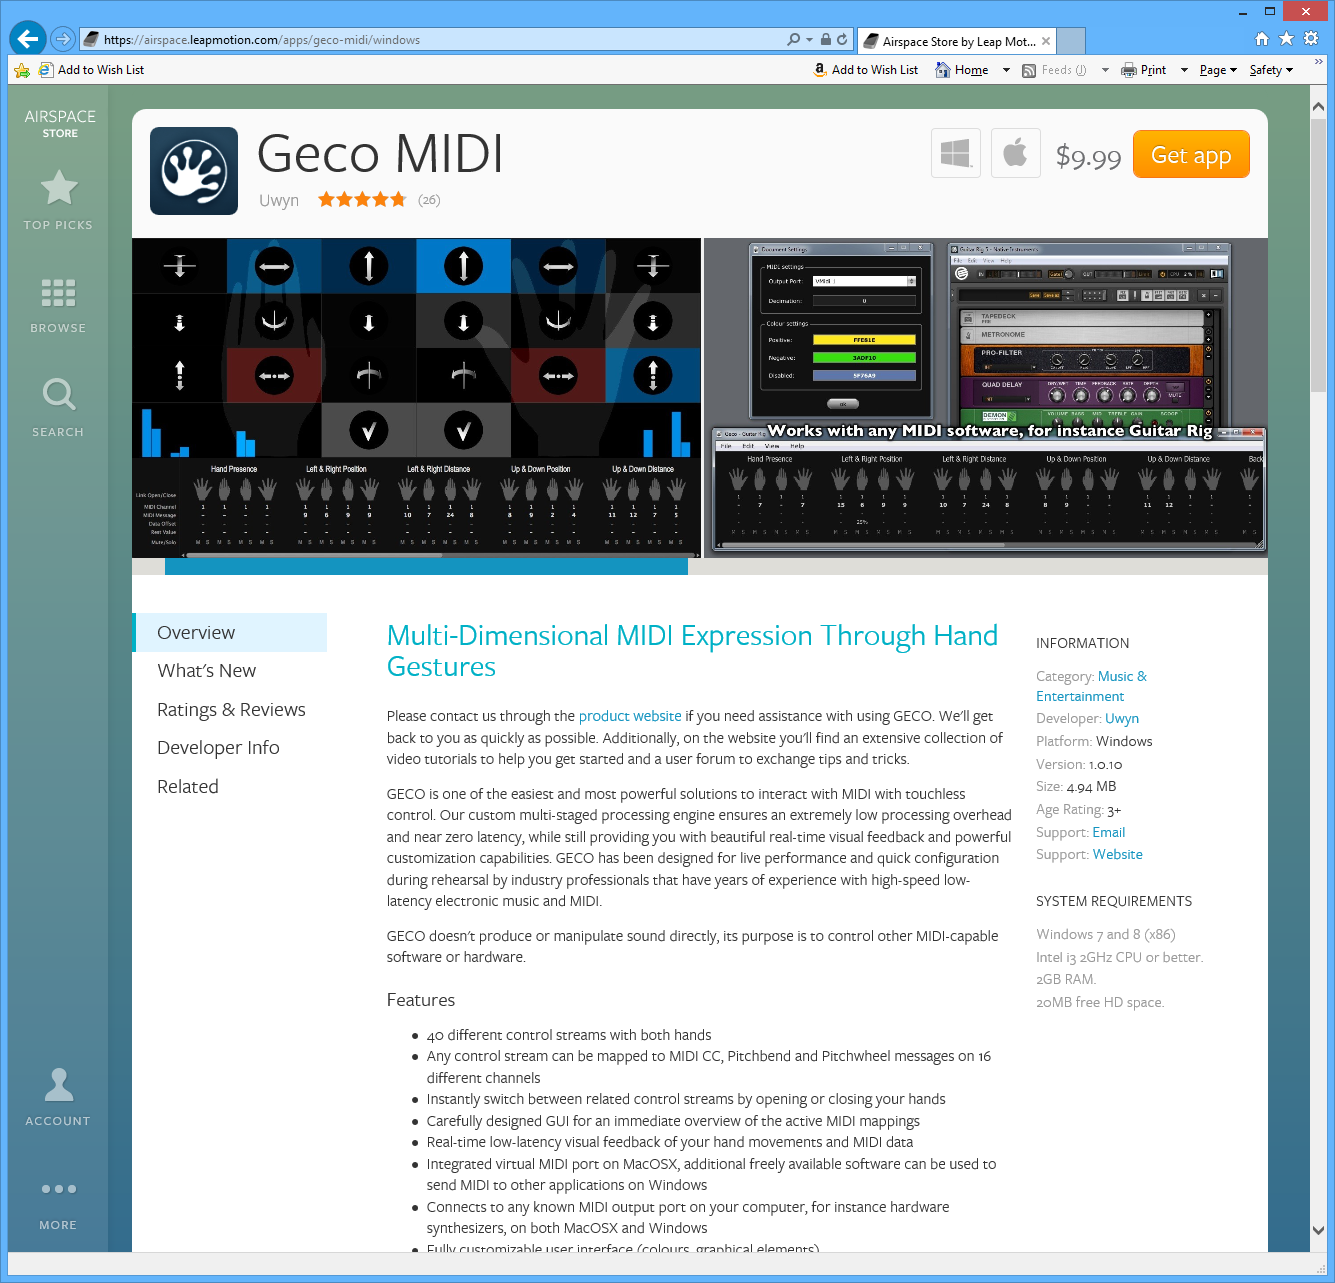
This is installed like the other store apps. As this one requires payment, you have to have a credit card set up ahead of time. I was hoping to use PayPal, but credit card is the only method of payment accepted.
One installed, go ahead and run it from the Airspace shell. Be sure to turn off any other apps (such as Touchless) first, as they will interfere with each other.
I ran the app, and went into the "Document Settings" dialog to configure the MIDI connection. The configuration for which messages are assigned to which gestures, and which device to use, are all stored as a document.
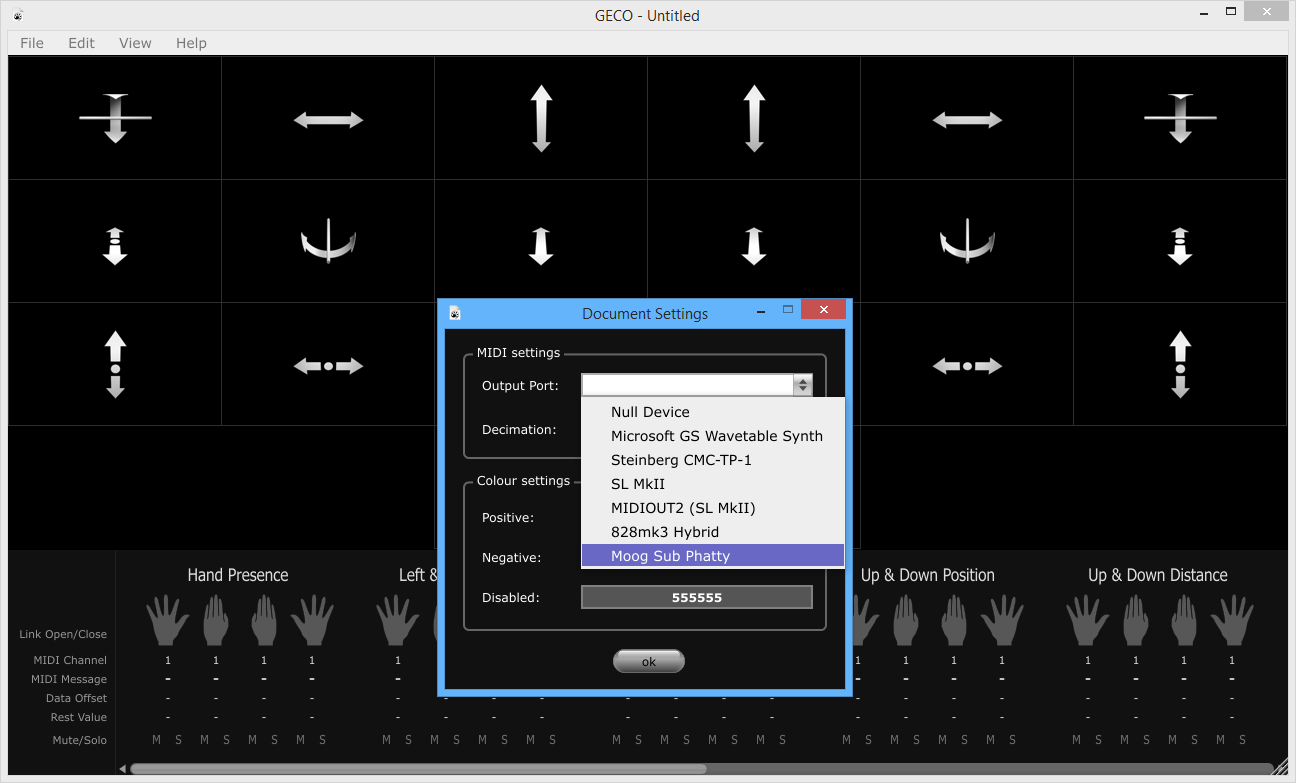
(note the branding in the title bar. Another confused company: GECO in the app, Geco in the listing).
I wanted to control the filter cutoff of my Moog Slim Phatty. So, I pulled up the manual and looked up the MIDI CC (Continuous Controller) messages. The Sub Phatty supports 14 bit (high resolution) MIDI, but GECO does not. So, I had to go with the 0-127 value 7-bit classic MIDI.
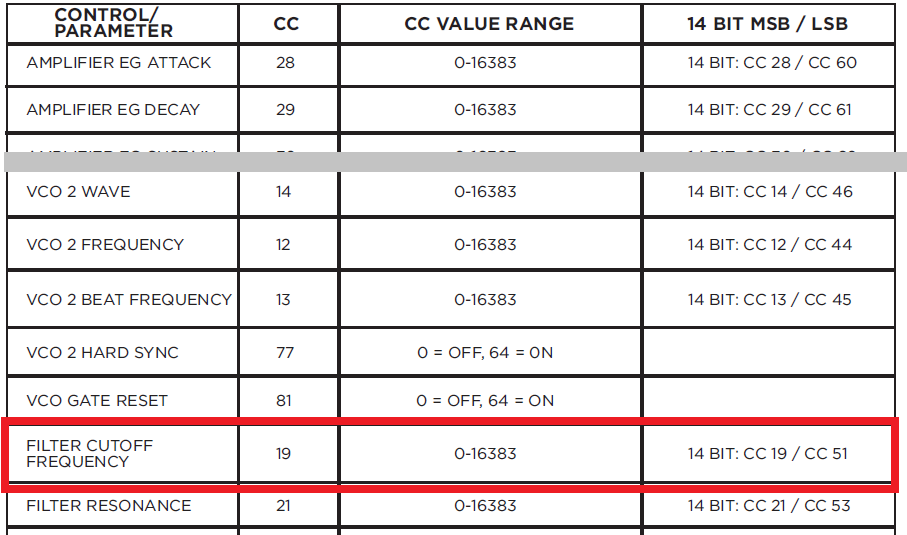
The Filter Cutoff Frequency is CC #19. The value range shown in the table is for 14 bit. For 7 bit, it's 0-127. I then set this up in the GECO app, assigned to the vertical position of my open left hand.
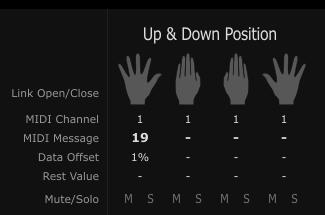
One that is set, all I needed to do was play a note on my Sub Phatty with my right hand and then use my left hand to control the filter cutoff. Despite the lack of 14 bit MIDI support, it sounded great. The Sub Phatty does a decent job of interpolating the 7 bit MIDI messages to avoid obvious stepping with filter cutoff (I could hear stepping with resonance, however).
I also mapped resonance to roll inclination. That was a bit awkward as your hand needs to be turned almost upside down to get the full range, but not too bad once you got used to the behavior at the extreme values.
I pulled up an older sequence in Cubase with the intent of using both hands to control the dynamics while the sequence plays. However, as GECO is not yet a VST, and you can't share a MIDI output between two programs at once on Windows, I was unable to use both GECO and Cubase to control the Sub Phatty. A workaround here is to use one over USB and the other over regular DIN MIDI, but I did not get a chance to try that out. Instead, I did the gesture control with my left hand and playing with my right.
Further Thoughts
This is a pretty neat unit, especially for the price. Apps are (for a modern app store) overpriced, but there's a developer program you can sign up for to write your own apps. Given that it requires a custom driver, this won't work on Windows RT, but I'll check it out in Windows 8.1.
The LEAP Motion was incredibly smooth and well-tuned right out of the box. Like any airspace-gesture technology, it required a steady hand for things like touching points on the screen. In that way, it's a bit of a novelty. As an additional vector for performance control, however, it really shines. It's like the Roland D-Beam from their V-Synth and others, with many more types of recognition other than just distance.
Costing not much more than a decent mouse, the LEAP Motion is a great device to add to your desk, especially if you like to experiment with new ways of interacting with your computer and/or instruments. My advice: get one if you have other creative uses in addition to normal UI control (musicians, folks playing with NUI, etc.). If you're looking to buy one just to replace a touch screen on Windows or OSX, I don't think you'll be happy in daily use.
I didn't have a chance to record a video today, but once I learn more about how to incorporate the LEAP Motion into my work, I'll post some examples. For now, here's some very short audio: right hand is on the Sub Phatty, left hand is using the LEAP Motion to control filter cutoff with open hand Up & Down Position (1/19/1%/100%) and resonance with open hand Roll Inclination (1/21/-1%/-). On the keyboard, all I did was hold down a single key - all the dynamics are coming from MIDI control via the LEAP Motion.
http://soundcloud.com/psychlist1972/sub-phatty-leap-motion-filter
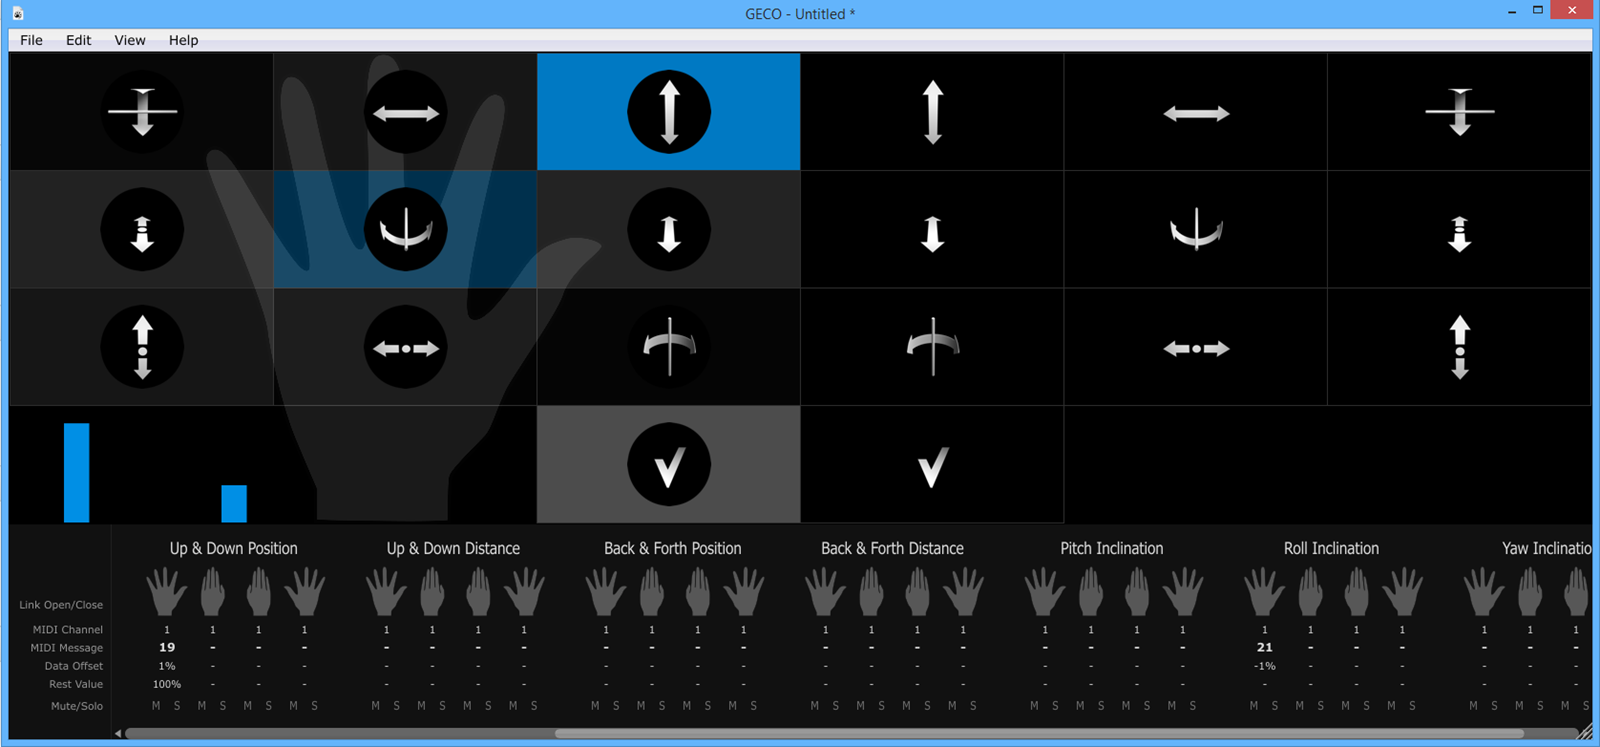
The above screen shot shows status of hand height (left bar) and roll (second bar).
Maker Geek Roundup 019 for 8/5/2013 5 Aug 2013 7:11 PM (12 years ago)
The Maker Geek Roundup aggregates information of interest to makers everywhere. Topics include .NET Micro Framework, Arduino, AVR and other MCUs, CNC, 3d Printing, Robotics, Microsoft Robotics Studio, Electronics, General Maker stuff, and more. If you have something interesting you've done or have run across, or you blog regularly on the topics included here, please send me the URL and brief description via the contact link.
Making with Machines (3d Printing, CAD/CAM/CNC, Laser Cutting)
- 9 days to go on Super Awesome Sylvia's WaterColorBot (Kickstarter)
- 3D Printing Graphene will change the World as we know it! (3D Printers Audstralia)
- Introducing Autodesk 123D Design (Makerbot)
- Makerbot partnership with Microsoft (in case you missed this at Build)
- 3D Printing Fairytales (Makerbot)
- Mechanical characters made easy (Ponoko)
- 3D Printing LEGO-like blocks (Ultimaker)
- Is desktop 3D printing safe? Will it harm your health? (voxel fab)
- MakerWare 2.2.2 Sharkfill for Shark Week (Makerbot)
- Interview with Prabhjot Singh of the GE Additive Manufacturing Lab on using 3D printing in Manufacturing (voxel fab)
- The on-board 3d printer (SMBC)
Synthesizers, Music, and MIDI/OSC
- Video Explains Why Difference Between Analog, Digital Isn't What Most People Think (Peter Kirn)
-
- Read the comments at the bottom of the page as well
- Owl Theremin (this is just …strange) (Nervous Squirrel)
- Sound as Art (NY Times)
NETMF (.NET Gadgeteer, FEZ Game-O, Netduino, AGENT, etc.)
- Just 8 days left on the Open-source programmable hand-held game console: Game-O (Kickstarter)
- .NET Microframework on Raspberry Pi (Part 1) (Laurent Ellerbach)
-
- More accurately: .NET on RPi and also some other goodies
- Ultrasound sensor ad .NET Microframework (Laurent Ellerbach)
- ZX Spectrum Emulator running on an agent smartwatch (Apeoholic)
Arduino and AVR
- Getting started with Arduino (from Nothing) (Ponoko)
- Kit review - the Freetronics CUBE4: RGB LED Cube (tronixstuff)
Other Microcontrollers (PIC, ARM, Raspberry Pi, Parallax, more) and general OSHW
- Review- adafruit industries Mini 8x8 LED Matrix with the I2C backpack (tronixstuff)
- Adapteva Parallella - parallel computing for the masses (OSHWA)
- Ambilight controlled by Raspberry Pi (Hackaday)
General Electronics and Hardware Hacking
- Centimeter-level precision GPS (Hackaday)
- How are Cubelets Made? (Modular Robotics)
- Various 1Hz Oscillator Methods (tronixstuff)
- The MAX7219 LED display controller - real or fake? (tronixstuff)
- 4 Transistor FM Transmitter (Circuit-Zone)
- OLEDs Move Closer to Mainstream Lighting (Electronics-Lab.com)
Robots, Rovers, Drones, and *Copters
- Oversampling, Decimation, Filtering (Michael Shimniok)
- Rover RC Multiplexer (Michael Shimniok)
General Maker
- A beautiful camera stabilizer (DIY Photography)
Random Stuff
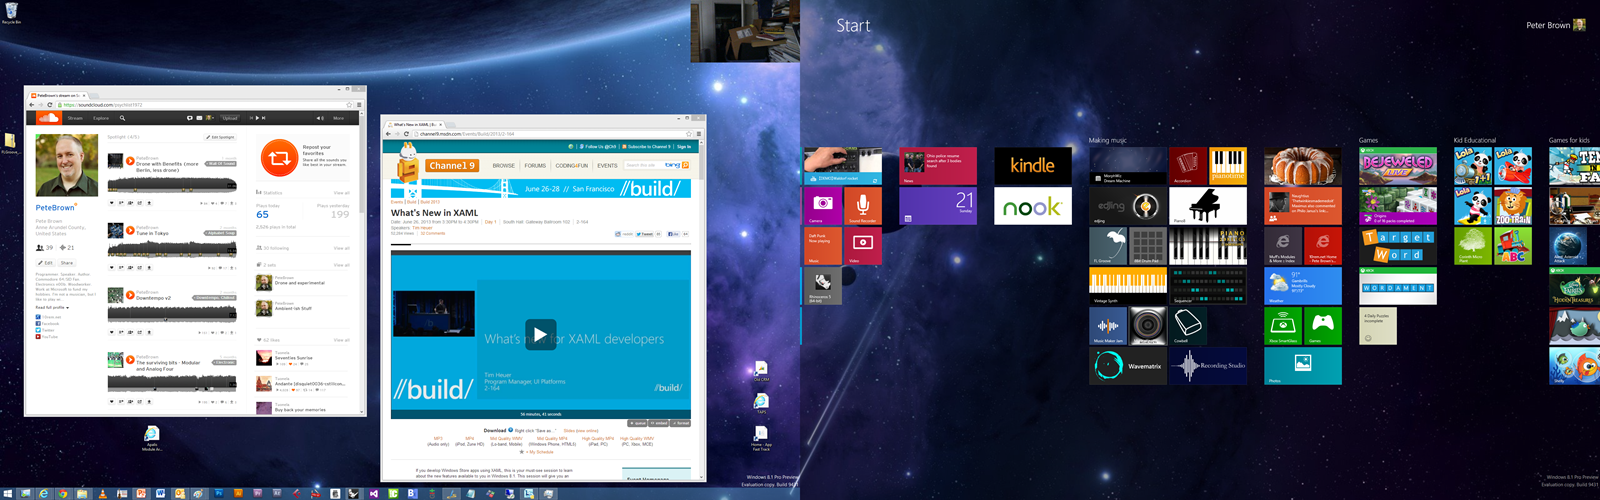
The little things that matter: Top desktop-friendly improvements in Windows 8.1 21 Jul 2013 4:48 PM (12 years ago)
Like many of you, I spend the majority of my day on a desktop PC. My PC happens to have two 30" displays, neither of which is touch, and a Logitech Touch Pad that has some basic gesture recognition. It's a giant water-cooled, overclocked beast that I built in 2010 (and upgraded video since then) and which still beats many new PCs sold today. This particular PC has been upgraded from Windows 7 to Windows 8 Consumer Preview to Windows 8 RTM to Windows 8.1 Preview, so it has been around the block a bit. I don't plan to pave it until the 8.1 release later this year. It's sitting behind the displays in this photo, so I never see it and generally never touch the PC itself.

In the course of regular usage, I've found a bunch of desktop features which make huge difference in the usability of Windows 8.1, but which aren't talked about a lot. So here are the little things that matter. This isn't a rah-rah post, just things that *I* personally found useful as a long-time user of Windows (since Windows 3.0, in case anyone is counting).
(As an aside, yes, the desk is a disaster. Now that I've removed the need for a room full of servers, I have plans for my new home office in the works, but I have to finish some other house projects before I can do that).
Yeah, that's a third 30" display in there :). I don't have room for one in my current office, but I've planned for room in the next.
Variable sized splits/Windows
On my desktop, I don't use Windows Store apps anywhere near as often as I do on my Surface. At most, I'll have Twitter open or something. However, I decided to give the new Windows 8.1 Xbox music app a spin, having finally uninstalled my Zune software the other day (the Zune may not have been a commercially successful piece of hardware, but the client was always top notch, and much better than the older Windows 8 Xbox music app). Being able to have a usable desktop on any screen, and not being stuck with the snapped and filled view states, is a big improvement for usability.
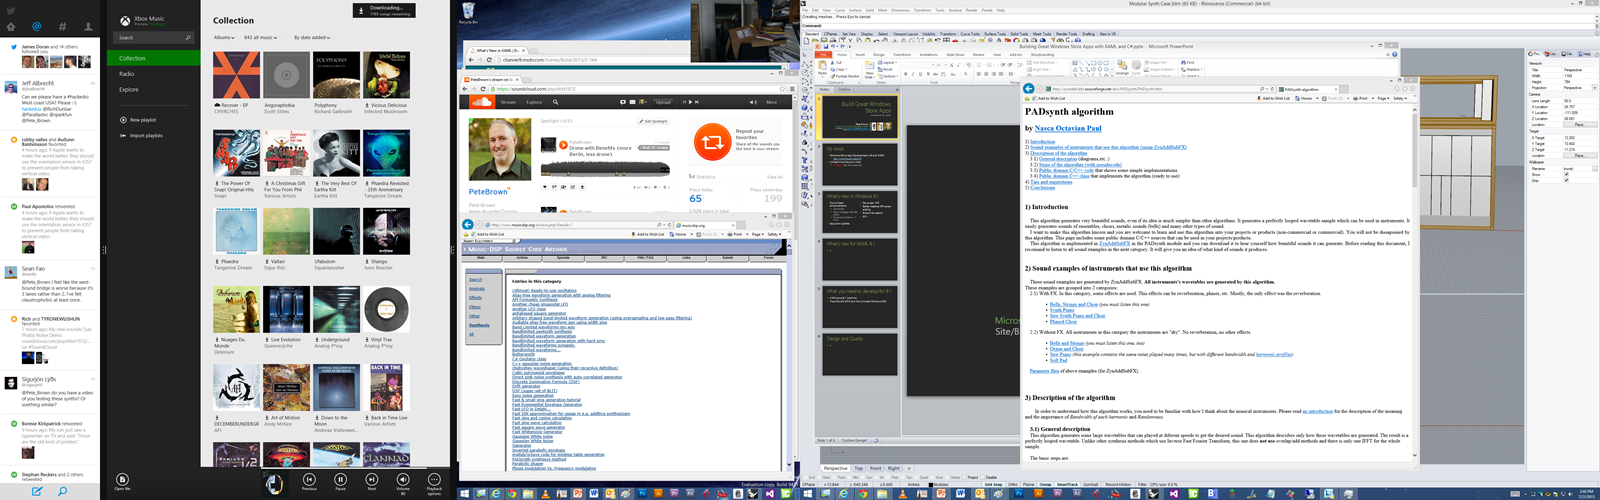
On my desktop, I'm still primarily a floating-windows guy, but the new window layout flexibility makes it more likely I'll incorporate modern apps into my normal use.
As an aside, the new Xbox music app is great. It's what got me to uninstall the old Zune software, although I'll still miss the pink patterned background.
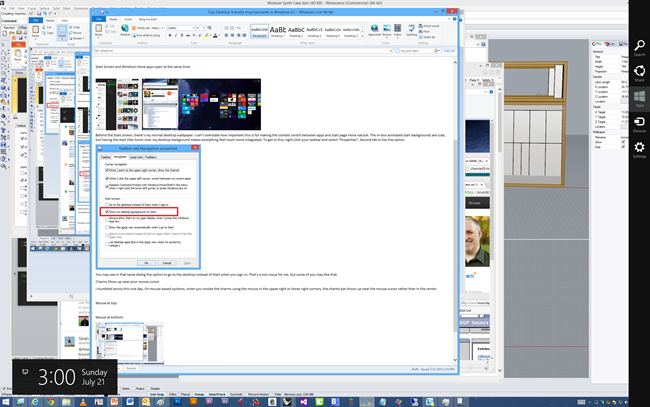
Start Screen and Windows Store apps open at the same time
One thing that I distinctly disliked in Windows 8 was that the start screen would take over any other modern app on the display. Windows Store apps could only be on one screen, and that screen was also where the start menu showed up.
In 8.1, I can have Windows Store apps open on one display (Twitter and Xbox Music, in this case), plus some of my desktop if that's appropriate. The start screen doesn't overtake that display, it shows up on the screen I'm on (or always on my primary if I select that option in the Navigation properties).
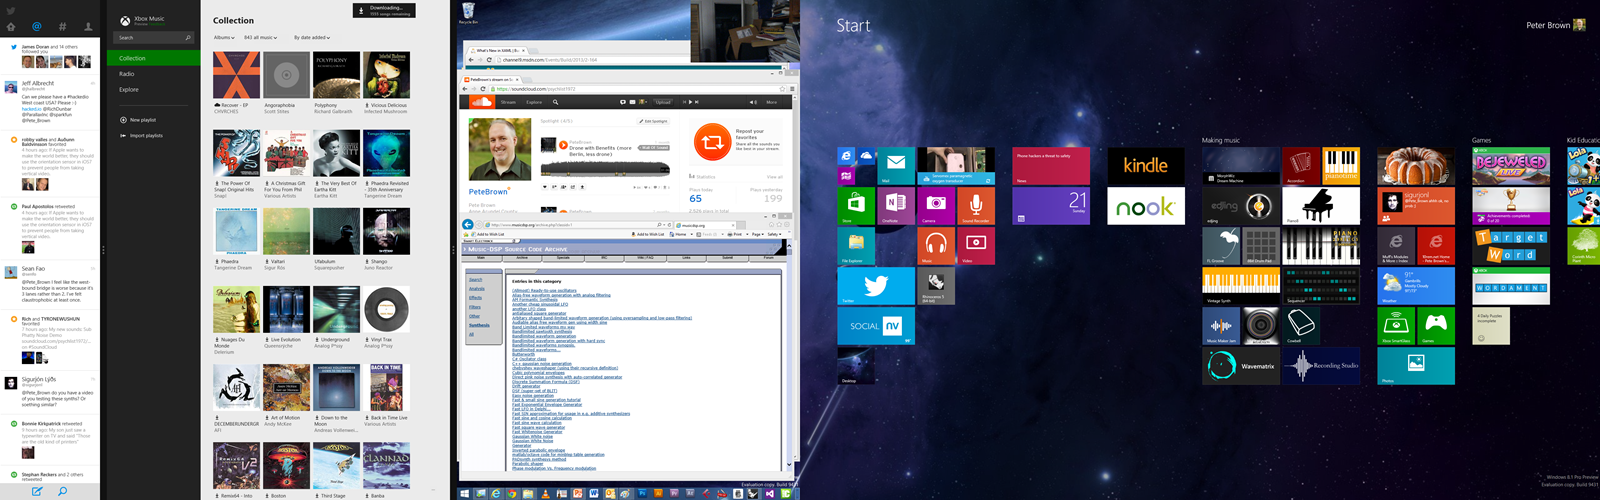
This makes it far less jarring, and puts me back in control over what shows up and where.
Start Screen with desktop wallpaper
Behind the Start screen, you may have noticed that I have my normal desktop wallpaper. Here's a better view so you can see the whole thing:

The display with the Start page on it gets a darkened background to make sure the tiles show up well, but other than that, it's my same background. It just feels right now, like an overlay, not something completely separate. (the dividing line between the two displays shown in the image isn't noticeable when you have two physical displays with a bezel between them).
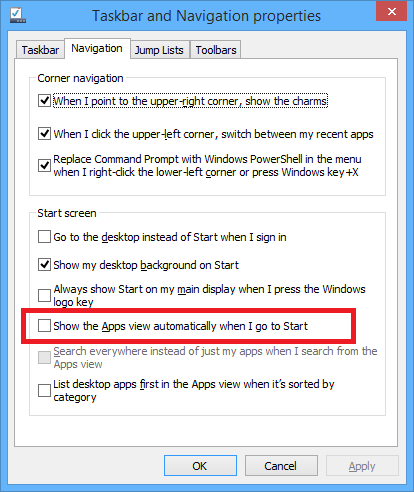
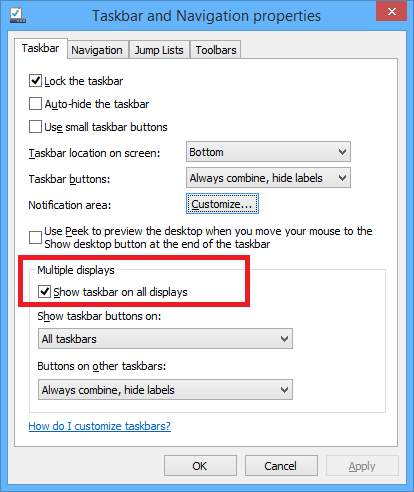
I can't overstate how important this is for making the context switch between apps and start page more natural. The in-box animated start backgrounds are cute, but having the start tiles hover over my desktop background makes everything feel much more integrated. To get to this, right-click your taskbar and select "Properties". "Navigation" tab in has the option.
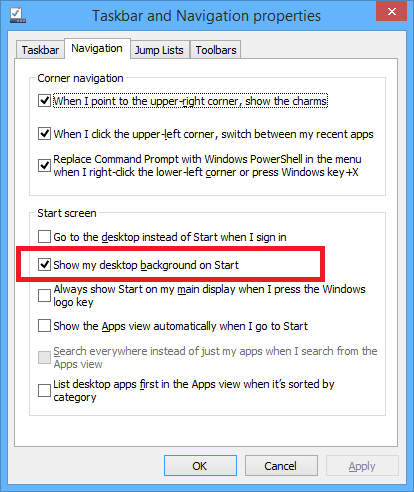
You may see in that same dialog the option to go to the desktop instead of Start when you sign in. That's a non-issue for me, but some of you may like that.
Charms Show up near your mouse cursor
I stumbled across this one day. On mouse-based systems, when you invoke the charms using the mouse in the upper right or lower right corners, the charms bar shows up near the mouse cursor rather than in the center. This is great because the charms bar is narrow, and mouse movement is typically elliptical in nature (I always have problems with getting to the far right of a wide list of preview windows on the task bar for that reason).
Mouse at top right:
Mouse at bottom right:

Having the charms appear closer to the mouse is one of those no-brainer things.
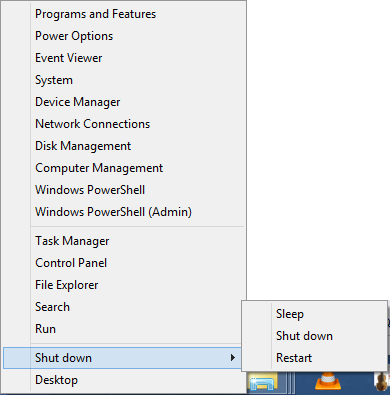
Shutdown and Reboot from Windows + X
The Windows + X menu (also available by right-clicking the start button) had a ton of useful stuff in Windows 8. In Windows 8.1, this has been improved further. One very useful option added is the shutdown menu. Most laptop users turn off their tablet by closing the lid. Most tablet users hit the power/sleep button. As a desktop user, I reboot rarely, but when I do, I do it from the menu - not a power button.
New apps aren't on the start screen by default
Most desktop apps install a main icon or three, and then a boatload of other start menu icons for samples, online help, and other crap that I don't want on my start screen. In Windows 8, all that stuff went to the start screen by default. In 8.1, those things all go to the full apps list (available by hovering down near the bottom left of the start screen and then clicking the down arrow) but you install icons to the start screen manually. I like this approach as it puts me in control over my start screen.
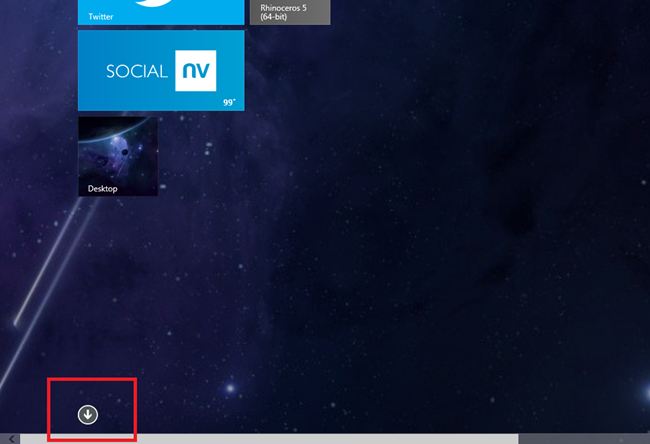
To see newly installed stuff, just change the sort order to "by date installed". You'll see some items marked as "new".
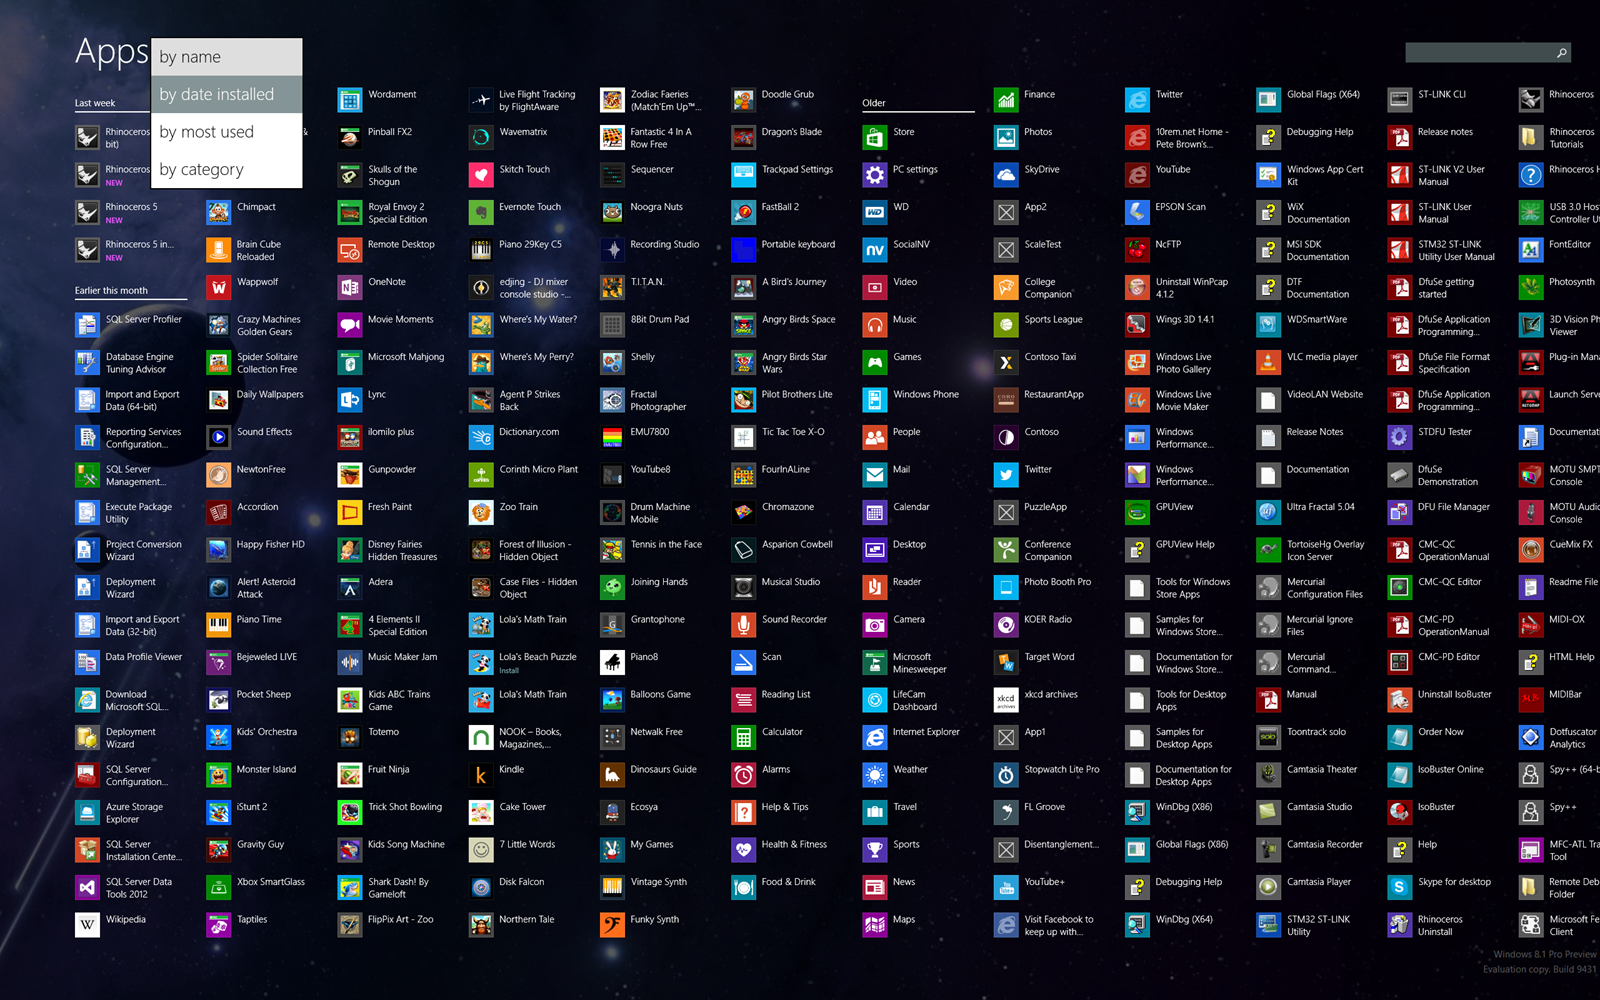
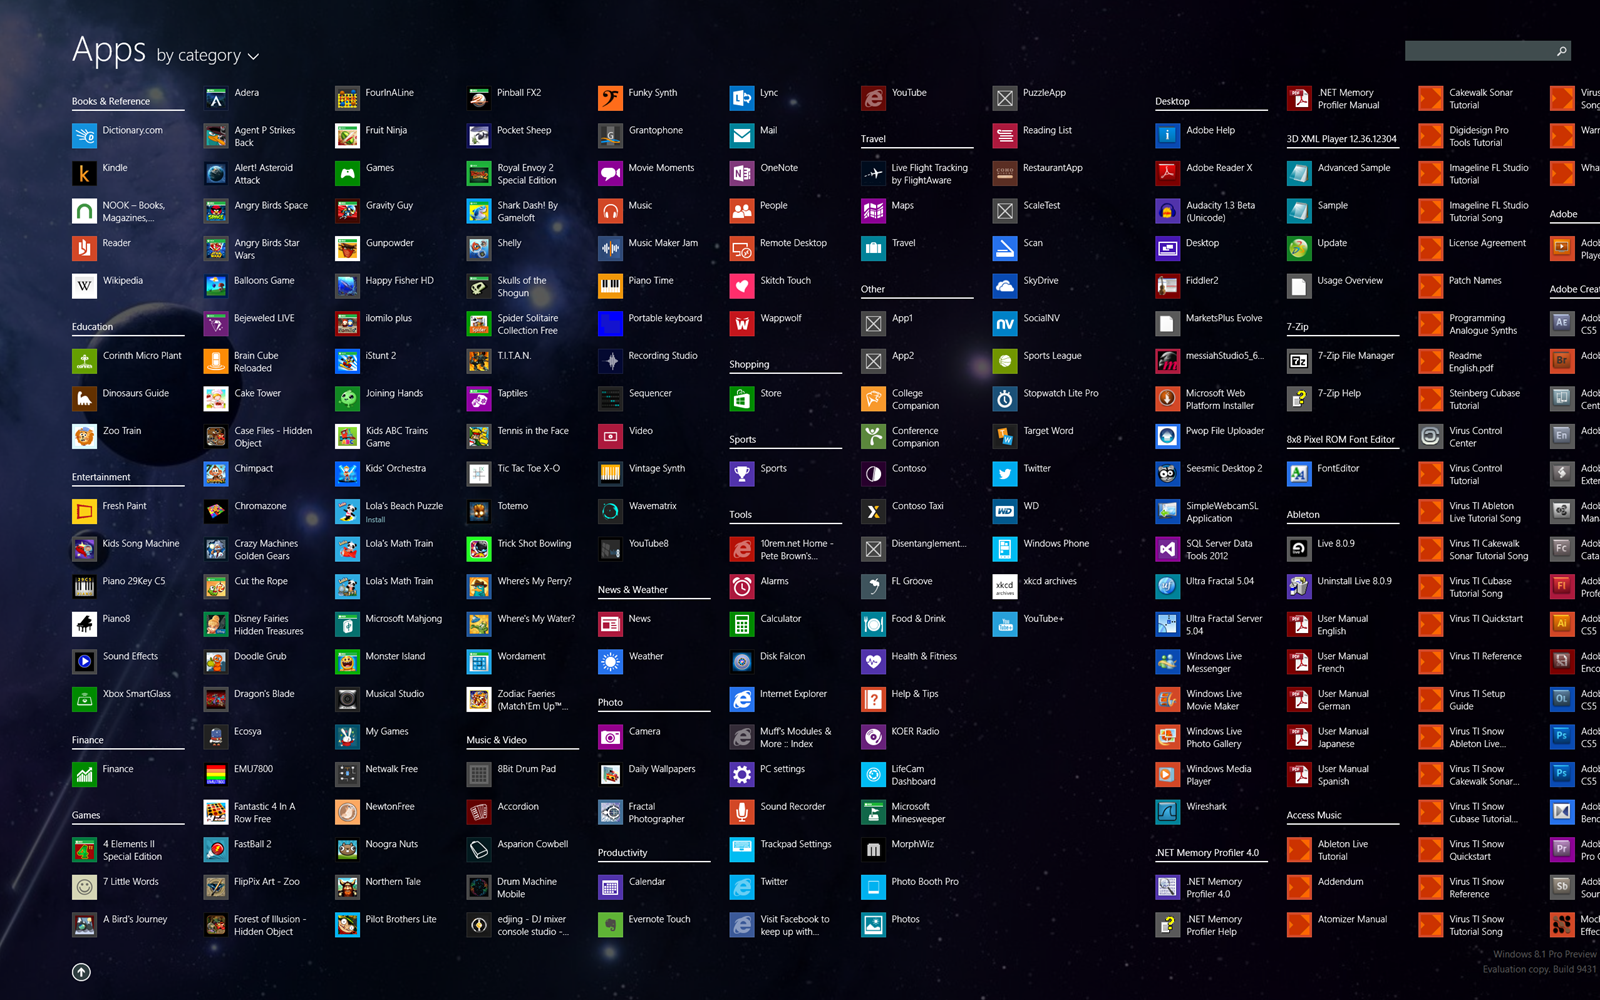
That screen is just a giant list though, so outside of the most recently installed, I don't find it useful because there's just so much stuff. The other sorts (Name and category, in particular) are useful. You can see an example of an install that put a zillion icons here (the Access Virus TI software and all of its orange icons). Glad that doesn't show up on my Start screen by default.
The alpha sort gives you alphabetical for Windows Store apps, and then names (also alpha sorted) for desktop apps.

Some people may prefer this as their start screen. I don't personally, but for those who do, there's an option to go directly to this apps screen rather than the start page. Right-click the task bar and go to the "Navigation" tab.
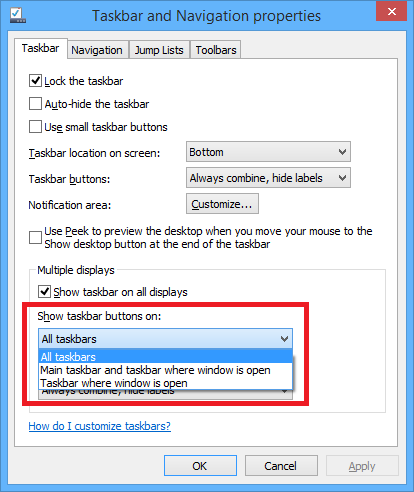
Taskbar on all displays
You may have noticed in the screen shots above that my taskbar is visible on both of my displays. This is enabled by default, but you can modify it from the same settings dialog as most of the other options mentioned here.
One thing that you appreciate is that you can have the taskbar show apps only for the screen it's on. This is particularly useful if you have more than just a couple screens.
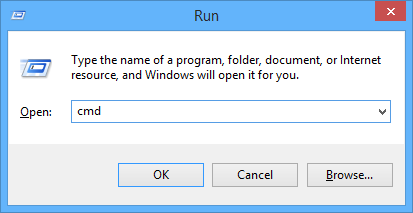
Windows + X -> Run
In Windows 7, I very rarely went to any icons or groups in the start menu. Instead, I would just click start and then type in the name of the app I wanted to run. That same thing works in Windows 8 (and 8.1) from the start screen. If you want something even smaller, simply do Windows + X, R to get the "Run" dialog.
(Or, as been helpfully pointed out in the comments, Windows + R will do the trick as it has in previous versions of Windows.)
Performance and fixes
Much of the rest here is difficult to quantify. I use some pretty heavy duty software (Cubase 7, Premiere Pro, Rhino 3d, and much more). I've found 8.1 to be both faster and more stable than Windows 8. For example, I had some audio issues in Cubase 7 in Windows 8 which have gone away with Windows 8.1. That alone makes me happy I upgraded.
Others
There are lots of other improvements that I use on other devices. For example, the per-display DPI is great on my laptop. On my desktop, since my displays are matched (and running at 100% DPI scaling) and I don't use a projector, it doesn't have any impact. On my Surface Pro, it makes a big difference as the DPI on my Surface is not what I want to use on a projector or an external screen.
Another thing I'm really looking forward to is the 3d printing (and more) API. More on that in the future :)
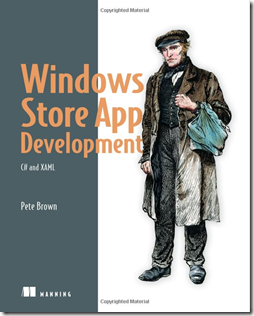
Interesting in creating Windows store apps?
Interested in coding for Windows? Check out my book Windows Store App Development: C# and XAML. For purchasers of the book, I'll have a free update chapter for the 8.1 changes later this summer/fall.
My site migration to Windows Azure Web Sites 15 Jul 2013 10:42 PM (12 years ago)
In this post, I'll cover the migration of this web site from a long history of local hosting to Widows Azure Web Sites.
I've had my own personal domains (GroupLynx.com followed by irritatedvowel.com followed by 10rem.net) since the mid 90s. Early on, I used regular hosts. I've run my personal website out of a succession of servers in my basement for at least a decade. It used to be serious geek cred to be running all your own servers. Here's a photo of my site's hardware in 2003:
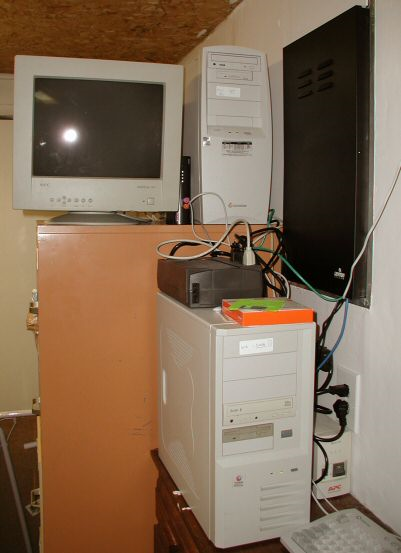
Back in 2007 I dumped the old desktops I was using and converted to a couple IBM 345 Xeon-based eServers in a big old APC rack. One server was for database, the other for the website. In addition, I had my own email server and domain controller at the time using old PCs housed in rack cases.
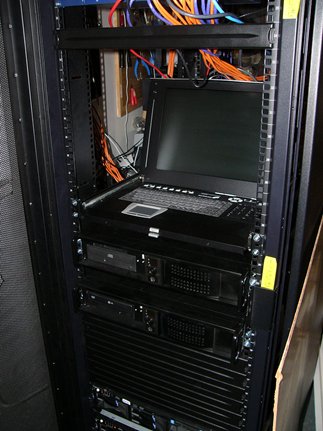
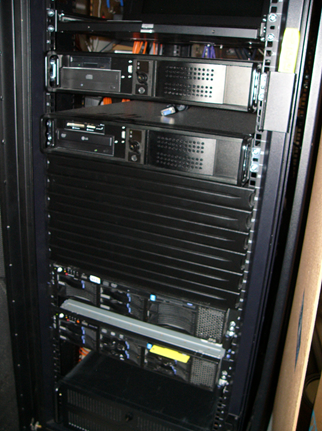
(Left photo shows top of rack, right photo shows bottom of same rack. Not shown: the ethernet switch near the top)
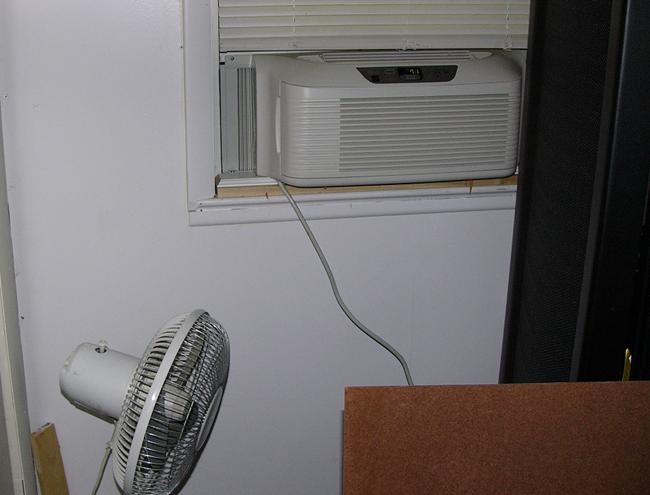
With these wonderful servers came increased cooling needs. That meant putting a window shaker in the utility room. Not only is this ugly, but pretty sure it was costing me a fair bit over time, even at the relatively high setting I kept it on. Purchasing a refrigerated rack wasn't an option. Using a purpose-built unit with a blower on front also wasn't an option as they just cost too much to purchase and ship.
Being your own IT guy leaves you with no one to yell at
Being your own IT guy is a pretty thankless job. I've had RAID drives go defunct, servers die, and the power to the whole house drop at least twice a year. Each time that happened, my site had downtime. Sometimes, especially in the case of the power outages, it was always a question as to whether or not the servers would all come back online properly, or if I'd find myself scrambling to fix things.
Also, all this equipment in the utility room made a lot of noise. That noise was picked up by the uninsulated ducting and broadcast throughout the house. You could hear the servers if you were near any of the central heating/cooling ducts on a quiet night.

Last summer, during the derecho storm and related power outage, my database server lost another drive. The RAID configuration couldn't handle that because, as it turns out, one of the other drives had been bad for a while, and I didn't realize it. That meant that the entire second logical drive (data drive) was gone. Luckily, I had a backup of the site data, but I had no spare drives. So I cleaned up the OS drive and freed up enough room to store the database there.
I investigated hosts for quite a long time. Even though my blogging has slowed down with my newer role at Microsoft, my site still gets enough traffic to put it outside the bounds for most inexpensive hosts. I looked at Azure at the time and at the Azure Web Sites preview. However, it had a number of issues at the time which prevented me from moving to it (not the least of which was you couldn't have a domain name that began with a number - a simple regex validation bug that stopped me cold).
So I hung it back up for a while. In the meantime, the site has been down a number of times due to power outages. I did migrate email off-site, which is good, as that server eventually died, and the blacklisting associated with not being a proper host got to be a bit too much. Oh, and I realized I was starting to be used as an open relay (which despite all the work I did in patches etc, kept happening).
Moving to Azure
Earlier this year, I made up my mind to move to Azure Web Sites during my first vacation. Right after Build, I took two weeks off, and used a small amount of that for the migration. My wife and kids were up at my mother-in-law's so the house was quiet and I could really concentrate on the move.
This site has been running on Windows Azure since the early morning hours of July 9, 2013. The timing was perfect, as I had yet another power outage, this one killing the domain server. No, I didn't have a backup domain server. That made some server tasks…challenging, but not impossible.
When moving to Azure there were several steps:
- Create the Azure account
- Create a Windows Azure Website instance
- Create a Database server (if required)
- Copy the site files
- Migrate data
- Map domain names
My site runs an old version of Umbraco that I have customized to better support my blog. There's a fair bit of custom code in there, so migrating to a newer version would be a chore. I decided for this move to just bring the whole thing over wholesale. Using an FTP client, I was able to move the site files over quite easily. In fact, there's almost nothing interesting about that process. Azure gives you the FTP address, and you just dump files to it. Simple as that.
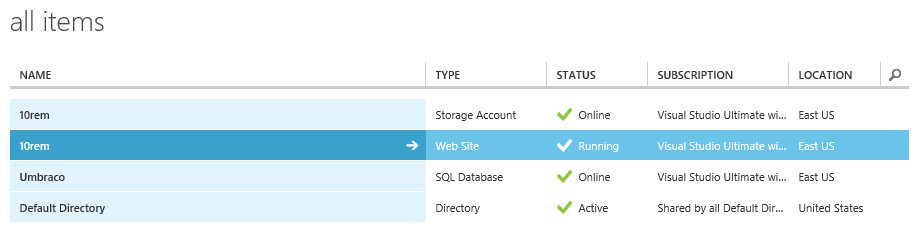
The database was a bit more interesting.
Because I use an external database server, and not just something simple like vistadb, I had to export data to the Azure database. If you use a filesystem-based database like vistadb with your install, this whole process becomes much simpler. I tried many different ways of getting the data over. Of all the things, this was the most time consuming. (Note that I'm using a SQL Database Business edition. Web would work fine, and you can switch between them as necessary. Currently, they both have the same pricing and features, as I understand it.)
It's so simple though? Why was it time consuming?
Exporting the BACPAC
The reason was I was running a bare SQL Server 2008 install (no SP, no R2) and using those client tools. What I didn't realize until I spoke with another person on the team, is that I needed to use the SQL Server 2012 client tools and then the migration would be dead simple. Let me save you that time: if you want to move a SQL database to Azure, regardless of what version, grab the SQL Server 2012 client tools.
http://www.microsoft.com/en-us/download/details.aspx?id=35579
Download the full installer (SQLEXPRWT_x64_ENU.exe), not the one that is oddly named SQLManagementStudio. Because, well, that package doesn't include the management studio. You want SQLEXPR_x64_ENU.exe (or the 32 bit version if you are on a 32 bit OS).
You'll also need to create and configure a windows azure storage account and a container (go into configure page and then choose "manage access keys" to get the account key). This is where the export package will reside.
Once I had the right product, I was able to export what is known as a "bacpac" file. This is not the same as a "dacpac", and is an option only available in the 2012 client tools. You'll need to export (not extract) the BACPAC from the database using the client tools. This is right on the context menu for the database.
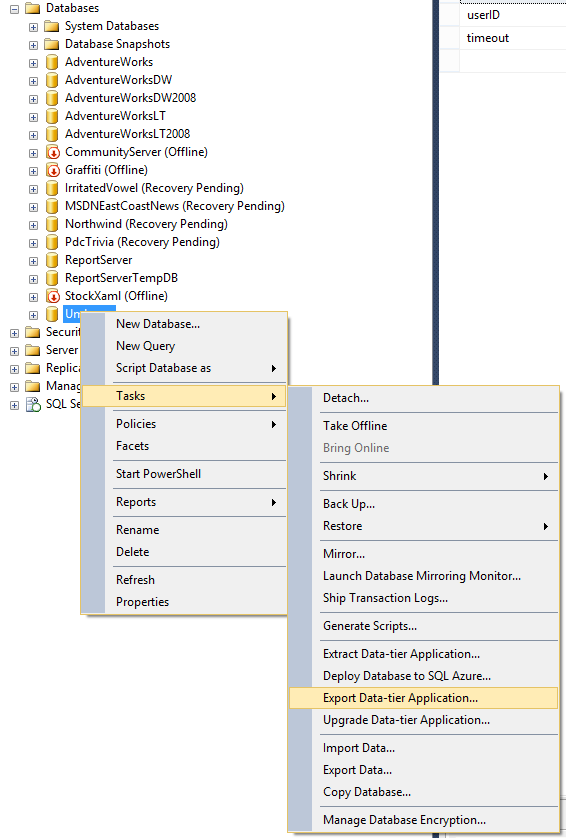
This will then bring you through a wizard. There aren't that many options. Note that you can have the bacpac uploaded to Azure automatically. This is the option I recommend you choose.
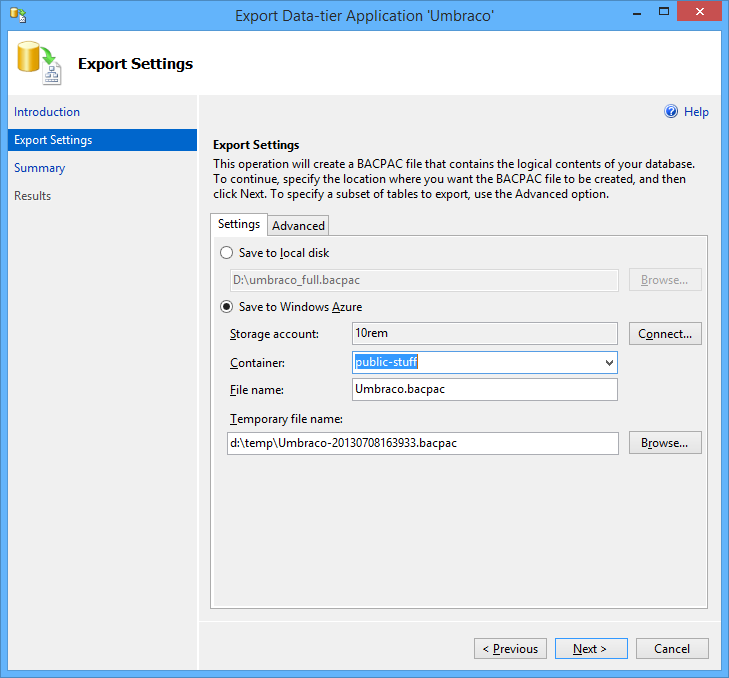
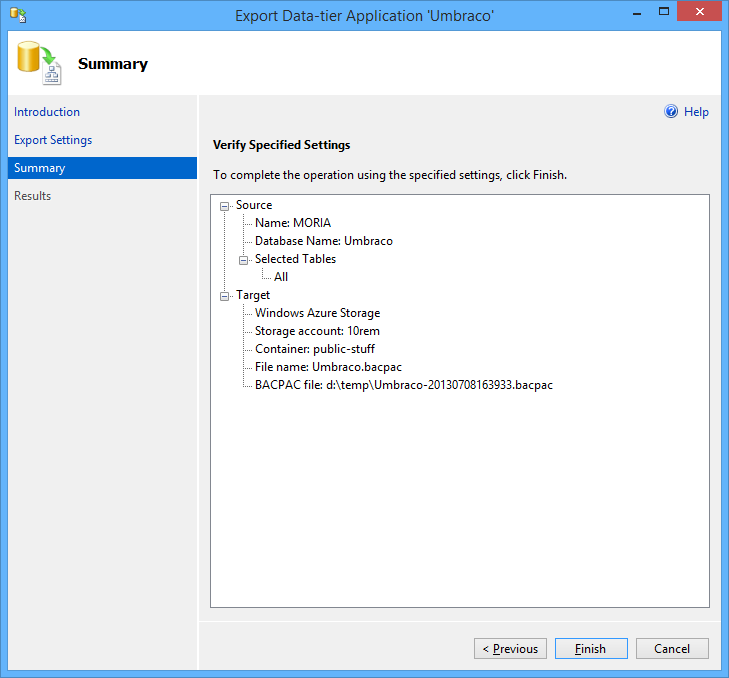
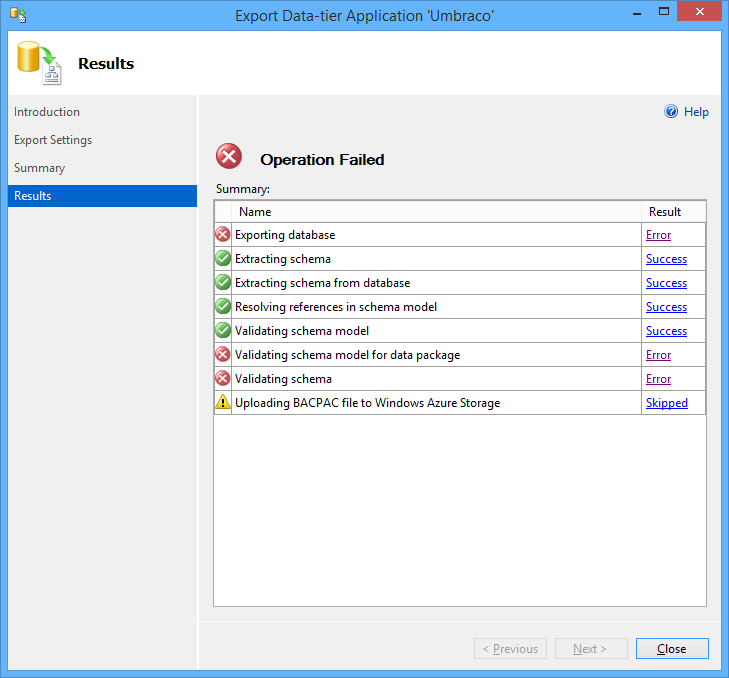
Because of my old SQL install and the newer standards, I was missing clustered indexes in the Umbraco database. The export failed because of that. Stuff like this must drive DBAs mad.
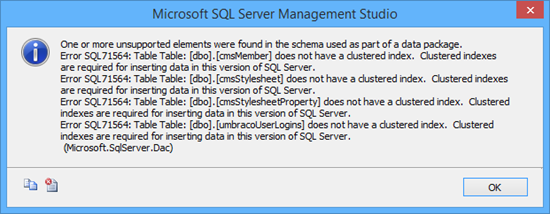
Once I went in and created clustered indexes for all tables, the export completed without a hitch.
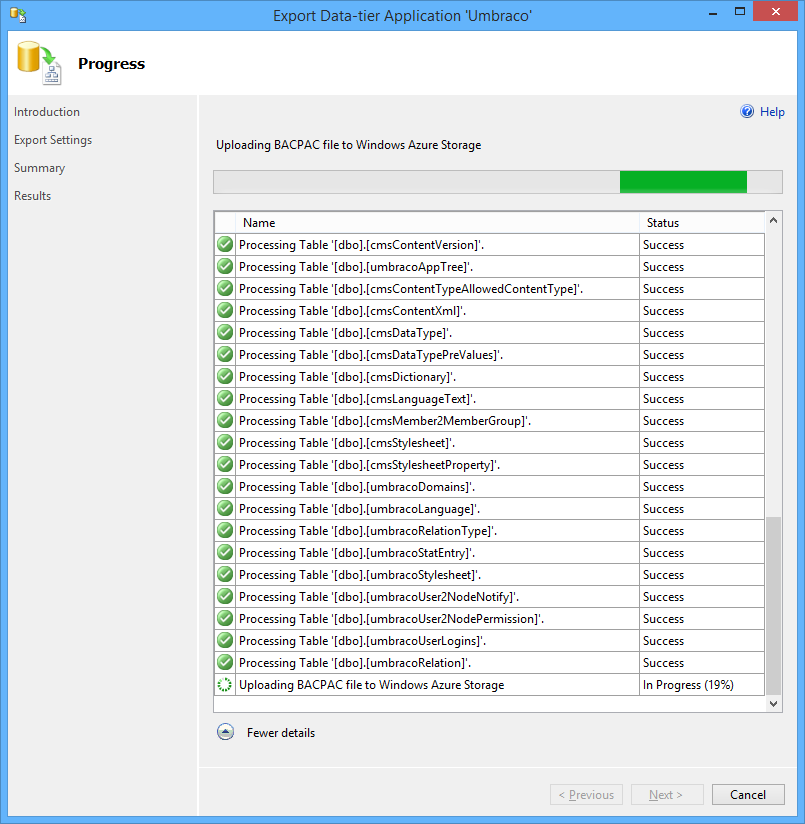
Then, I went into Azure and chose the option to import the database from the bacpac file. I had created a database prior to this, but decided to simply delete it and let the import create everything for me from scratch. After about 10 minutes of Azure showing me 5% complete (which means you're queued, as I was told), the import completed and the database was online.
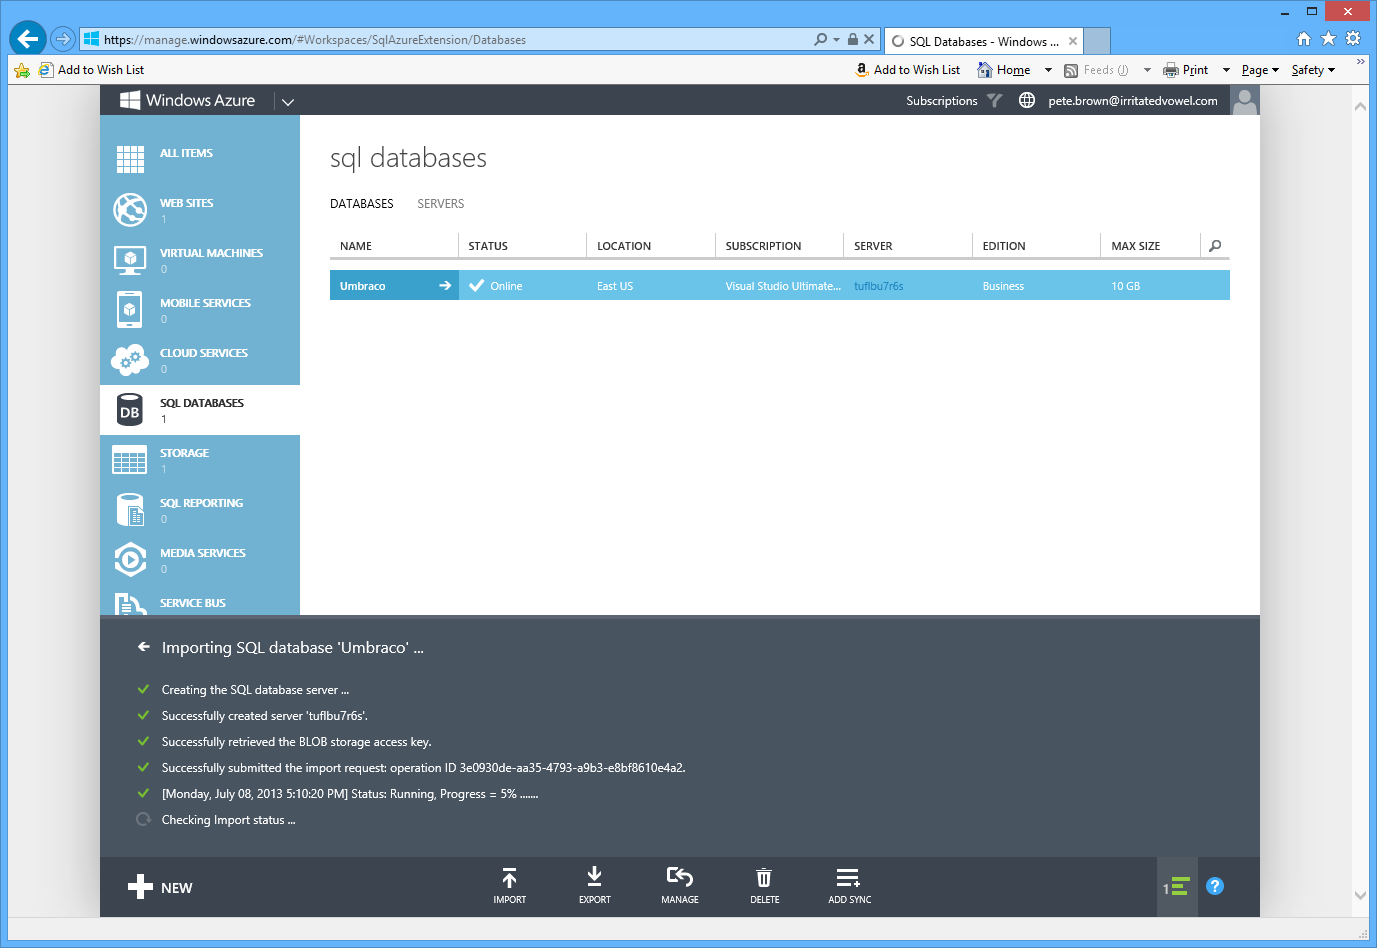
Painless! At that point, you could delete the bacpac if you're comfortable the database is up and running. I verified the data using the 2012 client tools - they could connect to Azure as easily as any other networked database.
The domain
The next step was to map the domain over. I had to do this because my build of Umbraco 4 includes redirect code which sends you to the main URL for the site regardless of what you type in. That makes testing on a non-production URL impossible. I don't recall if this is something I added to make sure I could use a naked domain like or if it was something intrinsic in Umbraco 4.
Now, if you're smart, you'll do all this before you even start with the database import. Why? Because DNS takes time to propagate.
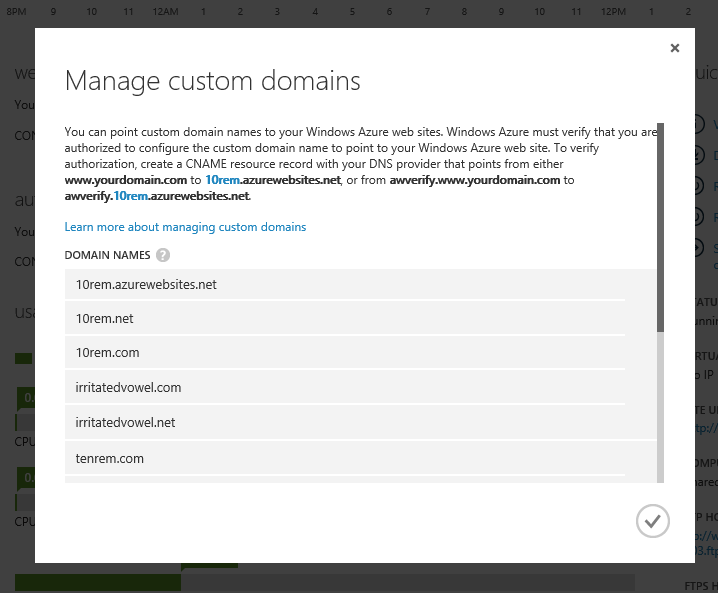
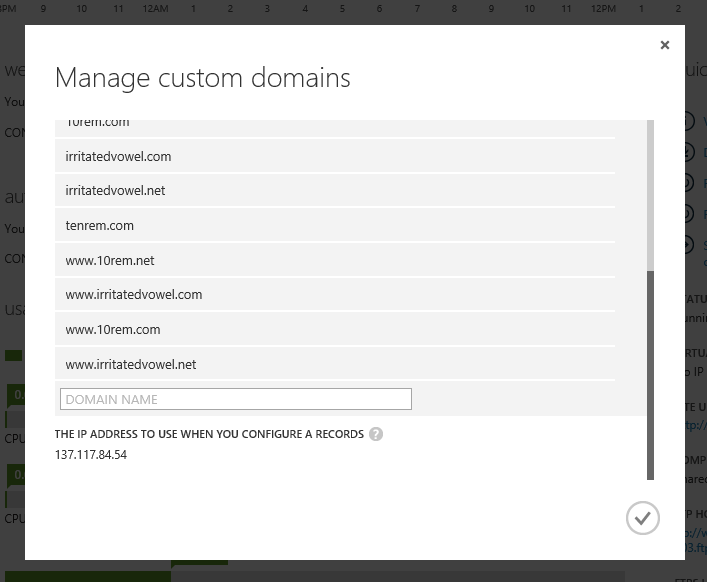
Before you can map domains, Windows Azure requires that you map some CNAMES for verification purposes, for each unique domain, as shown in the above screenshot. You can map the primary, or use some purpose-named subdomains. Azure is specific about this, so make sure you have the names mapped exactly as requested. For example, here's my main 10rem.net zone file with the Azure-required domains still mapped:
MX Records:

 A Records:

   10rem.net. IN A 137.117.84.54

   www.10rem.net. IN A 137.117.84.54

 CNAME Records:

   awverify.10rem.net. IN CNAME awverify.10rem.azurewebsites.net.

   awverify.www.10rem.net. IN CNAME awverify.10rem.azurewebsites.net.

 TXT Records:
You can't map your domain in Windows Azure until those cnames become visible to Azure. One way to track that is to use this web site:
http://www.digwebinterface.com/
Using this site, you can see the state of propagation for your DNS entries. It's quite useful. Simply pick "all" and enter the host names. Here's what it finds for my main domain:
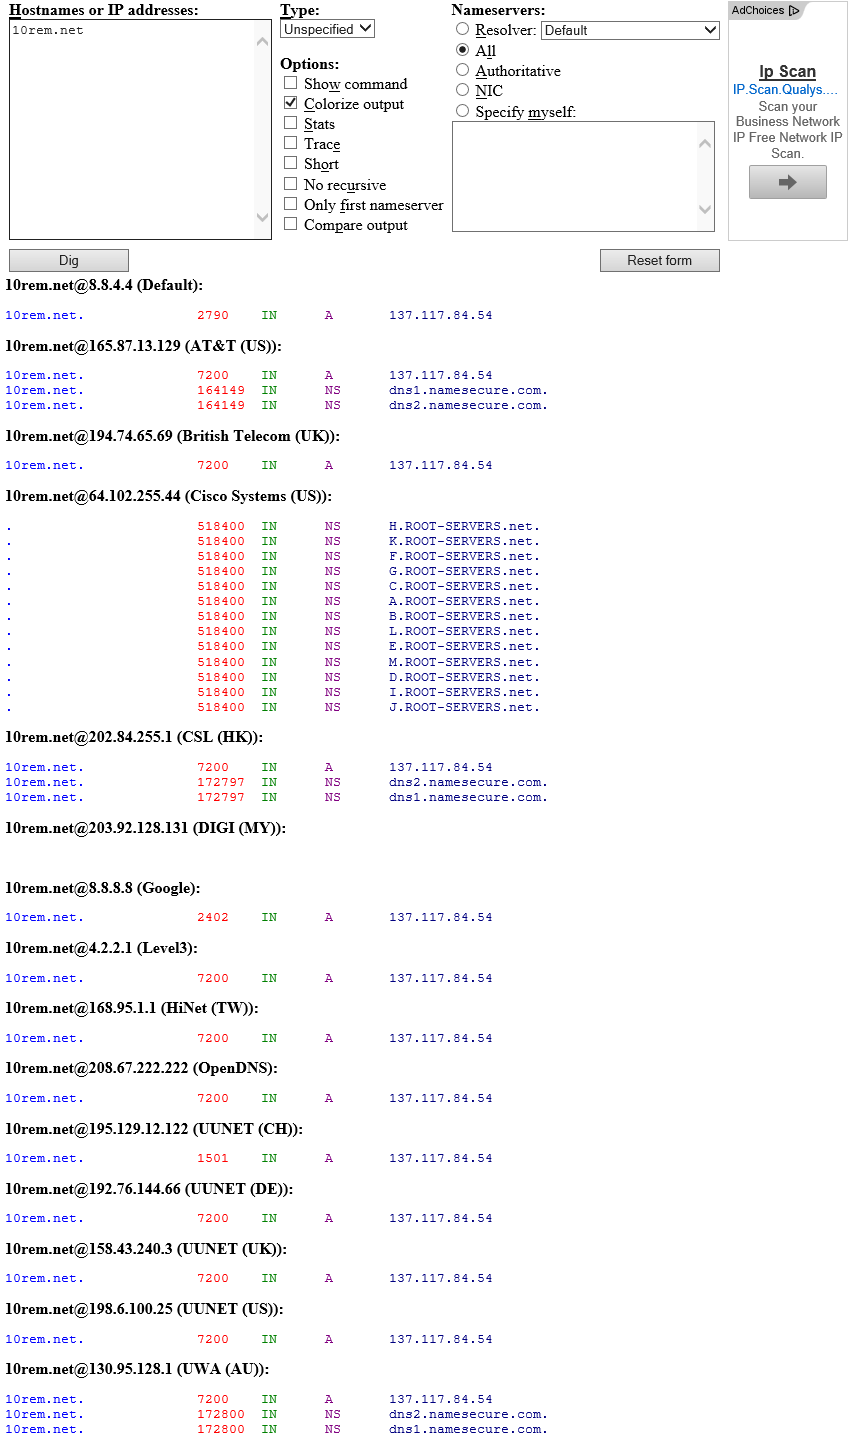
If you want to just check the authoritative one for your domain, select that from the options:
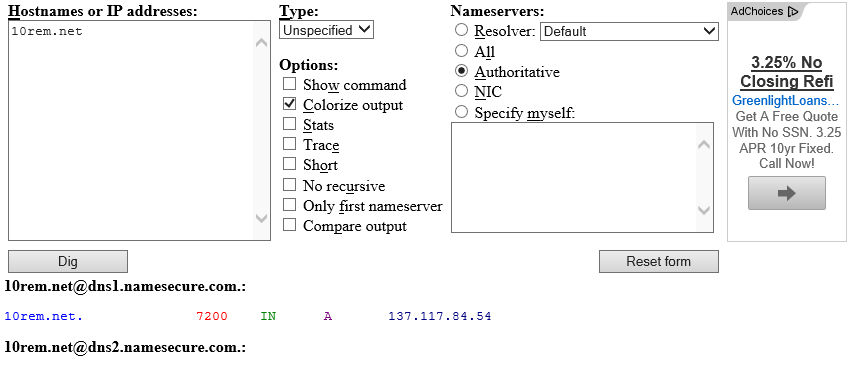
It's quite useful to monitor progress as you don't want to wait two or more hours to find out you messed something up.
Here's the awverify verification:
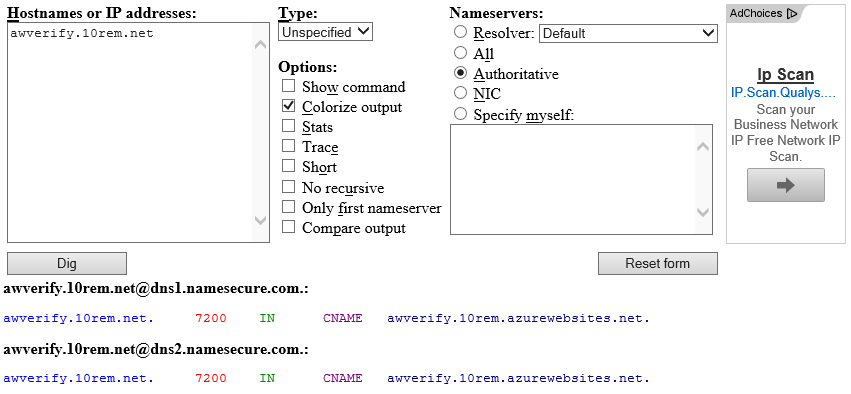
Note the CNAME entry - that's what Azure requires.
Azure in Production
My Azure Web Site is running in Shared mode, with .NET Framework 4.5, 64 bit with no other special settings.
So far, with just this small shared instance, everything has been running very smoothly. I'll continue to monitor in case it makes sense to make more capacity available in the future. I can see adding perhaps one more instance, but so far, it's quite happy as it stands today. My CPU time stays low. Memory usage is the highest number, at about 50% capacity on average.
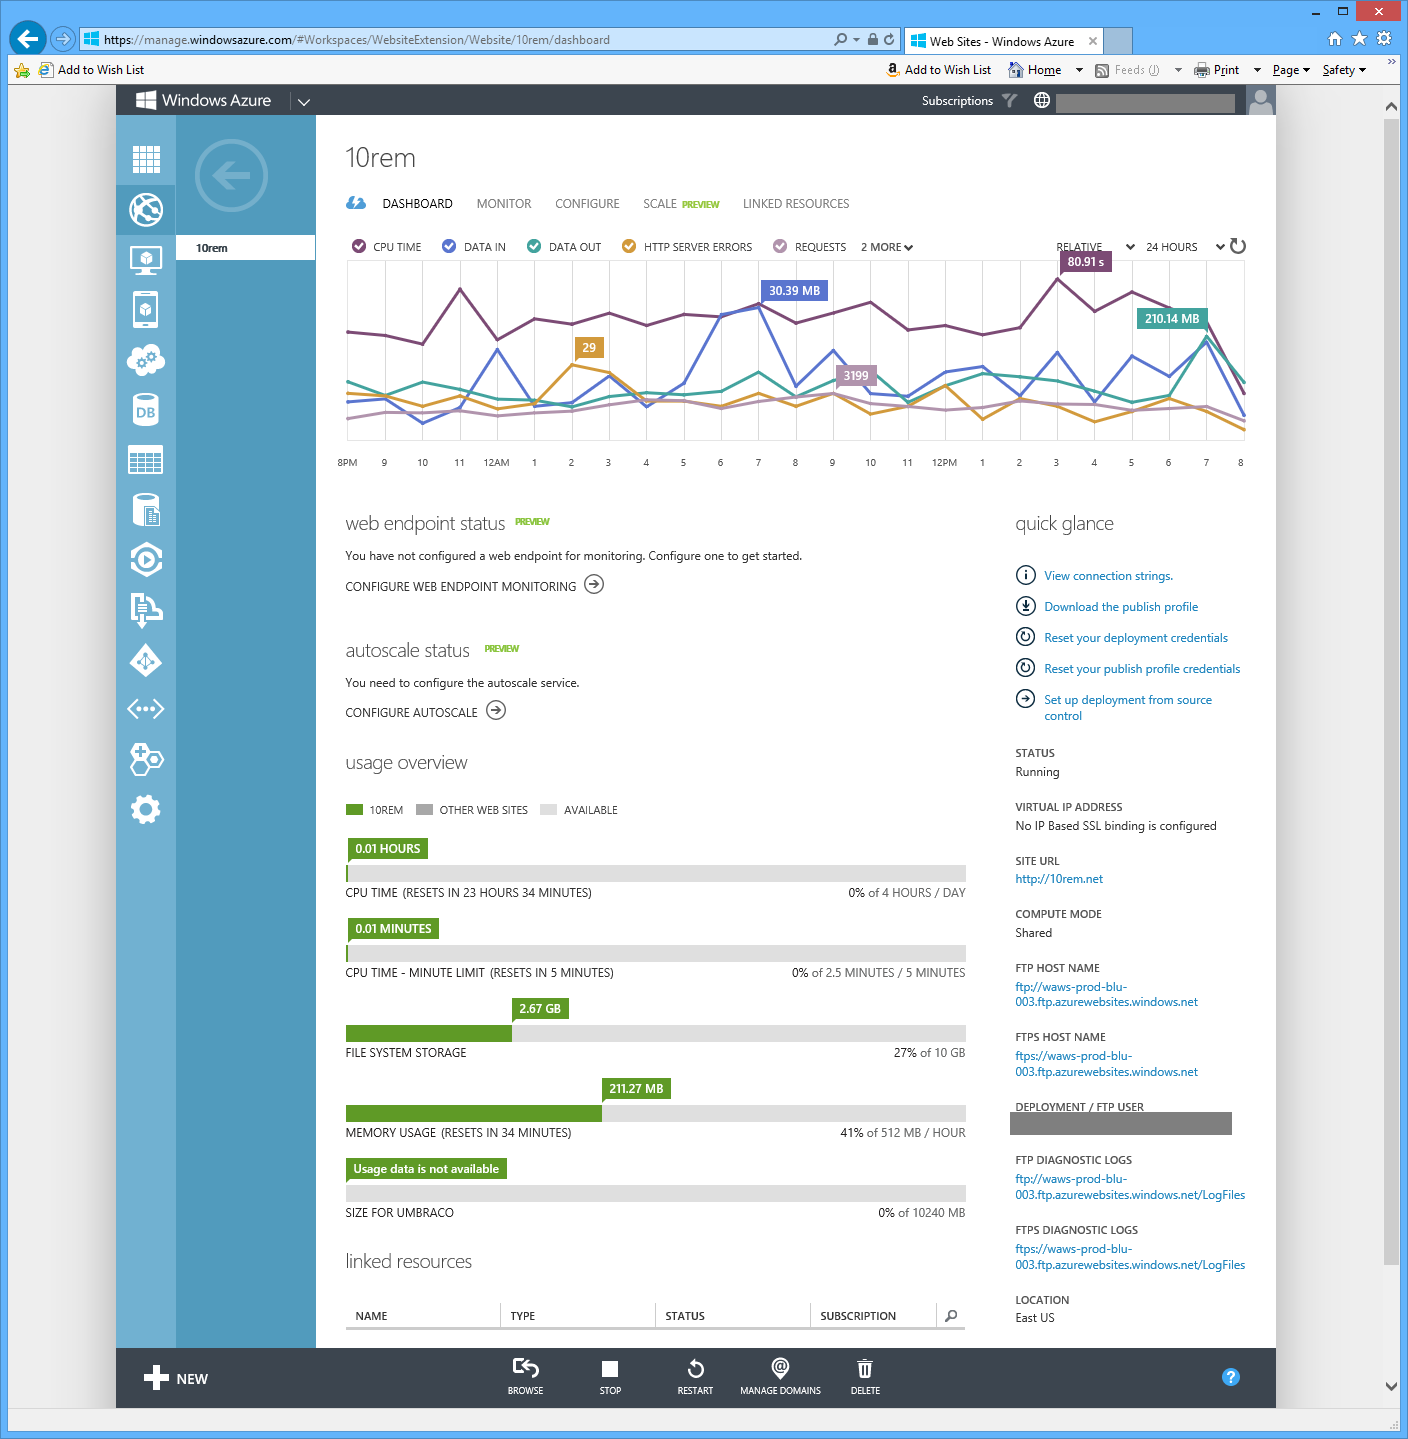
How's the cost? It's really very reasonable. Here's the cost so far, from late 7/8 through today
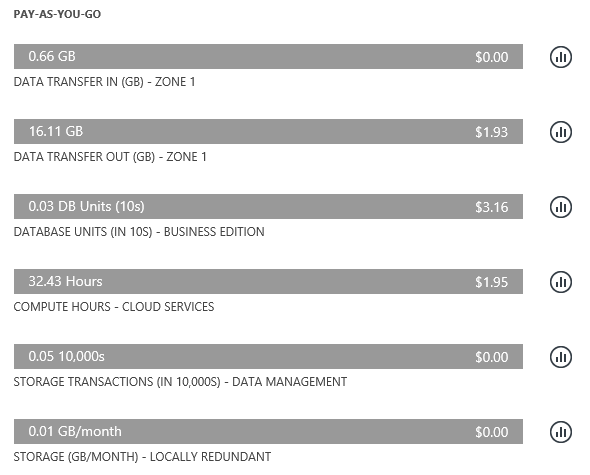
Yes, that's a whopping $7.04, or around a dollar a day. I've probably saved more than that in electricity just by killing the server rack and the associated AC unit.
I'm at about half the site visits I had in 2011. Once I pick up blogging at a pace like I used to, I would expect to see that go up. However, even at double or triple the cost, that's still a good deal considering I have a website with 3GB in files and several hundred MBs of database.
Conclusion
So far, this experiment with Windows Azure Web Sites is going quite well. Once I had the right tools, getting the database over was simple. Copying the files over was a no-brainer, and even though my Umbraco website ran under an older version of .NET locally, it worked just fine when moved to the server.
My site traffic is not much different from some small businesses I've seen. For those, especially ones which have seasonal traffic patterns, going with something like WAWS makes perfect sense.
Get an AGENT Smart watch and help them get to 1MM 15 Jun 2013 3:43 PM (12 years ago)
If you're a Windows Phone (or iOS or Android) user and want a smart watch which you can program using .NET, then get into the AGENT watch kickstarter before it ends in just 4 days.
You may know Secret Labs from their most popular NETMF product, the Netduino. I've always been a huge fan of their stuff.
Community
Secret labs has always made community a core part of their products. In this case, they've already helped people figure out how to create watch faces using straight NETMF, even before the SDK and community site are ready (both coming after the funding period is over).
The community is hard at work, even without prototype hardware, developing cool watch faces. Here are a few of my favorites community creations, snagged from the comment thread.


Those don't even include the ones that Secret Labs and House of Horology will deliver with the phone. Also, once people get the devices and have access to the on-board accelerometers, the weather data, bluetooth connections, and more, you can expect some pretty amazing watch faces and apps.
Coding your own watch faces
You can create all sorts of apps for the watch. To do this, you use the same tools you use for Windows Phone and Windows apps. You use Visual Studio, including the free version, and C# along with the Apache-licensed open source NETMF 4.3 runtime and the AGENT SDK.
One class of app is a watch face, like those shown above. Here's an example of what the watch face code might look like (source "Jeroen" via pastebin). This example has a background bitmap and some text over it.
If you're already a Windows, Windows Phone, ASP.NET, or NETMF developer, you'll find the code extremely easy to create. You'll be able to load the apps on to the watch using bluetooth and even create companion apps for your phone.
using System;

using Microsoft.SPOT;

using Microsoft.SPOT.Presentation;

using Microsoft.SPOT.Presentation.Media;

using System.Threading;


namespace WPWatchface

{

    public class Program

    {

        const int SCREEN_WIDTH = 128;

        const int SCREEN_HEIGHT = 128;


        // set the following to true for 24-hour time (00-23 instead of 1-12)

        const bool DISPLAY_24_HOUR_TIME = true;

        // set the following to true to outline screen in emulator

        const bool DISPLAY_BORDER_BOX = false;


        static Bitmap _bitmap;

        static Bitmap _background;


        static Font _fontLarge;

        static Font _fontMedium;

        static Font _fontSmall;

        static Font _fontExtraSmall;


        static Timer _updateClockTimer;


        static object _updateTimeLock = new object();


        static DateTime _startTime = new DateTime(2013, 01, 01, 09, 00, 00);


        public static void Main()

        {

            _bitmap = new Bitmap(Bitmap.MaxWidth, Bitmap.MaxHeight);

            _background = new Bitmap(Resources.GetBytes(Resources.BinaryResources.wp_logo), Bitmap.BitmapImageType.Gif);


            _fontExtraSmall = Resources.GetFont(Resources.FontResources.WeblySleek_12);

            _fontSmall = Resources.GetFont(Resources.FontResources.WeblySleek_14);

            _fontMedium = Resources.GetFont(Resources.FontResources.WeblySleek_24);

            _fontLarge = Resources.GetFont(Resources.FontResources.WeblySleek_32);


            // optionally set time; comment out the following line to use the current system time

            //Microsoft.SPOT.Hardware.Utility.SetLocalTime(_startTime);


            // display the time immediately

            UpdateTime(null);


            // set up timer to refresh time every minute

            DateTime currentTime = DateTime.Now;

            TimeSpan dueTime = new TimeSpan(0, 0, 0, 59 - currentTime.Second, 1000 - currentTime.Millisecond); // beginning of next minute

            TimeSpan period = new TimeSpan(0, 0, 1, 0, 0); // update time every minute

            _updateClockTimer = new Timer(UpdateTime, null, dueTime, period); // start our minute timer


            // go to sleep; time updates will happen automatically every minute

            Thread.Sleep(Timeout.Infinite);

        }


        static void UpdateTime(object state)

        {

            string hour = "";

            string minute = "";


            // clear our display buffer

            _bitmap.Clear();


            // set background

            _bitmap.DrawImage(0, 0, _background, 0, 0, SCREEN_WIDTH, SCREEN_HEIGHT);


            // grab the current time

            DateTime currentTime = DateTime.Now;


            // set our hour and minute based on 12/24 hour settinsg

            if (DISPLAY_24_HOUR_TIME)

            {

                hour = currentTime.Hour.ToString();

            }

            else

            {

                hour = (currentTime.Hour % 12).ToString();

                if ((currentTime.Hour % 12) == 0) hour = "12";

            }

            minute = currentTime.Minute.ToString();


            // draw hours

            int w = _fontLarge.CharWidth(hour[0]);

            if (hour.Length > 1)

            {

                w += _fontLarge.CharWidth(hour[1]);

            }

            else

            {

                hour = "0" + minute;

                w += _fontLarge.CharWidth(hour[0]);

            }

            _bitmap.DrawText(hour, _fontLarge, Color.Black, (90 - (w / 2)), 5);


            // draw minutes

            w = _fontSmall.CharWidth(minute[0]);

            if (minute.Length > 1)

            {

                w += _fontLarge.CharWidth(minute[1]);

            }

            else

            {

                minute = "0" + minute;

                w += _fontLarge.CharWidth(minute[0]);

            }

            _bitmap.DrawText(minute, _fontLarge, Color.Black, (84 - (w / 2)), 62);


            // draw current weekday

            string weekday = DateTime.Now.ToString("ddd");

            w = 0;

            for (int i = 0; i < weekday.Length; i++)

                w += _fontExtraSmall.CharWidth(weekday[i]);

            _bitmap.DrawText(weekday.ToLower(), _fontExtraSmall, Color.Black, (27 - (w / 2)), 28);


            // draw current date

            string date = currentTime.Day + "-" + currentTime.Month;

            w = 0;

            for (int i = 0; i < date.Length; i++)

                w += _fontExtraSmall.CharWidth(date[i]);

            _bitmap.DrawText(date, _fontExtraSmall, Color.Black, (26 - (w / 2)), 76);


            // draw a border around the screen, if desired.

            if (DISPLAY_BORDER_BOX)

            {

                _bitmap.DrawRectangle(Color.White, 1, 0, 0, SCREEN_WIDTH, SCREEN_HEIGHT, 0, 0, Color.White, 0, 0, Color.White, 0, 0, 0);

            }


            // flush the display buffer to the display

            _bitmap.Flush();

        }

    }

}
The project is a go, having met the goal a long time ago. However, at 1MM, we might see an app store for the watch apps. I'd love to see this happen and would also love to see more of you out there coding for NETMF devices you can wear on your wrist. Join us!
Join the kickstarter project and get a great watch.
Recent videos and music tracks 3 Jun 2013 2:46 PM (12 years ago)
I've put up a few videos and music tracks lately. Enjoy (view on my site to see the videos. They don't usually appear in RSS readers)
Soundcloud Tracks
Here are the original tracks, plus several others, on Soundcloud. Audio quality tends to be a bit better here.
Umbraco blocks iframes, so here's a link to the set.
Enjoy!
My Windows Store XAML book is now available 3 Jun 2013 1:37 PM (12 years ago)
Look what just arrived at the door!

The author copies are usually in the first set to be sent out. For folks who have pre-ordered paper copies, you should see those really soon. The ebooks typically show up shortly afterwards.
Yes, this is Windows 8 XAML in Action. We renamed the book to better cover its ongoing focus.
How to get your own copy
If you're at TechEd NA 2013 this week, I'll be at the TechEd book store this Thursday at 12:30pm local time, after my last session there, doing a book signing. Bring your own copies, or purchase a copy while at the store, or just come by to say "Hi".
Finally, if you haven't yet picked up a copy, my book is the Manning Deal of the Day this Wednesday June 5. The code to use on June 5 is dotd0605au at http://manning.com/pbrown3 . You'll save 50% off the normal price.

TechEd India, the India developer communities, and the Taj Mahal 14 Apr 2013 9:07 PM (12 years ago)
In the second half of March, I traveled to India (Bangalore, Delhi, and Pune) to speak at TechEd India and TechDays Delhi about Windows 8 app development.

I flew from Dulles International in VA to Charles De Gaulle in France, where I met up with my colleague Nisha Singh, who had flown from Seattle. From there, we flew Air France to Bangalore for TechEd India Bangalore, then hopped a Jet Airways flight to New Delhi for TechDays Delhi. While there, I took a car to Agra over the weekend (more on that shortly). Then another Jet Airways flight from Delhi to Pune for TechEd India Pune. And finally, a short flight from Pune to Mumbai before the 16 1/2 hour flight from Mumbai to Newark NJ, and the prop plane from Newark to Dulles.
What I had expected
Before I went away to India, my only experience with developers in India was the lowest-price outsourcing companies I often had to clean up after as a consultant, the outsourced call center tech support folks I'll sell a kidney to avoid, and the numerous "send me the codes" emails I get. So, I had some pre-conceived notions as to what to expect from the developer community.
I'm happy to say I was completely wrong.
The developer community in India is strong, professional, and enthusiastic. The people I met at TechEd India were serious developers, building awesome apps and the usual bevvy of line of business apps internal to companies. The developer community in Pune, for example, is huge. The Pune .NET user group community (PUG) has membership in the mid 4 digits. Yep. That's pretty big. I was lucky to have been able to meet with the leads (my flight was delayed, so I arrived at the hotel just in time.)

Photo by Vikram Pendse
TechEd and TechDays
TechEd India covered Bangalore and Pune. TechDays India happened in Delhi in between the two.
These events are smaller than TechEd US and TechEd Europe, but the production values are just as high, with even a few extras thrown in. A couple years ago, a monkey snuck in the back door of an event hall and perched on top of the screen, watching the demos. The original code monkey :)
Here's the keynote hall for TechEd Bangalore. This was located in an outside stand-alone building.

TechEd Pune was even larger, located inside a hotel: the JW Marriott Pune. Here's Nisha presenting to a full house:

I think this was from my talk on XAML performance. I must have been explaining something pretty serious when this photo was taken :)

(This photo from Bangalore was shared to me without attribution. If you are the photographer, please let me know.)
The "Stump the Speaker" panels were my favorite part. In this photo, from Bangalore, I had so much Q&A at the end of my session, I arrived late to the panel, and got the honorary tall seat.

Photograph by Microsoft, India
TechDays Delhi was a free event, so it attracted a lot of local students. I was pleased to speak with this audience, as getting our tools, and our guidance on quality apps in front of them is really important. Students are responsible for some of the most exciting startups and some of the coolest apps.
Finally, one thing that I thought was done extremely well at TechEd India was the keynote by four children. Take a moment and watch it now.

My session decks for the TechEd events are available here: https://india.msteched.com/ Click on "downloads" at the top right. My three sessions were:
- Addressing Performance in Windows 8 XAML apps (day 1, architect track)
- Tips and Techniques for Building High Quality Windows 8 apps (day 2, Windows 8 track)
- Smoothly Navigating the Windows Store Submission, Certification, and Listing Process (day 2, Windows 8 track)
Recordings will be up soon, as I understand it. I'd recommend watching Bangalore, as Pune had to squeeze sessions to account for keynote overrun, so the sessions are a bit compressed.
PCs and phones: an observation
Here are some interesting observations about PCs, phones, and tablets in India:
- Almost all developers have a smart phone
- iPhone is not the number one smart phone, or even the number
two smart phone in India, despite their advertising there.
- Look who's doing well in India and more recent news here
- I saw only a single iPhone at the events, and not a single iPad. This includes the event the students attended.
- Total phone ownership is approximately 12x any sort of PC or Mac ownership
- For car drivers and non-IT folks, that little indestructible Nokia was what I usually saw. Feature phones still dominate in India.
- I saw a number of high end Android tablets and some Surface w/ Windows RT
This data all came from the local folks and my personal observations, so use it only as anecdotal data. I did see a number of Windows Phones out in the wild, outside of the events. The HTC 8x in blue seems to be quite popular there (this also happens to be the phone I own).
Students generally get new PCs before they go to university, but (anecdotally) rarely have them available to them at earlier grades.
All of this helps to show why India is more of a producer of PC software than a consumer.
Apps
There are some really well-designed apps which have come out of India. I'm not going to list them all in this post, but here are a couple I found compelling:
Sweet 'N' Spicy

And Tarla Dalal

The fact that I absolutely love Indian food played no part in me picking these two specific apps. Honestly ;) You can find them both listed in most regions, including the US Windows Store.
Being a tourist
There is a lot to see in India, especially near New Delhi.
I arranged ahead of time to have a driver pick me up at 4am at the hotel on Saturday with instructions to bring me to the Taj Mahal and the Red Fort of Agra, and to make sure it was a driver who could speak and understand English. He then drove me the 4+ hours from Delhi to Agra. Once we arrived in Agra, he picked up my tour guide for the day (I didn't know I was getting one, but this turned out to be a good idea). They tried to stop for breakfast at a place where the guide obviously had some business interests, but it was too early, I convinced them to skip breakfast and to just bring me right to the Taj. (I left at 4am, but if taking the Delhi->Agra highway, I recommend leaving even earlier, like 3:30, depending on traffic etc.)
The Taj Mahal was everything I had hoped it would be, and much larger. It always looks so small in the photos.

The Taj Mahal is also full of people looking to tap your wallet a little. Just know it's all part of the experience and keep lots of rupees on you. The photos, for example, will run you 10,000 to 20,000 rupee. They say it's 100 rupee per photo, but then take close to 20 of them. Don't worry about whether or not you got the best price or someone else was able to negotiate off 100 rupee more than you. These folks are providing a service to tourists and by western standards, it's pretty inexpensive regardless.
The whole time the tour guide brought me around the Taj, he was talking up the marble inlay. This is interesting, but understand it's also them priming the pump for the trip to the state-owned marble shop afterwards.
TIP
When you're brought to the marble shop, you'll be face to face with one or more extremely talented sales people. In my case, they sat me down with hot tea and showed expensive marble tops first, and afterwards the inexpensive stuff. Then, it was off to jewelry, and then textiles, and (I insisted they leave this part out) rugs. In the case of the marble, unless you really want a table top, just ask to be shown the small things like statues, coasters, etc. Seriously, these sales people are good. I've had less pressure at a car dealer.
Some of the marble goods are nice, though, especially at the state-owned/certified shops. The one I was brought to was an emporium. I tried negotiating for a bit, but they wouldn't do any better than a small discount off the top. From speaking with others, the emporiums are generally fixed price. The one I went to was Cottage Industries, but oddly it also seems to go by the name Cauvery Emporium, as I had receipts from both places for my purchases inside the same building.
Before going in the shop, set a firm budget in your mind, and convert it to rupees so you don't have to do the math in front of the sales people. That's the best way to avoid the pressure as you can firmly say something is outside your budget. Remember, these folks are good.


The trip around the Taj Mahal took around 2 1/2 hours. I was there nice and early, before the majority of the crows. The photo above was taken on the way out as the place filled up. It was also getting pretty hot by then.
It also gets pretty hazy as the day goes on. Air pollution is pretty bad, as is the dust.

After the trip to the Taj, we stopped for breakfast (extremely inexpensive compared to the hotels, and very good) and then headed over to the red fort.

This part of the Agra fort had a fire on the inside, set by invaders. That burned all the painting off the walls, and left a smoky colored marble. Note the translucent marble near the windows.

The "forts" in India are the castles. Don't let the name "fort" put you off, as these aren't US-style forts, and are fully worth the trip. The Agra Fort, in particular, is impressive both in construction and in history. Read up a bit on it before visiting.


The drive back from Agra took quite a bit longer due to traffic. It was over 5 hours as I recall. We also had to dodge, of all things, stray cattle lying in the gutter in Agra. Imagine stray cats and dogs in another nation and then add like 600-800 pounds. They were just there, lying down in the street, in the middle of the city. It was amusing mostly in that it seemed so normal. :)
TIP
Don't get hung up over whether or not you tipped too much for your tourguide, driver, etc. Tip what you think is fair for the service you received, and if you go by Western standards, you'll almost certainly be tipping more than enough. Keep small bills and coins around for the dude in the bathroom who won't let you out without a tip.
While in Delhi, I also took an evening tour "Sound and lights show" of the Delhi Fort. Seeing the Agra Fort afterwards helped complete the story.
You can find all of my photos from this trip on my Flickr page.
Poverty
Before I point out a few helpful tips, I wanted to mention the poverty. I've seen slum-level poverty in the United States, but I was unprepared for the type of poverty I saw on the outskirts of the cities in India. Even the Delhi Airport had slum villages right up against the walls. These villages are made from piles of debris, trash, old signs, mud, dung and more. Basically, if it can be used to put a roof over one's head, it will be. I was never able to get a good photo as cars/planes never stop near the slums. The only real photos I got were these washed out hazy ones (did I mention the pollution?) from inside the plane at Mumbai Airport (click for larger version). These were at least made of building materials. Many were just hobbit holes in what appeared to be piles of trash held together by mud along the side of the road.


You'll also see a LOT of buildings in various stages of construction. Many seem abandoned before completion. Many are concrete skeletons with exposed rebar on top, and bamboo scaffolding. Such is the nature of a developing country.
Here is an image search showing more of these slums.
Some advice for fellow westerners visiting India
I've been to a number of places in Europe, but this was my first time this far east. The culture really is quite different from European culture, so be prepared.
- Dress
-
- Purchase really light cotton khakis before your visit. I brought jeans (too hot) and shorts (not recommended, as only kids wear shorts)
- Women should dress conservatively, especially at monuments. The Taj Mahal grounds include an active mosque and a lot of local and short shorts or low tops will likely get you unwanted attention from folks who think you're being disrespectful or tacky, or from people who want a closer look.
- Men, if you intend to visit any mosque, arms and legs must be covered.
- Food
-
- Unlike the US, don't expect to find water/snack vendors all over the place. If you have Type 1 or other blood sugar control issues, be sure to carry stuff with you, but also know that Taj Mahal will not allow most of this in the monument
- If you don't like Indian food, you're really missing out. :)
- Always drink bottled water. Even in the hotels, stick to bottled. Avoid salads which have been washed in local water. Even my India friends who have been away from India for a while found the local water really upset their stomachs
-
- Brush with bottled water as well.
- Purchasing
-
- If you look western, expect the starting price for everything on the street to be at least 2-3x what locals would even consider paying. Negotiate what you can, but also keep in mind that this is a relatively poor country, and you're doing your part to help out in a fair exchange of goods and cash. Don't get taken, but don't worry about nickels and dimes.
- Keep rupees on you. Outside of the western-style hotels, most places are cash-only. Keep lots of small amounts too, as you'll find 100 INR is far too large a tip for some things, and too small for others.
- Use a credit card, not your debit card. You want some protection.
- Airports and Travel
-
- Airport screenings segregate male / female
- Most airports require that you have a printed boarding pass before you can even enter the airport. Some will take a PDF on your phone, but that varies. Web check-in at the hotel.
- Use a hired car and driver. Don't even think of driving yourself. Hired cars (from a reputable company - I used Car Club) are very inexpensive. My whole trip to Agra (4am to 8pm) was around $150 US plus tips. Considering I monopolized a driver from 4am to 8pm, that's pretty good. Trips between hotels and airports typically ran around $15-$20 USD.
- If you use a video camera, realize that the monuments require you to pay extra to bring them in, and some like the Taj Mahal, make you pay to lock them up before entering the monument proper (they do not allow them on the grounds). I use my video camera as my still camera, but that didn't matter. Smart phones are fine as it doesn't seem that Indian officials have caught on to the idea that smart phones are also video cameras.
- If going on a business trip, make a point of seeing the monuments close to where you're staying. There are lots of great things around India, and the beauty can be breathtaking.
Maker Geek Roundup 018 for 3/12/2013 11 Mar 2013 10:25 PM (12 years ago)
The Maker Geek Roundup aggregates information of interest to makers everywhere. Topics include .NET Micro Framework, Arduino, AVR and other MCUs, CNC, 3d Printing, Robotics, Microsoft Robotics Studio, Electronics, General Maker stuff, and more. If you have something interesting you've done or have run across, or you blog regularly on the topics included here, please send me the URL and brief description via the contact link.
3d Printing, CAD/CAM/CNC
- Dude Has 75 Percent of His Skull Replaced By 3D-Printed Replica (Gizmodo)
- Gigabot 3D Printing: This is Huge! by re:3D (Kickstarter)
- Ecologically colored PLA (Ultimaker)
- Stop-motion video of 'Twizzler' by artist Dizingof (Ultimaker)
- The 30th Anniversary of the first ever 3d printed part (Grass Roots Engineering)
- 3D Printing: How Far We've Come (Ponoko)
- The importance of the Lyman Extruder, Filamaker, Recyclebot and Filabot to 3D printing (VoxelFab)
Laser Cutting
NETMF (.NET Gadgeteer and Netduino)
- Red Nose Day Door of Mystery (robmiles.com)
- A simple yet versatile GDI library for Netduino (TinyCLR.it)
- Gadgeteering at Tech Days (robmiles.com)
- A playable Invaders-like game with a Netduino Plus 2 (Highfield Tales)
- Sure Electronics Led-matrix driver for Netduino (TinyCLR.it)
Arduino and AVR
- The ultimate Arduino-based cat litter box (Ponoko)
- A DIY digital camera made with cardboard and an Arduino (Ponoko)
- Wearable soundscape from Canada (Arduino Blog)
- Arduino tutorial 15a - RFID with Innovations ID-20 (tronixstuff)
- Arduino and KTM-S1201 LCD modules (Arduino Blog)
- Duinobot V1.2 Childproof Arduino Brain (Bill Griggs)
- MAKE | Arduino Helicopter Game (Kevin Loney)
Other Microcontrollers (PIC, ARM, Raspberry PI, Parallax, more)
- News - New USB Host Library Released! (MikroElektronika)
- Graphic LCDs for Data Bus (Bot Thoughts)
- How to install Cloud 9 on raspberry pi (slickstreamer)
General Electronics and Hardware Hacking
- Eurocircuits - how to make a 4-layer PCB (YouTube) (great manufacturing walkthrough)
- PCB Preheater - Blazing Track (Jaanus Kalde)
- Furby Disassembly: Part 1 (Bot Thoughts)
- 4-layer Fusion PCB Service is Available at Seeed!! (Seeed Studio)
- SMD Manual Part Picker (Software & Sawdust)
Robots, *Copters, and Robotics Studio
- RoboBrrd 3D Printed Pieces (RobotGrrl)
General Maker
- A functional mini plotter made with cardboard, glue, wire, and tape (Ponoko)
- …a Goatskin drum (Bodhrán) (Steve Hobley)
Synthesizers, Music, and MIDI/OSC
Retro Computing and Commodore!
- C64 S-video mod (My Diy Blog)
Random stuff
- Electric fence experiment ends as expected (YouTube)
- Epic Fire Prank!! (YouTube)
- Meanwhile…In Heaven (19 Pics) (Pleated Jeans)
Disney Fairies: The evolution of hub screen box layout in Windows Store apps 7 Mar 2013 11:37 AM (12 years ago)
A large number of apps in the Windows Store follow the "bunch of boxes in a GridView" approach to the hub screen.
This can work in some cases, but I encourage developers and designers to move beyond that look, and consider either evolutions of it, or completely different approaches.
Boxes 1.0
For many, the basic box layout is a very workable layout. Here's one of my essential apps: YouTube+ (viewed on my desktop).
The UI us very conservative but very functional. I don't think anyone would disagree with me if I said it wasn't "beautiful" or particularly creative, but as a third-party app that can't necessarily use first-party branding, it works.
As an aside, I love the snapped view for the YouTube+ app. It's very workable, especially if you use it mostly for listening, as I do.
Boxes 2.0
Some, such as the Xbox games, improve on the stock templates by having a more varied layout. For example:

Many of the Xbox games follow this style. It's a great way to show all the game styles, your achievements, and more. It requires more effort to create this type of layout, as each of the groups contains a different layout with different data. This is truly a hub screen.
Boxes 3.0
Here's another example, from Adera. Though almost identical in concept to the earlier Xbox games like Minesweeper, the hub screen is more complex, requiring support for different chapters, and in-app purchases. I usually play Adera on my Surface, but here's what it looks like on my desktop. The background is textured, so wouldn't look correct assembled into a single image.


The colors are darker, fitting the Adera theme. The use of in-game images also really helps make the layout more appealing. Note how we're still using boxes, but the overall interface is more stylized and, to my eyes, more beautiful.
Boxes 4.0
That brings me to the game I installed yesterday. The latest game to come through is Disney Fairies Hidden Treasures. As the father of a 4 year old girl and a 7 year old boy, both of whom love the Disney Fairy cartoons and franchise, I immediately purchased it. When I ran it, I was pleasantly surprised by the hub screen. Here, take a look:
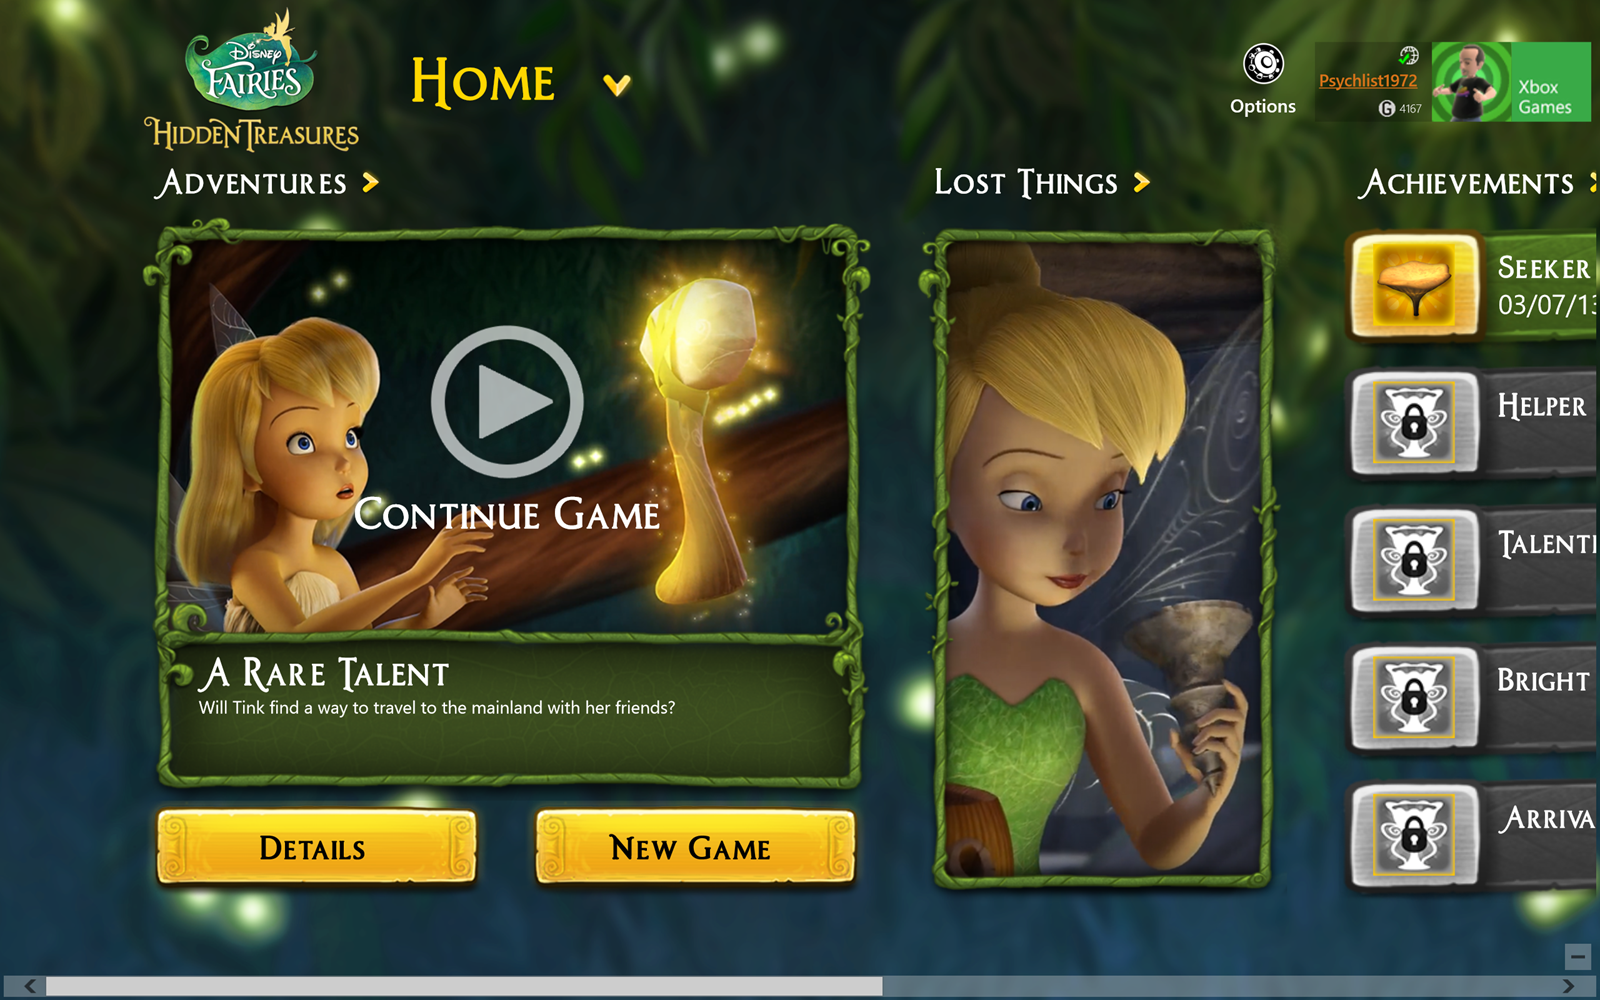
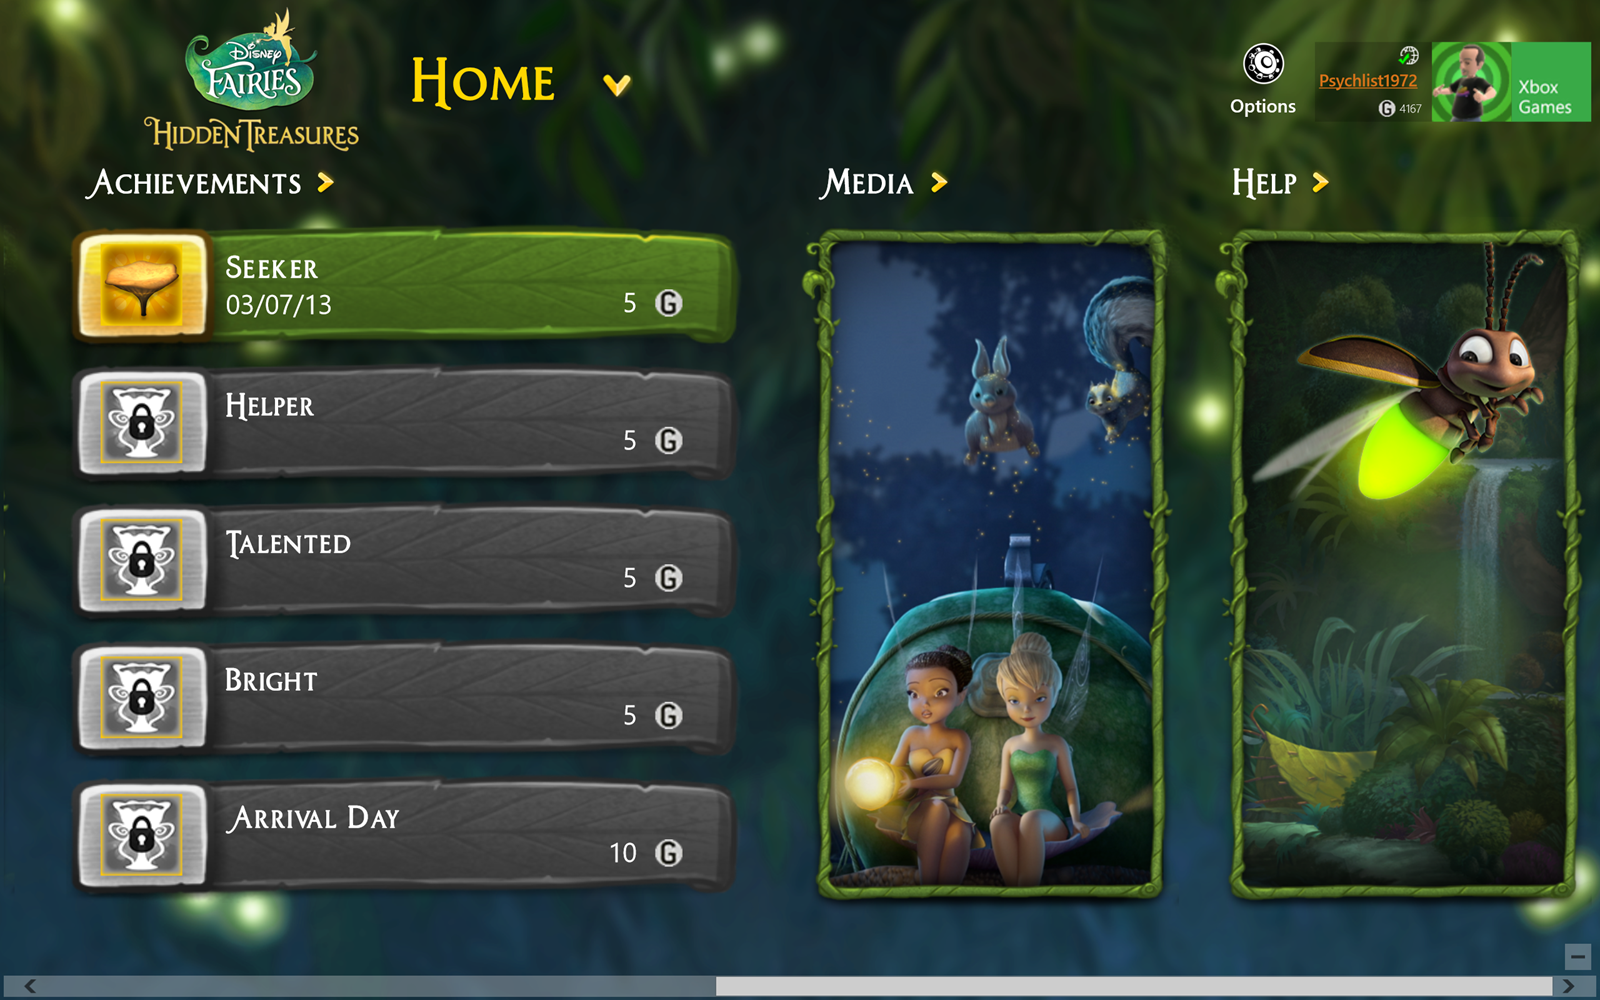
This is a game which, I assume, is primarily targeted to young children, typically girls. The gameplay is simple enough that young kids will certainly enjoy it. As part of that targeting (and overall branding), the design team has taken the boxes hub to the next level. Check out the styling of the hub screen in this close-up:

Yes, there's adornment around those boxes. However, it completely works as it's minimal and appropriate both to the brand and to the game itself. The layout follows well-known Windows design patterns, but takes it to the next level.

You can see how the branding was brought forward from the game tile.
Now look at the same general section from Adera. You can make out the same elements, but in a less stylized fashion. A stock font is used, and the game itself doesn't have any real branding at the top. Note also the use of color in the Fairies navigation chevrons as compared to Adera. You can see how the use of color (and shading in that case) helps those stand out. Adera does use some background styling which, in this case, makes all the difference in helping set the mood for the game.
It would be nice if they used the Adera branding at the top to better tie in with their tile:

And now, a similar concept from Minesweeper. This is one of the very early games, and it follows a conservative Windows style. There's no texture in the background, and the fonts and branding are all stock. Of course, this is Minesweeper, not something that you'd expect to be heavily stylized or branded.

Do you see the progression between the three?
Some take-aways
I wouldn't expect everyone to have Disney-class design support for their apps. However, there are some things we can take away here.
1. Branding is very important. Bring your brand forward in the game, and be consistent in its use. Matching the branding used on your tile is a good idea.
2. Using a custom font as part of your branding can really work. It needs to integrate with your branding and with the app as a whole, but it doesn't need to be limited to Segoe UI.
3. You don't need to limit yourself to box layout. If you do, however, you can use additional design elements to help that layout pop. Keep in mind that the content is the most important, so be careful that the adornment is not the focus.
4. Sometimes, a background texture can help change the UI from something boring to something very interesting. You need to use good design sense when doing this, and not slap any old darkened stock photo in the background.
Oh, and unofficial take-away number 5: if you have younger children who like Disney Fairies, pick up Disney Fairies Hidden Treasures. It's a great game for them.
Do you really know what your kids are doing online and in games? 28 Feb 2013 8:29 PM (12 years ago)
It seems that each generation is exposed to more mature or serious situations at earlier ages than the one before it. There are a lot more ways for kids to get in trouble online than just running afoul of the creepily mustachioed basement dweller you see on "that" episode of Special Victims Unit.
tl;dr: A child was banned from Xbox live and that caused me to investigate some things which, in turn, surfaced a lot of other stuff. Unless you're really watching closely, you almost certainly don't know what your kids are doing online. Kids are clever.
I know a child, not my own, who is 9 years old. Let's call him "Nine". He's a great kid, has excellent conduct scores in school (never once has he had to be disciplined in school). He's fairly shy and generally keeps to himself. He's really a great kid.
One thing he does like doing is playing on his Xbox 360. He has a neighbor friend who is 10 years old, who sometimes comes over and plays on the same console. We'll call him "Ten". This 10 year old "wants to be a hacker" when he grows up. He also has a 360 at his house. From the sounds of it, he's also poorly supervised when it comes to computer and gaming time.
Recently, Ten manually updated his Xbox gamer profile and changed his tenure and some of the avatar's appearance. At the same time, he helped Nine change his avatar's appearance. Now, understand that to do this, you have to go to some of the seedier corners of the Internet and use tools which download your gamer profile, update the file, and then re-upload it. The use of these tools violate the Xbox terms of service and are considered an offense worthy of a permanent ban.
Yep. Both kids were banned until 12/31/9999. 9999. Harsh, I know, especially if you are an otherwise good 9 year old. That said, as bad as I feel for Nine, I completely support it.
They got a rather vague email from the Policy & Enforcement Team telling them about the ban. Through the same channels as everyone else, I was able to ask support for some (slight) clarification as to what happened. That's how I found out they had modded the gamer profile. (BTW, take a moment and watch that linked video. It's really good)
As part of that ban, both kids completely forfeit their remaining Xbox gold balance. (As well as everything else associated with their gamer tag, the least of which are their Cheevos). For Nine, that means the $50 of birthday and Christmas money he saved up to get that 12 month subscription is now gone. Wasted. I'm not sure if he had downloaded content or games, but I believe that gets lost as well.
My 7 year old son uses the Xbox under my Live account. After seeing how the ban process works, you can bet that will stop once he starts playing Xbox by himself, especially now that my gamer tag reaches into my Windows 8 machines and my Windows Phone. There's a lot to loose if you break the rules.
Mom of Nine had no real idea what happened, so I helped her investigate. As part of this, I was able to see both Nine and Ten's gamer history using public sites on the Internet (this is easily discoverable online for accounts which don't keep it private). I saw some things in there that made me sit back and question what these kids are being allowed to play.
That got me to thinking about what games are appropriate and how much parents should watch what their children do. I also had a long talk with Mom-of-Nine about some of these topics. This post is a bunch of loosely related "stuff" that came up as part of this. I'll start with games, but then get into privacy and security.
Game Appropriateness and Ratings
In both children's gamer tags I found, among a number of other games, the following:


Both are rated M for mature, which technically means 17+. The problem is, many otherwise fun and arguably harmless games are rated M for mature, so the on-box rating has become an almost meaningless mark when it comes to evaluating games for pre-teen, tween, and teen kids.
The real issue is that the Mature rating is a large bucket under which a lot of stuff gets thrown. The Mature rating isn't alone in this. For example, I let my 7 year old son and 4 year old daughter together play the various LEGO games on the Xbox (Star Wars, Harry Potter, Batman) -- those fall into the 10+ category.
There are a number of sites online which do parental reviews of video games. Some of them have agendas and biases, and some get overrun by kids posting as adults, so you really just need to find a site which fits with your own values and which appears to have relevant reviews. My kids are not yet at an age where I've had to research using one of these sites, but they're out there. For example, here's the parents review for Halo 4 and here's the review for Grand Theft Auto IV
I'm not going to make a value judgment for you, nor do I want to start a discussion about what is appropriate for children as we all have our own rules. I'm also not trying to make a martyr out of particular game here, or suggest games can corrupt or anything like that. Both games are considered excellent games overall. That said, most parents put more effort into selecting movies than in video games. (How many would let a 10 year old see Goodfellas? A Tarantino film? Showgirls? Yet many are fine with games of equivalent nature.)
- Halo is very violent (4 out of 5 points) and involves a lot of battles typically in a "shoot the guy over there" first person shooter style. The only sexual content is the scant cladding on one character (1 out of 5 points for sex). There's no foul language or drinking, drugs, or smoking.
- GTA IV is violent (5 out of 5 points), but also contains "adult" language (5 out of 5 points), drug references (as part of core gameplay - it got 5 out of 5 points here), calling police and then shooting them when they arrive, killing drug dealers, and a fair bit of sexual content (scored 4out of 5 points in that area), prostitution, lap dances, porn shops etc. The violence itself is at more of a "personal" level.
Again, both of them have the same rating. Depending upon what you find concerning, you may disallow both, or just one of them, or maybe you're fine with both (one parent of a 9yo on the reviews said GTA IV is fine for her son). Regardless, you can't tell that by looking at it on a store shelf; you need to read reviews of the game. Interestingly, the reviews generally agree that GTA IV is appropriate for 13+ and Halo 4 for 12+. Both of those are a far cry from 17+.
I'm of the camp which doesn't believe video games turn kids into killers, but I also don't think that means one should expose their kids to violence, sex, drugs, etc. before they are mature enough to understand what they're looking at, and make appropriate real-life decisions.
As parents, we need to understand the nature and content of a game before we purchase or allow the purchase of those games. More importantly, we need to discuss the themes of the games and get our children to think about what messages the games are sending them. We often do this for television, games are even more immersive.
Dangerous Activity
There are lots of places where you can get in trouble online. From viruses and malware to chatting with basement neckbeards, to posting inappropriate photos of themselves. Kids are naturally curious and also feel like they are impervious to harm. Combine this with perceived anonymity of the Internet, and you can get into all sorts of bad spots.
Dialogs
Teach your child not to click-through dialogs without reading them (if they are old enough) or having you read them. Unless you enjoy malware, extra toolbars, or other scary stuff on the machines, this is essential.
Chat and Email
If you've ever watched Law & Order, you know that chat can be a bad place for kids to hang out. They're also a place where kids can release private information in a way that is hard for you to track. Same goes with Facebook chat and even email. The younger the child, the more you need to control how these communication mechanisms are used. My 7 year old son has an email address, but only for sending email with me. It helps his typing and reading skills and it's fun. It has also helped him be smarter about how to read email and how to judge. Eventually he'll use it to email others (we'll start with a couple of his same aged friends), but we'll shepherd him through that.

Pictures and webcam/video
When I was young, taking and sharing a photograph required several steps:
- You had to decide that what you were taking a picture of was actually worth the film it would use
- You had to wait for the film to be developed (the quickest was typically an hour). A clerk *saw* the photos when they came off the line, and if you had something illegal, you could be reported.
- If you wanted to share the photo, you had to physically show the paper photo to someone.
Each of these was a possible inflection point which helped prevent impulse decisions. A politician couldn't simply make an impulse decision to unzip, snap, and tweet all within a matter of seconds. If you really wanted to expose yourself to someone, it was easier to just go see them in person.
In general, I tell people never to send to anyone else anything they wouldn't be comfortable having broadly shared. This is especially true of photos and video, especially *those* kinds of photos and video. There have been many stories of politicians sending photos of their junk to girls and assuming those would somehow be kept secret. That takes a special kind of stupid. Even more common are photos shared with boyfriends/girlfriends which become Internet fodder after a bad breakup. They meant well, and in the heat of the moment, it felt like a fun thing to do. However, it's rare to find someone who marries their high school sweetheart, so just assume that anything you share could become public in a couple months or a couple years. If you're uncomfortable with that, don't share it with anyone, not even that special someone.
If you share it with anyone, you can't guarantee its privacy. Especially during childhood, kids who are friends this week may be bitter enemies the next. That information you shared with them? Those pictures? Expect them to show up on facebook, or 4chan, or worse. Once something gets on the Internet, it's almost impossible to remove it. Search engines index too quickly and stuff goes viral faster than ever. The best way to keep things private is not to share them.
Online Privacy
I'm calling privacy out separately, even though much of this could easily fit under the heading of Dangerous Activity.
Many of us have heard that when you get a new expensive device (like a big screen TV), that you should take the box directly to the dump and not leave it on your curb. This is so potential thieves driving by your house don't get a heads up to the new things you have inside. This just seems like common sense … to an adult.
Many of us also know not to post information about these things online. Even if you think a thief couldn't figure out your address, it is surprisingly easy to do so. There are many address search sites available, for one. For another, many people post their addresses (or cities, or more) to social networking sites like Facebook, or mention them in twitter. Usually all it takes is a simple Google/Bing search to connect the dots.
Kids breaching your privacy

But maybe you're extremely careful. Maybe you don't have any of that information online. That's awesome. But now your kids are online - will they spill the beans on you? We worry about kids' privacy, but what about what they do with *your* private information?
Do your kids know not to:
- Mention the school they attend (this one is especially hard)
- Put their address or phone number on anything
- Talk about what their parents do for a living or how much they make
- Mention when their parents are or are not home
- Announce when the family is taking a vacation (this includes tweeting or facebooking while on vacation)
- Talk about that cool big ticket item the family just purchased
- Post photos of themselves online
"Hey, nobody is home" is a big one. For me, I generally won't tweet or facebook about a vacation until I return. Sure, that's not as fun as doing it live, but it's safer. Plus, if you're on vacation, get off the damn Internet and try to pay some attention to your family. :)
Social networks
Those things can be hard, because kids naturally love talking about stuff like that. The problem is, with services like Twitter, and increasingly Facebook, it's hard to control who does or does not see those things. The business models of most social networks require them to offer as little privacy as possible. One even came right out and said it. (paraphrased) "Privacy is for old people".
Think about it: Facebook needs you to share as much as possible. It also needs to make your information available to advertisers, and to the public web. If Facebook made everything private by default, they would wither and die. Just like credit card companies telling you your privacy is important to them (bull), know that social networks don't have your privacy as their top priority. Unfortunately, this makes it even harder to keep your kids safe, and to make sure they're keeping you safe in turn.
Each and every piece of information you post on line, no matter how small, should be evaluated:
- Could this information cause harm to anyone else if it got out?
- If the wrong people saw this, could it cause me harm?
- Am I sharing information that is private to someone else? Is it my secret to share?
But what's that, you say? Your child doesn't have a Facebook account? I wouldn't be so sure about that. Facebook may have a policy which requires you to be at least 13 years old to sign up, but it relies on the honesty of the child. It's completely unverifiable and unenforceable. I personally know a number of kids who are on there who are well under 13, and I've talked with parents who later found out their kids had facebook and twitter accounts. Every day, parents find out their kids have social network accounts, created without permission. Just like you would talk to your kids about sex with the assumption they're not going to ask your permission to mess around, you should talk to them about social networks and privacy proactively.
Their personal brand
I encourage people to create "real" accounts for their kids, as you don't want to have to start over at some designated age. That has the fortunate, or perhaps unfortunate, effect of causing someone's personal brand to start at an early age.
I personally *do* want my things from ten or fifteen years ago showing up on the Internet. I have had a lot of neat projects in that time. But think of how many changes a kid goes through in the same amount of time.
Even today, I can search the usenet archive and find posts from when I was 19. Those were embarrassing, but not horrible. Back then, we didn't know this stuff would be around forever; the Internet was relatively new and just recently opened to the public. It's routine for employers to google/bing their prospective employees before bringing them in for an interview. Sure, you may think they'll take into account that they were ten years younger when they posts that obnoxious rant, but reality is, they probably won't even if you're lucky enough to have the material dated. You're dealing with real people reviewing this material, and what they see *will* color their opinion. Those racist/sexist/offensive/obnoxious comments at age 13, written on Facebook or Twitter? Yes, they will cause you problems in your job search at age 23, and 33, and probably even 43.
This can be an extremely difficult lesson to teach as a child or teen is probably not going to understand (or care about) what a professional profile should look like. As a parent, it'll be your responsibility to help them with this so they don't ruin their future chances at college.
You may think that the best route would be to then create a "temporary" profile. The problem is, when you go to transition them to the "real" profile, they'll have too much invested in the old one. Even if they are able to transition, they'll have to leave lots of pointers and breadcrumbs linking the two, effectively negating the effect of having a temporary profile to start with.
Illegal Activity
Of course, most of us are aware of the illegal activity that kids can participate on online. However, we're generally not aware of how easy it is to do so.
Pirating and illegal downloads
I'm not making a statement here on DMCA or copyrights. As an author, software developer, and employee of a very large software, devices, and services company, I do my best to respect copyrights. At the same time, I can see and understand some of the damaging effects of over-long and overly strict copyrights both for authors/artists, and for consumers.

Groups like the RIAA have really cracked down on illegal downloads of music and video. If caught, your child could cost you jail time and a significant amount of cash. It's in your own best interest to make sure your child knows not to download illegal software or music. Question anything your child gets "for free". Some things are legitimately for free, others are malware, and others are warez/pirated and could land you in a heap of trouble.
Regardless of your personal feelings on the DMCA and whether software/music/etc. should be free, understand that you or your kids breaking the law here can cost you dearly. You are responsible for what your children are doing and cannot claim ignorance. And yes, the RIAA has gone after individuals.
Hacking
The first movie I saw which really connected with me with regard to computers was WarGames. Even in that movie, hacking is very glamorous. In later movies, hackers always had really cool FUI with 3d models and other cool representations of the "codes" they were trying to crack. It looks like a lot of fun, until the feds come by and throw you in a van.

The reality is, hacking is typically either scary professional crime organizations, or kids getting in over their heads messing with stuff they never should, trying to be cool. The proliferation of hacking "kits" makes it easy for even young kids to hack stuff. Technically, the Xbox stunt which prompted this post is considered hacking. Jailbreaking your phone? That's a type of hacking. Stealing someone's facebook password? Yep.
Children should be taught to never try to get someone else's password, to never access stuff they don't have explicit permission to, and to always ask for your advice when it comes to gray areas. In general, if they need to download an additional program to access "features" not otherwise present in something, you should look closely at the source of that program and whether or not it might violate any agreements in place.

Bullying
Not too long ago, the idea of online dating was laughed at. But then it took off, and is now a huge industry. Similarly, the idea of online bullying used to be laughed at. (and if you call it "Cyber Bullying", I'll laugh at it. Please stop using the term "Cyber" unless you're talking about world-destroying robots.) Many parents still don't consider online bullying "real" bullying until their own child is a victim of it.

Many schools and organizations have very strict bullying policies in place. When I was younger, typically you'd get suspended for fighting in school. These days, bullying can land you and your child in deeper stuff, including the court system. Bullies no longer need to be the over-hormoned kid who was kept back twice; it can be the mousy girl in class, the nerd, the jock, anyone. Online bullying also leaves an even easier to follow trail than just beating someone up "behind the Kentucky Fried at 3:00" (that's where everything happened in my junior high), which makes these lawsuits even easier.
I don't want to sound like an after-school special here, but teaching your child about bullying, both to prevent them being a victim but also to prevent them from being a bully themselves, is an important part of the set of online tools you'll provide them. Children need to be taught never to share private information about others, and never to text/tweet/facebook/message anything they wouldn't say to someone in person. A good rule of thumb is "Don't be mean".
What you should do
Despite me filling this post with things you should do, I'm not here to tell parents what to do. Each parent has their own style for raising their kids, and that style is typically a very personal decision. As a concerned parent, and someone who stays up with technology and software, I just want to make sure this information is out there.
Please don't ban your kids from using these services. If you do, they'll just do it out of your sight and out of your control. That's how kids are. It's better to have them do it where you can monitor and guide them. In all honesty, I'd much rather my son (or daughter) stumble across porn on the computer at the kitchen table rather than over a friend's house when the parents are gone.
I think the worst thing you can do is shut down your kid's access to online services, or set up some sort of Net Nanny or other blocker. In the former, your kid will simply take their activities to places outside your sight (friends' houses, school, the phone, etc.). In the latter, the nanny software will simply be a challenge to the kid, and a false security for you. Most on-computer blocking software is complete crap, and also blocks legit content. Plus, kids will find a way to work around it. My son got a Nintendo DS at the age of 6. Within a few hours of me setting it, he brute force cracked the PIN which disabled connectivity and 3d. Seriously, he just sat there and tried number after number until it let him in. He was 6.
Instead, I encourage you to tell your kids the reasons behind the decisions to restrict certain activities. And then, depending on the child, you either need to actively monitor what they're doing, or you trust but verify. For my kids (ages 7 and 4), they are only allowed to use the computer in the public places in the house (the kitchen table), and we routinely check on what they're doing. More importantly, they know which places they are allowed to go to, and know to ask permission to use anything else. We're not so naïve as to think that will always work, but it's working well enough for now. I can only hope that by the time their curiosity gets the better of them, we've instilled enough knowledge and values to help make up the difference. Well… a little, anyway :)
What we should do as a community
In addition to the parental tasks, we should help the non-technical parents. One fun way to do this might be to create a package insert for new laptops. I recommend this in humor, but a serious interpretation of this could be really useful as general consumers are buying computers and phones for their kids without realizing what can be done with them.
If you're good with graphics arts, I suggest that we should create a universal Ikea-like diagram that is included with each new computer and phone. It should include:
- Don't let your kids post personal information
- Don't let them send nude photos
- Don't let them pirate stuff
- Don't bully or let others bully. Don't be mean. Don't lie about others or spread lies.
- Monitor webcam usage
- Do keep tabs on what your kids are doing
- Do teach your kids what they should and should not do on a computer
- Do assume your kids are clever enough to fool you
I think everyone would be able to understand that. :)
Using CallerMemberName for property change notification in XAML apps 25 Feb 2013 12:34 PM (12 years ago)
.NET 4.5 quietly introduced several attributes which are useful for debugging and error reporting: CallerMemberName, CallerFilePath and CallerLineNumber, all collectively referred to as "Caller Information". One of those, CallerMemberName, is also very useful for MVVM apps and other apps using INotifyPropertyChanged for change notifications.
Getting the calling function name
The CallerMemberName attribute, from the System.Runtime.CompilerServices namespace, supplies the name of the function which called the function with the attribute in its parameter list. For example, if you have a function defined like this:
private void DoSomething([CallerMemberName] string callingFunction = null)

{

    if (callingFunction != null)

        Debug.WriteLine("Calling function name is " + callingFunction);

    else

        Debug.WriteLine("Calling function not supplied.");

}
Then, you call it like this:
private void CallSomething()

{

    DoSomething();

}
The callingFunction parameter will be filled with the name of the calling function. In this case, the output indicate that the calling function is "CallSomething". This works because the property uses the CallerMemberName attribute and has a default value. The default value is a required part of this pattern.
Using CallerMemberName in property change notification
XAML uses an interface and event based property change notification pattern to alert the binding system when a non-static property has been changed. (WPF supports binding to static properties, and although it uses the event, it does not use the interface as there's no class instance.) The interface used is INotifyPropertyChanged, and regardless of how you feel about the requirement to use this interface for change notification, it seems it is here to stay.
The problem
One real issue with INotifyPropertyChanged is the requirement to pass in the name of the calling property as a string. Some time ago, I spoke with the people who originally designed this approach, and despite me not caring much for it, I'm convinced that it was, in fact, the correct approach to use. It provides the best performance and flexibility compared to other approaches, and required no changes to the language specs or the CLR.
Code using this approach, without the benefit of any MVVM toolkits or other base classes, typically looked something like this:
public class PuzzleLevel : INotifyPropertyChanged

{

    private string _title;

    public string Title

    {

        get { return _title; }

        set

        {

            if (value != _title)

            {

                _title = value;

                OnPropertyChanged("Title");

            }

        }

    }


    // ...


    public event PropertyChangedEventHandler PropertyChanged;

    protected void OnPropertyChanged(string propertyName)

    {

        if (PropertyChanged != null)

            PropertyChanged(this, new PropertyChangedEventArgs(propertyName));

    }

}
This leads to countless problems when properties are refactored and renamed, but the string (which is not verified by the compiler) is not changed. For example, here' I've renamed the Title property to Name. This will compile just fine:
public class PuzzleLevel : INotifyPropertyChanged

{

    private string _name;

    public string Name

    {

        get { return _name; }

        set

        {

            if (value != _name)

            {

                _name = value;

                OnPropertyChanged("Title");

            }

        }

    }


    // ...


    public event PropertyChangedEventHandler PropertyChanged;

    protected void OnPropertyChanged(string propertyName)

    {

        if (PropertyChanged != null)

            PropertyChanged(this, new PropertyChangedEventArgs(propertyName));

    }

}
Not only will this compile just fine, but it will run as well. The only real indication of a problem will be the field not updating in the UI when changed from someplace else in the code, or another part of the UI. This can be really easy to miss in testing.
The solution
There are multiple ways to solve this, but the newest, and perhaps most elegant, is an approach using the CallerMemberName attribute. This approach is used by the default Windows Store XAML app templates in the BindableBase class:
public abstract class BindableBase : INotifyPropertyChanged

{

    public event PropertyChangedEventHandler PropertyChanged;


    protected bool SetProperty<T>(ref T storage, T value, [CallerMemberName] String propertyName = null)

    {

        if (object.Equals(storage, value)) return false;


        storage = value;

        this.OnPropertyChanged(propertyName);

        return true;

    }


    protected void OnPropertyChanged([CallerMemberName] string propertyName = null)

    {

        var eventHandler = this.PropertyChanged;

        if (eventHandler != null)

        {

            eventHandler(this, new PropertyChangedEventArgs(propertyName));

        }

    }

}
If you were passing in strings for property names before, this base class will simplify your code and also save you from the difficult-to-track binding bugs you'd get if you changed property names without updating the string in the property change notification call. Now, your setters can be as simple as this:
public class PuzzleLevel : BindableBase

{

    private string _title;

    public string Title

    {

        get { return _title; }

        set { SetProperty(ref _title, value); }

    }


    private int _highScore;

    public int HighScore

    {

        get { return _highScore; }

        set { SetProperty(ref _highScore, value); }

    }


    private bool _isLocked;

    public bool IsLocked

    {

        get { return _isLocked; }

        set { SetProperty(ref _isLocked, value); }

    }

}
There were other ways to do this, but they all involved more steps and additional parameters. The use of third-party MVVM toolkits and lambda expressions simplified that somewhat. Those will still work and work well, but for new code, I recommend you consider using the built-in CallerMemberName attribute approach.
The CallerMemberName (and other Caller* functions) are changed into literal values at compile time, so there's no runtime reflection lookup or similar performance hit like that encountered by other methods. This, combined with its ease of use, makes it a no-brainer to use.
This approach also works with VB with appropriate syntax changes.
Getting more visibility for your Windows Store app Part 1: Create great apps 22 Jan 2013 10:47 PM (12 years ago)
Many developers ask me how to get more visibility for their apps in the Windows Store. Most do not realize, that even on the public web, visibility is almost never organic. It's the result of hard work on the part of all involved. In this first post I'll provide some observations as to things that I personally think help increase app visibility, specifically, app quality. In part 2, I'll cover the listing and promotion side of the equation.
DISCLAIMER: I'm not a marketing person, and I do not have inside knowledge of the Windows Store ranking and sorting algorithms. Additionally, I do not have metrics which empirically prove any of these techniques work. This is just advice based on my own observations, primarily targeted to people who are new to publishing apps in an online store. This is not a replacement for the Develop Great Apps content on our dev center.
The single most important thing you can do to increase the visibility of your app is to start with a great app. Full stop. All other things equal, a great app will do better than a mediocre app or a terrible app. Here are some suggestions for things which can help tip the scale from "meh" to "yeah!"
Don't create throwaways
Back when I used to work for Scott Hanselman, one recurring piece of advice he'd give to the team was "Don't create throwaways". He was talking about blog posts then, but the same thing applies to apps. Throwaway apps can ruin your reputation with customers and also with the Windows Store. The Windows Store is not a great place to post things like little test projects or homework apps. You can do those easily and share them with your testers using documented side-load capabilities.
Each and every app you put in the Windows Store should be an app you're proud of. It should be something you wouldn't hesitate to show your friends, family, and your colleagues. It should be useful and engaging. In fact, the number one requirement in the Windows 8 app certification requirements is "Windows Store apps provide value to the customer". Put another way: Your app needs to be worth the download time and storage space, or else it's going to get a bad review.

Apps don't need to be perfect, or masterpieces, but they need to be apps that will raise your overall reputation. If you thought of, designed, and coded the app in an evening, chances are you can do even better if you take a few more days :)
Don't be tempted to put a rough draft out into the wild. As the old saying goes, you only get one chance to make a first impression. This is as true for apps as it is for dating.
Go beyond the stock templates
I do a lot with music both in the app world and with hardware synthesizers. A common complaint is when a synthesizer preset gets used by many different artists as-is, without any substantive customization or modification. It becomes the only thing you hear in the song. Some get so over-used, even when slightly modified (M1 Piano, DX7 E. Piano 1 (and this) and slap bass, D-50 Fantasia, JP-8000 supersaw (which I still like, but that's besides the point), Alpha Juno "Hoover" etc.) that others start to rebel against them. The recommendation is to start with stock patches, but to customize them, or just create new ones from scratch. Otherwise you'll sound pedestrian, dated, and maybe even like a copycat. Presets are in synthesizers just to give you an idea of what the machine is capable of, sound designers didn't expect to hear them on actual records.
The built in templates in Visual Studio are a great starting point for structuring your app. However, like the synthesizer presets, they were never meant to be used exactly as-is. They are a starting point to help you get from zero to working in a very short period of time.
Here's a screen shot of one of the built-in templates running on my 30" screen.

Notice how each square is the same 250px with a text overlay at the bottom. There's nothing there to mix it up. It's a starting point - a preset. It's deliberately grayscale so that you don't fixate on existing colors while you flesh out your ideas.
The Windows design aesthetic doesn't limit you to a gray app with a bunch of 250px squares with a text overlay at the bottom. Think, erm, outside the 250px box.
Once you've proven that the functionality of your app works, then you can get creative with the UI. Customize it with appropriate branding and logos. Change the sizes of tiles, if you decide to stick with a tile layout at all.
Here are some apps which use simple box layouts, but do it in a good way that is different from the stock templates. Some vary the sizes of the boxes, some simply alter the layout of the main screen. Both use branding and colors. This is a very conservative approach which looks good, but relies on amazing content to carry the app. Keep in mind that you're seeing these all on my huge screen.


I've seen an increasing number of apps in the store which use rectangles and even the labels as shown in the stock templates, but mix it up enough to be different and interesting. For example, most of the Xbox games on Windows have a hub screen which is not quite as conservative as the previous two, but still rooted in the same design principles. Note the use of boxes which span more than one row or column. Note the use of color. This is a simple design which any developer could pull off.

Xbox video takes a similar approach.

Top Gear News from the BBC is another app which sticks with a general box layout, but is far from being a template app. This is a portal-type app where the content is highlighted in the app but hosted on the web site.

(Please note that none of the above three are optimized for a high resolution, low DPI screen like mine. More on that later):
(The built-ion News app is another great app with a variation on the box layout. No screen shot today, however, as it doesn't feel right to post that with the headline story being about the college shootings.)
How about some other interesting boxes? The FX app leans towards the boxes side of the design aesthetic, but manages to have an engaging and very attractive UI, again, without sticking to a pure template layout. The app also scales well to different resolutions.

My wife and I share a Kindle account (we set it up before Kindle supported sharing). Here's what the Kindle app hub page looks like when you're signed in (I don't read books on this PC. I use my Surface for that). It's not the same type of boxes we've seen before, but it is appropriate to this app's audience. Notice also the use of branding logos and colors on the top left.

Enough with the boxes
Then you have other apps which eschew the boxes and go their own way (you can thank me for that, later). There's nothing in the design aesthetic which mandates the use of boxes in your layout. Grids are recommended, but we don't have any commandments you absolutely must follow when laying out your content. As long as you're consistent in modes of interaction and with system-provided tools (app bar, charms, navigation), and the app is attractive and usable from mouse, touch and keyboard, you should feel free to experiment with design that is appropriate to the brand, domain, and audience. An example of this is Nook. Notice that Nook also takes advantage of the extra space on my huge screen.


They don't look like boxes, but we're still on a grid layout. We still have side scrolling. How about a couple apps which move even further away from the boxed layout design:


(Did I mention I have a four year old daughter? The dress-up app isn't mine. Honest!)
The Disney app still uses side scrolling and has obvious touch points. It just works well. The Lola math game has no such box layout, but has obvious places where the user would interact with the screen and works well with touch and mouse. My 4yo girl picked it up without any problems at all.
You can see that although most of these use the hub page boxes-style layout, none of them look exactly like one of the built-in templates. Each has changes in color, styling, branding, and most importantly, layout which works for that specific app.
Several of them (and many other apps) do, however, fall down a bit when it comes to targeting people with giant screens like mine. Let's look at that.
Be resolution and DPI aware
When you write apps for Windows 8, you're writing apps for PCs. Apps need to work on everything from 1024x768 all the way up to low DPI 30" screens at 2560x1600, and smaller high DPI screens running at similar resolutions. Much of the DPI work is taken care of for you automatically by the runtime, and scaling to different resolutions is easy.
High DPI
High DPI screens are ones where there's a high resolution but small physical size. On these types of screens, Windows typically installs at a higher DPI setting where one pixel in your app is multiple physical pixels on screen. The additional pixels are used by vector graphics and fonts to make edges smoother and crisper. But when it comes to bitmapped graphics, you need to provide different DPI versions in order to maintain crispness in the display. Luckily, this is REALLY easy to do by simply naming your images following the scale naming convention. Visual Studio even has support for this for the logo graphics.
High Resolution
Higher resolution, low DPI screens take a little more thought on your part. You generally have two choices:
- Show more content on the screen
- Make everything bigger
I've seen both done successfully. The second ("make everything bigger") works well only when you have high resolution bitmap graphics or you are using all vector content. In XAML, you can use a ViewBox to make this happen for you. The former ("show more content") works well only if you have sufficient content to fill the screen. The stock itemscontrols (ListView, GridView) typically work well in this scenario.
Unfortunately, many apps take a third option: just center everything in an area optimized for 1366x768. On a large screen, this looks terrible. I won't pick on specific apps here as I'd rather work constructively with those app authors to see how they can make better use of screen space.
While you're there making your app scale nicely, you can use the same code and layout to make sure you support Portrait, Landscape, Snapped, and Filled views. The default templates provide a great way to structure these notifications and layout changes. Endeavor to make each view as functional as possible.
Testing DPI and Resolution
We don't all have access to giant screens, or high DPI screens, so we need to use the built-in tools. The Simulator in Visual Studio lets you run your app at different resolutions and DPIs just to verify that elements are laying out as you'd expect.
Support different processors
My desktop machine is a water-cooled overclocked processor with 6 cores and 12 logical processors and 12gb memory. I have a 16gb quad core laptop as well. My son has an older netbook with something like 2 or 3gb. My wife has a core i5 machine with 4gb memory. I also have two surfaces, each with ARM processors running Windows RT. All of those Windows 8 PCs are just in a single house.

The power of the Windows ecosystem is choice. There are currently over 1,700 systems certified for Windows 8. Now, before you think "holy crap that's a huge test matrix" consider that this is no different from what PC manufacturers have had to test for in the past, except we've made the API more uniform and have made the OS version matrix far smaller.
I'd encourage developers with serious apps to test on:
- A developer class desktop or laptop with high resolution display. This should have discrete NVIDIA or AMD graphics, also preferably an SSD. No touch.
- A typical laptop with integrated graphics and a spinning rust hard drive, touch optional but a good idea.
- Possibly an older (2-3 years) laptop without touch.
- A Surface or other Windows RT device with touch.
That, to me, provides a decent look at performance at a CPU level. Now, if you're a game development house, you likely have a much larger matrix, covering different makes of video cards with different capabilities, for example. Again, we've made that easier in Windows 8 and Windows RT, but you'll still want to continue that practice.
But what's the independent developer to do? For you, I suggest testing on your development PC and a Windows RT device. Consider it a good excuse to get a lightweight and low power tablet (I know I love mine). For other performance testing, invite some friends with different laptops and side-load the app on to their machines for testing. Make a party out of it (but realize you'll get the most, umm, useful feedback before the party gets too far along). It's easy to do and you'll get great feedback not only on performance, but your friends will be blunt with their assessment of your app as well.
Many developers ask me "if I'm targeting ARM, do I really need a Surface to test?" Yes, I consider a Windows RT device, such as a Surface, essential for testing anything but the most basic of apps. We've done a ton of work to unify the development model across all of Windows 8 and Windows RT, but at the end of the day, ARM is a completely different architecture from x86/64. I've worked with developers who discovered race conditions in their apps that were masked on x86 but which showed up on ARM, for example. Plus, for many developers, it would be their only touch device, and you really do want to understand how your app performs on a true touch device.
If you can't pick up a Surface (or other Windows RT device) yourself, you could solicit the help of local or international friends who could test on their own Surface. The Internet is a wonderful thing.
Don't be an island: support searching
Most apps have data which can be searched. Sometimes that data is external, on the web. Sometimes that data is just files stored on the file system. Sometimes that data is structured and stored in a database. In all cases, these apps should support the search contract.

Adding search contract support is quite easy, and you can use it to replace any built-in search you were going to include in your app anyway. You can learn more about searching on MSDN, and also in my book Windows 8 XAML in Action.
Use the built-in file pickers
The days of all the user's data existing on their local machine are, if not already long gone, well on their way out. These days, a file might exist locally, or on a server, or on a social network, or cloud storage. Or maybe, just maybe, the file doesn't exist in a physical form at all! WinRT provides an easy way for apps to integrate with file pickers both as consumers and as owners of content. You could, for example, provide a file picker interface for your app which pulls data from a database and assembles a file on-demand.
Back to the music scenarios: imagine that you want to load a sample or loop into your app. Another app could serve as a file picker, but only for content you purchase. You could then easily use that purchased content in your music creation app.

(figure from Windows 8 XAML in Action)
By integrating with file pickers as a consumer, your app doesn't need to know where the files came from, or how they got there. It simply simply needs to work with the StorageItem class and the file picker interfaces. These are your new OpenFileDialog and SaveFileDialog, so get to know them well.
You can learn more about the File Open and File Save pickers on MSDN (and, as with most of these topics, also in my book).
Sharing is as important now as it was in Kindergarten
One of the first things you're taught in Kindergarten is to share with others. Why? Because it forces interaction with others and helps take a bunch of loners and turn them into a classroom.
An app that can share to other apps will gain visibility through that share. For example, if your app can share photos it creates with other apps, there's a better chance those photos will show up on social networks like Twitter and Facebook.

An app that can be the target of sharing will be indispensible to users. For example, if your app can take shared music files and post them to SoundCloud or MySpace or BandCamp, or shared videos and post them to Vimeo or YouTube, the user will come to rely on your app for those operations. Your app becomes an integral part of the system, adding value to every other app in Windows, and serving as an important gateway to outside services.
There are a number of different formats which can be shared, from simple URLs and text to whole files and HTML markup. Support as many of these as makes sense in your app.
You can learn more about sharing on MSDN.
Draw your user in
Let's assume for a moment that you were able to get the user to download and install your app (the topic for the next post). Once installed, a good app keeps the user coming back for more. It does this by keeping content fresh, if it is a content app, or by just being an indispensible part of the user's workflow.
The Start Screen Tile
An attractive tile is important to getting the user to use your app. It needs to be obvious and clear. It should also be attractive, and not look like it was a last-minute design asset thrown together in Paint. :)

Content apps and games can both take advantage of live tiles on the Windows Start screen. Content apps can show slideshows of the content, working under the assumption that it is the content that is the draw, not the app itself. Games can, similarly, entice users to continue playing by showing progress so far, how many steps to the next level, etc.
Make use of the available layouts in the tile template catalog and pick one which is appropriate for your app. That page also has excellent guidance for when to use each type of tile.
The Hub Page
If your app has a number of different options, different categories of content, or has multiple projects the user may be working in, a hub page may make sense. A hub page is the first page the user sees - it provides an overview of what has been done so far, and what remains to be done, as well as what new content is available and more. The minesweeper screenshot near the start of this post is an example of a hub page. It lets you switch themes, see your achievements, and more.
Many productivity apps on the desktop include a dialog which is displayed when you first start the app. For example, when I open Cubase 7, I get this dialog:

Formatted another way, this type of hub would be perfect for the hub screen of a Windows 8 app.
Similarly, when I open Premiere Pro and After Effects, I get these screens:


And, of course, you're all familiar with the hub screen we see almost every day:

If your app is complex enough to warrant it, or simply needs a nice landing spot for the user before throwing them into the task, consider putting a hub page. It will help you with discoverability of features for your app, as well as make it easy for a new user to navigate your UI.
Music Maker Jam uses its hub page for selling content packs as well as for loading existing projects and even a little advertising on the side.

One of my favorite uses of a hub screen is in the episode-based game Adera, shown here in a screen shot from my Surface. Notice how it has the main tasks right there, but then additional engaging information to the right, including achievements and collections. Each group lets you drill down to see more episodes, items, and more.

A good tile can attract the user's attention, and a good hub screen can engage them them moment they launch your app.
Test, Test, Test
Finally, I can't say this enough: test your app. Test it on your own machines, and then, if you don't have a formal testing group, send side load versions to your friends to test. At a minimum, you want to test on all processor architectures you support (x86 32, 64 and ARM). If your app makes use of peripherals like sound cards, web cams, microphones, or others, you'll want to test using a variety of those devices as well.
Trust me, you don't want your app to earn one of these stickers:

Just because an App seems smaller than an Application, don't test it any less.
In the next post, I'll provide some ideas for promoting your app and for getting your user to get past the first hurdle: the initial download.
Maker Geek Roundup 017 for 1/22/2013 21 Jan 2013 7:14 PM (12 years ago)
The Maker Geek Roundup aggregates information of interest to makers everywhere. Topics include .NET Micro Framework, Arduino, AVR and other MCUs, CNC, 3d Printing, Robotics, Microsoft Robotics Studio, Electronics, General Maker stuff, and more. If you have something interesting you've done or have run across, or you blog regularly on the topics included here, please send me the URL and brief description via the contact link.
This fall I was swamped with my new position at work, all the awesome Windows 8 launch work, plus my involvement in Build 2012, so I took a break from the roundup. Lots of stuff to cover here.
3d Printing, CAD/CAM/CNC
- Printing Lumia Cases (based on templates Nokia themselves released | Rob Miles)
- MakerBot Replicator™ 2X Desktop 3D Printer (MakerBot - Announced at CES)
- Cubify - Express Yourself in 3D (CubeX - Announced at CES)
- Will 3D Printing Be Legislated (3d Printers Australia)
- The Largest Ever 3D Printed Wrench! (YouTube | Objet)
- Ultimaker pivotal in Dutch medical research (Ultimaker)
- 3D Printed iPhone Case with Moving Gears! (YouTube | Objet)
- Design Unique Things Easily With MakerBot Customizer (Makerbot)
- Mendel90 updates (HydraRaptor)
- Bringing a 12 year old Roland MDX-20 up to date (Johan von Konow)
Laser Cutting
- Laser cut gingerbread house (Johan von Konow)
- Laser cut layers (Ponoko)
- Laser Cut Paper Stained Glass Windows (Ponoko)
NETMF (.NET Gadgeteer and Netduino)
- How to get our Netduino running faster (Highfield Tales)
- Playing with Mountaineer Ethernet Mainboard (Marco Minerva)
- Modbus libraries version 2 beta are out! (Highfield Tales)
- Rick Dangerous Port for NETMF | Take a break (Valentin Ivanov)
- Gadgeteer Home Automation System (Marco Minerva)
- Creating an UDP Server with .NET Gadgeteer (Marco Minerva)
- Netduino 2 - Faster & Better for the Same Price. (Make)
- Netduino - Optocoupler testing (My projects)
- Netduino Day 3 - Multiplexed Seven-Segment LED displays (Embedded Lab)
Arduino and AVR
- Nanino - the DIY friendly Arduino (Johan von Konow)
- An Arduino-based ADB-to-USB adapter for NeXT keyboards (Arduino Blog)
- An Arduino-controlled RGB lamp (Arduino Blog)
- RFID Multipass spoof using ATTiny85 (Dangerous Prototypes)
- Cracking an electronic safe using brute force (Hack-a-day forum)
Other Microcontrollers (PIC, ARM, Raspberry PI, Parallax, more)
- Snake game on an ARM microcontroller (Jumptuck)
- Hive retro computer (Dangerous Prototypes | Classic computer created with Parallax processors)
- (Also see Launchpad + Rapsberry PI link under synthesizers/MIDI/OSC)
- Macro Pi - Focus Stacking using Raspberry Pi (David Hunt Photography)
- Raspberry Pi with RGB-Pixels and node.js (Tinkerlog)
General Electronics and Hardware Hacking
- An example of an hardware problem and how to solve it (Highfield Tales)
- Quick Tip - Soldering Resistors to LEDs (Ian Lee)
- Analog Clock turned DC Voltmeter (WhiskeyTangoHotel)
- Oh Sting, Where Art Thou Wifi? (Jomegat)
- Make a Variable Resistor with 1 Million Settings (Instructables)
Robots, *Copters, and Robotics Studio
- Reverse Engineering the Propel ExecuHeli IR Protocol (PetaVolt)
- Make: Lego and Arduino Projects Foreword (Robotgrrl)
General Maker
- A Desktop Computer For The Ages (Retro Thing)
- Combat Shotgun, Fallout (Volpin Props)
- Princess Wands (Ian Lee)
-
- plus: Birthday Badges
- Daft Punk Helmet (Thomas): Part 1 (Volpin Props)
- Heat Sensitive Table (Toxel)
- Skyrim Female Ancient Nord Helmet (Volpin Props)
- Real-life Mario Kart with RFID-Tagged Special Items (Make)
Synthesizers, Music, and MIDI/OSC
- NEW! AtomoSynth MochikaXL v2.2 "Dark side" (Atomosynth)
- The Monster: DIY Project Looks, And Sounds, Like Alien Spacecraft Control Panel (Create Digital Music)
- Launchpad + Raspberry Pi (Illuminated Sounds)
- Midi Fighter Spectra: Crazy-Sexy Arcade Buttons, US$175.99 [Live+Serato+Traktor] (Create Digital Music)
- Moog Sub Phatty Synthesizer Sets New Standard for Analog Sound Design (Moog, introduced at CES)
Retro Computing and Commodore!
- (see the "The Monster" link under synthesizers for some C64 + SID action!)
- Portable Commodore 64 Turns 30 (Retro Thing)
- The 6502 CPU's overflow flag explained at the silicon level (Ken Shirriff)
- Strange peripherals… the Triton Quick Disk (MOS6502)
- Strange peripherals… the Soft Card (MOS6502)
- Macintosh Plus (Nice refurb | My DIY Blog)
- Sub Hunter Cartridge Available! (C64) (RGCD)
- Let me carry your C64 (MOS6502)
- There and back again (MOS6502)
- Space Lords (Centaurus) Available! (C64) (RGCD)
Random stuff
- You Built What?!: The World's Fastest Baby Carriage (Popular Science)
- Bet you didn't do this well when you last TP'd a house (Toxel)
Traits of a good Windows Store app privacy policy 21 Jan 2013 11:39 AM (12 years ago)
A common cause of Windows Store app certification failures is a missing or insufficient privacy policy. Many don't realize that a network-enabled app must have a policy, or if they do, don't realize exactly what needs to go into it. In this post, I'll talk about some of my observations regarding what makes for a good privacy policy for a Windows Store app.
IMPORTANT: This is neither official guidance from Microsoft, nor legal advice from me. I'm not a lawyer - not even close. Privacy policies are legal documents like licenses and should be crafted by a lawyer. When you speak to your lawyer, however, you'll be better prepared because of the information below. These are simply my suggestions based upon what I have observed. I do not guarantee that a privacy policy written as I recommend will pass store certification or be an appropriate legal document. (Hopefully that's enough disclaimer.)
Also, I am not on the Windows Store certification team. Please don't come to me with "App X's privacy policy doesn't seem to follow your instructions but it got in and I didn't" type of questions. For those types of questions, there is the "Resolving certification errors" page http://aka.ms/StoreFix and the Windows Store support site http://aka.ms/StoreSupport . Also, for obvious legal reasons, I cannot review your privacy policy and provide you with feedback on it.
Yes, the disclaimer is pretty big, but there's good reason behind that. If you dig into the certification requirements, you'll see that we don't recommend a privacy policy or provide any templates for one, despite it being a fairly common request. That's because Microsoft is not able to give legal advice and, as I mentioned above, the privacy policy is a legal document.
You should use a lawyer to help you write your privacy policy. In reality, though, I know most independent developers will not request the services of a lawyer, so let's talk a bit about what should go into that policy regardless.
First, please review these requirements (specifically requirement 4.1/4.1.1). The requirements are updated quite often to remove ambiguities and provide further guidance, so if you see any conflicts between what I'm writing here and what's in those requirements, the requirements rule. The other important page is the Resolving certification errors page which also includes information on the privacy policy.
What is a privacy policy?
In the context of a Windows Store app, a privacy policy is a legal document which details any privacy related aspects of the app. It's intended to be transparent to the user and to allow them to make informed decisions about what they share with the app, and even if they want to install it to begin with.
ASIDE: When writing your policy, consider not only how to explain the privacy aspects of the app, but also whether the app even needs to the things it is using. For example, does the server really need to store locale information about the user? If not, go back to the app development team and request they not keep that around. Your privacy and other legal obligations get simpler the less you store. If you don't absolutely need it, don't store it.
How to create a good privacy policy
A good privacy policy is clear, concise, and complete. It tells the user exactly what is captured and what the app does it with. It gives the user instructions to follow if they don't agree with aspects of the policy (even if those instructions are to uninstall the app and then email us at XYZ to delete the persisted data).
Make it specific
Many privacy policies fail in certification because the policy isn't specific to the app. In most cases, the linked policy is a generic one which is available on the company's web site. I personally prefer to see a separate privacy policy just for the app, but if that's not possible, you at least need to make sure the policy has a section which very specifically details the named Windows 8 app, what it collects, etc.
Any app-specific section should have its heading on-screen, without scrolling, when displayed at 1366x768 on a PC. In this way, an end user will more easily find the content and what an end-user can more easily find, so can a certification tester.
Make it comprehensive
The privacy policy needs to detail every piece of information that is captured, and what you do with it. For example:
- IP Address
- Device ID
- User name from Windows
- Language information
- Third-party account information
- Webcam? Microphone?
- Documents?
- Contact information?
- Information collected by ads? (link to privacy policy for the ad network)
- etc.
If any of those things are transmitted (IP address always is), then you need to say what you do with it. For example, you may point out that your server keeps a log of IP addresses which contact the service, but that this information is not given to third parties, is purged every X days (if it is), and would not be released to any third parties except when required by law. You must
- Explain what is collected
- Tell your users how it is used, stored, secured, and (if so) disclosed
- Provide a way for the user to control the information
- Explain how users can access the information you've collected
- Follow the law.
Although it is rare, if you don't collect or store anything, just say so in your policy (for example, a peer-to-peer networking app which stores nothing, not even the IP addresses, so server logs don't even come into play). You still need to have a privacy policy if you declare the Internet Client, Internet Client/Server or Private Network Client/Server capabilities.
Make it comprehensible
Legal language is generally seen as pretty opaque to common English readers. The language serves a good purpose, however, in that the words chosen typically have well-understood legal definitions and therefore help remove ambiguity. A common mistake I've seen with EULAs and similar in the past, is a lay person writes them using what they think looks like legal language. The end results is often both incorrect and incomprehensible. To a lawyer, it sticks out like web page code written by that spreadsheet guru in the accounting department does to you.
A privacy policy does not necessarily have to be written in legalese. (Your lawyer can help you make this distinction if necessary). In fact, I much prefer privacy policies that are short and understandable and written in common language. If you are not a lawyer, and are writing your policy yourself, just write it in plain English (or the appropriate primary language for your app) and don't pretend to be a legal expert.
Make it honest
Be honest about what you collect and what you do with it. If there's anything which is even remotely a gray area, explicitly call it out in the policy.
If you update the privacy policy, include a revision date at the top and then link to any previous versions. In general, unless you've made the user opt in to a newer version of the policy, the one that is in effect is the one that was out there when they purchased the app. If there's any doubt, contact a lawyer for how to proceed with revisions. Just don't try to slip them in there with no notice.
Don't be mean or sneaky. It will catch up with you.
Make it available
The privacy policy is linked to from the description page of your Windows Store app listing, as well as from the charms bar while the app is running. I'd also encourage you to make it available as a link from your web site's standard privacy policy.
You can link to a web page with the privacy policy, or simply include it in-line. I prefer to read it right on the screen, much like the eBay app does, but either approach can be valid. Here's the eBay app showing all of the points I've discussed so far.
I believe their policy is simply in an IFrame or webview in the flyout. In that way, it is made available inside the app as well as online.
There are many other aspects of a good privacy policy, but these were the ones that really stood out to me. Please consider them when creating your own apps. Most of all, consider your user and what is appropriate for them and fair to them. Put the user in control of their data and their privacy, and don't make it difficult for them to opt-out.