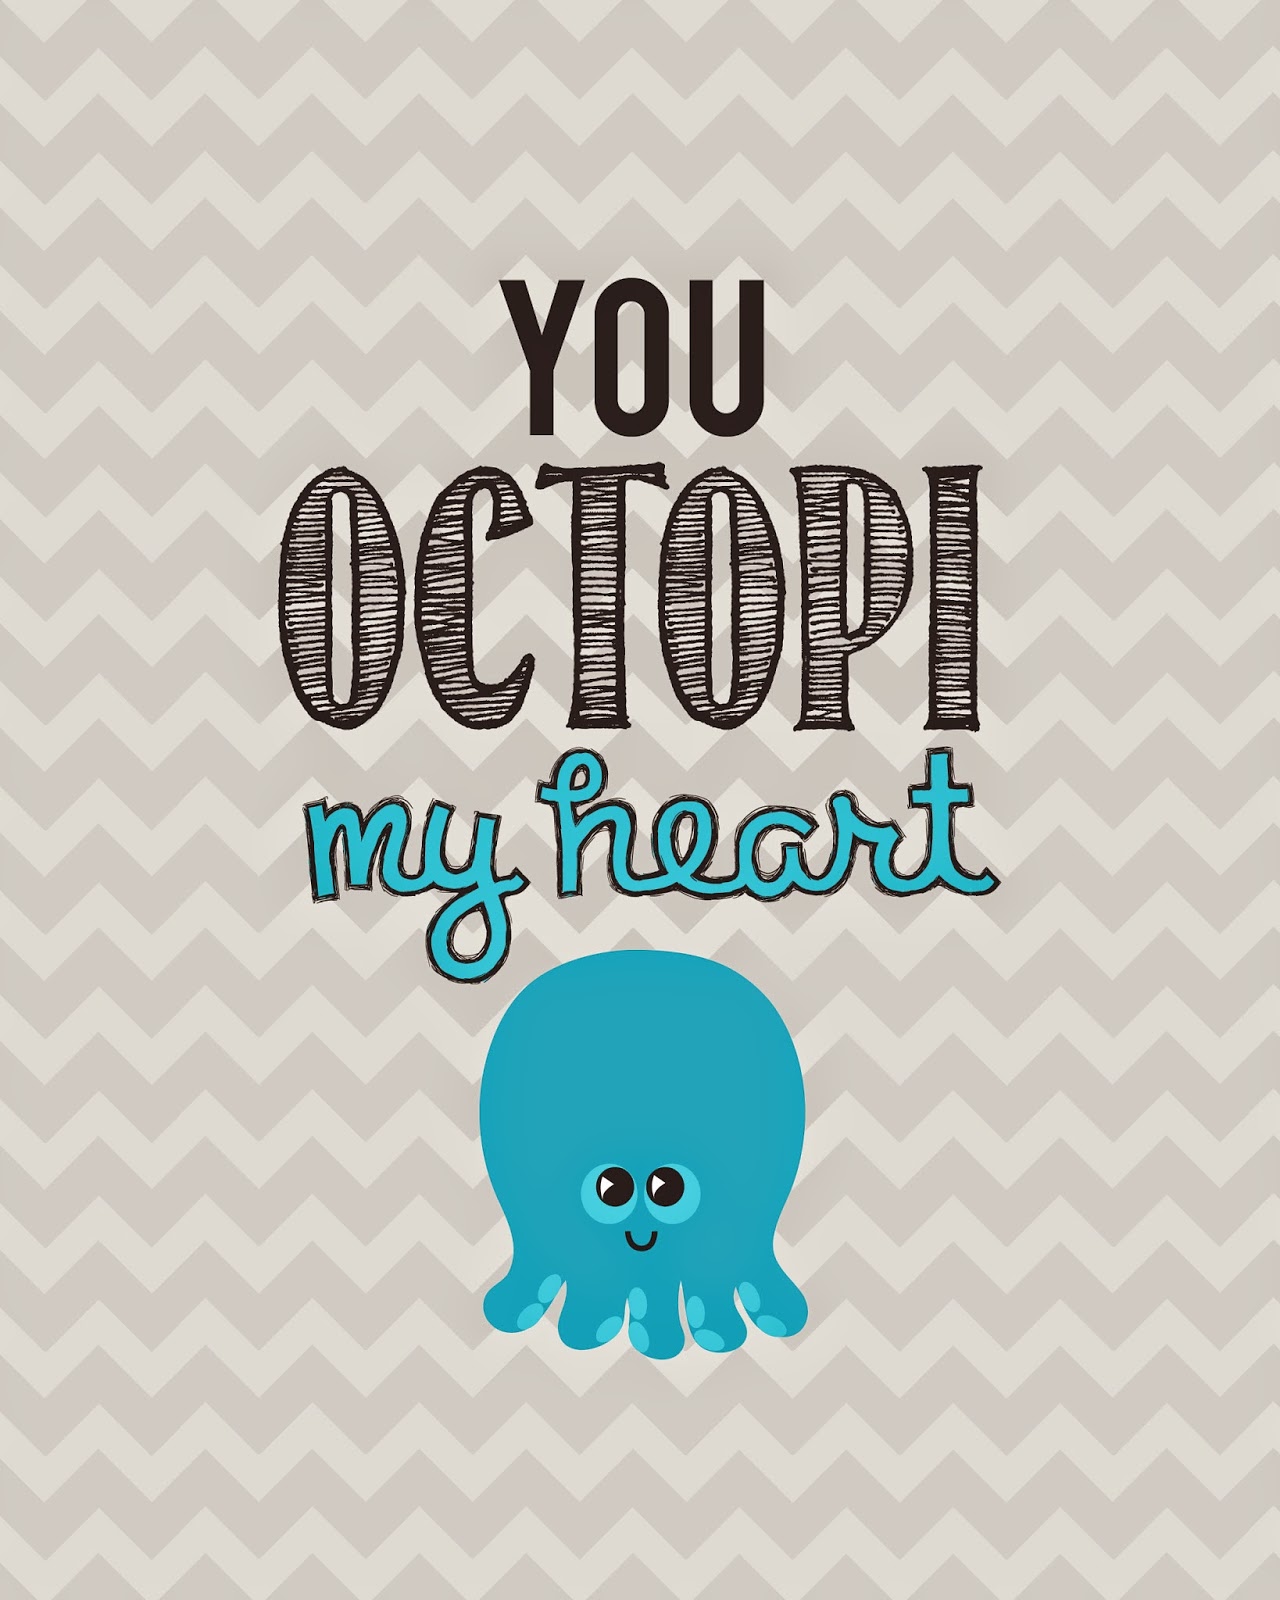
"You Octopi My Heart" Nursery Art Print/Printable 30 Mar 2015 4:00 AM (10 years ago)

I had to cure my baby hankering somehow, so I created this printable nursery art as a little stopgap. It's 8x10, but should crop smaller. It would be pretty cute as Valentine's Day cards too, now that I think about it.


Please share on Pinterest, if you like! Thanks!


,%20I%20often%20get%20uterus%20cramps%20while%20looking%20at%20small%20babies.%20If%20anyone%20knows%20of%20any%20babies%20locally%20I%20could%20rent%20for%20an%20afternoon,%20I'm%20available.%3Cbr%20/%3E%0A%3Cbr%20/%3E%0AI%20had%20to%20cure%20my%20baby%20hankering%20somehow,%20so%20I%20created%20this%20printable%20nursery%20art%20as%20a%20little%20stopgap.%20It's%208x10,%20but%20should%20crop%20smaller.%20It%20would%20be%20pretty%20cute%20as%20Valentine's%20Day%20cards%20too,%20now%20that%20I%20think%20about%20it.%3Cbr%20/%3E%0A%3Cbr%20/%3E%0A%3Cdiv%3E%0A%3Ca%20href%3D%22https://www.dropbox.com/s/vmd4c3mb6bnv0mw/Octopus.zip?dl%253D0%22%3E%3Cimg%20border%3D%220%22%20src%3D%22https://blogger.googleusercontent.com/img/b/R29vZ2xl/AVvXsEgXNCjycZVjUHJSiGimmw2I6QJYu5BDE6l9cfGf_Jg1z5zRpb49BOLHlXprH-g3bWirZpCRRrE88JffSNlqQe50QmfMkAudaZuKx5MVxFrDrDeNUh0DpCT5eGW6iENrdS_8KyCc/s1600/Pin-01.JPG%22%20height%3D%22640%22%20width%3D%22494%22%20/%3E%3C/a%3E%3C/div%3E%0A%3Cbr%20/%3E%0A%3Cdiv%3E%0A%3Cbr%20/%3E%3C/div%3E%0A%3Cdiv%3E%0A%3Ca%20href%3D%22https://www.dropbox.com/s/vmd4c3mb6bnv0mw/Octopus.zip?dl%253D0%22%20target%3D%22_blank%22%3EClick%20to%20Download%20(it's%20a%20zipped%20file%20with%20all%20three%20prints)%3C/a%3E%3C/div%3E%0A%3Cbr%20/%3E%0A%3Cdiv%3E%0A%3Ca%20href%3D%22https://www.dropbox.com/s/vmd4c3mb6bnv0mw/Octopus.zip?dl%253D0%22%3E%3Cimg%20alt%3D%22You%20Octopi%20My%20Heart%20baby%20printable%20from%20Craftastical!%22%20border%3D%220%22%20src%3D%22https://blogger.googleusercontent.com/img/b/R29vZ2xl/AVvXsEjyGbFeHIqJq5ArLDvDfmaPNM7nJTIfgI6jIGo8a3BvzD1tH_xMKyGHYb1KM3qIo-VfTuPKk58_w-qVFoyNt_w-MZMocF-FYSHqqBCwSlZkM38SvTzITGLxc9qC575kDy_Je01w/s1600/Blue-Octopi+copy.jpg%22%20height%3D%22400%22%20title%3D%22%22%20width%3D%22320%22%20/%3E%3C/a%3E%3C/div%3E%0A%3Cbr%20/%3E%0A%3Cdiv%3E%0A%3Ca%20href%3D%22https://www.dropbox.com/s/vmd4c3mb6bnv0mw/Octopus.zip?dl%253D0%22%3E%3Cimg%20border%3D%220%22%20src%3D%22https://blogger.googleusercontent.com/img/b/R29vZ2xl/AVvXsEiwfzvUkQwX2koEKMNZWCxg9v6kc3UDcU-e2ZX8VQDgaNs1GnccN1Xh9Dj8s-1iNPfibIAZm_8CzxustVFfEUPLHd2A_q8VCnsZ-9obwDdNUVTOUO-IZ10cEvgUztnNsKX5EAJP/s1600/Pink-Octopi+copy.jpg%22%20height%3D%22400%22%20width%3D%22320%22%20/%3E%3C/a%3E%3C/div%3E%0A%3Cbr%20/%3E%0A%3Cbr%20/%3E%0APlease%20share%20on%20Pinterest,%20if%20you%20like!%20Thanks!%3C/div%3E)


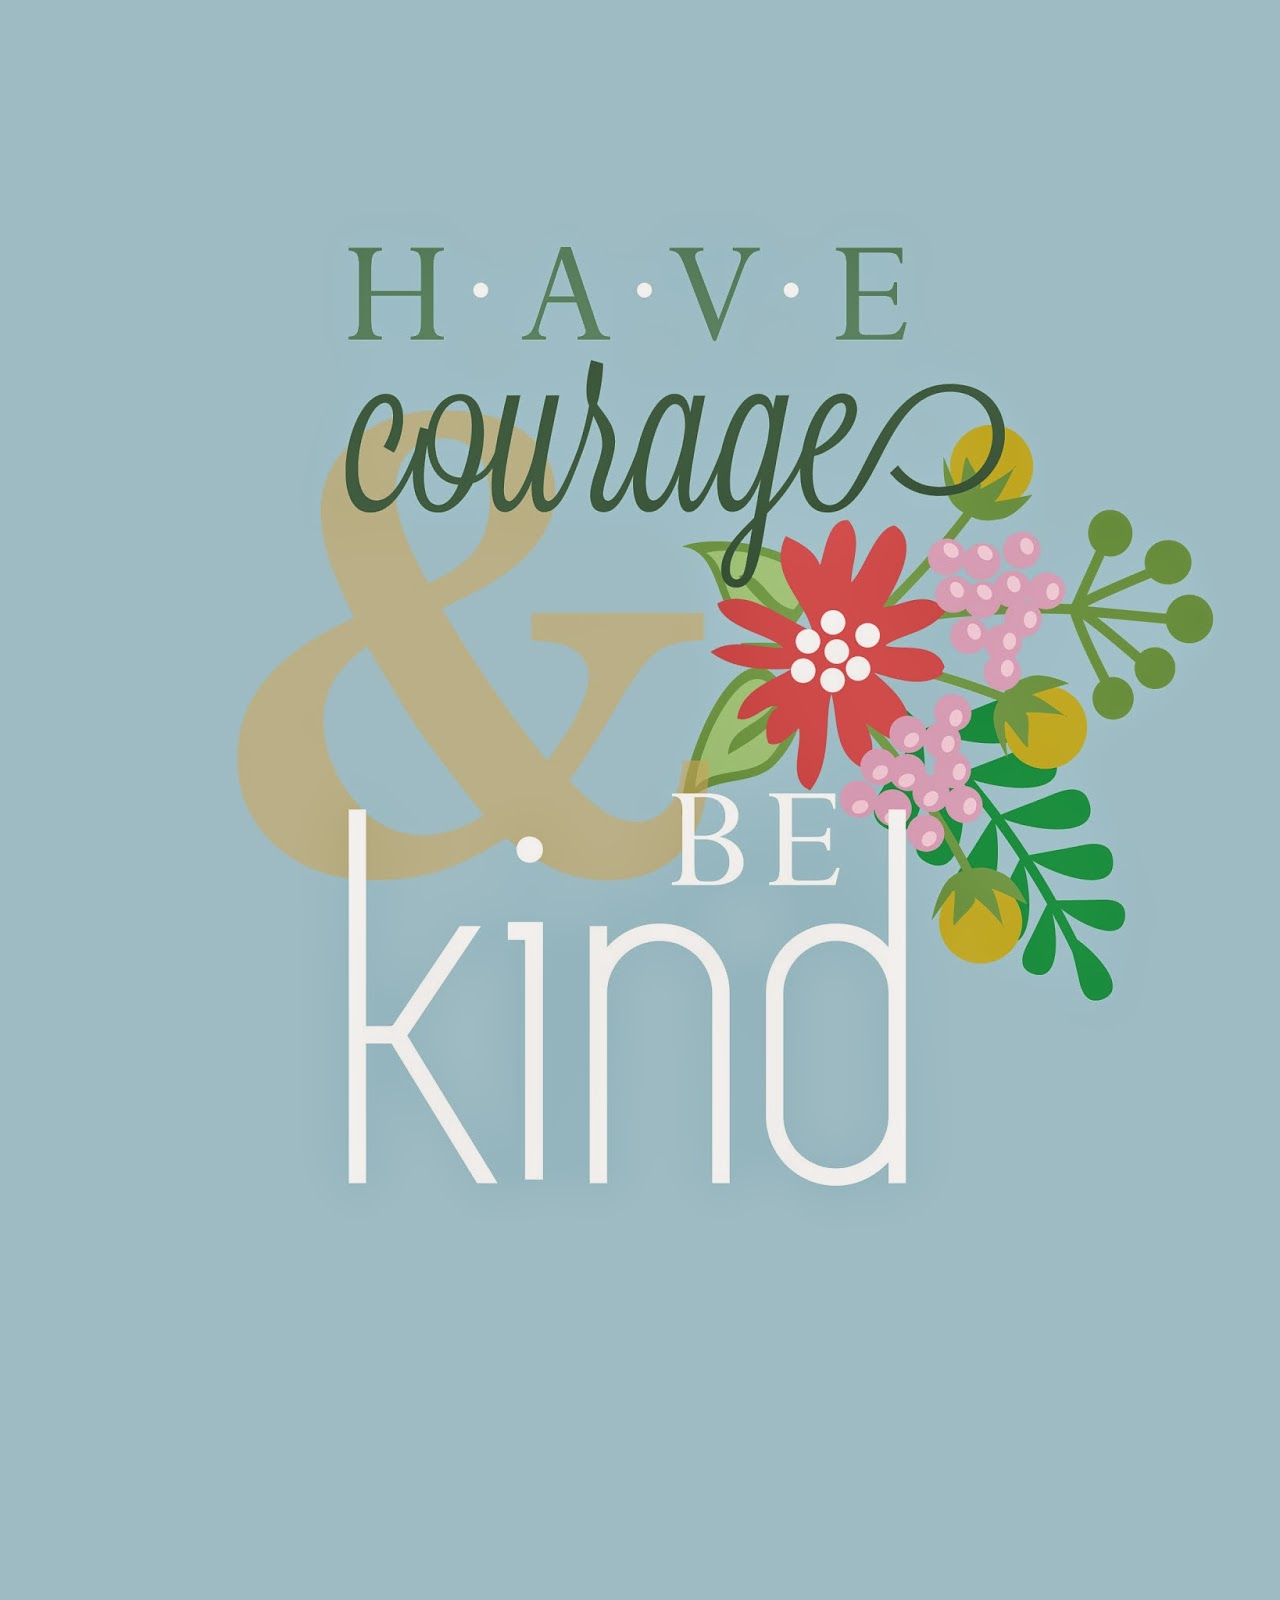
"Have Courage and Be Kind" Free Printable 23 Mar 2015 4:00 AM (10 years ago)

%3C/div%3E%0A%3Cdiv%3E%0A%3Cbr%20/%3E%0A%3Cbr%20/%3E%3C/div%3E%0A%3C/div%3E%0A%3C/div%3E)
Free Printable: Love My Camera 19 Mar 2015 4:00 AM (10 years ago)


,%20and%20it%20was%20all%20gross,%20from%20the%20lack%20of%20glass.%20Or%20maybe%20it%20just%20got%20gross%20because%20I%20have%20children.%20Whichever.%3C/div%3E%0A%3Cdiv%3E%0A%3Cbr%20/%3E%3C/div%3E%0A%3Cdiv%3E%0AIt%20was%20time%20for%20a%20change,%20and%20this%20is%20what%20I%20came%20up%20with:%20an%208x10%20print%20that%20immortalizes%20for%20all%20time%20my%20love%20of%20the%20camera.%20It%20doesn't%20have%20the%20border--that's%20so%20the%20wording%20would%20fit.%3C/div%3E%0A%3Cdiv%3E%0A%3Cbr%20/%3E%3C/div%3E%0A%3Cdiv%3E%0AI%20hope%20you%20enjoy!%3C/div%3E%0A%3Cdiv%3E%0A%3Cbr%20/%3E%3C/div%3E%0A%3Cdiv%3E%0A%3Ca%20href%3D%22https://www.dropbox.com/s/jr7iq5u6j1hzrws/camera.pdf?dl%253D0%22%20target%3D%22_blank%22%3E%3Cimg%20border%3D%220%22%20src%3D%22https://blogger.googleusercontent.com/img/b/R29vZ2xl/AVvXsEhaluxRIduhpCJrX5tQAC6SYDqPQdSIP7cEoCFzqv858ZAs4kaGQun8dHa-bEZW-1nhdFsaipZvch18XLwa3VGiVmKDL5csS-g4sZ7lpkVffEsyJxbYNSN_23iqFuZmcEnoULiA/s1600/camera-02.jpg%22%20height%3D%22400%22%20width%3D%22308%22%20/%3E%3C/a%3E%3C/div%3E%0A%3Cbr%20/%3E%0A%3Cdiv%3E%0A(%3Ca%20href%3D%22https://www.dropbox.com/s/jr7iq5u6j1hzrws/camera.pdf?dl%253D0%22%20target%3D%22_blank%22%3EClick%20to%20download%20PDF%3C/a%3E)%3C/div%3E%0A%3C/div%3E)
How to Convert a Dress into a High-Low Tunic 16 Mar 2015 4:00 AM (10 years ago)


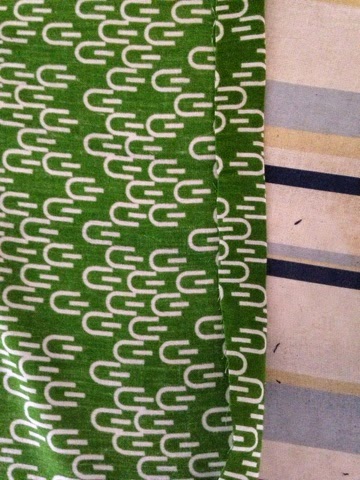
Saint Patrick's Day is upon us, and I realized I have very little green in my wardrobe, which is unacceptable. I searched through three stores, not finding anything green that looked good on me, and finally found a cute green dress at the local thrift store in town, AND it was half off day, so the grand total for this dress? $2.50. Only, it was a bit. . . frumpy? Action had to be taken.
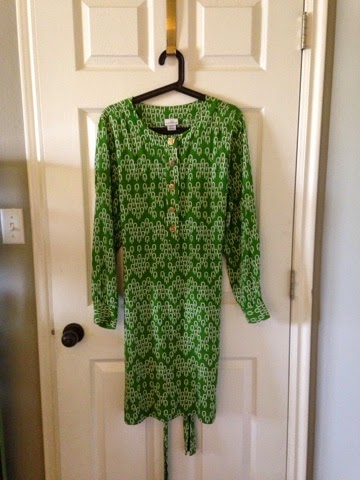
I decided to modernize it by making it into a high-low tunic. It was actually a lot easier than I was expecting and only took me about 30 minutes. I love any sort of thrift store find (half my wardrobe is from thrift stores or consignment shops), and I love all things upcycled and restyled.
Here's my tutorial, so you can try it too.
STEP ONE
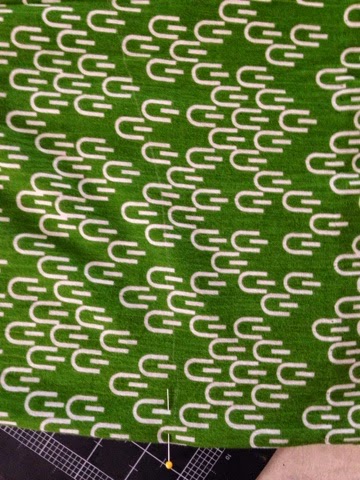
First, put on your dress/skirt/extremely long shirt, whatever you are converting. Mark the length of the front hem with a pin exactly in the middle (I would actually use safety pins--one of mine fell out when I took off the dress). Do the same with the back. Obviously, the back is going to be anywhere from 3-4 inches longer to, well, as long as you want. Drama, baby.
Front pin (hard to see with that pattern, but it's there):

Back pin:

STEP TWO
Next, you're going to cut your hem. Remember to leave 1-2" of seam allowance.
To mark the hemline, lay the garment on its side, with the side seams matched up. This should leave your marking pins on the fold lines for the front and back.
Side seams matching and folded exactly along the front and back:

Draw your line for your hem (remember seam allowance). This is probably the trickiest bit. Remember you're going to want to hit the fold at a right angle so you don't create a point, and you're going to want most of the "high-low" movement to happen at the sides, leaving the front and back fairly level.
I used a white fabric pencil to mark my line:
I used a rotary cutter to make a smooth cut. Fabric scissors will do the same thing though. Cut through both layers of fabric at the same time. Once you've cut your line, try on the garment again before hemming, to make sure you like the line. I realized my cut wasn't curvy enough the first time, and cut a tiny bit more off, after I lined everything back up again.
My finished cut:

STEP THREE
Once I had my hem line like I liked it, it was time to iron the hem. Turn up however much you allowed, and iron. You're going to want to finesse this a bit--you've got some curves and that's always a bit tricky to get to iron flat, but most fabrics will adjust if you work them a bit.
Raw edge turned up:
Then turn the raw edge under again, making it meet the ironed fold and press.
Raw edge turned under again towards fold:

Once that's all done, stitch the hem down. You can use a machine or hand sew. I chose to hand-stitch my hem, but a machine will do the job just as well. Just make sure to ease as you go, since you're sewing curves here.
Hand stitching my hem down with matching thread:

Then wear your new tunic with pride! I love how mine turned out.

Linked Up Here:
Tatertots and Jello

My Kids Are Growing Up and Learning to Code! 13 Mar 2015 4:29 PM (10 years ago)

How long before I can farm them out or have them take over my job on the sly? Two weeks or so?

Anyway, I'm even using codecademy to make sure my skills are more well-rounded. I highly recommend it (also, they don't know I'm saying this. Just my experience with the site, which I really like, and all the standard disclaimers).
,%20they%20are%20eager%20to%20keep%20going%20with%20learning%20HTML.%20Xander%20is%2012%20and%20Maxton%20is%2011%20years%20old,%20and%20it%20makes%20my%20little%20web-designer/proud-mama%20heart%20do%20a%20small%20jig%20to%20see%20them%20learning.%3Cbr%20/%3E%0A%3Cbr%20/%3E%0AHow%20long%20before%20I%20can%20farm%20them%20out%20or%20have%20them%20take%20over%20my%20job%20on%20the%20sly?%20Two%20weeks%20or%20so?%3Cbr%20/%3E%0A%3Cbr%20/%3E%0A%3Cdiv%3E%0A%3Ca%20href%3D%22https://blogger.googleusercontent.com/img/b/R29vZ2xl/AVvXsEhpGTzS0nYuKMK8IFUDoZarjy1C3KGp4evkjHDFiip3-tfjTBZtaze9ur-53OQQrEg2BV_m9nz1TwONDJf-MqI4GMr3muR-PFNSrb6tJzfnaItQUDuQ5mLvAZvKyliyVMumeZWn/s1600/11044550_10206048542799912_8248572556099244138_n.jpg%22%20imageanchor%3D%221%22%3E%3Cimg%20alt%3D%22Learn%20to%20code%20at%20http://www.codecademy.com/%22%20border%3D%220%22%20src%3D%22https://blogger.googleusercontent.com/img/b/R29vZ2xl/AVvXsEhpGTzS0nYuKMK8IFUDoZarjy1C3KGp4evkjHDFiip3-tfjTBZtaze9ur-53OQQrEg2BV_m9nz1TwONDJf-MqI4GMr3muR-PFNSrb6tJzfnaItQUDuQ5mLvAZvKyliyVMumeZWn/s1600/11044550_10206048542799912_8248572556099244138_n.jpg%22%20height%3D%22400%22%20title%3D%22%22%20width%3D%22300%22%20/%3E%3C/a%3E%3C/div%3E%0A%3Cbr%20/%3E%0AAnyway,%20I'm%20even%20using%20codecademy%20to%20make%20sure%20my%20skills%20are%20more%20well-rounded.%20I%20highly%20recommend%20it%20(also,%20they%20don't%20know%20I'm%20saying%20this.%20Just%20my%20experience%20with%20the%20site,%20which%20I%20really%20like,%20and%20all%20the%20standard%20disclaimers).%3C/div%3E)
We Can Pickle That! Subversive Cross Stitch 9 Mar 2015 4:00 AM (10 years ago)

But, I've been seeing those subversive cross stitch projects around, and it's hard to resist the juxtaposition of such a traditional looking project with such an unexpected message.
I searched through a lot of options before finding the perfect one for my sister. It's based on this Portlandia sketch. Although my sister isn't a fan of the show (I don't think she's ever seen it), she is a huge canner. I mean, she cans things. Usually out of her own garden, which she plants from seeds. That is some serious homemaking crap that I cannot keep up with.
The finished project (which she loved by the way):
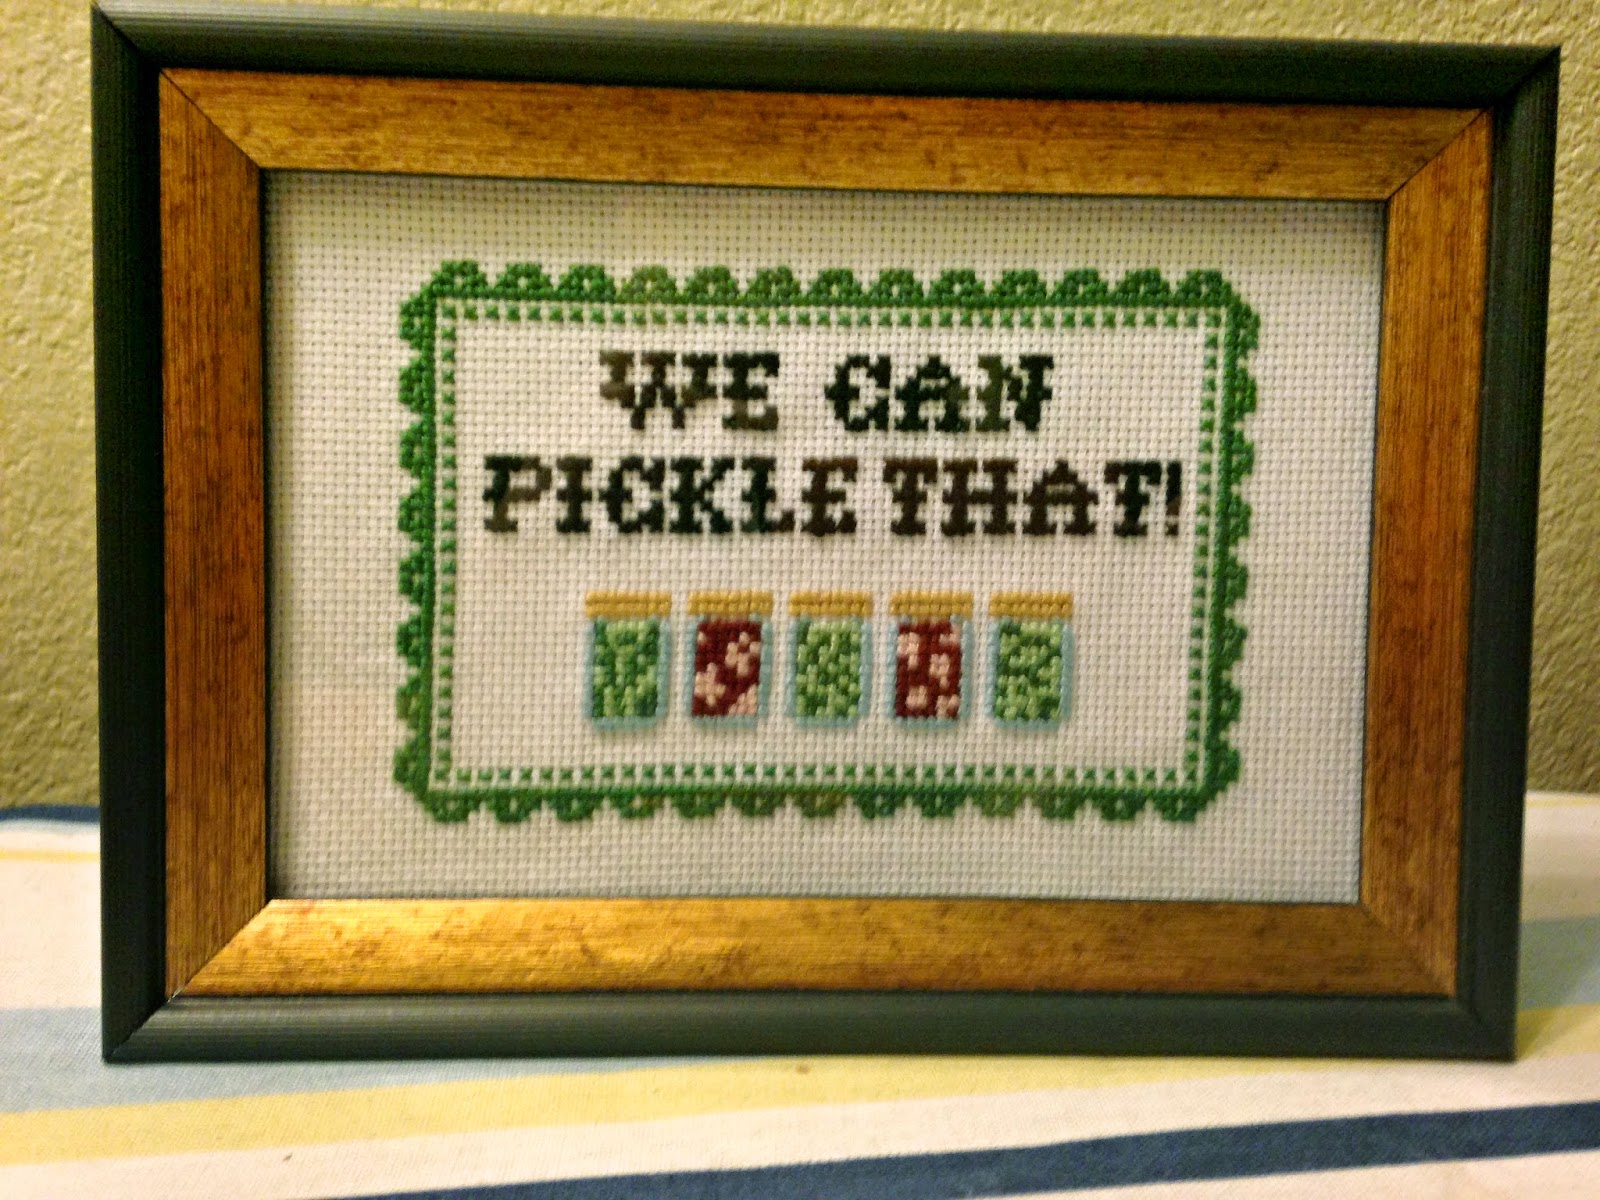
You can find the pattern here.
.%20So,%20it's%20been%20a%20while.%3Cbr%20/%3E%0A%3Cbr%20/%3E%0ABut,%20I've%20been%20seeing%20those%20subversive%20cross%20stitch%20projects%20around,%20and%20it's%20hard%20to%20resist%20the%20juxtaposition%20of%20such%20a%20traditional%20looking%20project%20with%20such%20an%20unexpected%20message.%3Cbr%20/%3E%0A%3Cbr%20/%3E%0AI%20searched%20through%20a%20lot%20of%20options%20before%20finding%20the%20perfect%20one%20for%20my%20sister.%20It's%20based%20on%20%3Ca%20href%3D%22https://www.youtube.com/watch?v%253DyYey8ntlK_E%22%20target%3D%22_blank%22%3Ethis%20Portlandia%20sketch%3C/a%3E.%20Although%20my%20sister%20isn't%20a%20fan%20of%20the%20show%20(I%20don't%20think%20she's%20ever%20seen%20it),%20she%20is%20a%20huge%20canner.%20I%20mean,%20she%20cans%20things.%20Usually%20out%20of%20her%20own%20garden,%20which%20she%20plants%20%3Ci%3Efrom%20seeds%3C/i%3E.%20That%20is%20some%20serious%20homemaking%20crap%20that%20I%20cannot%20keep%20up%20with.%3Cbr%20/%3E%0A%3Cbr%20/%3E%0AThe%20finished%20project%20(which%20she%20loved%20by%20the%20way):%3Cbr%20/%3E%0A%3Cbr%20/%3E%0A%3Cdiv%3E%0A%3Ca%20href%3D%22https://blogger.googleusercontent.com/img/b/R29vZ2xl/AVvXsEioxnnazq_T4rgUTOcbVwK9p-NePbV2EDxbTQNiYtrsxNzilBLX8Do7RCUQt0ljHrFy9qvGBy3bqvTUBo0dyKwiBcVE-7_RcHcV6bNSCyTqJLR8On2l-mj-QxHycMUSXbzXFc5W/s1600/We-Can-Pickle-That.jpg%22%20imageanchor%3D%221%22%3E%3Cimg%20alt%3D%22We%20Can%20Pickle%20that%20Subversive%20Cross%20Stitch%22%20border%3D%220%22%20src%3D%22https://blogger.googleusercontent.com/img/b/R29vZ2xl/AVvXsEioxnnazq_T4rgUTOcbVwK9p-NePbV2EDxbTQNiYtrsxNzilBLX8Do7RCUQt0ljHrFy9qvGBy3bqvTUBo0dyKwiBcVE-7_RcHcV6bNSCyTqJLR8On2l-mj-QxHycMUSXbzXFc5W/s1600/We-Can-Pickle-That.jpg%22%20height%3D%22240%22%20title%3D%22%22%20width%3D%22320%22%20/%3E%3C/a%3E%3C/div%3E%0A%3Cbr%20/%3E%0AYou%20can%20find%20the%20%3Ca%20href%3D%22http://shop.subversivecrossstitch.com/products/pdf-we-can-pickle-that%22%20target%3D%22_blank%22%3Epattern%20here%3C/a%3E.%3C/div%3E)
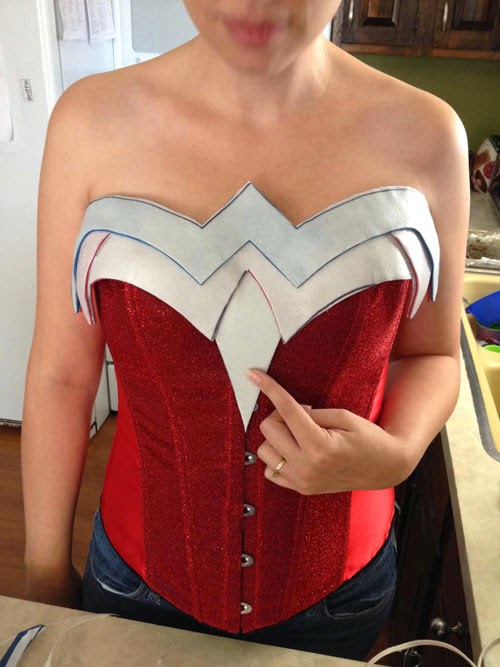
Wonder Woman Cosplay 28 Nov 2014 7:00 AM (10 years ago)


It's been a while since I went all out on a Halloween costume, but David talked me into trying out Wonder Woman this year. Of course, this involved figuring out how to make my own custom-made armor, because why do anything the sensible, easy way?
This tutorial about how to make Wonderflex armor was invaluable in this process.
So, I started with the idea. After looking through hundreds of photos of Wonder Woman online, I sketched my own concept based on what I liked the best.

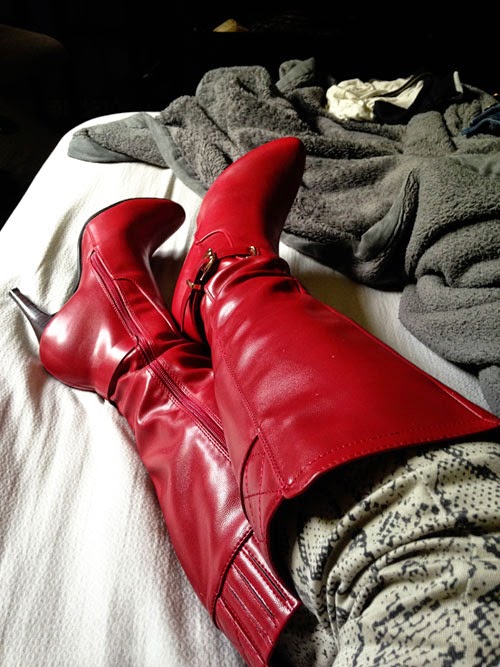
Now, it was time to shop for boots and the corset. We got one corset, and it was too small. I wanted the corset lacing to either meet, or to have a panel, and it probably had a six inch gap with no panel. The peril of ordering on the internet. So, we tried a different style. This time it was too big. Of course. So, I ended up just taking it in.
I also looked at probably hundreds of pairs of boots. I could have got the classic Wonder Woman boots, but I thought it would be more fun to go with something a little more realistic looking, to match the mood of the costume, and so I could wear them after Halloween too. I love the pair I got. When they came in the mail, I put them on and told David I was never taking them off.
Once we had the corset sorted, we started patterning the armor. It didn't seem like much, but there were a ton of different pieces to pattern, and then the problem of how to actually attach everything so it could come on and off my body had to be worked out before we made pieces.
I wish I had taken more photos of patterning, but I didn't start until we started molding. We used mostly Wonderflex backed with craft foam to make the pieces. I wouldn't do that again. The craft foam did not like sticking to the Wonderflex and it was a pain in the butt. I think several layers of Wonderflex is a much better option.
So, here's the front belt piece after the first mold, and then with the layers on top to add dimension.


I can't believe I don't have more in progress shots of the breastplate. Urg! It was the most challenging, because it had more complicated curves and levels. I did put in one little dart and that helped mold the curves a bit.
There you can see I'm building up the levels.
You can see at this point, there are still a lot of waves and bumps.
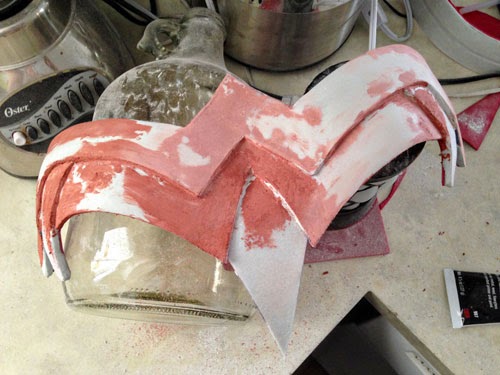
We ended up covering a lot of it with Apoxie Sculpt, which was another giant pain. I don't think I mixed it correctly, so it was sticky, and impossible to get where I wanted it. And then it dries to concrete. You can sand it, and I spend hours sanding it.
We also made the stars out of Apoxie Sculpt. The stars were also a pain in the rear. I would do them differently now. I knew I wanted that shape and type of star, but how to get the very sticky stuff in the mold (which took us AGES to find--we were even going to make our own mold at one point), and then out again without destroying the star? We end up using olive oil. Which was ok. But, I would have lined it with cling wrap and then coated the inside with olive oil. I bet they would have come out so nicely.
The red you see up there isn't the Apoxie Sculpt, it's filler. Which then had to be sanded. Again.
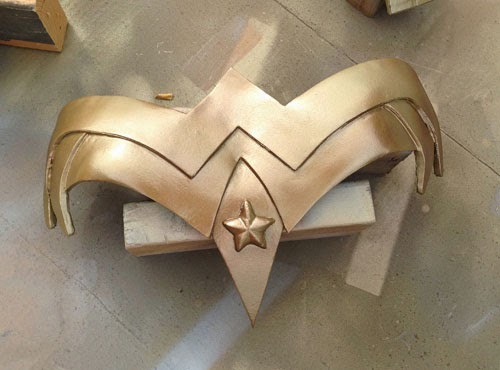
First coat of paint! I actually ended up painting them three times. I wanted a slightly aged look, but couldn't figure out the right balance. Eventually, did a mix of two spray paints, and then mixed gold acrylic paint with browns, yellows, blacks and whites to age the top, and then ever so slightly misted that with spray paint. And then a top coat of polyurethane.
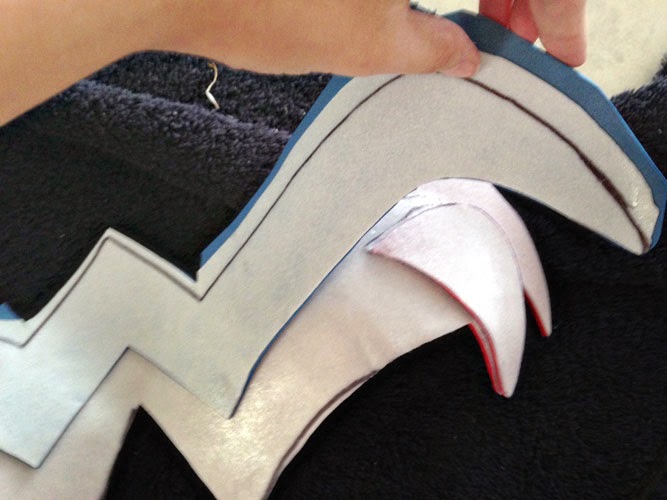
The bracers were actually done with a sheet of ABS plastic, craft foam and a touch of Wonderflex. Same with the tiara. It was a lot harder to heat to mold--but we were using my embossing gun from my stamping days. With an actual heat gun, it might have been a bit easier.
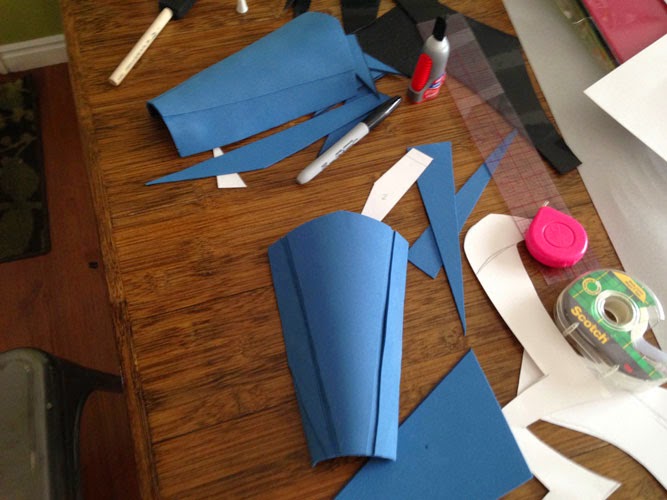
The basic bracer with a layer of craft foam, and then another layer for the dimension. (On the right is one of the paper pattern pieces.)

Adding the stars. I had to sand them down for ages to get them to curve. I wish I had figured out a better way to mold them so I could have just stuck down the clay when wet and avoided that whole mess. Next time!

The pieces to make the recesses traced and ready to cut out.

The tiara ready for paint. You can see the black ABS plastic (Wonderflex is white).
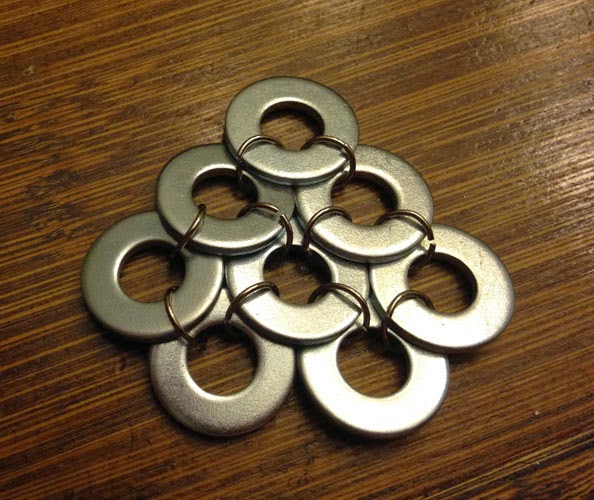
The chainmail was all handmade from washers and jump rings.

We found the red belt on the back at a thrift store and attached it to the armor with screws. The belt also comes apart in the front with overall hooks. Yes, the kind of overalls that are currently coming back into style. I found the hooks at JoAnn Fabrics.

The skirt I sewed from suede fabric. The star on the front is hand-stitched, and the other stars are metal--those things that you stick into fabric with the prongs that bend to attach. Studs, maybe? The bottom metal looking things on the end of each flap is wonderflex again, painted, with metal spike studs on each end.
The skirt is all attached to the belt. The back piece velcros so the belt still can unbuckle in the back. I got a swimsuit bikini bottom to wear under the whole thing.


Craft Room Furniture! This is Finally Happening! 5 Aug 2013 9:29 AM (12 years ago)


Dealing with Those Pesky Sewing Patterns: Organizing Solution 15 Oct 2012 2:48 PM (13 years ago)

Part 1 (Intro) is here.
Part 2 (Simple Rules to Create Organization that Sustains Itself Plus Master Bath Organization) is here.
Part 3 (Inexpensive Organizing) is here.
Did you think I abandoned my organizing project? Oh no, I have not. I have only stared into the abyss that is my craft room, and it is not a short thing. It is a long, multi-part thing.
I started with my sewing patterns, which is what this post is about. I recently started crafting for a great company again, you know, on a professional basis, and that means lots of time in the craft room. And that place is scary. We don't have a garage, so storage is a rare and precious commodity at our house. Stuff that has no where to go ends up in the craft room. If a kid comes to me to ask where something goes, it's usually phrased this way, "Where does this go? The craft room?"
David has started calling it "the junk drawer." I know another crafter who calls hers "the room of requirement."
I have slowly started to change this. It was a major milestone when I could reach the closet--which by the way, is right next to the door.
I've also started changing my habits. I don't craft the same way I used to. I put things away as I go. It's a novel concept, I know, and more about how I made it easier to do later, but it does make my brain more clear. I spend a lot less time looking for the scissors (or other craft tool) that are somewhere on my table and clean-up afterward is so much easier.
But, I'm getting ahead of myself. Back to the patterns.

I picked up a huge box of retro patterns at a garage sale a few Saturdays ago, and nearly doubled my pattern collection in one go. I desperately needed a way to look at what I had and also find what I had.
My boxes of patterns--they don't look that disorganized, but oh, are they!

So, I sorted all of them by brand, and then by number. I also took snapshots of them as I went, just with my camera phone. Nothing fancy. Although, I wish I had been more careful to make sure that you could clearly see the pattern number.
In the middle of sorting:

I also did a lot of putting away of random pattern pieces that had strayed.
One of my nice, neat boxes:

Then, I put them all way, all neatly categorized and in numerical order. And, I thought of a brilliant way to look through them without having to rifle through the patterns themselves. I have all the photos on my computer, but I thought I'd share the joy (and they are easier to tag this way) on flickr. (Confession: I haven't really used flickr much before. I hope I did that right.) I haven't finished tagging them all, but I can easily browse and find just the thing I'm looking for this way.
No getting out the boxes of patterns until I know exactly what pattern I want and when I know which one I want, I can go directly to it. It's like the Dewey Decimal system for sewing! Or you know, like how they have it set up when you look through the books and then find them in the drawers to buy your pattern. Whatever. I like the library analogy better.
Ahhh, so much better! Simple but effective solution.
Step one of the craft room is conquered. Only 301 more steps. . .
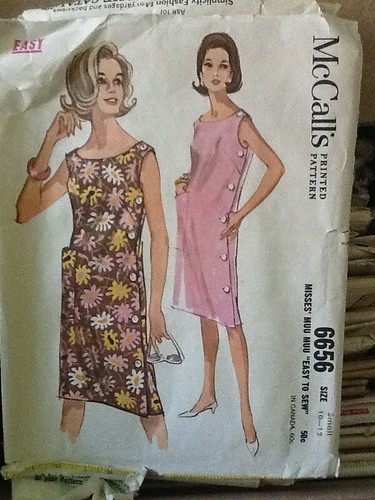
PS: Probably my favorite of the new patterns--I must make this dress. I must!
Inexpensive Organizing 2 Oct 2012 11:37 AM (13 years ago)

Part 1 (Intro) is here.
Part 2 (Simple Rules to Create Organization that Sustains Itself Plus Master Bath Organization) is here.

Some things I've learned for organizing on the cheap:
- Organizing is about your life, not about how much money you spend (obvious, but it took me a little while to learn. I love pretty, fresh school supplies, um, I think I've mentioned my love of pretty containers, I love pretty interior design--all that generally costs money--even though I try to manage to spend as little money as possible). I used to want it to be pretty and perfect or not at all. It doesn't work that way. It can be pretty later. Right now, it just needs to be organized. In fact, it's better to see if what you come up with works, then buy whatever pretty things to put it in. That way you're not investing a money in a system that won't work for you in the long run anyway.
- Don't get caught up trying to create the perfect system. Very related to #1. Trying to make the perfect system generally has the effect of making me want to spend $. No system is perfect, but there are systems that work. Like I've said before, if you see a problem, think about how to fix it. Sometimes it's as easy as providing a trash can in the right spot, grouping the right things together, or moving something so that you have easier access. And sometimes it's just accepting that you have to change your habits (hard!).
- Get rid of stuff. Less to organize! I recently made a goal to get rid of 100 things. This is something I plan to do regularly. Along with that, don't buy new things. I recently read that if you are contemplating buying a (non-perishable) item, put it on a list and wait a designated period of time: two weeks, a month, whatever. If at the end of that time, you still want/need it, buy it.* I find delayed gratification so hard, but it does help a lot with clutter.
- Use "trash" to organize.** Food comes in great containers. If all you have are oatmeal containers, cardboard boxes from cereal boxes, fruit snacks, peanut butter jars, strawberry baskets, mayonnaise jars, peanut containers, empty spice jars, even boxes of soda, then use those. There are lots of ways to dress them up, if you want.*** Baby wipe containers are also quite amazing--ask friends if you don't buy wipes yourself. I've seen great things done with paper towel rolls--and toilet paper rolls, but that grosses some people out.
- Use what you have already.**** You've probably bought baskets or plastic containers already. As you organize, you'll find you get rid of things (see #3) or find new systems. A lot of shifting will occur and you can reuse those old containers.
- To help with costs, go second-hand. Thrift stores and garage sales can be great for finding containers (the flower vase in the picture came from a garage sale). Canning jars are often easy to find and make pretty good storage containers; also, muffin tins. Sites like Craig's list can be great sources for free cardboard boxes people are looking to ditch after they move. This can work great for some things (the free section even has furniture if you are looking for bigger storage solutions--it doesn't have to be pretty--think basement or garage and hide it--and even if it's ugly for a while, if it's free, you won't feel like you wasted money by buying a cheap temporary option). Even cups or bowls you don't use much can make great storage containers.
- Hit up your friends. Trade around. Find an organizing buddy and see if you might have things they can you use and vice versa. When I told my friend Natalie about my project, she said she might have some things I could use--funnily enough, I just realized she gave me those jars that appear in the picture above!
- Another cheap source is the dollar store or bargain stores (although I think this can add up quickly if you're not careful and sometimes you don't get much for your money. Caution.)
- Make your own storage.***** There are great tutorials out there for sewing your own fabric boxes, and if you use fabric you already have on hand, it doesn't have to be too much out of pocket. Or use the $4 bed sheets from Walmart for the fabric to get a more uniform look. I've even seen sturdy baskets woven out of paper.
- Make your own cleaning supplies. This isn't really about organization, but it will save you tons of money, and when things are clean, you want to keep them organized. There are a few products that I really love that I still buy, but for tons of things, I make my own. There are dozen of recipes out there, and I will probably do a post on my favorites at some point.
*This also works great for children. We've started this with our kids. If they ask us for something, we tell them to put it on their list. Then they can prioritize it and start saving for the things they really want. Even things as small as candy can go on the list. We haven't ever had much of a problem with begging (sometimes for the small things), but this has pretty much completely eliminated it. Our oldest son really, really wants a board game, and he is saving up for it. It's not a cheap one, and he is about 1/5 of the way there. It's helping him a lot to put things on his list and realize that he still wants the board game most of all.
**Milk Carton Storage
Clips from cheap plastic hangers as food bag clips
Holder for charging phone made from lotion bottle
Scarf holder
Paint can makeover
Toilet paper rolls for cords
Recycled zipped snack container
Painted tin cans on wall
***Milk Crate Cover
How to remove printing from plastic containers
Pretty mason jar lids
Jars decorated with zippers
Porcelain pens on mason jars
Pretty tray from cookie sheet
Spray paint ugly containers
****Pantry Storage
Eyeglasses case as storage
*****Floppy disk pencil cup
Storage basket tutorial
Another fabric basket tutorial
Fabric storage box (this is much stiffer than the other two)
Round fabric baskets
Tote
Pajama eater
Board game upcycle
Another game board upcycle
DIY crates from paint sticks
Sturdy basket woven from newsprint/packing paper
Melted record bowl
Bowl from rolled paper
Felt bowl
Hulk Birthday Party Invite 25 Sep 2012 10:08 AM (13 years ago)

Here's to awesome super heroes and fun graphic design and birthday parties and theater and staying up way too late!

.%3Cbr%20/%3E%0A%3Cbr%20/%3E%0AHere's%20to%20awesome%20super%20heroes%20and%20fun%20graphic%20design%20and%20birthday%20parties%20and%20theater%20and%20staying%20up%20way%20too%20late!%3Cbr%20/%3E%0A%3Cbr%20/%3E%0A%3Cdiv%3E%0A%3Ca%20href%3D%22https://blogger.googleusercontent.com/img/b/R29vZ2xl/AVvXsEj3_Qeh3ycBK06BvQ9mCeY8zwYzJ3J6TkRQDGDyN3Gq-4xOzWD4_I6TrLLspQ_Uh1Lh_MaX6BHhAplS25Ch8YiatGBlr9W8BFuyuCw3_01g3zcRqhnvUVN3eMjwX47BYr0Q9QNk/s1600/Hulk.jpg%22%20imageanchor%3D%221%22%3E%3Cimg%20alt%3D%22Graphic%20super%20hero%20birthday%20party%20invite%20The%20Incredible%20Hulk%22%20border%3D%220%22%20height%3D%22640%22%20src%3D%22https://blogger.googleusercontent.com/img/b/R29vZ2xl/AVvXsEj3_Qeh3ycBK06BvQ9mCeY8zwYzJ3J6TkRQDGDyN3Gq-4xOzWD4_I6TrLLspQ_Uh1Lh_MaX6BHhAplS25Ch8YiatGBlr9W8BFuyuCw3_01g3zcRqhnvUVN3eMjwX47BYr0Q9QNk/s640/Hulk.jpg%22%20title%3D%22%22%20width%3D%22494%22%20/%3E%3C/a%3E%3C/div%3E%0A%3Cbr%20/%3E%3C/div%3E)
Medicine and Cleaning Cabinet Organization 18 Sep 2012 9:27 AM (13 years ago)

This is Part 3 of my How I Organized My Entire House for $0.00 (Really!) series.
Part 1 (Intro) is here.
Part 2 (Simple Rules to Create Organization that Sustains Itself Plus Master Bath Organization) is here.
It occurred to me that this should be my next project when I was sick on last Monday. Super sick. I slept almost the entire day on Sunday (I was awake for like five hours the entire day) and on Monday it felt like my bones are trying to escape from my body. Fun times. Except, I couldn't find the thermometer. Are you surprised, looking at this photo?
Before:


Yeah, I wasn't either. The shelf on the top is our medicines and the bottom has some cleaning supplies and the sunscreen/hand sanitizer/light bulb type stuff. The medicine is actually kind of organized, but it ended up tossed all in there, and some of it was out because that is is the stuff we use the most.
So, I took everything out of the bottom. I knew I could reuse that metal shelf for the medicines, because it was doing nothing on the bottom there. (PS, I found both thermometers in the mess on the bottom shelf.)

Grouping stuff:

Somehow, I didn't take in progress photos of the medicine. More on that in a sec. But, you can see I got some white plastic bins (one was already in there, one I snagged out of the craft room). I corralled the sunscreen, bug spray and some hand sanitizer in it. Before, they had been floating randomly. Then, in the other, I put all the cleaning supplies. Behind them, there are light bulbs (nicely packaged so they don't need their own containers). See the green bin in the above photo? It's from the dollar store. I bought a bunch of them a while ago. I have a post coming up how to organize on the cheap, and I have mixed feelings on the dollar store, but it works here.
I have all my furniture polish/repair/leather conditioner in that bin, behind the cleaning supplies, because I don't use it much.
I hate to dust.
I also stuck a few nails into the side to hang the duster. I would have preferred a cup hook, but I couldn't find a cup hook, and this is a zero dollar make over.


My process for the medicines was to clean up some of the existing organization. Around the edges, we had duplicate medications, so I rounded up all of those and put them in a bag (it's at the back of the cabinet). We'll check here first when we run out of anything.
Then, I figured out what we were using most (it usually found its way to the front of the cabinet) and made a bin for our most-used medicines. It's also the easiest to reach and I made sure to put those thermometers in there. I am not losing those things again.
I also combined a lot of packages of band-aids. We had a lot of band-aids. And I put all the athletic tape, band-aids and gauze together. That bin with some of the bandage stuff was actually hanging out underneath the bathroom sink. Doing no good whatsoever, because I don't think anyone knew it was there.
The other categories are first-aid kit, allergies, cold/flu, digestion, pain relief, topical, and children's.

Things I would upgrade:
- The nail would definitely go to a cup cook. It's not dangerous or even ugly (you can't see it), but a couple of cup hooks would be so cute.
- Cuter containers. Duh.
- I would build a little wooden shelf of some sort to go across the medicine shelf in the front so that I could get rid of the metal one.
- The medicine bins don't quite fit. This is soooo annoying. I could maybe mess with it a bit more, but it's probably a bin problem. I would change them out.
- I would paint or something in there. Still might do this--it could be a super cute cabinet. Right now, it looks pretty sad. Wouldn't a stencil be darling?
Simple Rules to Create Organization that Sustains Itself Plus Master Bath Organization 7 Sep 2012 6:47 AM (13 years ago)

This is Part 2 of my How I Organized My Entire House for $0.00 (Really!) series. Part 1 (Intro) is here.

I want to start off this series by giving myself a set of rules (more like guidelines) to follow. It's easy to get carried away and easy to lose sight of your goals, so this will help keep me on-track.
- Think about how you live your life. It doesn't make sense to have a system that doesn't work with how you live. Have the things you use together grouped together, not always like with like*. You usually use tape and scissors and wrapping paper together. Have them together. You usually use toothpaste and toothbrushes together (if I'm making any weird assumptions here, feel free to educate me! :) )--make it so you only open one drawer or one cabinet to get them. Think efficiency.
- Have the things you use the most in easiest reach. The stuff you use less can be harder to get to. Make things easier on yourself.
- Along with number 2, have the things where you use them, or put them where you are more likely to use them.** Don't get too caught up in where things are "supposed" to go. Put them where they work for you.
- Make things easy to put away. If they aren't (and you are like me), they won't get put away.
- Make it simple. Don't go overboard labeling stuff. Don't make a tiny compartment for everything. Have a place for everything, but there's no need to make it more complicated than it needs to be. If you want. Simple systems are the most self-perpetuating.***
- Reevaluate. Organize, then go back a week later and see if it's working. If not, tweak. Just because you organized it one way doesn't mean it has to stay that way. And it's easier to rework it when it's still somewhat organized than when it's completely disorganized because the system didn't work with the way you live.
- Get rid of stuff you don't use. I've heard if you haven't used it in the last year, get rid of it. But, I think that's unrealistic. I have things I haven't used in the last year that I want to keep and it would tick me off to replace. But, there is a lot of good in honestly evaluating if you are going to use it. Are you holding onto something because of guilt? Because of what it represents?**** When getting rid of stuff, the biggest thing is to be honest with yourself.
- Educate your family on your new system, but don't overwhelm them. Make it fun. Get their input if it affects them (I've found it works a lot better if ideas come from everyone, instead of my trying to impose a top down approach).
- It doesn't have to be perfect. It won't be perfect. What you organize now will probably have to be organized again at some point. Hopefully a long, long time from now. But, your life will change. Your needs will change. Don't get caught up in perfectionism or get overwhelmed. One little piece at a time.
**I have a topical acne medication I need to use every day, but not within 30 minutes before or after showering. When it was in the bathroom, I didn't use it regularly. But, put it by my laptop, and suddenly I remembered to use it twice a day like I am supposed to.
***It's my experience that I will put something box in a drawer, but not necessarily a certain spot in that box in drawer. For example, if I have a box for often-used medicines: works great! If I have a certain spot for Tylenol in the box, it doesn't get put there every time by everyone and I get frustrated. It doesn't work across everything (forks have a certain spot, dang it!), but it's a generally good rule of thumb.
****Sometimes that's ok--you may pry my great-grandma's quilts out of my bloody fingers--but sometimes it means you need to let go of that to get rid of it. I kept some kitchen gadgets for a long time, because if I had kitchen gadgets, then surely it meant that someday I was going to be fabulous and motivated to cook all the time, right? And, it would make life easy, and I would transform into super chef-type "good mom" person. I was invested in seeing myself as "person with cool kitchen gadgets" and invested in thinking that a good mom cooks every night. Once I let go of that--good moms don't have to cook every night--then I could get rid of the clutter that wasn't helping my life. Or my cooking.
Do you all have any other tips? I'd love to hear what has and hasn't worked for you!
(Also, I need to take my own advice! I am just horrible at putting things away and not always good at setting up things that work for me, but that's the point--right? To take time to set this stuff up; to stop and think about it.)
Now, onto the bathroom!
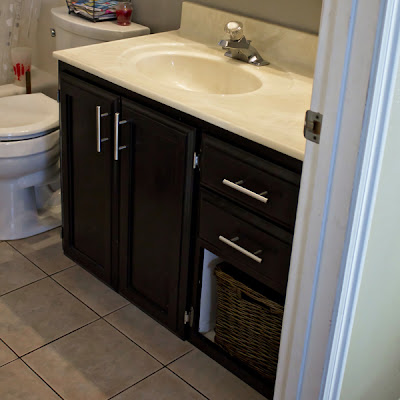
The main problem with our master bath is that the cabinet storage wasn't being used well. The drawers were working ok, the floating shelves I barely tweaked at all, but behind those under-the-sink doors, that stuff was always trying to escape. I pretty much tossed a bunch of crap in there when we moved in and never looked at it again.
Another big thing was getting rid of stuff in here we don't use. I had old products that were around since Griffin was a baby (six or seven years ago!) or even before that I've barely used. A large part of what was holding me back was being realistic about the products I use. I got rid of a flat iron, a curling iron, four brushes, six or seven or eight bottles of stuff I never use and a whole trash can of stuff. I also removed some things we never use in the bathroom, like some first aid kit stuff. Why is it in here if we don't use it in here?
Because it got tossed in here when we moved in.
I also rearranged some things, and tweaked positions of stuff. Like most of the brushes went under the sink in a bin, except for the two we use most.
This just looks like a messy bathroom. Yeah, pretty much. But, it looks nice and neat afterward. I was able to make the floating shelves a lot neater and all the cleaning supplies are under the sink now.


Where the basket goes:
This is the top drawer of the vanity. It was a drawer of whatever landed in here, but mostly David's shaving stuff (the dude is hairy). So, I decided to make it official, and just put shaving things in here. It's a shallow drawer, so not a lot fits in here. The great thing about this is that after he's done with something, it can just get tossed back into the drawer. (See numbers four and five of the rules--simplicity. This is a system we can keep up.) My razors suddenly had a place to be, which was sweet after roaming all over the bathroom.
It's so much easier to see what is in the drawer now!

This is the second drawer down, where our hair stuff lives. With my short hair, my hair needs are fairly minimal most of the time. This is mostly Aubrey's stuff. I normally do her hair, but she brings me the things I need. Our new ritual is that I do her hair on the bed before she goes to school, so she's been fetching me the comb and hair bands and bobby pins. Now she can just take the plastic tray (the plastic hair bands she uses are in the plastic tray next to the bobby pins) and the brush and bring it to me and we will be ready to go. Everything else that was in here got put in a different spot (under the sink).
Everything is easy to see and easy to find.

The dreaded under the sink. This photo does not accurately portray the horribleness.
I was able to completely get rid of that white basket and one of the teal plastic containers (sweeeeet! empty containers for another area of the house!). All the cleaning stuff is along the right side. Less used hair stuff at the back--I only use that stuff for special occasions (read: theater). The teal container has the rest of the brushes, the light blue one has all the fancy bows, the clear plastic one underneath it has Aubrey's bracelets (she was so excited to be able to reach this stuff, as it had been up on the floating shelves). Then feminine hygiene to the left. I remembered I hadn't included room for toilet paper after I took this picture, so I slid the bows on top of the brushes and moved everything over, and it fit no problem!
Things aren't trying to escape anymore. Again, easy to see, easy to find.

It doesn't seem that impressive in photos, but it is in person. It only took me about an hour and half to sort everything and find it new homes (I also rearranged hair products and some of my make up), but it makes a huge difference on how easy it is to find things. I didn't do too much in the medicine cabinet because the toothbrushes and hairspray and cologne situation in there was working pretty well already.
I told David I organized the bathroom, and he was all like: crap, am I going to be able to find anything? He was relieved to see that everything of his basically stayed the same, except easier to see, find and put away. That's the goal! Mission accomplished in the master bath.
Sooooo, time to dream! If I had some money, what would I upgrade?
- I would buy a pretty soap dispenser.
- I would get a shelf for underneath the sink (actually, I could build one out of materials I already have, so I may do that as one of my future projects).
- Another couple of baskets for the floating shelves. The ones I have came from Walmart, fyi.
- New towels. We have matching ones, but I love fresh towels!
- A pretty scented yellow candle!
- Prettier containers. I love pretty containers. The plastic ones are good for the bathroom though, and they stack well.
Tic-tac bobby pin storage (such a good idea--no tic-tacs containers owned already here though)
Magnetic bobby pin storage (I almost did this--I have something I could have used to do this idea, but considering how I use my bobby pins, it wouldn't make sense)
Baskets on wall for towel storage
How to clean a shower head
Tons of storage solutions--all very, very pretty, and some more practical than others
Balsa wood drawer organizer--make your own custom drawer organizer
Use dryer sheets to clean your bathroom--I use this tip; it is awesome!
Coat hook in shower (hang on opposite side of shower head to hang caddy on)--I have built in shelves in my shower, but this is such a great idea!
How I Organized My Entire House for Zero Dollars (Really!) 6 Sep 2012 1:38 PM (13 years ago)


Maybe it's the kids going back to school, maybe it's just because I've reached my breaking point, or maybe it's because of no good reason, but the disorganization in my house has got to grow up and leave already. I am tired of it. I'm tired of not being able to find things. I'm tired of sighing when I see certain areas of my house. I'm just fed up.
When I've tried to organize my house before, it's gone like this (this may sound familiar to you--perhaps you have felt similarly?): I am motivated. I see beautiful pictures of organized spaces on Pinterest! Oooooo, so pretty. Wow, I want my house to look like that! I need containers! I need all the pretty containers! Must buy containers now! I need all the things! Wait, I have no money for containers! Sad face. I organize some things halfheartedly, maybe buy a few little pretty containers (I actually have about five times as many jars now, see picture above), but my money seems to have other priorities (new water heaters, piano lessons, um, thrift stores), and I think, sheesh, if I just had pretty containers, it would stay all pretty and organized and birds would sing outside my windows all day long and my children would never complain about doing their chores or putting away their toys and I would be soooo motivated to keep it nice. While it might be true that pretty spaces and pretty containers might keep me slightly more motivated, the problem is me.
I have a three drawer nightstand and I have probably tried four or five ways to keep the stuff in it organized, and it always ends up a mess. And what is the common denominator in this super-simple equation? Oh yes, me!
Now, I will say that the rest of my family is not very good about keeping my systems up and that is horribly discouraging, because I just want to yell at them. And rather than getting uptight and control-freaky about keeping my house clean (perfectionist here!), I tend to go to the other extreme and not care, to avoid the yelling that comes with the caring (to be clear, I am not a yeller. I probably yell maybe once a month, if that. I'm a pretty chill mom. I just hate to get frustrated, so I tend to the other extreme). Also, a horrible idea, the not caring.
So, I am starting today. I am going to organize my house, and I am going to do it for $0. That is right. NO money.
(Of course, I've always thought that was a silly notion, calling something like this free, because I bought these things at some point--the plastic bins and the boxes, and the jars, and the pretty boxes, and even the few pretty baskets I have. Even if I use cereal boxes, I bought the cereal--of course, that has the added benefit of getting to eat cereal! Yuuuuuummmmmmmm, cereal. Even cleaning supplies cost money. But, the point is, the goal is, not to spend any additional money, and so I am calling this free.)
Now, this might not be the prettiest make-over ever. It might, in fact, be ugly. But the ugly will all be hidden, and it will be free. Did I mention free?
And, so my first project, the master bathroom. Which, I will show you tomorrow, to kick off this thing. I will also give you my organizing philosophy (man, it is deep!). I will be coming back to this page to update as I go around my house, organizing all the things.
Part 2--Simple Rules (Well, More like Guidelines) to Create Organization that Sustains Itself and Organizing The Master Bathroom
Part 3--Medicine and Cleaning Supplies Organization
Part 4--Dealing with Those Pesky Sewing Patterns
%26bodytext%3D%3Cdiv%20dir%3D%22ltr%22%20trbidi%3D%22on%22%3E%0A%3Cdiv%3E%0A%3C/div%3E%0A%3Cbr%20/%3E%0A%3Cdiv%3E%0A%3Ca%20href%3D%22https://blogger.googleusercontent.com/img/b/R29vZ2xl/AVvXsEg5cRnBVvRLkP4JcBT2f83qD4XQK6e_2ijXcQZ6yx2G91Hf3LliokEuV0QJJ8TzuEerBe3gW4NO6qwGHOF2MV3tAlNpvlXQgm-Z-mCgIcnLc1JL9ck8seRxm4uiQUMPh_INxcXG/s1600/CRW_8619.jpg%22%20imageanchor%3D%221%22%3E%3Cimg%20alt%3D%22a%20blogger%20tells%20how%20she%20organized%20her%20house%20without%20spending%20any%20money%22%20border%3D%220%22%20height%3D%22266%22%20src%3D%22https://blogger.googleusercontent.com/img/b/R29vZ2xl/AVvXsEg5cRnBVvRLkP4JcBT2f83qD4XQK6e_2ijXcQZ6yx2G91Hf3LliokEuV0QJJ8TzuEerBe3gW4NO6qwGHOF2MV3tAlNpvlXQgm-Z-mCgIcnLc1JL9ck8seRxm4uiQUMPh_INxcXG/s400/CRW_8619.jpg%22%20title%3D%22%22%20width%3D%22400%22%20/%3E%3C/a%3E%3C/div%3E%0A%3Cbr%20/%3E%0AMaybe%20it's%20the%20kids%20going%20back%20to%20school,%20maybe%20it's%20just%20because%20I've%20reached%20my%20breaking%20point,%20or%20maybe%20it's%20because%20of%20no%20good%20reason,%20but%20the%20disorganization%20in%20my%20house%20has%20got%20to%20grow%20up%20and%20leave%20already.%20I%20am%20tired%20of%20it.%20I'm%20tired%20of%20not%20being%20able%20to%20find%20things.%20I'm%20tired%20of%20sighing%20when%20I%20see%20certain%20areas%20of%20my%20house.%20I'm%20just%20%3Cb%3Efed%20%3C/b%3Eup.%3Cbr%20/%3E%0A%3Cbr%20/%3E%0AWhen%20I've%20tried%20to%20organize%20my%20house%20before,%20it's%20gone%20like%20this%20(this%20may%20sound%20familiar%20to%20you--perhaps%20you%20have%20felt%20similarly?):%20I%20am%20motivated.%20I%20see%20beautiful%20pictures%20of%20%3Ca%20href%3D%22http://pinterest.com/karah99/someday-i-might-be-organized/%22%20target%3D%22_blank%22%3Eorganized%20spaces%20on%20Pinterest%3C/a%3E!%20Oooooo,%20so%20pretty.%20Wow,%20I%20want%20my%20house%20to%20look%20like%20that!%20I%20need%20containers!%20I%20need%20all%20the%20pretty%20containers!%20Must%20buy%20containers%20now!%3Ca%20href%3D%22http://hyperboleandahalf.blogspot.com/2010/06/this-is-why-ill-never-be-adult.html%22%20target%3D%22_blank%22%3E%20I%20need%20all%20the%20things%3C/a%3E!%20Wait,%20I%20have%20no%20money%20for%20containers!%20Sad%20face.%20I%20organize%20some%20things%20halfheartedly,%20maybe%20%3Ca%20href%3D%22http://www.craftastical.com/2010/03/project-progress-crafty-organization_19.html%22%20target%3D%22_blank%22%3Ebuy%20a%20few%20little%20pretty%20containers%3C/a%3E%20(I%20actually%20have%20about%20five%20times%20as%20many%20jars%20now,%20see%20picture%20above),%20but%20my%20money%20seems%20to%20have%20other%20priorities%20(new%20water%20heaters,%20piano%20lessons,%20um,%20%3Ca%20href%3D%22http://www.craftastical.com/search/label/thrift%2520store%22%20target%3D%22_blank%22%3Ethrift%20stores%3C/a%3E),%20and%20I%20think,%20sheesh,%20if%20I%20just%20had%20pretty%20containers,%20it%20would%20stay%20all%20pretty%20and%20organized%20and%20birds%20would%20sing%20outside%20my%20windows%20all%20day%20long%20and%20my%20children%20would%20never%20complain%20about%20doing%20their%20chores%20or%20putting%20away%20their%20toys%20and%20I%20would%20be%20soooo%20motivated%20to%20keep%20it%20nice.%20While%20it%20might%20be%20true%20that%20pretty%20spaces%20and%20pretty%20containers%20might%20keep%20me%20slightly%20more%20motivated,%20the%20problem%20is%20me.%3Cbr%20/%3E%0A%3Cbr%20/%3E%0A%3Ca%20name%3D'more'%3E%3C/a%3E%3Cbr%20/%3E%0AI%20have%20a%3Ca%20href%3D%22http://www.craftastical.com/2011/01/bedside-table-makeover.html%22%20target%3D%22_blank%22%3E%20three%20drawer%20nightstand%3C/a%3E%20and%20I%20have%20probably%20tried%20four%20or%20five%20ways%20to%20keep%20the%20stuff%20in%20it%20organized,%20and%20it%20always%20ends%20up%20a%20mess.%20And%20what%20is%20the%20common%20denominator%20in%20this%20super-simple%20equation?%20Oh%20yes,%20%3Ca%20href%3D%22http://www.craftastical.com/p/about-this-blog.html%22%20target%3D%22_blank%22%3Eme%3C/a%3E!%3Cbr%20/%3E%0A%3Cbr%20/%3E%0ANow,%20I%20will%20say%20that%20the%20rest%20of%20my%20family%20is%20not%20very%20good%20about%20keeping%20my%20systems%20up%20and%20that%20is%20horribly%20discouraging,%20because%20I%20just%20want%20to%20yell%20at%20them.%20And%20rather%20than%20getting%20uptight%20and%20control-freaky%20about%20keeping%20my%20house%20clean%20(%3Ca%20href%3D%22http://www.craftastical.com/search/label/Type%2520A%22%20target%3D%22_blank%22%3Eperfectionist%20here%3C/a%3E!),%20I%20tend%20to%20go%20to%20the%20other%20extreme%20and%20not%20care,%20to%20avoid%20the%20yelling%20that%20comes%20with%20the%20caring%20(to%20be%20clear,%20I%20am%20not%20a%20yeller.%20I%20probably%20yell%20maybe%20once%20a%20month,%20if%20that.%20I'm%20a%20pretty%20chill%20mom.%20I%20just%20hate%20to%20get%20frustrated,%20so%20I%20tend%20to%20the%20other%20extreme).%20Also,%20a%20horrible%20idea,%20the%20not%20caring.%3Cbr%20/%3E%0A%3Cbr%20/%3E%0ASo,%20I%20am%20starting%20today.%20I%20am%20going%20to%20organize%20my%20house,%20and%20I%20am%20going%20to%20do%20it%20for%20$0.%20That%20is%20right.%20NO%20money.%3Cbr%20/%3E%0A%3Cbr%20/%3E%0A(Of%20course,%20I've%20always%20thought%20that%20was%20a%20silly%20notion,%20calling%20something%20like%20this%20free,%20because%20I%20bought%20these%20things%20at%20some%20point--the%20plastic%20bins%20and%20the%20boxes,%20and%20the%20jars,%20and%20the%20pretty%20boxes,%20and%20even%20the%20few%20pretty%20baskets%20I%20have.%20Even%20if%20I%20use%20cereal%20boxes,%20I%20bought%20the%20cereal--of%20course,%20that%20has%20the%20added%20benefit%20of%20getting%20to%20eat%20cereal!%20%3Ca%20href%3D%22http://www.youtube.com/watch?v%253Dq6TIsxTdrCU%22%20target%3D%22_blank%22%3EYuuuuuummmmmmmm,%20cereal%3C/a%3E.%20Even%20cleaning%20supplies%20cost%20money.%20But,%20the%20point%20is,%20the%20goal%20is,%20not%20to%20spend%20any%20additional%20money,%20and%20so%20I%20am%20calling%20this%20free.)%3Cbr%20/%3E%0A%3Cbr%20/%3E%0ANow,%20this%20might%20not%20be%20the%20prettiest%20make-over%20ever.%20It%20might,%20in%20fact,%20be%20ugly.%20But%20the%20ugly%20will%20all%20be%20hidden,%20and%20it%20will%20be%20free.%20Did%20I%20mention%20free?%3Cbr%20/%3E%0A%3Cbr%20/%3E%0AAnd,%20so%20my%20first%20project,%20the%20%3Ca%20href%3D%22http://www.craftastical.com/search/label/bathroom%22%20target%3D%22_blank%22%3Emaster%20bathroom%3C/a%3E.%20Which,%20I%20will%20show%20you%20tomorrow,%20to%20kick%20off%20this%20thing.%20I%20will%20also%20give%20you%20my%20organizing%20philosophy%20(man,%20it%20is%20deep!).%20I%20will%20be%20coming%20back%20to%20this%20page%20to%20update%20as%20I%20go%20around%20my%20house,%20organizing%20all%20the%20things.%3Cbr%20/%3E%0A%3Cbr%20/%3E%0A%3Ca%20href%3D%22http://www.craftastical.com/2012/09/this-is-part-2-of-my-how-i-organized-my.html%22%20target%3D%22_blank%22%3EPart%202--Simple%20Rules%20(Well,%20More%20like%20Guidelines)%20to%20Create%20Organization%20that%20Sustains%20Itself%20and%20Organizing%20The%20Master%20Bathroom%26nbsp;%3C/a%3E%3Cbr%20/%3E%0A%3Ca%20href%3D%22http://www.craftastical.com/2012/09/medicine-and-cleaning-cabinet.html%22%20target%3D%22_blank%22%3EPart%203--Medicine%20and%20Cleaning%20Supplies%20Organization%26nbsp;%3C/a%3E%3Cbr%20/%3E%0A%3Ca%20href%3D%22http://www.craftastical.com/2012/10/dealing-with-those-pesky-sewing.html%22%20target%3D%22_blank%22%3EPart%204--Dealing%20with%20Those%20Pesky%20Sewing%20Patterns%20%3C/a%3E%3C/div%3E)
How I Spent My Summer Vacation 6 Aug 2012 9:01 AM (13 years ago)

One of the funnest things about being in the ensemble was that I had nearly as many costume changes as anyone else. Five. While the theater provided three, it ended up that I offered to make two of mine: my dress for Ascot (possibly one of the most famous scenes for costumes ever) and my Embassy Waltz dress. For both of them, I didn't use a pattern. Edwardian style is stunning.

My Ascot dress I made from a beaded "little black dress," a sleeveless thing I picked up from a thrift store. I should have taken a before picture, but it was a basic black sheath dress. I cut off the bottom entirely, and gathered it around the front half of the top, then draped the black "bustle" from some taffeta to fill in the back. Then I added a white skirt and some sleeves, and a sash and a huge white bow. It's not terribly period accurate (the sleeves are horribly wrong), but it's not all that far off either. The bustle draping is very period (My Fair Lady takes place in 1912), except that mine insisted on being too fluffy! You can't see it too well in these photos--I neglected to take a good photo of the back. But, you can kinda see it from the side, and I will link you to the Facebook albums with amazing photographs of the whole show.

And oh yes, I did make that fabulous hat!
My waltz dress I actually based off of a period tea dress. It ended up being a little too fluffy too. And very, very blue.
My inspiration dress:

My dress:


Again, the sleeves are horribly not period. If I had had more time, I would have done them over, but I barely finished in time as it was. I didn't even have all my accessories done until opening night (my fault). You can see how the dress of the period is very sleek and mine is a bit more poofy, but again, I didn't have a lot of time to fix it. This summer I was constantly going from one thing to the next. My sister was in town from Missouri for almost a month, so when I wasn't at the play, I wanted to be with her, and NOT sewing. Well, I wanted to sew, for I love to sew, but I didn't want to not be with her.
If you'd like to see photos of all the costumes I wore (they were all fabulous!) in a backstage setting, this is the Facebook album: My Costumes
Professional photos of the whole amazing thing, as we are meant to be seen, onstage, by Ring Lite Photography: Photos of the Whole Production
"The Voice of the Rain" Print Download 24 Apr 2012 4:00 AM (13 years ago)

The poem making the rain is a beautiful one by Walt Whitman called "The Voice of the Rain" from Leaves of Grass. Bonus points for it being out of copyright. (Obviously, I wouldn't be offering it as a download if it wasn't.)
Right now it's 11x14", but could easily be cropped to a different aspect ratio. I hope you enjoy this print--I'd love to know if you end up using it for anything.


%3Cbr%20/%3E%0A%3Cbr%20/%3E%0ARight%20now%20it's%2011x14%22,%20but%20could%20easily%20be%20cropped%20to%20a%20different%20aspect%20ratio.%20I%20hope%20you%20enjoy%20this%20print--I'd%20love%20to%20know%20if%20you%20end%20up%20using%20it%20for%20anything.%20%3Cbr%20/%3E%0A%3Ci%3E%3Cbr%20/%3E%3C/i%3E%0A%3Cbr%20/%3E%0A%3Cdiv%3E%0A%3Ci%3E%3Ca%20href%3D%22https://www.dropbox.com/s/2oby7wjhyfm0fij/VoiceoftheRain.jpg?dl%253D0%22%20target%3D%22_blank%22%3E%3Cimg%20alt%3D%22The%20Voice%20of%20the%20Rain%20freebie%20download%20illustration%22%20border%3D%220%22%20src%3D%22https://blogger.googleusercontent.com/img/b/R29vZ2xl/AVvXsEhCweJWJDL1WjoQHw0l_8RRWncRwRPtuKSd7yxOgcdlMduWIwCv9nwlCtKy95GnIGVKCoHLn6quHwIZRP9tKr6fLs73lr-rRu5JxlSFF2NdDmc0wsRnb1MCxuRnPPSPGq-Ccf2m/s400/Umbrella3.jpg%22%20height%3D%22400%22%20title%3D%22%22%20width%3D%22313%22%20/%3E%3C/a%3E%3C/i%3E%3C/div%3E%0A%3Ci%3E%3Cbr%20/%3E%3C/i%3E%0A%3Ca%20count-layout%3D%22horizontal%22%20href%3D%22http://pinterest.com/pin/create/button/?url%253Dhttp://www.craftastical.com/2012/04/voice-of-rain-print-download.html%2526media%253Dhttp://3.bp.blogspot.com/-MaGAPD4X_ZY/T5S44jFR6mI/AAAAAAAAE6g/9nuv2PLXck4/s400/Umbrella3.jpg%2526description%253DWalt%2520Whitman%2520Poem%2520%2522The%2520Voice%2520of%2520the%2520Rain%2522%2520printable%2520and%2520free%2520illustration%22%3E%3Cimg%20border%3D%220%22%20src%3D%22http://assets.pinterest.com/images/PinExt.png%22%20title%3D%22Pin%20It%22%20/%3E%3C/a%3E%0A%3Cbr%20/%3E%0A%3Cdiv%3E%0A%3Ca%20href%3D%22https://www.dropbox.com/s/2oby7wjhyfm0fij/VoiceoftheRain.jpg?dl%253D0%22%20target%3D%22_blank%22%3E(Click%20to%20Download)%3C/a%3E%3C/div%3E%0A%3C/div%3E%0A%3Ci%3E%0A%3C/i%3E%3C/div%3E)
Momma and Baby Knit Monsters 22 Apr 2012 11:47 AM (13 years ago)

Direct quote after asking her about her monsters, "I'm getting super mad at you for not letting me [eat] anything." I'm sure I seem like the most horrible mother ever, making her wait 10 minutes to eat until dinner is ready. So, her dislike might have been influenced by her rumbling tummy and my horrible mommy meanness.
I love these monsters. If she doesn't like them anymore, I will start sleeping with them at night. I went to five different fabric stores looking for real wool felt to make their mouths. I carefully selected the yarn. I agonized over what type of eyes to use. I even had to use double pointed needles! Heck, I may even change out the yellow in my gray and yellow bedroom to pink and green to match, I'm so darn fond of these little monsters.

They were knitted using this pattern, by Rebecca Danger of Danger Crafts. It's kind of rare for me to use a pattern, but this one was easy to follow and worth every penny. I made my nephew a pair for Christmas that were gray and dark blue. As far as my sister reports, he's still delighted with his!
How could you not love their little faces?? Aubrey will come to her senses after dinner.

I feel like if I don't learn how to do something new on a project, I've somehow cheated. On this project, I mastered stripes. I tried this jogless method (the traveling one--the first one described), and I learned how to change colors, carrying them up and twisting them before changing.
I've got the whole knit stripes down now, and they don't scare me anymore. Take that, knit stripes! I will take you on, any time, any place. I can knit stripes, chew gum, watch TV, check my email, and arbitrate hellish sibling MMA fights all at the same time. I'm pretty sure if I can do that, there isn't anything I can't do. Pretty sure.

,%20and%20I%20learned%20how%20to%20change%20colors,%20carrying%20them%20up%20and%20twisting%20them%20before%20changing.%3Cbr%20/%3E%0A%3Cbr%20/%3E%0AI've%20got%20the%20whole%20knit%20stripes%20down%20now,%20and%20they%20don't%20scare%20me%20anymore.%20Take%20that,%20knit%20stripes!%20I%20will%20take%20you%20on,%20any%20time,%20any%20place.%20I%20can%20knit%20stripes,%20chew%20gum,%20watch%20TV,%20check%20my%20email,%20and%20arbitrate%20hellish%20sibling%20MMA%20fights%20all%20at%20the%20same%20time.%20I'm%20pretty%20sure%20if%20I%20can%20do%20that,%20there%20isn't%20anything%20I%20can't%20do.%20Pretty%20sure.%20%3Cbr%20/%3E%0A%3Cbr%20/%3E%0A%3Cdiv%3E%0A%3Ca%20href%3D%22https://blogger.googleusercontent.com/img/b/R29vZ2xl/AVvXsEiJZBvbX6wQx6M_dzfYWXDpPotPAlVFGP4n37Na4jQ3lPZKKhnAlve5PMj8E5RtE6visBswqK0eC_lGFa7jYQoG90joeY_7zPKtg5YBdXjzq8f2RIVYfMjfSfHrFXkPFPPSKYWI/s1600/2012-01-04+008.jpg%22%20imageanchor%3D%221%22%3E%3Cimg%20alt%3D%22Momma%20and%20Baby%20knit%20monsters,%20using%20pattern%20by%20Rebecca%20Danger%20of%20Danger%20Crafts%22%20border%3D%220%22%20height%3D%22266%22%20src%3D%22https://blogger.googleusercontent.com/img/b/R29vZ2xl/AVvXsEiJZBvbX6wQx6M_dzfYWXDpPotPAlVFGP4n37Na4jQ3lPZKKhnAlve5PMj8E5RtE6visBswqK0eC_lGFa7jYQoG90joeY_7zPKtg5YBdXjzq8f2RIVYfMjfSfHrFXkPFPPSKYWI/s400/2012-01-04+008.jpg%22%20title%3D%22%22%20width%3D%22400%22%20/%3E%3C/a%3E%3C/div%3E%0A%3Cbr%20/%3E%3C/div%3E%0A%3C/div%3E)
In which I beg and enter a contest. 5 Apr 2012 1:58 PM (13 years ago)

I do and do not have this problem. You don't write a blog about your life and your projects without a certain amount of fondness for navel-gazing. (My navel used to be so cute, by the way, but now it is just so not, after four pregnancies. So wrong. Not sure how long I could stand to gaze at my actual navel before combusting, requiring a ferocious pep talk back into liking my body again.)
Remember this project? (Click on the link for a tutorial.)

It is far and away the most popular project on my blog. And my enterprising friend, Shaunte, entered me into a contest on this awesome site. I didn't even ask her to! It required no begging! And it ends up that I am a finalist. Very unexpected development.
Anyway, the point of all of that is to ask for votes! A thing which I have never done before. I bet you were wondering why I was going off on that odd, not craft related tangent there at the beginning! But, you would probably ask for votes too, if Shaunte was your cheerleader. Her encouragement and enthusiasm is like bird-flu-strength infectious. So, I'm trying not to care that I am vote-begging/bragging. Take that, patriarchy.
I could win a $100 gift card if I garnish the most votes. Which is a great prize. So, if you'll tolerate me asking you to vote, here's the link to the contest. And, of course, feel fee to vote for whichever one you think is the best. But, I'd be pretty darn happy if you think it's mine.
%20blog%20I%20often%20read,%20which%20basically%20says%20women%20don't%20like%20to%20brag%20for%20fear%20they%20will%20seem%20attention-grabbing%20or%20not%20self-effacing%20enough.%20%3Cbr%20/%3E%0A%3Cbr%20/%3E%0AI%20do%20and%20do%20not%20have%20this%20problem.%20You%20don't%20write%20a%20blog%20about%20your%20life%20and%20your%20projects%20without%20a%20certain%20amount%20of%20fondness%20for%20navel-gazing.%20(My%20navel%20used%20to%20be%20so%20cute,%20by%20the%20way,%20but%20now%20it%20is%20just%20so%20not,%20after%20four%20pregnancies.%20So%20wrong.%20Not%20sure%20how%20long%20I%20could%20stand%20to%20gaze%20at%20my%20actual%20navel%20before%20combusting,%20requiring%20a%20ferocious%20pep%20talk%20back%20into%20liking%20my%20body%20again.)%3Cbr%20/%3E%0A%3Cbr%20/%3E%0ARemember%20%3Ca%20href%3D%22http://www.craftastical.com/2010/05/tutorial-quilled-monogram-letter.html%22%20target%3D%22_blank%22%3Ethis%20project%3C/a%3E?%20(Click%20on%20the%20link%20for%20a%20tutorial.)%3Cbr%20/%3E%0A%3Cbr%20/%3E%0A%3Cdiv%3E%0A%3Ca%20href%3D%22https://blogger.googleusercontent.com/img/b/R29vZ2xl/AVvXsEgCHcHnJjkjck_poD-iLf0hXG6U8dhBDnwU1LC_0mPpszpmvsnVMjG-6PO4vDgN3QiXS1ODjioi_iGNR8VRW54XekTWqtv8-arnodn5dWzX71qS5Yddgh2rMU9jSPBSlnH5maKX/s1600/Quilling+Paper+Monogram+FrameHandmade+Decor+Blue+White+Swirls15.jpg%22%20imageanchor%3D%221%22%3E%3Cimg%20alt%3D%22Quilled%20monogram%22%20border%3D%220%22%20height%3D%22400%22%20src%3D%22https://blogger.googleusercontent.com/img/b/R29vZ2xl/AVvXsEgCHcHnJjkjck_poD-iLf0hXG6U8dhBDnwU1LC_0mPpszpmvsnVMjG-6PO4vDgN3QiXS1ODjioi_iGNR8VRW54XekTWqtv8-arnodn5dWzX71qS5Yddgh2rMU9jSPBSlnH5maKX/s400/Quilling+Paper+Monogram+FrameHandmade+Decor+Blue+White+Swirls15.jpg%22%20title%3D%22%22%20width%3D%22368%22%20/%3E%3C/a%3E%3C/div%3E%0A%3Cbr%20/%3E%0A%3Ca%20name%3D'more'%3E%3C/a%3E%3Cbr%20/%3E%0A%3Cbr%20/%3E%0AIt%20is%20far%20and%20away%20the%20most%20%0Apopular%20project%20on%20my%20blog.%20And%20my%20enterprising%20friend,%20Shaunte,%20entered%20%0Ame%20into%20a%20contest%20on%20%3Ca%20href%3D%22http://www.craftsunleashed.com/index.php/news/linky-party-finalists/comment-page-1/%23comment-39269%22%20target%3D%22_blank%22%3Ethis%20awesome%20site%3C/a%3E.%20I%20didn't%20even%20ask%20her%20to!%20It%20required%20no%20begging!%20And%20it%0A%20ends%20up%20that%20I%20am%20a%20finalist.%20Very%20unexpected%20development.%3Cbr%20/%3E%0A%26nbsp;%20%3Cbr%20/%3E%0AAnyway,%20the%20point%20of%20all%20of%20that%20is%20to%20ask%20for%20votes!%20A%20thing%20which%20I%20have%20never%20done%20before.%20I%20bet%20you%20were%20wondering%20why%20I%20was%20going%20off%20on%20that%20odd,%20not%20craft%20related%20tangent%20there%20at%20the%20beginning!%20But,%20you%20would%20probably%20ask%20for%20votes%20too,%20if%20Shaunte%20was%20your%20cheerleader.%20Her%20encouragement%20and%20enthusiasm%20is%20like%20bird-flu-strength%20infectious.%20So,%20I'm%20trying%20not%20to%20care%20that%20I%20am%20vote-begging/bragging.%20%3Ci%3ETake%20that,%20patriarchy.%3C/i%3E%3Cbr%20/%3E%0A%3Cbr%20/%3E%0AI%20could%20win%20a%20$100%20gift%20card%20if%20I%20garnish%20the%20most%20votes.%20Which%20is%20a%20great%20prize.%20So,%20if%20you'll%20tolerate%20me%20asking%20you%20to%20vote,%20%3Ca%20href%3D%22https://www.facebook.com/media/set/?set%253Da.10151444120050251.826075.324735220250%2526type%253D3%22%20target%3D%22_blank%22%3Ehere's%20the%20link%20to%20the%20contest.%3C/a%3E%20And,%20of%20course,%20feel%20fee%20to%20vote%20for%20whichever%20one%20you%20think%20is%20the%20best.%20But,%20I'd%20be%20pretty%20darn%20happy%20if%20you%20think%20it's%20mine.%20%3C/div%3E)
Grace Lace Beret 17 Feb 2012 11:52 AM (13 years ago)


I knit it twice. Because I am a contradiction. I hate figuring out gauge. I would rather guess. I know enough about the way I knit and crochet to know that I have a very tight gauge. So, I guess. Educatedly.

I've always thought my incredibly tight gauge was due to my Type A personality. Gives a new meaning to the phrase "tightly wound" when considered in the context of yarn crafts. Ha ha. So, you'd think that someone as anal as I am would love the concept of gauge, but no. Because I insist on being quirky. And my Type A quirky personality thinks that gauge is a waste of time. It's largely inefficient when I can guess correctly most of the time. Or when my tension is so tight that I have to adjust the pattern anyway (my rows are rarely tall enough). However, my guess was none too good on this one. I ended up taking out some of the pattern repeats even on my second attempt.

This pattern is the only one I can recall where my problem was the item turning out too large when I followed the pattern exactly. Even my 2nd attempt is a tiny bit too big, but I'm going to deal with it. If I make this hat again (which I totally would), it's going to be with much nicer yarn than this, so no way was I frogging it again. I'm too embarrassed to say what cheap-o yarn it is, but you can buy it at Walmart. Not that there's anything wrong with that. I'm just turning into a yarn snob, and this yarn does not make my snobbery glands salivate. It makes them ashamed that they were caught in the yarn aisle at Walmart buy sub par yarn. Not that some of the yarn at Walmart isn't good. I shall stop now. Shopping at Walmart for yarn is certainly convenient. They have much longer hours than my local yarn shop.
I really like this hat. It's jaunty. I'd never considered jaunty as a look for myself, but I'm quite taken with it. It's very clever how the band goes into the lace pattern. It was a pretty easy pattern to follow too. Always a good thing.
?%22%20This%20question%20is%20much%20too%20large,%20even%20for%20my%20newly%20enlarged,%20degreed%20brain.%20So,%20I%20quite%20naturally%20fell%20to%20knitting%20to%20ease%20my%20mind%20of%20such%20weighty%20questions.%20I%20knit%20a%20lot%20in%20January.%20A%20lot.%3Cbr%20/%3E%0A%3Cbr%20/%3E%0A%3Cdiv%3E%0A%3Ca%20href%3D%22https://blogger.googleusercontent.com/img/b/R29vZ2xl/AVvXsEgRSyQCdicz6EfmaQLuHC6aD3sLmVM10Ilf-hjrELWwZRaxK-0VdFWqSJ25OBS3UVXbmU3FEjkmjUY3ZSHBtpqu5WuXjobpb_EEqF2nf6mVmgGC5srqryvJbeJTweJhXjo4sKkl/s1600/2012-02-07+041.jpg%22%20imageanchor%3D%221%22%3E%3Cimg%20alt%3D%22Aubrey's%20artwork%22%20border%3D%220%22%20height%3D%22400%22%20src%3D%22https://blogger.googleusercontent.com/img/b/R29vZ2xl/AVvXsEgRSyQCdicz6EfmaQLuHC6aD3sLmVM10Ilf-hjrELWwZRaxK-0VdFWqSJ25OBS3UVXbmU3FEjkmjUY3ZSHBtpqu5WuXjobpb_EEqF2nf6mVmgGC5srqryvJbeJTweJhXjo4sKkl/s400/2012-02-07+041.jpg%22%20title%3D%22%22%20width%3D%22308%22%20/%3E%3C/a%3E%3C/div%3E%0A%3Cdiv%3E%0A%26nbsp;Exhibit%20A%20(Courtesy%20of%20Aubrey)%3C/div%3E%0A%3Cbr%20/%3E%0AI%20knit%20it%20twice.%20Because%20I%20am%20a%20contradiction.%20I%20hate%20figuring%20out%20%3Ca%20href%3D%22http://www.earthguild.com/products/knitcroc/marypat/gauge.htm%22%20target%3D%22_blank%22%3Egauge%3C/a%3E.%20I%20would%20rather%20guess.%20I%20know%20enough%20about%20the%20way%20I%20knit%20and%20crochet%20to%20know%20that%20I%20have%20a%20very%20tight%20gauge.%20So,%20I%20guess.%20Educatedly.%3Cbr%20/%3E%0A%3Cbr%20/%3E%0A%3Cdiv%3E%0A%3Ca%20href%3D%22https://blogger.googleusercontent.com/img/b/R29vZ2xl/AVvXsEh5gfSJPfNGtuSBk5Fky8CmAJAcfgyESho4VNjR5cm4ZRljtEXPrsAeos2bOtm50hAL_ISGId4MyLPKPcs4gUiq9SWtuzFhTKd02A6qqax-NpUpIwPe9N5ZihZOunY7HcIOSnDN/s1600/2012-01-07+025.jpg%22%20imageanchor%3D%221%22%3E%3Cimg%20alt%3D%22Gray%20Grace%20Lace%20Beret%20slouchy%20knit%20hat%22%20border%3D%220%22%20height%3D%22266%22%20src%3D%22https://blogger.googleusercontent.com/img/b/R29vZ2xl/AVvXsEh5gfSJPfNGtuSBk5Fky8CmAJAcfgyESho4VNjR5cm4ZRljtEXPrsAeos2bOtm50hAL_ISGId4MyLPKPcs4gUiq9SWtuzFhTKd02A6qqax-NpUpIwPe9N5ZihZOunY7HcIOSnDN/s400/2012-01-07+025.jpg%22%20title%3D%22%22%20width%3D%22400%22%20/%3E%3C/a%3E%3C/div%3E%0A%3Cbr%20/%3E%0A%3Ca%20name%3D'more'%3E%3C/a%3E%3Cbr%20/%3E%0A%3Cbr%20/%3E%0AI've%20always%20thought%20my%20incredibly%20tight%20gauge%20was%20due%20to%20my%20%3Ca%20href%3D%22http://en.wikipedia.org/wiki/Type_A_and_Type_B_personality_theory%22%20target%3D%22_blank%22%3EType%20A%20personality%3C/a%3E.%20Gives%20a%20new%20meaning%20to%20the%20phrase%20%22tightly%20wound%22%20when%20considered%20in%20the%20context%20of%20yarn%20crafts.%20Ha%20ha.%20So,%20you'd%20think%20that%20someone%20as%20anal%20as%20I%20am%20would%20love%20the%20concept%20of%20gauge,%20but%20no.%20Because%20I%20insist%20on%20being%20quirky.%20And%20my%20Type%20A%20quirky%20personality%20thinks%20that%20gauge%20is%20a%20waste%20of%20time.%20It's%20largely%20inefficient%20when%20I%20can%20guess%20correctly%20most%20of%20the%20time.%20Or%20when%20my%20tension%20is%20so%20tight%20that%20I%20have%20to%20adjust%20the%20pattern%20anyway%20(my%20rows%20are%20rarely%20tall%20enough).%20However,%20my%20guess%20was%20none%20too%20good%20on%20this%20one.%20I%20ended%20up%20taking%20out%20some%20of%20the%20pattern%20repeats%20even%20on%20my%20second%20attempt.%3Cbr%20/%3E%0A%3Cbr%20/%3E%0A%3Cdiv%3E%0A%3Ca%20href%3D%22https://blogger.googleusercontent.com/img/b/R29vZ2xl/AVvXsEgBWErOUHckhCElDJ0bQvrEFbEqBBAQfRylhMiV-ESMf46yFHT01AXCltczwoGjXe9R8zT_bHY5h_ru0H-LKw_DJRT2XhWoorDxf0SQOkcZHli0BedVoqqAZANIOIVt5h9MzAIF/s1600/2012-01-01+140.jpg%22%20imageanchor%3D%221%22%3E%3Cimg%20alt%3D%22Gray%20Grace%20Lace%20Beret%20slouchy%20knit%20hat%22%20border%3D%220%22%20height%3D%22266%22%20src%3D%22https://blogger.googleusercontent.com/img/b/R29vZ2xl/AVvXsEgBWErOUHckhCElDJ0bQvrEFbEqBBAQfRylhMiV-ESMf46yFHT01AXCltczwoGjXe9R8zT_bHY5h_ru0H-LKw_DJRT2XhWoorDxf0SQOkcZHli0BedVoqqAZANIOIVt5h9MzAIF/s400/2012-01-01+140.jpg%22%20title%3D%22%22%20width%3D%22400%22%20/%3E%3C/a%3E%3C/div%3E%0A%3Cbr%20/%3E%0AThis%20pattern%20is%20the%20only%20one%20I%20can%20recall%20where%20my%20problem%20was%20the%20item%20turning%20out%20too%20large%20when%20I%20followed%20the%20pattern%20exactly.%20Even%20my%202nd%20attempt%20is%20a%20tiny%20bit%20too%20big,%20but%20I'm%20going%20to%20deal%20with%20it.%20If%20I%20make%20this%20hat%20again%20(which%20I%20totally%20would),%20it's%20going%20to%20be%20with%20much%20nicer%20yarn%20than%20this,%20so%20no%20way%20was%20I%20frogging%20it%20again.%20I'm%20too%20embarrassed%20to%20say%20what%20cheap-o%20yarn%20it%20is,%20but%20you%20can%20buy%20it%20at%20Walmart.%20Not%20that%20there's%20anything%20wrong%20with%20that.%20I'm%20just%20turning%20into%20a%20yarn%20snob,%20and%20this%20yarn%20does%20not%20make%20my%20snobbery%20glands%20salivate.%20It%20makes%20them%20ashamed%20that%20they%20were%20caught%20in%20the%20yarn%20aisle%20at%20Walmart%20buy%20sub%20par%20yarn.%20Not%20that%20some%20of%20the%20yarn%20at%20Walmart%20isn't%20good.%20I%20shall%20stop%20now.%20Shopping%20at%20Walmart%20for%20yarn%20is%20certainly%20convenient.%20They%20have%20much%20longer%20hours%20than%20my%20local%20yarn%20shop.%3Cbr%20/%3E%0A%3Cbr%20/%3E%0AI%20really%20like%20this%20hat.%20It's%20jaunty.%20I'd%20never%20considered%20jaunty%20as%20a%20look%20for%20myself,%20but%20I'm%20quite%20taken%20with%20it.%20It's%20very%20clever%20how%20the%20band%20goes%20into%20the%20lace%20pattern.%20It%20was%20a%20pretty%20easy%20pattern%20to%20follow%20too.%20Always%20a%20good%20thing.%3C/div%3E)
The Bee's Knees Digital Scrapbooking Kit Freebie 24 Jan 2012 8:01 PM (13 years ago)

Apparently, I've gone too long without designing a kit. Shaunte, over at This Too Shall Pass has progressed to harassment in order to get me to design another digital kit. This is good, because I apparently need harassment levels of persuasion in order to get me motivated to do anything after graduating. While harassment isn't supposed to make you feel desirable, I feel privileged to be Shaunte's object of harassment. If she progresses to stalker I will probably never be able to deflate my ego.
(If you don't read Shaunte's blog, you should. She's the type of funny that makes me realize that my attempts at humor are. . .how can I be kind? . . .underdeveloped. Perhaps if I had gone the extra step and had five children like her instead of four, I would have gone that extra bit of insane that would have imbued me with the truly funny stuff--not that I'm commenting on Shaunte. Really. Just on me. But, it's too late now to add any more crazy to our house. I must be content with envying Shaunte's comedic ability and forever wishing I had her finely-honed thrift-store shoe-finding abilities.)

I'm also hoping that this kit will be helpful to another friend who is in charge of an girl's camp this summer. Their theme is centered around bees, hence the theme of this kit. It just so happened to work perfectly with Aubriana's Halloween costume from this past year. Even if you don't have a need for a bee theme, there are plenty of unrelated papers in this kit--I'm quite fond of the clouds and the chevrons.
So, cheers all around for my first digital kit in ages! I enjoyed making it--I forgot how much fun it is to have an excuse to watch endless TV and dink around in Illustrator. I hope you like it!

Kit contains: 33 pattern papers, 1 set stitches, 1 overlay, 1 sheet honeycomb stickers, tags, 1 mask, 1 torn edge, 2 bee stickers, 2 flower stickers
%3Cbr%20/%3E%0A%3Cbr%20/%3E%0A%3Cdiv%3E%0A%3Ca%20href%3D%22https://blogger.googleusercontent.com/img/b/R29vZ2xl/AVvXsEjGWZu4uayHRJyChcU9bDMsaEkKaKE3y1LWqpG4r4_aG-rrt0NGH5di20U3oubpOPqq-ffJ89skhyLqgX9SXLFyZyL9fkEgFiDQbjGhQ1yw6pGGVGbSE0QbYvuQ6shMC66SPj-Y/s1600/BeautifulBeeThumb.jpg%22%20imageanchor%3D%221%22%3E%3Cimg%20border%3D%220%22%20src%3D%22https://blogger.googleusercontent.com/img/b/R29vZ2xl/AVvXsEjGWZu4uayHRJyChcU9bDMsaEkKaKE3y1LWqpG4r4_aG-rrt0NGH5di20U3oubpOPqq-ffJ89skhyLqgX9SXLFyZyL9fkEgFiDQbjGhQ1yw6pGGVGbSE0QbYvuQ6shMC66SPj-Y/s320/BeautifulBeeThumb.jpg%22%20height%3D%22320%22%20width%3D%22320%22%20/%3E%3C/a%3E%3C/div%3E%0A%3Cbr%20/%3E%0AI'm%20also%20hoping%20that%20this%20kit%20will%20be%20helpful%20to%20another%20friend%20who%20is%20in%20charge%20of%20an%20girl's%20camp%20this%20summer.%20Their%20theme%20is%20centered%20around%20bees,%20hence%20the%20theme%20of%20this%20kit.%20It%20just%20so%20happened%20to%20work%20perfectly%20with%20Aubriana's%20Halloween%20costume%20from%20this%20past%20year.%20Even%20if%20you%20don't%20have%20a%20need%20for%20a%20bee%20theme,%20there%20are%20plenty%20of%20unrelated%20papers%20in%20this%20kit--I'm%20quite%20fond%20of%20the%20clouds%20and%20the%20chevrons.%3Cbr%20/%3E%0A%3Cbr%20/%3E%0ASo,%20cheers%20all%20around%20for%20my%20first%20digital%20kit%20in%20ages!%20I%20enjoyed%20making%20it--I%20forgot%20how%20much%20fun%20it%20is%20to%20have%20an%20excuse%20to%20watch%20endless%20TV%20and%20dink%20around%20in%20Illustrator.%20I%20hope%20you%20like%20it!%3Cbr%20/%3E%0A%3Cbr%20/%3E%0A%3Cdiv%20dir%3D%22ltr%22%20trbidi%3D%22on%22%3E%0A%3Cbr%20/%3E%0A%3Cdiv%3E%0A%3Ca%20href%3D%22https://www.dropbox.com/s/9dvpi65w11090h2/BeesKnees.rar?dl%253D0%22%20target%3D%22_blank%22%3E%3Cimg%20border%3D%220%22%20src%3D%22https://blogger.googleusercontent.com/img/b/R29vZ2xl/AVvXsEg6LUxQxnJdJIMjG4Lo9eUrZKrVx2hZcgXpfQzIIemsMvE-wg_c-yedRrplV3-JqenhFV4B6ASAgSFizW1WSlheQgi0lyA1sXjmgArGMaVSX7EQwwvjv0yRmfnjsB1zqpajz0mE/s320/Thumbnail.jpg%22%20height%3D%22320%22%20width%3D%22320%22%20/%3E%3C/a%3E%3C/div%3E%0A%3Cdiv%3E%0A%3Cbr%20/%3E%3C/div%3E%0A%3Cdiv%3E%0A(%3Ca%20href%3D%22https://www.dropbox.com/s/9dvpi65w11090h2/BeesKnees.rar?dl%253D0%22%20target%3D%22_blank%22%3EClick%20to%20download%3C/a%3E)%3C/div%3E%0A%3Cbr%20/%3E%0AKit%20contains:%2033%20pattern%20papers,%201%20set%20stitches,%201%20overlay,%201%20sheet%20honeycomb%20stickers,%20tags,%201%20mask,%201%20torn%20edge,%202%20bee%20stickers,%202%20flower%20stickers%3Cbr%20/%3E%0A%3Cbr%20/%3E%3C/div%3E%0A%3C/div%3E)
Is that a 1? I believe it is. 12 Dec 2011 12:16 PM (13 years ago)


It now looks like this.

One more week, baby. Then I will be a college grad and a human again. Instead of a subspecies with a laptop type growth on her fingers.

Sunshine Paisley Throw Pillow Tutorial 15 Nov 2011 4:00 AM (13 years ago)

Once I finished the five embroidered paisley squares (click for pattern), I knew I wanted to make a pillow out of them. I was worried though, because I didn't want it to get too "patchwork quilt." I didn't think that would go with the modern feel of my bedroom.
I wanted to do solid yellows and grays, but the quilt story nearby (Gracie Lou's--sooooo awesome!) didn't have any. This was perplexing. Normally, when I get an idea, there is nothing that can prevent me from doing that idea. I mean, small adjustments, they normally make the project turn out better. Large adjustments like substituting a print for a solid? I will normally not proceed. I think the saleswomen in the shop thought I was being completely unreasonable (although she was very perplexedly kind about it). Like, I had gone into a restaurant and said, "But, these green beans aren't green enough, I wanted more of a Christmas green, not so much an olive green. And I wanted them cut 1/4" longer. Do you have different green beans in the back?" (I did not ask for super-secret back-room fabric, FYI).

However, I did eventually find some fabric I liked. I'm still not sure about it. I think I would like it better with solids, but heck, it's done and it's cute and I adore the embroidery, which is really the point of this pillow. And, it's growing on me.

Sunshine Paisley Pillow
Supplies:
3/4 yard fabric #1
1/3 yard fabric #2 (Four squares of coordinating fabric cut to 5 1/4" and two 45" lengths of 1" wide strips sewn together to make one long length)
Five embroidered squares at 5 1/4"
Square of muslin around 20x20"
Square of low-loft batting around 20x20"
Cording approximately 72" long
Fusible interfacing (2 pieces approximately 13x19")
Step One: Embroider five squares with paisley in any color you like. Embroider within a 5 1/4" square. Once finished, cut to 5 1/4".

Step Two: Cut four pieces of fabric to 5 1/4" square. If your fabric is patterned, you may want to consider cutting the squares so the pattern is symmetrical (this may take additional yardage). Also cut two lengths of the sashing fabric (gray in my pillow) to 1 3/4" wide.


Step Three: Lay out your squares and determine where each square will go. Sashing only needs to go on the inside between the two squares. Pick up the middle squares, leaving the outside squares in place, and sew sashing on each side of the middle squares. I chain stitched mine (shown below). I didn't do mine as methodically, so my photos are slightly different.


Step Four: Once you've chain stitched one side of the three squares, trim off the sashing at the bottom roughly, leaving a tail (we will trim this more exactly later). Iron seams toward the sashing. Then sew sashing to the other side and iron seams again.


Your finished square will look like this (with only one side done).

Step Six: Sew outside squares to middle squares/sashing. Iron and trim.


Step Seven: Sew sashing to top and bottom of middle row. Iron seams toward the sashing. Trim.

Step Eight: Carefully pin top row to sashing of middle row. I spent some time making sure the corners of the squares lined up exactly. I pinned every spot there was a seam. Sew. Do the same for the bottom row of squares. Iron.
Now your top is almost finished!

Step Nine: Cut two more lengths of sashing 1 3/4" wide. Sew sashing along both sides of square, iron and trim. Then sew along top and bottom. Iron and trim.
Your finished top will look like this:

Step Ten: Next is the quilting. I wanted something very subtle, so I used a very low loft batting. I also knew the back of this part wouldn't show, so I used a cheap muslin. Cut batting to 1 1/2" larger than finished pillow front. Then cut muslin 1/2" larger than batting.


Step Eleven: Pin layers together. You can use quilting basting adhesive spray, but I decided to use pins for mine.

Step Twelve: Quilt pillow. I did simple in the ditch quilting, making a sort of tic-tack-toe pattern along the lines of the sashing, stitching in the ditch along the squares.
Front of my finished quilting:

Back of my finished quilting:

Step Thirteen: Trim batting and backing along pillow edge. (I seriously need a new ruler. One of my kids stepped on mine and cracked it.)


Step Fifteen: Pin the cording all around the outside of the pillow front, with the cording part toward the center and the raw edges lining up against the outside. Around the corners, clip to stitching so that the cording will turn around the edges, and make them as sharp turns as possible. At the bottom of the pillow, overlap the cording slightly and run it off the edge and downward, so that the ends will be caught when you sew and no raw edges will show (see photo in next step for more of an idea of how this looks).


Step Sixteen: Baste cording in place.

Step Seventeen: Cut 2 fusible webbing 1/2" shorter than height of backing pieces. Fuse to wrong side of fabric. Iron raw edge along top down, so that the raw edge touches the top of the fusible webbing. Then fold it down along the fusible webbing, so that the raw edge is folded in. Pin. Then topstitch. Do the same for both backing pieces.


Step Eighteen: Make sure the back pieces are the same width as the pillow. If not, cut down to fit. Then, pin first back piece on front, right side toward pillow front, with finished edge across the center of the pillow. Pin the second piece, layering over the first piece, with right side toward pillow and finished edge across center, creating envelop. (See photo in next step to see how finished back will look).

Step Nineteen: Stitch back to front. Trim corners. Turn. Insert pillow form. And that's it! You have a beautiful new pillow!


Black and White Mod Podge Stool Makeover (With Tutorial!) 7 Nov 2011 7:37 AM (13 years ago)

I was cleaning the bathroom, and I decided that my white stool was never going to look clean on top and that painting it white was the worst decision of my life. Because, clearly, paint weighs out over anything else, including the credit card debt I started accumulating in college. Nope, nope, white paint on this stool--MUCH, MUCH worse.
I bought it for $5 at an antique shop, and it was clearly someone's shop stool. It had drill marks down through the top. But, I liked it. I think it has charm.
The Before:

The After:

So, before it looked all pretty with the pattern, I painted it white. But, this is what it looked liked about a year. I'm not sure the nastiness is showing up in this photo.

I pulled out some black and white wrapping paper from Hobby Lobby, some Mod Podge, a pair of scissors, some sand paper and a paintbrush and pretty soon my stool (that just sounds so weird after having four children--stool has so many meanings once you are concerned with the frequency and consistency of four other people's bowel movements), anyway, pretty soon my stool had been transformed.

So, here we go!
Step one: Cut of a hunk of wrapping paper about the size of the footstool (see how I nicely got around the word "stool" there?). I knew I didn't want the hassle of trying to line up the wrapping paper's pattern with the edge of the stool, so I decided it would be charming to have it at an angle.

Step two: Working in small sections, apply a thin coat of Mod Podge to the top of the stool (footstool sounds pretentious, maybe?) and smooth down. Then lift up to see where it's not yet adhered. Work in short sections, across the short width of the step stool. Pay special attention to the edges. Let dry.


I have to admit that my wrapping paper did not smooth on completely nicely. However, you can't even tell. I am shedding the prison of my perfectionism! Imperfection is . . . alright! Particularly when it's completely unnoticeable.
Step three: Using the scissors, cut away as closely as you can to the edge of the step stool. It occurs to me that turning over the footstool and using an exacto knife and a cutting mat might have worked better, but I was in a rush the morning I did this. I had to get to my imaginary doughnuts.

(I also like how I have ghostly helpers in these photos. Who is cutting that wrapping paper? Seriously?)
Step four: Using the sand paper, lightly sand the edges of the wrapping paper. You might notice the edges aren't adhered as much as one would like. Brush some Mod Podge up under the edges and press down if you find spots like that.

Step Five: Brush off any dust from sanding. Put an even coat of Mod Podge over the top of the stool.

Ta-da!

Another look at the before:
Then, put your stool into its natural habit, the bathroom.
I mean, put your footstool where it will get the most use, which for us is the bathroom where my daughter stands on it while I do her hair.
Halloween! 1 Nov 2011 9:57 AM (13 years ago)

So, of course, I didn't have a pattern, so this is hodge-podged together. The pants I based off a super easy pattern, then I added elastic around the bottom. The cape I sewed in one try, making up my own pattern, and same with the belt.
The collar took me four tries to get right (it's separate from the shirt). I'd never sewn anything like that, and I had to make my own pattern, so that was some serious trial and error. The shirt was a nightmare. The pattern I chose for the shirt was all wrong--the directions did not make any sense (or I was just not getting it, I'm going with the first because it makes me feel better), so I ended up just doing my own thing with it. But, it's done!


The other three children, luckily, found store-bought costumes. It might seem like I favor Maxton, because I sewed him a costume, but really I love my other children more for not making me sew them costumes.


As awesome as Maxton's costume turned out, I think David takes the prize this year. Actually, he literally took the prize. He won the costume contest at his work with Sir Bedivere from Monty Python and the Holy Grail. He got free movie tickets and a gift certificate to Olive Garden. I see a date in the near future. He made the entire costume himself. He even sewed the skirt and the sleeves onto his costume. I told him how to draft the sleeves for the pattern, but he did all the work himself. (His helmet is made from a popcorn tin and a feather duster.)


And I, well, I somehow could not plan ahead for myself. So, on Halloween, I woke up, after going to sleep at 4:30 (I couldn't fall asleep after finishing Max's costume at 3:30) with no ideas for myself. So, I did "girl in tights with mohawk and bad eyeliner." It worked for me. I dig the 80s vibe and I think I got some impressive height on the mohawk.

Here's to the post-holiday sugar rush. My children have gone to school and left their candy unguarded. . .
Curtains in my Kitchen! 18 Oct 2011 9:05 PM (14 years ago)

One of the "stuff" I got was the curtains that were in their living room. They just happened to go perfectly in my kitchen.
This is the before shot:

This is what they looked like before I hemmed them. Yeah, way too long:

And the completely finished after:

As I said on Twitter, "Two windows in my house have curtains! Two!"
(My other curtains are these in my bedroom. And I finally lengthened them. Can you believe it?)
They are from IKEA. I hemmed them all by myself. I can't decide if I like the slight pooling at the bottom or not. I think I do, but I may change my mind.
Toward my front door:

I love how the small orange dots in the fabric subtly pick up the touches of mustard in my kitchen.

I only had to pay for the curtain rod, which I picked up at Walmart for $13. Not bad for a set of curtains!
It looks so much more finished and polished. It makes me want to put curtains up in every window, like now.
%3Cbr%20/%3E%0A%3Cbr%20/%3E%0AThey%20are%20from%20%3Ca%20href%3D%22http://www.ikea.com/us/en/?cid%253Dus_ps_branded_mst_br_core_go_ikea%22%20target%3D%22_blank%22%3EIKEA%3C/a%3E.%20I%20hemmed%20them%20all%20by%20myself.%20I%20can't%20decide%20if%20I%20like%20the%20slight%20pooling%20at%20the%20bottom%20or%20not.%20I%20think%20I%20do,%20but%20I%20may%20change%20my%20mind.%3Cbr%20/%3E%0A%3Cbr%20/%3E%0AToward%20my%20front%20door:%3Cbr%20/%3E%0A%3Cbr%20/%3E%0A%3Cdiv%3E%0A%3Ca%20href%3D%22https://blogger.googleusercontent.com/img/b/R29vZ2xl/AVvXsEhgrbGmJLhM2hcXIy6uMhksnuw4GNuHfDo61SNW8FJVeedo-dvRWRP9N4-9MnLfMVfSCODXS1wrhgD6CkSLHLQFAdxrXyVsUi5Anp1t1lSqTvu6sAH-x17Lq9qJINPVvttqqLKL/s1600/2011-10-08007.jpg%22%20imageanchor%3D%221%22%3E%3Cimg%20border%3D%220%22%20height%3D%22266%22%20src%3D%22https://blogger.googleusercontent.com/img/b/R29vZ2xl/AVvXsEhgrbGmJLhM2hcXIy6uMhksnuw4GNuHfDo61SNW8FJVeedo-dvRWRP9N4-9MnLfMVfSCODXS1wrhgD6CkSLHLQFAdxrXyVsUi5Anp1t1lSqTvu6sAH-x17Lq9qJINPVvttqqLKL/s400/2011-10-08007.jpg%22%20width%3D%22400%22%20/%3E%3C/a%3E%3C/div%3E%0A%3Cbr%20/%3E%0A%3Cbr%20/%3E%0AI%20love%20how%20the%20small%20orange%20dots%20in%20the%20fabric%20subtly%20pick%20up%20the%20touches%20of%20mustard%20in%20my%20kitchen.%3Cbr%20/%3E%0A%3Cbr%20/%3E%0A%3Cdiv%3E%0A%3Ca%20href%3D%22https://blogger.googleusercontent.com/img/b/R29vZ2xl/AVvXsEh7pMXZRbOTVTE8eMUSJT6HoPpwumHOmJhjtsbyCANRNLID9r2FlSvqzO0vXoJfSU5oecw1x8mk3VBnSLy5799irEtk5PXMYK50_jVN_gvW0fLORTpDw0836hg9Jp7dQb1Bugu4/s1600/2011-10-08010.jpg%22%20imageanchor%3D%221%22%3E%3Cimg%20border%3D%220%22%20height%3D%22266%22%20src%3D%22https://blogger.googleusercontent.com/img/b/R29vZ2xl/AVvXsEh7pMXZRbOTVTE8eMUSJT6HoPpwumHOmJhjtsbyCANRNLID9r2FlSvqzO0vXoJfSU5oecw1x8mk3VBnSLy5799irEtk5PXMYK50_jVN_gvW0fLORTpDw0836hg9Jp7dQb1Bugu4/s400/2011-10-08010.jpg%22%20width%3D%22400%22%20/%3E%3C/a%3E%3C/div%3E%0A%3Cbr%20/%3E%0AI%20only%20had%20to%20pay%20for%20the%20curtain%20rod,%20which%20I%20picked%20up%20at%20Walmart%20for%20$13.%20Not%20bad%20for%20a%20set%20of%20curtains!%3Cbr%20/%3E%0A%3Cbr%20/%3E%0AIt%20looks%20so%20much%20more%20finished%20and%20polished.%20It%20makes%20me%20want%20to%20put%20curtains%20up%20in%20every%20window,%20like%20now.%3C/div%3E)