How to Create a Simple Contact Form in WordPress 7 Oct 8:20 AM (23 days ago)
A contact form lets your visitors send you messages directly from your website without revealing your email address. The easiest way to add a form in WordPress is by using the free Contact Form 7 plugin. It is lightweight, reliable, and easy for beginners to use.
Step 1: Install and Activate Contact Form 7
- Log in to your WordPress dashboard.
- Go to Plugins → Add New.
- In the search box, type Contact Form 7.
- Click Install Now, then Activate.
Once activated, you will see a new menu item called Contact in your dashboard.
Step 2: Create a New Form
- Go to Contact → Add New.
- Give your form a title such as “Contact Us.”
- Delete any code in the form editor, then paste this code:
<label> Your Name (required)
  [text* your-name akismet:author]
</label>

<label> Your Email (required)
  [email* your-email akismet:author_email]
</label>

<label> Subject
  [text your-subject]
</label>

<label> Your Message
  [textarea your-message akismet:comment_content rows:6]
</label>

[submit class:cf7-default "Send"]
This form includes four basic fields: name, email, subject, and message. The two asterisks (*) mark the required fields. The Akismet tags help reduce spam messages.
Click Save when you’re done.
Step 3: Add the Form to a Page
After saving, Contact Form 7 will show you a shortcode that looks like this:
[contact-form-7 id="1234" title="Contact Us"]
Copy that shortcode.
Now go to Pages → Add New, and create a new page called Contact (or open an existing one). Paste the shortcode into the content area. Publish or update the page.
You now have a working contact form on your site.
Step 4: Add a Little Spacing and Default Styling
The form will automatically use your theme’s fonts and colors. If you want slightly better spacing, you can add this simple CSS under Appearance → Customize → Additional CSS:
.wpcf7 label {
  display:block;
  margin-bottom:8px;
  font-weight:500;
}

.wpcf7 input[type="text"],
.wpcf7 input[type="email"],
.wpcf7 textarea {
  width:100%;
  padding:10px;
  font-size:1rem;
  border:1px solid #ccc;
  border-radius:6px;
  box-sizing:border-box;
}

.wpcf7 input[type="submit"].cf7-default {
  background:buttonface;
  color:buttontext;
  padding:10px 18px;
  border:1px solid #ccc;
  border-radius:6px;
  cursor:pointer;
}

.wpcf7 {
  max-width:600px;
  margin:auto;
}
This CSS uses your theme’s default button color and font, so it blends naturally with your website design.
Step 5: Test the Form
Visit your new contact page and try sending a test message. If you receive the email in your inbox, the setup is complete.
If not, check your spam folder or verify your site’s email settings with your hosting provider.
Step 6: Optional – Add Spam Protection
If you have the Akismet plugin installed and active, the tags already included in your form will help block spam.
If you don’t use Akismet, you can add a simple honeypot field for extra protection. Just add this line anywhere in your form:
[honeypot your-website]
This creates a hidden field that catches most spam bots automatically.
This form design is simple, clean, and works with almost any WordPress theme. It requires no coding experience and only a few minutes to set up. You can always adjust colors or font sizes later in your theme customizer.
With Contact Form 7, you now have an easy, reliable way for visitors to contact you directly from your website.
The post How to Create a Simple Contact Form in WordPress appeared first on .


How to Use the Transparent Background Generator 30 Sep 1:02 PM (last month)
![]()
This tool creates backgrounds with solid colors, gradients, and transparency. It is suitable for headers, hero sections, overlays, banners, and UI elements.
1. Set the Canvas Size
Enter your desired width and height in the fields provided.
Example: Width 1920, Height 400
2. Transparent Background Option
There is a checkbox labeled “Background (transparent).”
- When enabled, the background layer is fully transparent.
- When disabled, the background is solid.
3. Choose the Fill Mode
Use the dropdown to select one of the following:
- Solid
- Linear Gradient
4. Solid Color Mode
If Solid mode is selected:
- Choose a color.
- Adjust the opacity value (0 to 100).
- 100 means fully opaque.
- Lower values make the color semi-transparent.
Click Preview to update the image.
5. Gradient Mode
If Linear Gradient mode is selected:
- Set Color A and its opacity.
- Set Color B and its opacity.
- Adjust the angle of the gradient.
Click Preview to apply changes.
6. Fully Transparent Image
To create a blank transparent image:
- Enable “Background (transparent).”
- Set opacity to 0.
- Click Preview.
- Download the image.
7. Semi-Transparent Color
To create a see-through overlay:
- Enable “Background (transparent).”
- Select a color.
- Set the opacity between 10 and 70.
- Click Preview.
- Download as PNG.
8. Fully Solid Color
To create a solid background:
- Either disable “Background (transparent),” or set opacity to 100.
- Click Preview.
- Download the image.
9. Download Options
There are two formats:
- PNG (supports transparency)
- WebP (smaller file size)
The downloaded image will match the width and height you set.
10. Reset
Click Reset to restore default settings and start over.
Download Transparent Background Generator
The post How to Use the Transparent Background Generator appeared first on .
Quick Watermark Studio – Free Browser App to Add Text Watermarks to Your Photos 18 Sep 7:00 PM (last month)

Quick Watermark Studio is a free browser-based app that lets you add professional text watermarks to your photos without installing software or uploading files. Everything runs directly in your browser, keeping your images private and the process fast.
How It Works
First, download the Quick Watermark Studio HTML file and open it with any modern browser such as Chrome, Edge, or Firefox. The app opens instantly in a simple one-page layout.
Next, drag and drop an image into the upload area or click the box to select a file from your computer. The photo appears immediately in the preview area so you can start editing right away.
Enter your watermark text in the text box. The default text is “© DIGIDEPOT,” but you can replace it with any words you prefer, such as your name, brand, or website address.
Customize Your Watermark
You can adjust the appearance of your watermark using the control panel:
- Font size and weight let you control how large and bold the text appears.
- Opacity changes how transparent the text is.
- Rotation tilts the watermark at an angle if you want a diagonal effect.
- Color lets you choose any shade that fits your photo.
- Position allows you to place the watermark in the center or any corner.
- Margin controls how far the text sits from the image edges.
- Tiled repeat can cover the entire image with repeated watermarks for stronger protection.
Every change is shown instantly in the live preview area.
Export and Save
When your watermark looks right, choose the export settings that fit your needs.
- PNG and WebP formats keep transparency for a clean background.
- JPG works well for normal photos and includes a background color picker.
- The quality slider adjusts compression for JPG and WebP formats.
Finally, click Download to save your finished image. All work stays on your device, and nothing is uploaded to any server. Your privacy is fully protected.
Why Use Quick Watermark Studio
Quick Watermark Studio is lightweight, secure, and works on any system. It provides professional results quickly without ads, registration, or tracking. It is ideal for photographers, artists, online sellers, or anyone who needs a simple and private way to protect their images or add text captions before sharing them online.
Download
Download Quick Watermark Studio today and add clean, professional watermarks to your photos in seconds.
Download Quick Watermark Studio
The post Quick Watermark Studio – Free Browser App to Add Text Watermarks to Your Photos appeared first on .
How to Use the Scan and Convert to PDF App 15 Sep 4:22 PM (last month)
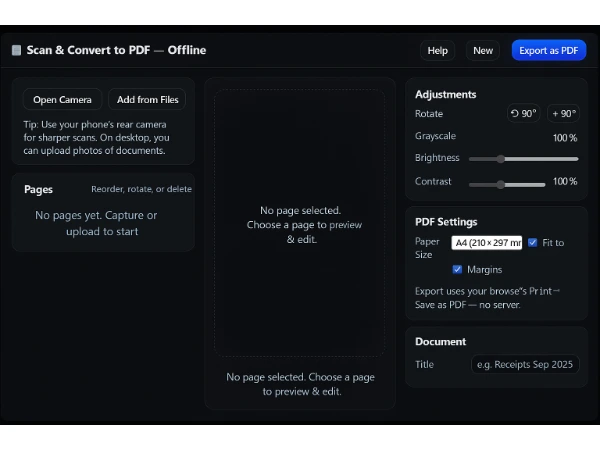
The Scan and Convert to PDF app lets you capture or upload documents and save them as a multipage PDF or as individual JPEG images. It works entirely offline, so no data is sent to a server.
Open the file index.html in any modern browser such as Chrome or Edge. You will see options to start scanning or add existing files. If you are on a phone or a computer with a camera, select Open Camera to capture a new page. Use Add from Files to upload photos of documents that are already stored on your device.
Each captured or uploaded image appears as a page in the list. You can reorder pages with the up and down arrows, rotate them if they are sideways, or delete any page you do not need. Select a page to preview it in the main area. In the adjustments panel you can switch to grayscale, change brightness, and adjust contrast to make text clearer.
Enter a document title in the provided box if you want to label your PDF. Choose the paper size and decide whether to fit images to the page or keep margins. When everything looks correct, click Export as PDF. Your browser’s print dialog will appear. Choose Save as PDF and confirm to create a multipage PDF file. If you prefer image files, use Download JPGs to save each page as a separate JPEG.
The app runs completely in your browser and does not upload any information. It is a simple way to scan receipts, notes, and documents and store them securely on your device.
Download Scan and Convert to PDF App
The post How to Use the Scan and Convert to PDF App appeared first on .
WorldMeet – Free Multi-Time-Zone World Clock 14 Sep 5:14 PM (last month)
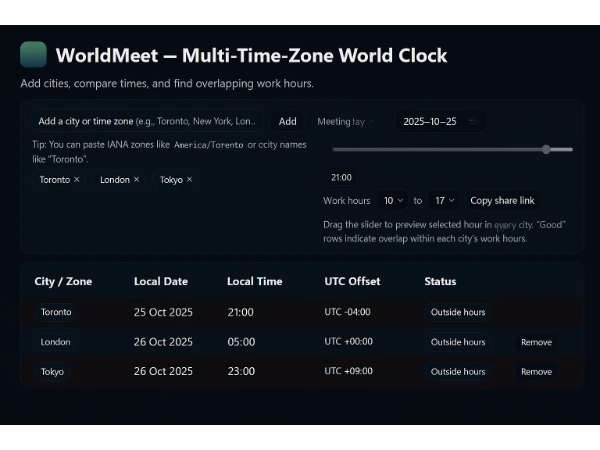
WorldMeet is a free browser-based tool that helps you plan meetings across different cities. It runs completely in your browser, so there is no installation and no account required. You can open it on a computer, tablet, or phone.
1. Open the App
Download the HTML file or visit the hosted link and open it in any modern browser such as Chrome, Edge, Firefox, or Safari. The page will load instantly.
2. Add Cities or Time Zones
Type a city name like Toronto, London, or Tokyo into the search box and click Add.
You can also paste a time zone in IANA format such as America/New_York.
To remove a city, click the × next to its name. Your list of cities is saved in your browser and will appear the next time you open the app.
3. Set the Meeting Date
Choose a date from the calendar. The app automatically applies daylight-saving rules for each city.
4. Slide to a Meeting Hour
Drag the hour slider to preview a specific hour. Each city row shows the local date, local time, and UTC offset for that hour.
5. Check Work-Hour Overlap
Use the work-hour selectors to define a typical work window (for example 10:00 to 17:00).
Rows are highlighted to show whether the selected hour falls within, near, or outside those hours for each city.
6. Share a Link
Click Copy share link to get a URL that contains your selected cities, date, and hour. Send the link to colleagues so they can see the same schedule.
Key Features
• Runs entirely in the browser – no signup, no data stored on a server.
• Saves your city list locally for quick reuse.
• Automatically handles daylight saving time.
• Works on desktop and mobile devices.
WorldMeet makes it easy to compare times and find the best overlap for meetings with colleagues, friends, or family around the world.
Download WorldMeet
The post WorldMeet – Free Multi-Time-Zone World Clock appeared first on .
ShieldPass: Test, Generate, and Protect Your Passwords for Free 14 Sep 4:33 PM (last month)
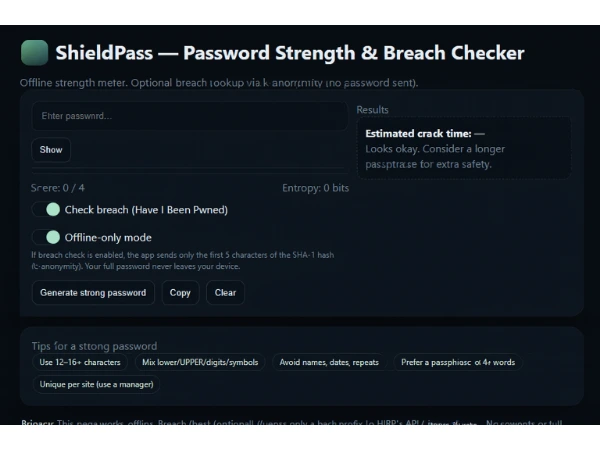
How to Use the ShieldPass Password Strength & Breach Checker
ShieldPass is a free browser-based tool that helps you create and evaluate strong passwords. It works entirely on your device and can also check whether a password has appeared in known data breaches. Follow the steps below to use it.
1. Open the App
Download or open the HTML file in any modern browser such as Chrome, Edge, Firefox, or Safari. No installation is required and it runs completely offline unless you enable the breach check.
2. Enter a Password
Type any password into the password field. As you type, ShieldPass calculates an entropy score, displays a strength rating from 0 to 4, and estimates how long a powerful computer would take to crack the password by brute force.
3. Read the Feedback
Below the meter you will see an entropy value and a list of issues if the password is weak. For example it may warn about short length, repeated characters, or common patterns. A higher entropy value means a stronger password.
4. Optional Breach Check
If you keep the breach check switch turned on, ShieldPass will query the Have I Been Pwned database using a privacy-preserving hash method. Only the first five characters of a one-way hash of your password are sent, never the password itself. If the password appears in known leaks the app will display the number of times it has been found.
5. Generate a Strong Password
Click the “Generate strong password” button to instantly create a long random password. This password is created in your browser using secure random values. You can copy it to your clipboard and store it in a password manager.
6. Copy or Clear
Use the “Copy” button to copy the current password or generated password to your clipboard. Use the “Clear” button to erase the field if you want to start over.
7. Stay Secure
A very high crack time or a perfect score means the password is strong against brute force attacks, but it is still important to keep each password unique for every account and to store it securely in a reputable password manager.
ShieldPass provides quick feedback and a safe environment to test and generate passwords. Because it can run offline, your passwords never leave your device unless you enable the optional breach check.
Download ShieldPass
The post ShieldPass: Test, Generate, and Protect Your Passwords for Free appeared first on .
Text Rewrite Lite – Free Browser Image Editor with WebP Export 13 Sep 10:31 AM (last month)

Text Rewrite Lite is a lightweight, browser-based image editor for quick edits and text overlays.
It runs completely in your browser, so there is no installation and no need to upload files to a server.
The latest version adds the ability to export in the modern WebP format alongside PNG and JPEG.
Key Features
- Edit images directly in your browser with no downloads
- Add and style text (font, size, color)
- Brush, heal, and clone tools for quick touch-ups
- Export as PNG, JPEG, or WebP
- Works offline once the page is loaded
Step 1: Open an Image
- Click Open Image and choose a picture from your computer.
- The app loads the image onto a white canvas while keeping the original aspect ratio.
Step 2: Use the Brush Tool
- Click the Brush button in the toolbar.
- Adjust brush size and hardness (if available) using the controls at the top.
- Click and drag on the canvas to paint directly on the image.
- To erase, select the Eraser tool and drag over the areas you want to remove.
Tip for picking colors directly from the image:
Hold Alt (or Option on Mac) and click on the color you want,
or simply press the brush and click the desired color area to sample it.
Step 3: Add Text
- Click the Text tool. A text box will appear on the canvas.
- Type your message inside the box.
- Drag the box to position it anywhere on the image.
- Use the toolbar options to style your text:
- Font Family – choose from the available fonts
- Font Size – enter or select the desired size
- Color Picker – select any color for the text
- Bold/Italic (if present) – apply additional styling
When you are satisfied, click Commit to apply the text permanently to the canvas.
Step 4: Choose Export Size
In the Export Size dropdown:
- Working – saves the image at the current canvas size
- Original – saves at the original image dimensions
- Custom width – lets you set a custom pixel width
If you select Custom, enter your desired width in pixels; the height adjusts automatically to maintain the original aspect ratio.
Step 5: Save Your Image
Click one of the save buttons:
- Save PNG – creates a high-quality PNG (supports transparency if the canvas is transparent)
- Save JPEG – creates a compressed JPEG image
- Save WebP – creates a modern, efficient WebP image
Notes on Backgrounds
- The canvas is filled with white by default.
- Although WebP supports transparency, this version of TextRewriteLite does not include a transparent background toggle.
- Your saved image will match the visible canvas background.
Text Rewrite Lite is completely free to use and provides all the essential tools for quick image editing and text styling—ideal for everyday tasks, blog graphics, or social media images.
Download Text Rewrite Lite
The post Text Rewrite Lite – Free Browser Image Editor with WebP Export appeared first on .
Free Trivia Quiz 10 Sep 5:03 PM (last month)

The Free Trivia Quiz is a simple, browser-based game that challenges your knowledge with a mix of easy, medium, and hard questions. Each round gives you ten questions, starting with simple ones and moving toward harder ones as you progress.
What Is the Free Trivia Quiz?
This quiz is designed for quick and fun play sessions. It runs directly in any web browser and does not require sign-up or installation.
- Ten questions per round
- Easy, medium, and hard levels included
- Score and best score saved in your browser
- Unlimited replays
How to Play
- Open the Free Trivia Quiz in your browser.
- Read the first question and choose the answer you think is correct.
- The quiz will immediately show if your choice was correct or incorrect.
- Select “Next” to move to the following question.
- After ten questions, the quiz shows your final score.
Restart and Share
- Use the “Restart” button to begin a new round at any time.
- The “Share Score” option lets you copy or send your score to friends.
Why Play the Free Trivia Quiz?
The Free Trivia Quiz is a quick way to test your knowledge, learn new facts, and enjoy a short challenge. It is suitable for all ages and can be played during study breaks, at work, or at home.
Download and try the Free Trivia Quiz today to see how many questions you can answer correctly.
The post Free Trivia Quiz appeared first on .
Color Tools – Free App 9 Sep 5:42 AM (last month)

Color Tools is a free app that works offline in your browser. It helps you work with colors and create custom background images. No account is required.
How to use:
- Color Picker: Upload an image, hover to preview colors, click to select, then copy HEX, RGB, or HSL values.
- Palette from Image: Upload an image, generate the top 5 colors, click a color to copy.
- Contrast Checker: Pick foreground and background colors, see the contrast ratio, and check if it passes WCAG accessibility rules.
- Gradient Maker: Choose two colors and an angle, preview the gradient, and copy the CSS code.
- Background Generator: Choose solid or gradient, set width and height in pixels, pick PNG, JPG, or WebP format. You can adjust quality for JPG/WebP, make solid backgrounds transparent (PNG/WebP only), and reset settings anytime. Click download to save the image.
Color Tools is simple, fast, and completely free to use.
Download Color Tools
The post Color Tools – Free App appeared first on .
Text to Handwriting Generator – Now With One-Click Copy 8 Sep 8:45 AM (last month)

f you want to make your typed words look like real handwriting, this free app is for you. The Text to Handwriting Generator instantly transforms any text you type into a natural-looking handwritten style. It is perfect for notes, assignments, or just for fun.
Now the app is even easier to use with the new Copy Text option.
Key Features
- Multiple handwriting styles to choose from
- Adjustable size and color
- Copy Text button for instant use
- No downloads required, works in your browser
How the Copy Text Option Works
Before, users could only download handwriting as an image. That was fine for graphics, but sometimes you only need the text itself. The new Copy Text button lets you copy your typed words directly without saving an image. Just type your text, click Copy Text, and paste it anywhere such as Word, Google Docs, email, or chat.
Why Use This App
- Students can create handwritten notes quickly
- Teachers can prepare handwritten-style content
- Designers can test handwriting styles easily
- Anyone can add a personal touch to their text
Try It Today
Open the Text to Handwriting Generator, type your text, and click Copy Text. It is fast, free, and simple to use.
Download Text to Handwriting Generator
The post Text to Handwriting Generator – Now With One-Click Copy appeared first on .