
Mary Beth Johnson is a writer based in Atlanta, GA. She is currently writing her first book in between school drop off and laundry piles. She can be found every day on Instagram and at the local coffee shop.
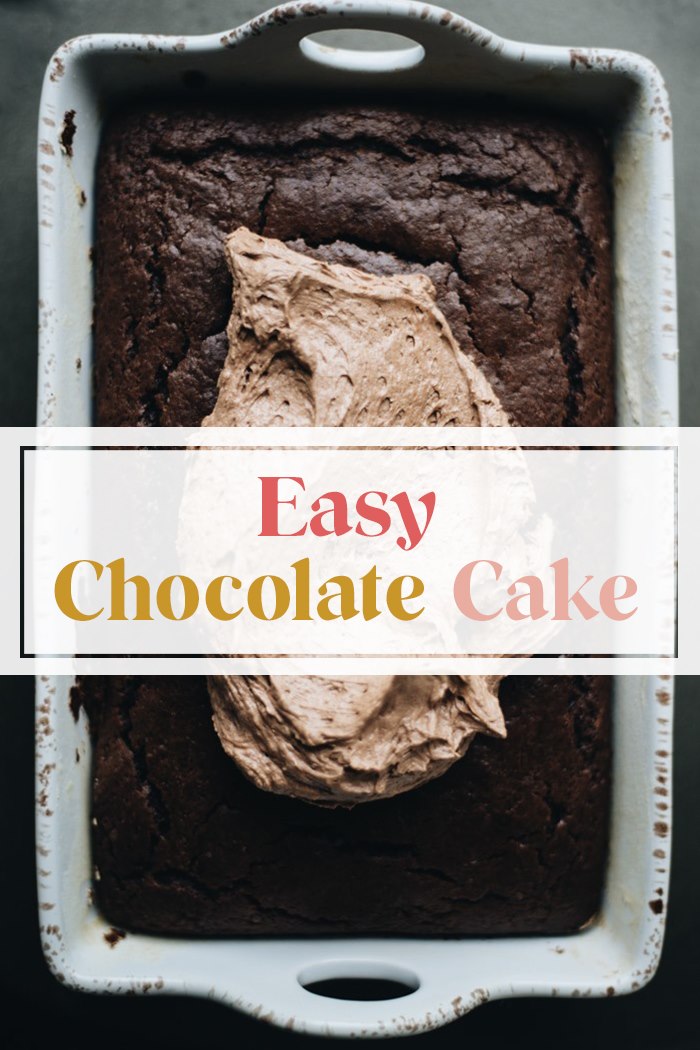
I spent the long July 4th weekend flipping through cookbooks, finding myself bookmarking an easy chocolate cake, along with other frivolous recipes I wouldn’t normally include in our weekly rotation. I’ve noticed that once the memory of early school mornings and fast packed lunches has faded, I seem to have more space for indulging in creating food that makes everyone happy.
This is not to say I’m not still currently filtering dinner recipes through what can be made in 30 minutes or less or whether or not the ingredients can be thrown on the grill, but these dinners are garnished with a sprig of fresh thyme, served with a bowl of fresh cherries, and finished with an easy chocolate cake. This is more effort than my over-worked brain can take during the school year, but with eleven summers spent by the pool with my kids, here’s what I’ve learned about cooking through the hottest months of the year:
Summer is a reset.
Every summer I take my kids to a you-pick farm to overpay for a bucket of fruit we could’ve easily picked up at Wal-Mart, but instead paid for in sweat equity and stained, white tee shirts. If this sounds like insanity to you, I get it. The reason I take my kids is that pick-your-own-food has a way of slowing them (and me) down long enough to appreciate where food comes from during the other 9 months of the year when we’re impatiently waiting for a frozen pizza to finish cooking. In a world of on-demand and download-right-now, it is important to me that my kids swat some flies and pluck some berries to learn that “for everything, there is a time and season” and that summer is the time to slow down and reset expectations.
Summer is a time for getting back to the basics.
I come from a long line of no-fuss women, so it should come as no surprise that I like to keep things simple, particularly in the kitchen. I don’t need tons of spices or fancy kitchen gadgets to feel inspired to cook and I love that summertime supports this back-to-basics kind of thinking. Summer is raw. Summer is unpretentious. Summer has a way of stripping us all down with no choice but to show up as our truest of selves. I see this clearest when I’m at the pool. The moms have their damp, stringy, chlorine hair tied up in baseball caps, bravely showing their legs in swimsuits, generously slathering sunscreen instead of foundation, and jumping around with their kids. We all look like this together, collectively firing up our grills later with basic food and basic hair and basic tan lines, the smell of dinner hanging in the air.
Summer is a time for exploring.
Since summer is when food bursts with color and flavor, I try to introduce as many new foods to my kids as possible. Raw produce that we wouldn’t normally have access to during other times of the year fills up our weekly farmer’s market and we have plenty to choose from. We’ve tried white and golden raspberries after a farmer explained that their flavor is sweeter than red raspberries. My kids prefer them over the red, and now that I’m thinking about them, I wish I had had some to throw on this easy chocolate cake.
In addition to the raspberries, we’ve also tried Ranier cherries, a lighter and sweeter cherry that doesn’t stain as easily as the deep red ones we would normally buy. I have also switched to hydroponic arugula, kale, and romaine once I discovered that the taste is unbelievably better than lettuce from the grocery store.
Summer is for easy chocolate cake.
I’m kidding, but only slightly.
I’ve found that the slower pace of summer has afforded us more opportunities to have other families over. This week alone we have shared a meal or an after-dinner glass of wine with friends on five days out of seven and with four extroverted children, this is living.
The constant revolving kitchen door, and the extra mouths to share treats with gives me the perfect excuse to bake. I found this unassuming and easy chocolate cake thanks to Bridget who also has a bunch of kids and an affinity for summer. Growing up, cake recipes made from scratch had a reputation for being mysterious and kind of serious, which is precisely why we always used boxed cake mixes and premade icing. I always assumed that making a cake completely from scratch was fastidious and difficult, and I’ve definitely tried a few that took extra effort. But something about knowing another mom with little ones was whipping this up for a friend on a normal afternoon made me think, “I can totally do this, too.”
So, easy chocolate cake on a breezy summer afternoon it was.
Once I tried it, I couldn’t stop making it. I made it for a birthday. I made it to share with friends. I made it to celebrate a new family milestone. And I made it to bond with my daughter when I knew she needed extra time with me. It is literally the perfect size; the perfect blend of already-in-your-pantry ingredients; and the perfect end to a perfect day.
And, it really is easy.
Easy Chocolate Cake
6 tablespoons unsalted butter, at room temperature
¾ cup firmly packed dark brown sugar
2 tablespoons granulated sugar
1 large egg
1 large egg yolk
¾ cup buttermilk* (see notes for other options)
1 teaspoon vanilla extract
½ cup dutch cocoa powder
1 cup all-purpose flour
¼ teaspoon baking soda
½ teaspoon baking powder
½ teaspoon fine sea salt
Easy Chocolate Frosting
2 ounces unsweetened chocolate, melted and cooled
1 ½ cups powdered sugar, sifted if lumpy
½ cup unsalted butter, at room temperature
Pinch of fine sea salt
1 tablespoon cream or whole milk
½ teaspoon vanilla extract
For the easy chocolate cake:
Heat oven to 350°F (175°c). Line the bottom of an 8-inch square cake pan with parchment paper, and either butter the parchment and exposed sides of the pan, or spray the interior with a nonstick spray. In a large bowl, use a hand or stand mixer to beat the butter and sugars until fluffy; scrape down bowl. Add the egg, yolk, and vanilla and beat until combined, then the buttermilk and mix again. Scrape the bowl down well and don’t worry if the batter looks uneven. Place your flour, cocoa, baking soda, baking powder and salt in a sifter (I find this step necessary because my cocoa is very lumpy) and shake it over the batter bowl. Stir on low until just combined; scrape down bowl one final time. Scoop batter into prepared pan and smooth flat. Bake for 25 to 35 minutes, until a toothpick inserted into the center comes out clean. Let cool for 5 to 10 minutes in cake pan on cooling rack, then flip out onto rack or serving plate to completely finish cooling before frosting. Speed this up by placing it in the refrigerator for 10 minutes.

For the easy chocolate frosting:
Beat butter, powdered sugar and salt in a large bowl with an electric mixer until fluffy. Pour in chocolate, milk, and vanilla, beat until combined, then one more minute to whip it further. Scoop the frosting onto the cooled chocolate cake and swirl it around.
Cake keeps at room temperature for a day or two, or in the fridge up to a week, or so I’ve heard but never tested out.
Spend this summer giving your family a reset from the school year, getting back to the simple basics of life, and exploring new tastes with new experiences. Don’t forget to splurge a little and make time for an easy chocolate cake. Tag us on Instagram if you try it!- Post via Mary Beth Johnson


I cherish our time away as a family.
Having the opportunity and making the time to spend those weeks at the beach meant everything to me. I have this constant pull in my heart of making sure I am soaking in every moment.
Saying yes to them, to those moments, brings such lifelong joy, and I am so grateful. We love heading to the beach and exploring, putting our feet in the waves. Watching my kids paddleboard and be so brave in the water is magical. Swimming and snocones, slow mornings together, and game nights in our pajamas - every moment a treasure!
Chris took the kids fishing, and I loved hearing about how he saw their eyes light up with excitement at every catch. Riding around in the golf cart, going out on alligator airboats - so many sweet moments, one beautiful adventure. My heart is full, and I can’t wait to do it again.
I hope they know what it means to walk and hold their hand, to look into their eyes, to have these moments. There is no way that words could say what it makes my heart feel.

Mary Beth Johnson is a writer based in Atlanta, GA. She is currently writing her first book in between school drop off and laundry piles. She can be found every day on Instagram and at the local coffee shop.
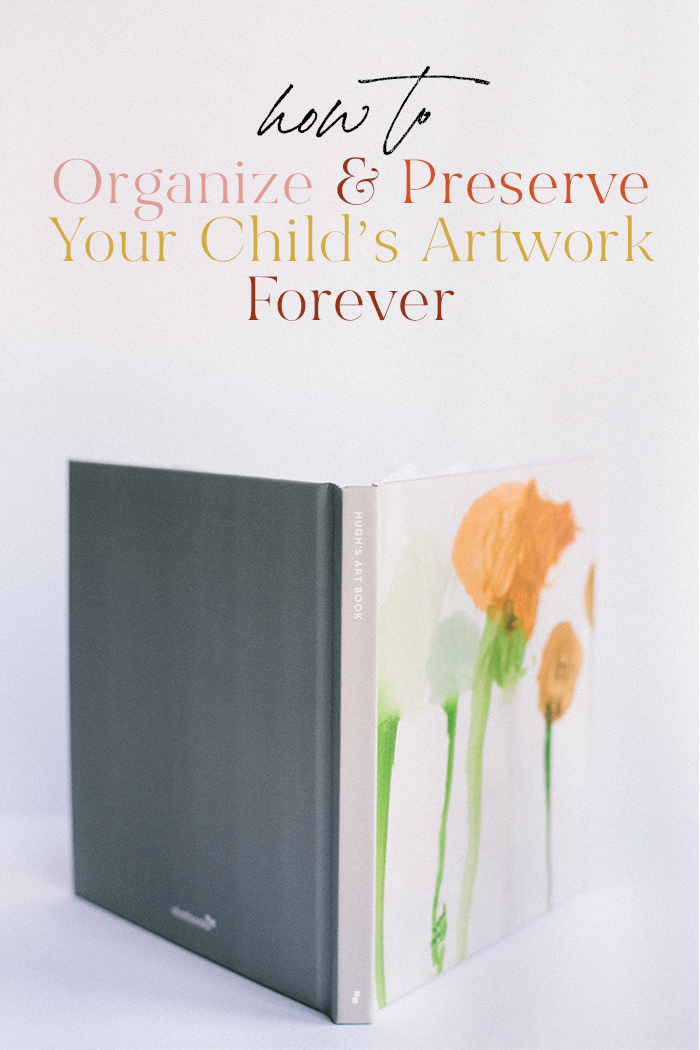
With the new school year just around the corner, the issue of how to organize and store kids' artwork begins to loom. If your kids are anything like mine, they’ve caught you throwing away their masterpieces, awards, certificates, or special “you-name-its” and protested till your mom guilt ran deep. Rather than allowing the guilt to take over, I decided to use the summertime to come up with a system for organizing and storing my kids’ artwork in one simple place where we could actually enjoy it.
To succeed at this, I knew I needed a solution that was simple, fast, and inexpensive or I would never stick with it. After some trial and error, I turned all of the piles into digital files, and created art books for each of my kids:
Here’s the step-by-step process of how I got rid of the clutter and organized my kids’ artwork so we could enjoy it forever.
Gather every piece of your kids’ artwork and store it in one place.
World-renowned home organizer, Marie Kondo, suggests organizing your home by category, not room so that you can see the full scope of what you’re dealing with. Go through the house and gather all of your kids’ artwork hiding in closets, backpacks, piles, and vehicles and put it in one place. To assuage any doubts or fears that their artwork will end up in the trashcan again, explain to your kids that mommy is going to make something super special with all of their masterpieces. Your kids will begin to check in with you and ask if you’ve finished the “special project” yet, which is a great motivation to stick with the process and see it through to the end. Organize your kids’ artwork into two piles: stay and go.
Having all of your children’s artwork in one place, you will probably begin to notice whether or not you have duplicates, are heavily favoring one child over another, or you just have more than you want to actually document. This is the time to get rid of the excess.
Organize and store your kids’ artwork in two piles: one pile stays and one pile goes. Here’s how I decide what stays:
artwork that demonstrates your child’s personality
artwork that represents a particular phase your child went through
artwork that documents a particular developmental milestone, such as your child writing their name for the first time
artwork that includes handprints, footprints, or photos
documents of recognition, such as certificates, ribbons, and personal notes from your child’s friends or teachers
If you have particularly crafty kids who like to create ambitious 3-D art, you can include these multi-dimensional projects in your stay pile as well. Divide the artwork by child, year, or grade.
Once you’ve sifted through what to keep and what to get rid of, it’s time to decide if you’re going to create photo books by child, year, or grade. This step depends entirely on what’s important to you. However, I think it’s important to note that many moms get stuck on a step like this because it’s easy to get hung up on the details. Maybe the artwork isn’t dated, or they don’t know the name of the child who drew it so they just stare at the piles hoping the information will come to them.
So, if you feel like dividing the artwork by child, year, or grade will stall your momentum, then, by all means, skip this step and make one giant photo book with all the artwork. I promise you your kids will never pester you about the date they drew that amazing “H”.
Take photos of the artwork on a white background.
Lighting really is everything, so look for an area in your home that has filtered, even light. I find that the countertops underneath a kitchen window work well, or the dining room table pushed up close to a nearby window. Bonus: both places are high enough to keep little hands at bay.
Pro tip: shoot your images during daylight and shut off all interior lights as it can cause unwanted glare and distortion of the colors.
Organize your kids’ artwork into digital files with a few simple edits.
Once I’ve photographed each piece and thrown away the originals, I organize and store my kids’ artwork into digital files on Google Drive with corresponding folders for each of my kids. You can see how mine looks here:
Before I add the artwork to a photo book, I like to make three simple edits so the artwork really pops:
My before and after typically looks something like this:
You can make these edits in a photo editing app on your phone, or a desktop program on your computer. When I’m on my phone, I prefer the app VSCO for its simplicity and easy slide tools, or I will edit directly in the Instagram app. When I’m working on my desktop, I use tools such as Lightroom, Canva, or Picmonkey. Organize and store your kids’ artwork in a permanent home.
The last step is to take all of those images that are digitally stored and edited and give them a permanent home: a photo book. You can certainly choose any printing company you are loyal to, but as a professional photographer I’ve been around the block a few times and chose Chatbooks for this project for a few reasons:
Inexpensive, but great quality. A 6 x 6 hardcover photo book starts at $15.
Ongoing photo book series option which connects to Instagram or Facebook. You are automatically sent a new book every 60 photos and you can cancel anytime.
Simple designs. I wanted this project done like yesterday, so I didn’t need fancy photo book bells and whistles slowing me down. It took me maybe 15 minutes to put the book together.
Once you set up an account with Chatbooks and select the size of the book you’re making, you will be asked to upload your photos via Instagram, Facebook, or your computer. When the photos are all loaded it will look something like this: There is an option to change the layout of your book in the top right corner. When you select “layout settings” you will be given two layouts to choose from, standard and fit to page. You can also choose to add a caption and the date the book was created. As you can see below, I chose the standard layout with no captions:
I rearranged a few pages, selected a cover image, and added a caption page at the very beginning before giving the book one final review:
After double checking the layout, I realized I needed to add a title to the project, or the spine of the book would default to “My Project”. After that small change, I was ready to order.
When the artbook came in the mail, it completely surpassed all of my expectations:
The real stamp of approval came when my kids saw the artbooks. Their eyes completely lit up when they saw their names on the book, flipped through the pages, and realized their art was organized and stored in a safe place forever (i.e., not the trash can).
Good habits often take longer than twenty-one days to establish. You may be wondering if I manage to keep up with the steady flow of artwork coming through my doorway after these books were finished. Yes, and no. Instead of letting the artwork backlog again I decided to have Chatbooks do some of the work for me by signing up for their ongoing photo book series. I set up a private Instagram account just to organize and store my kids’ artwork, and after every sixty photos, Chatbooks sends me a new book. No more clutter on my kitchen table, which makes me and my kids super happy.
So, there you have it. A complete guide on how to organize and store your kids’ artwork forever, without tears, without (much) frustration, without making more work for yourself, and without getting into the same situation a couple of months from now.
If you found this tutorial helpful, will you let us know? We would love it if you tagged us on Instagram or Facebook with your little artist’s work.

This week has been incredible...simply perfect in every way! Even the imperfect moments were beautiful in their own way as we spent every moment together, soaking up the sun, biking, cuddling in beach chairs, curled up on the couch napping together, playing games, snocones and ice cream, splashing and laughing, golf cart rides in flowy dresses after dinner.....the list goes on and on....cherishing these moments! 7 summers - everything goes through that filter... 7 left just the 6 of us.
This is our favorite place to visit every single year, and there are so many special little memories that will be sealed into our hearts forever! We have loved our tradition at Seaside so much! The regular traditions we have started over time and look forward to each year, and the new traditions and memories made this year....I’m coming home with my heart full of treasures!
Have you ever thought about those experiences and moments that we could easily let slip by us without noticing or giving extra thought? I am finding that learning to cherish and notice the little things more, actually makes them more special, something we will remember, something that will spark the sweetest memories for years to come! Like finding a simple seashell with your youngest, and seeing her so carefully hold it and rub it and carry it around in her sand bucket all day....these sweet moments I want to capture in my heart forever. I want to think about these things when the harder days come, when I am tired, or when I miss them being under my roof.
My heart is truly FULL!!!

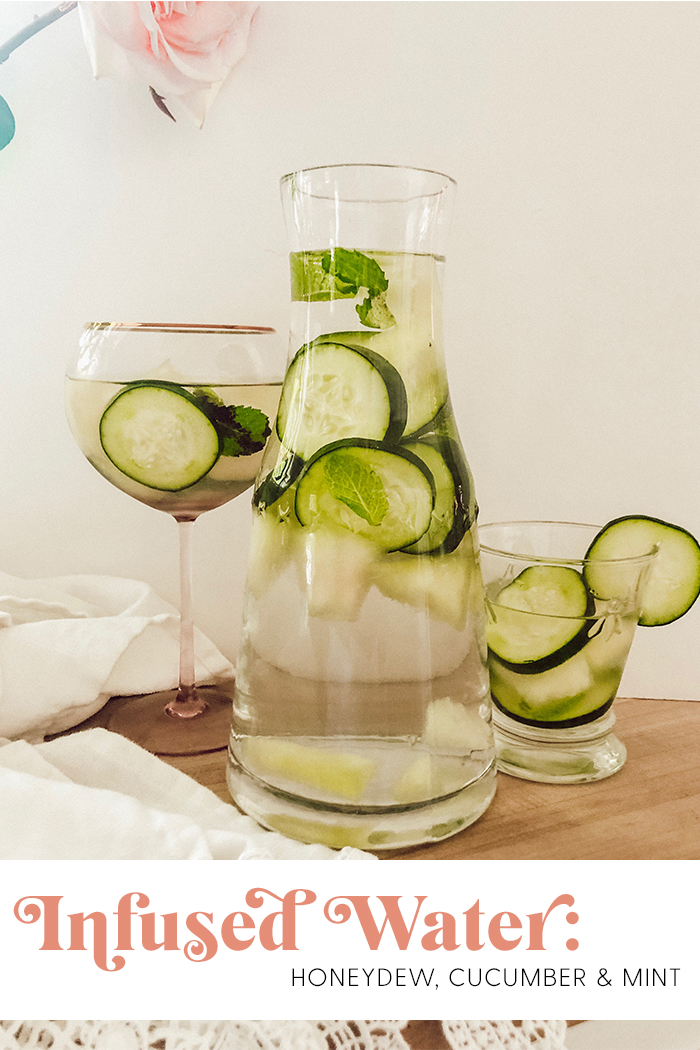
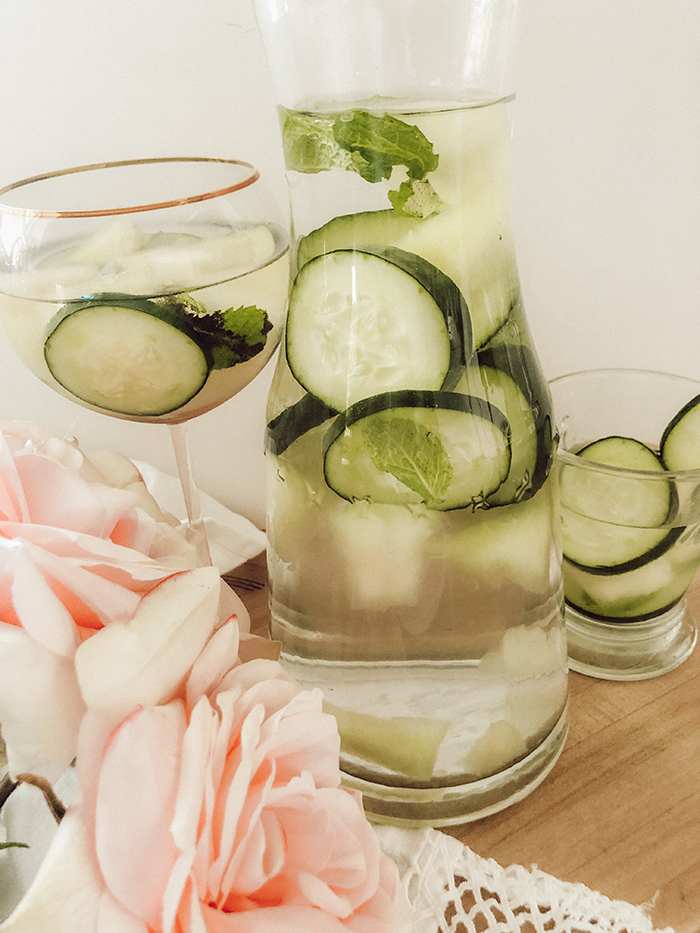
Are you a lover of drinking infused water? This is something that I’ve been intentionally doing for a while now, and I am loving the benefits and the enjoyment! It is so refreshing and tasty, which makes me want to drink more water...win-win!
I’m excited to try ALL these this summer! ☀️
+ Blueberry and Orange
+ Strawberry and Lemon (try adding basil leaves too!)
+ Watermelon and Mint leaves
+ Kiwi and Cucumber
+ Grapefruit and rosemary sprigs
For the one pictured all you need is,
Honeydew, Cucumber, and Mint:
1/2 cup honeydew cubes
1 cucumber thinly sliced
10 fresh mint leaves torn
SO simple yet so beautiful and of course incredible for the benefits!
Fill a glass (or a jug if you want to make a large amount) with water. Add the ingredients and stir. Top with ice cubes and serve with a straw! [For a stronger flavor allow the water to sit in the fridge for 1-2 hours. 1-2 tsp of coconut sugar can also be added to sweeten.
I encourage you to grab your fav fruits and herbs, get that water infused, and drink up this summer! This could be a great habit to start....enjoy!!!

 Having my birthday while in Florida had to the absolute BEST way to celebrate! Being right where I want to be with all the loves of my life right with me....THE BEST.
Aiden asked me in the ocean what I hoped for for my birthday and I told him that daddy and his sisters and him were my greatest gifts- having two weeks of intentional time with them.... naps with them in my arms, linked arms as we dive in the ocean, golf cart rides where they are whispering in my ear, seeing them bonding as siblings- it’s everything I could ask for.
I woke up on my birthday, and Aiden came down the stairs with the biggest smile on this face with Happy Birthday playing on his iPad, and everyone joined in for a big birthday morning dance party.....and here I am...with everything I could ever have dreamed of!
I’m full of love and so thankful for time spent away with my loves, to slow down, walk the beach, take in the sunset, snuggle in the mornings, hunt for seashells, ride bikes, tell jokes, share secrets, and just get lost in the thought that I am right where I want to be on my birthday and in life.
My cup is running over, spilling thankfulness for our moments right now, and hope for all the moments to come!
This birthday I am counting my many blessings, with most of them cuddled up beside me! A day that will be marked with summer fun, a day at the beach, party horns and laughter, swimming in the pouring rain.....with my favorite people in the world!


I can’t wait to share another hair DIY with you today! As we get into the hot summer months, all of the sun exposure and time in the water can leave our hair feeling drier than it usually does, and even brittle. That means a little extra TLC to get it back to a softer state!
I love this DIY because it uses super simple ingredients that are so nourishing.
Here’s what you need:
1/2 cup full fat plain yogurt
2 tablespoons honey
5 drops Roman Chamomile essential oil
Just mix all of your ingredients in a little dish and you’re ready to go! Apply the mask from scalp to ends, gently massaging into your hair as you work your way down. Leave the mask on for 15-20 minutes and then shampoo as you normally would! I like to wrap my hair in a warm towel as I let the mask do its magic!
The protein and fat in the yogurt help to moisturize and strengthen your hair, while the honey acts as a sealant to keep moisture in and reduce frizz! Roman Chamomile is know to soften and strengthen hair, and help enhance relaxation during the process.
I love this recipe and I hope you do, too!
*adapted from HERE

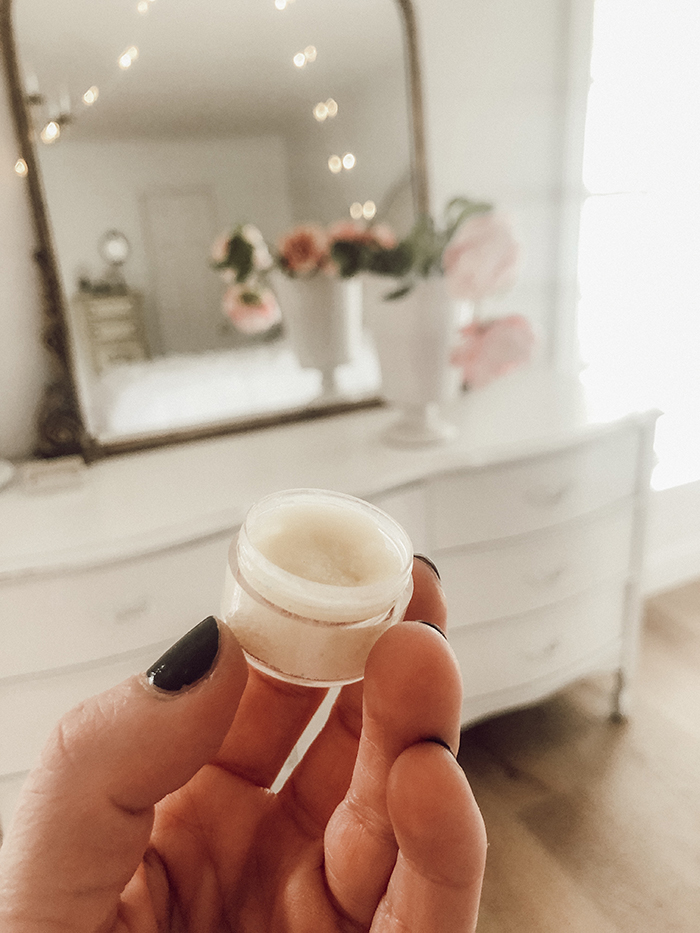
Do you love yummy lip balms as much as I do?😍
This is a really fun lip balm DIY, and the best thing is, you can add whatever essential oils you want and make it just perfect for you and your friends! These make PERFECT gifts for friends and family....so special and soooo good! Everyone is sure to rave over them, so go ahead and make a bunch at a time! I like to keep extras in a drawer for those last minute gift needs! Giving something so small can say so much, just to be thought of! (And don’t forget to put back a stash for yourself☺️)
You’ll need to create a little double boiler if you don’t already have one. Just add a couple inches of water to a saucepan and put a glass bowl on top, making sure that the bottom of the bowl doesn’t touch the water. Bring the water to a boil, and then add in your ingredients.
You’ll need:
1/2 cup coconut oil
1/3 cup shea butter
1/3 cup cocoa butter
2 tablespoons beeswax
1 tablespoon jojoba oil
Tangerine & Lemon EO
( if going to be out in the sun, choose lavender instead)
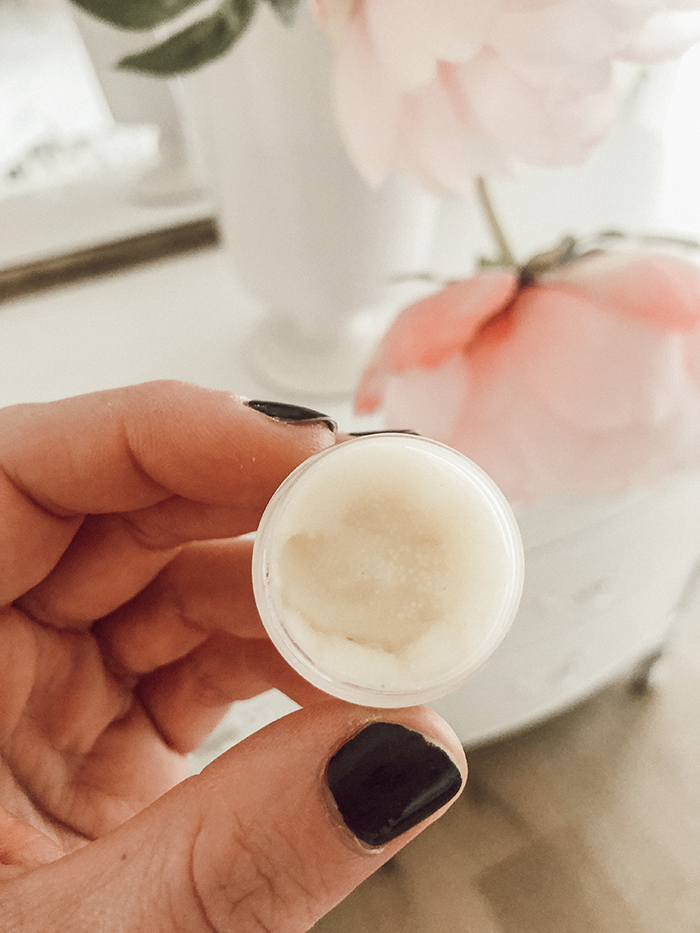
Once the water is boiling, add in coconut oil, Shea butter, cocoa butter, beeswax, and jojoba oil. Stir occasionally until everything is melted and combined. Remove from heat and stir in your essential oil!
Once it’s cooled a bit, transfer to a container of your choice. Apply as needed!


Making our house into a home was such a special gift to me.
Taking time in each room to plan and decorate - to make it our own. Special touches here and there that are personalized to each of us, it has created a space that feels like it’s truly ours. I get asked so often about little touches here and there, so I wanted to have one landing spot where you could see each of the rooms we love so much.
I am linking some past room tours here, and I hope you’ll feel at home as you take a peek around!

JavaScript is currently disabled in this browser. Reactivate it to view this content.

These photos of me and my sweet Adelaide have me feeling so wistful.
In just a month, she's going to be three!
I love watching her grow, seeing bright new changes in her every day.
But my mama heart can hardly take losing her babyhood.
I adore seeing her come into her own, being able to chat with us in brand new ways, taking after her older sisters, and wanting to be one of the big girls. It's truly so sweet.
But as I get older, and my kids grow up, those memories of them as babies seems to get even stronger. My heart aches remembering them in my arms, and I am so aware of how quickly it all goes.
Adelaide, my precious girl, ready to take on the world. You'll be my baby girl forever, never ever far from my heart.
I will never lose the feeling of a baby head all nuzzled up to my neck, the smell of their sweet little self and all the sweet moments met in the middle and quiet of the night.
Each summer goes faster and as I celebrate the beauty of what today holds, I see it also just going so quickly. Here is to saying yes: to seeing the beauty in our little moments,
to soaking in the years and to cherishing it all , sealing it in our hearts.

Being a mama and holding these sweet babies in my fingertips has been life's greatest gift.

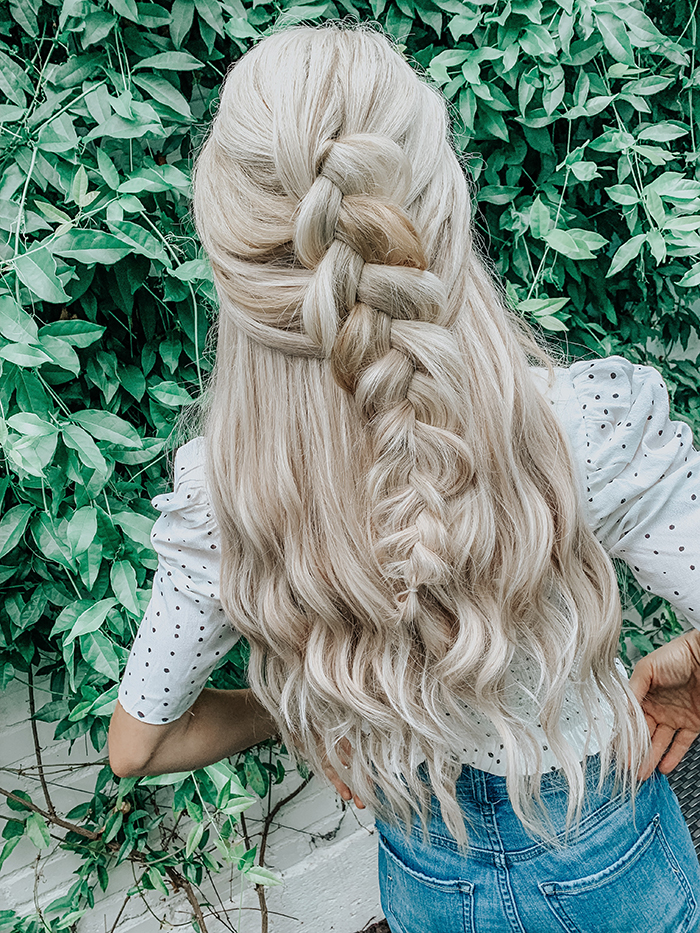
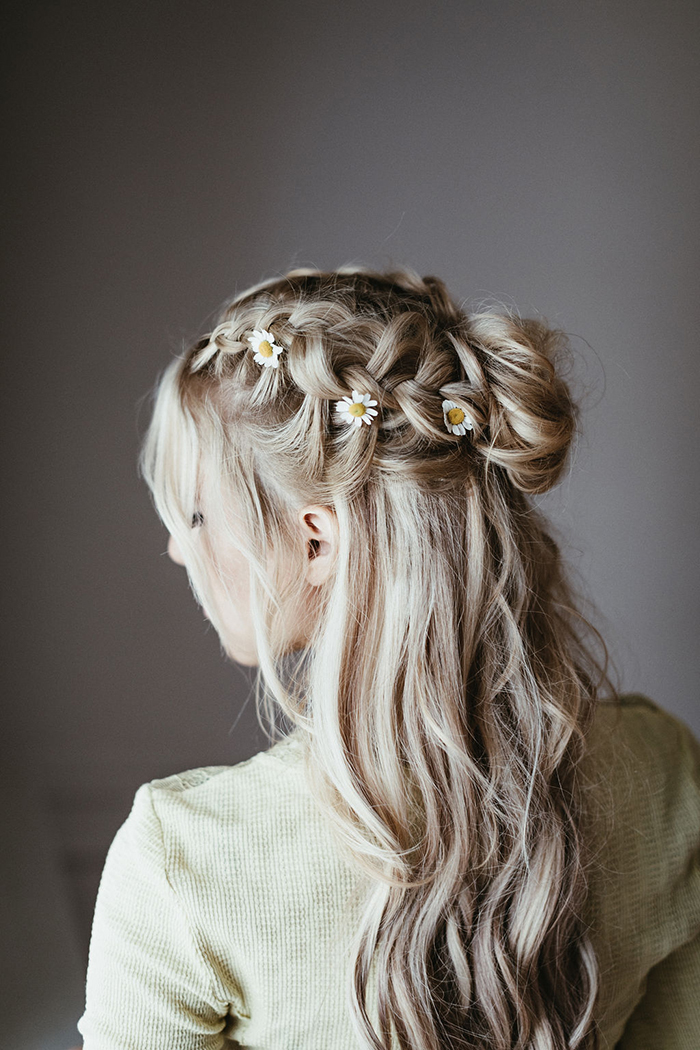
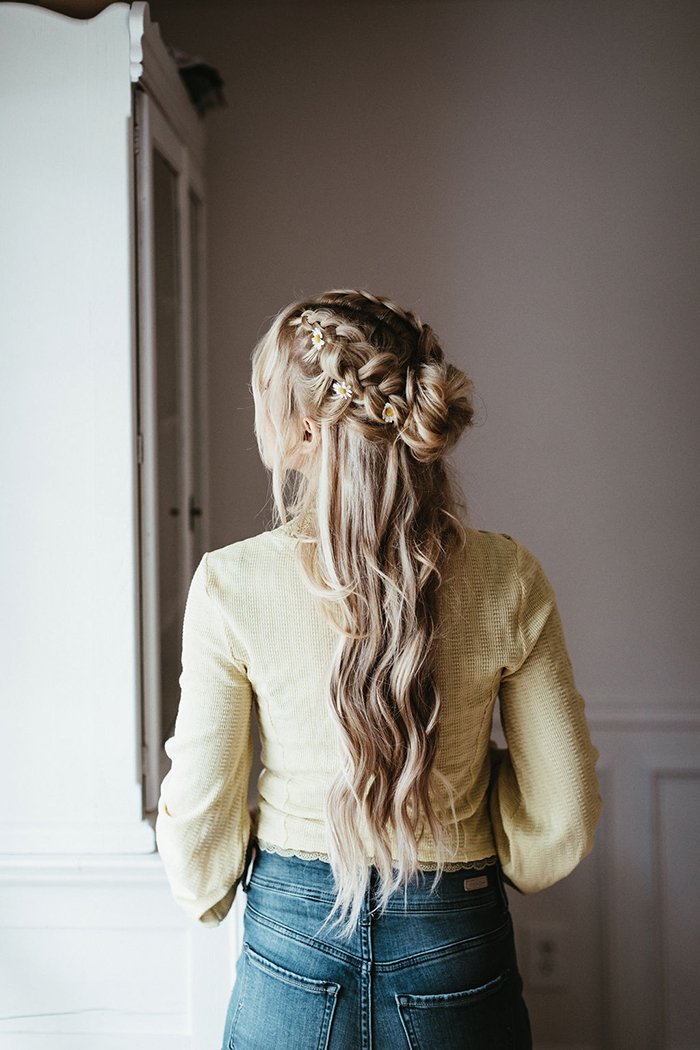
 braids via photos via beckley co

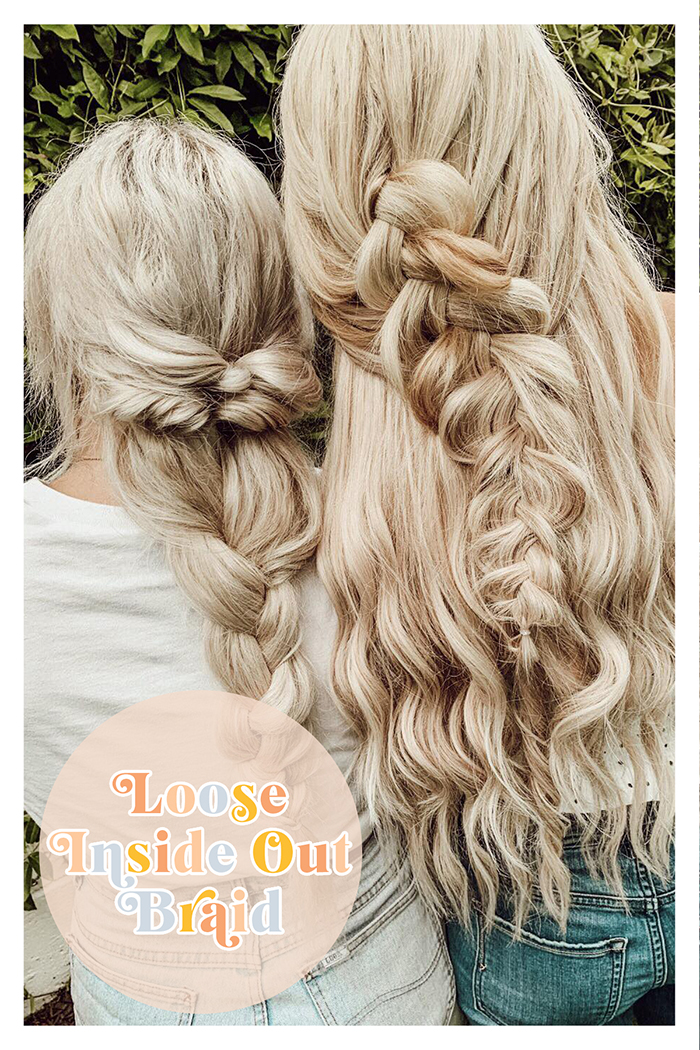
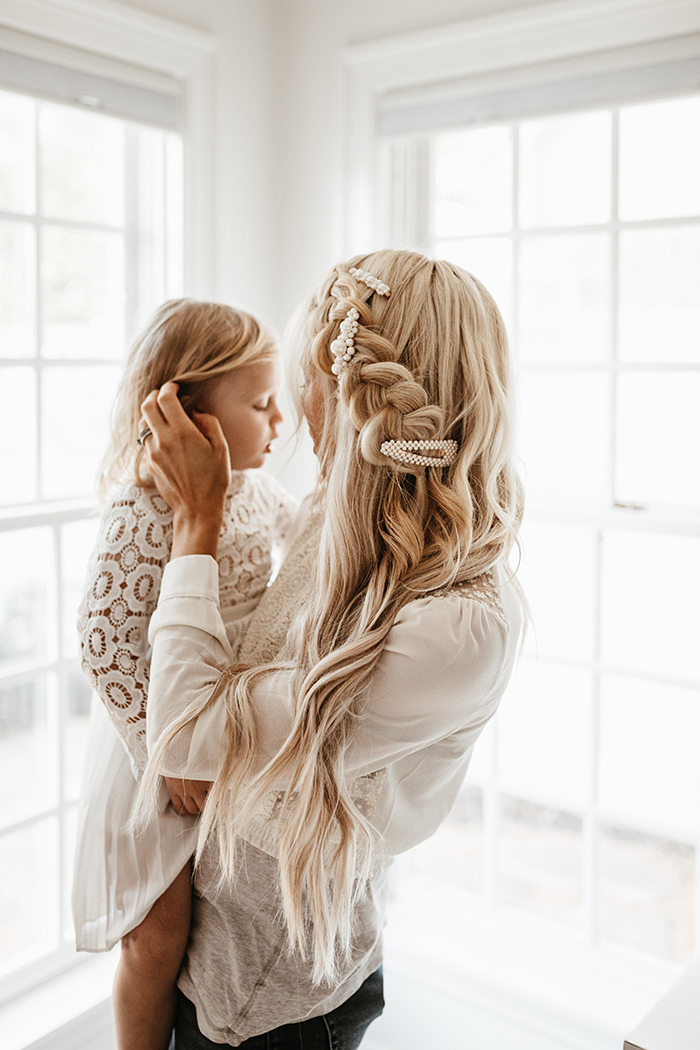
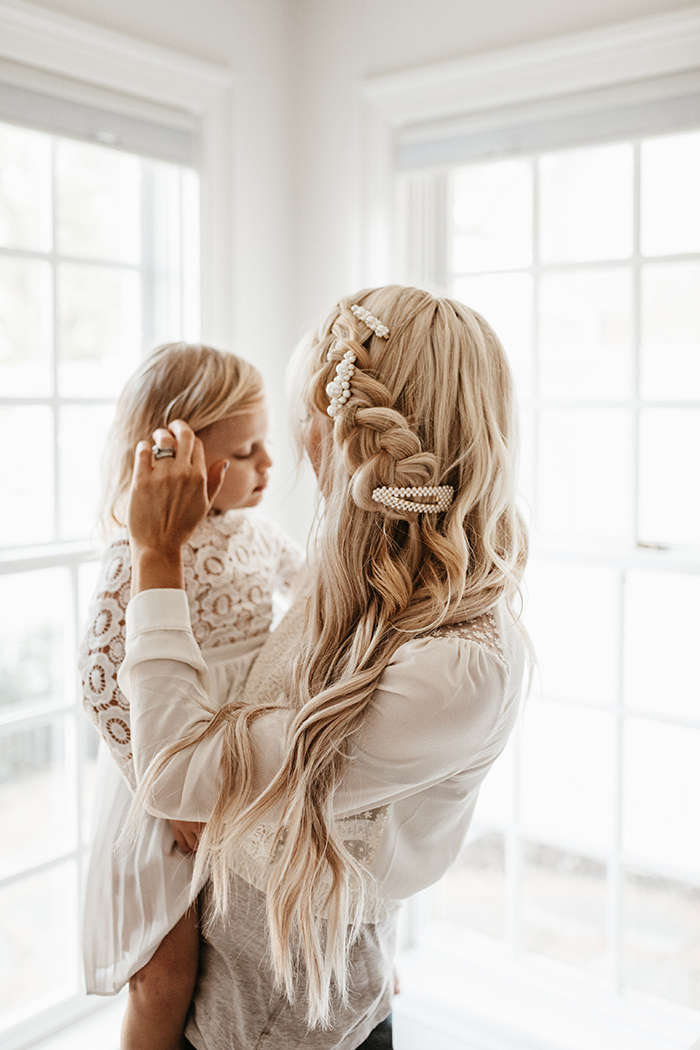
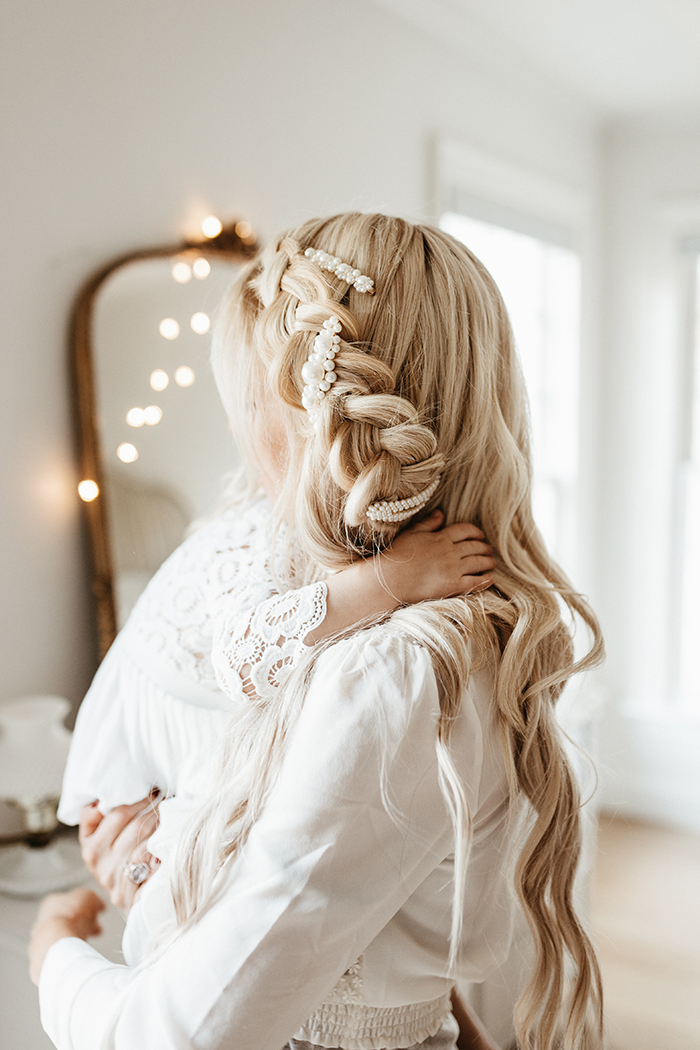
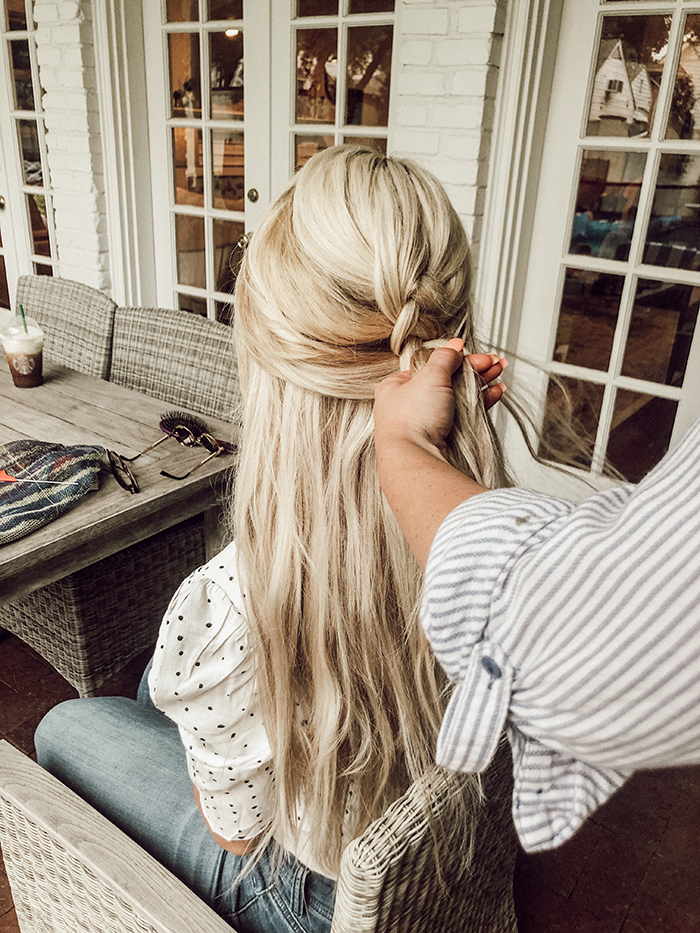
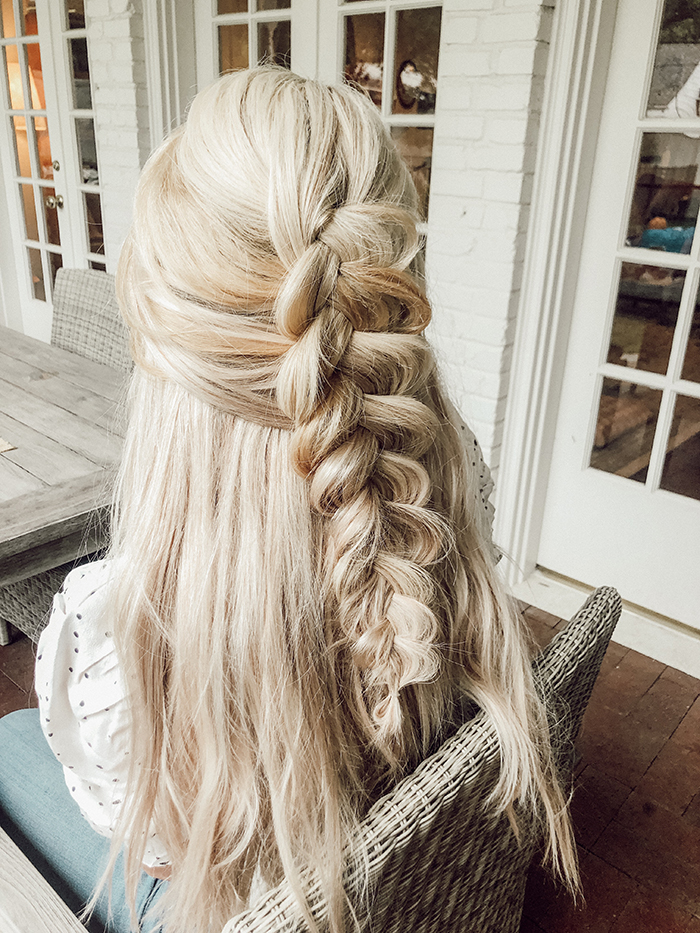
I have another beautiful hair tutorial for you today - this inside out braid is such a fun way to bring effortless beauty into your everyday!
Whether you’re having lunch with friends, or loading up the kids for a trip to Target, taking a little time to create something pretty is an easy way to practice self care and feel our best wherever we are!
Start by combing through your hair - second and third day hair is best!
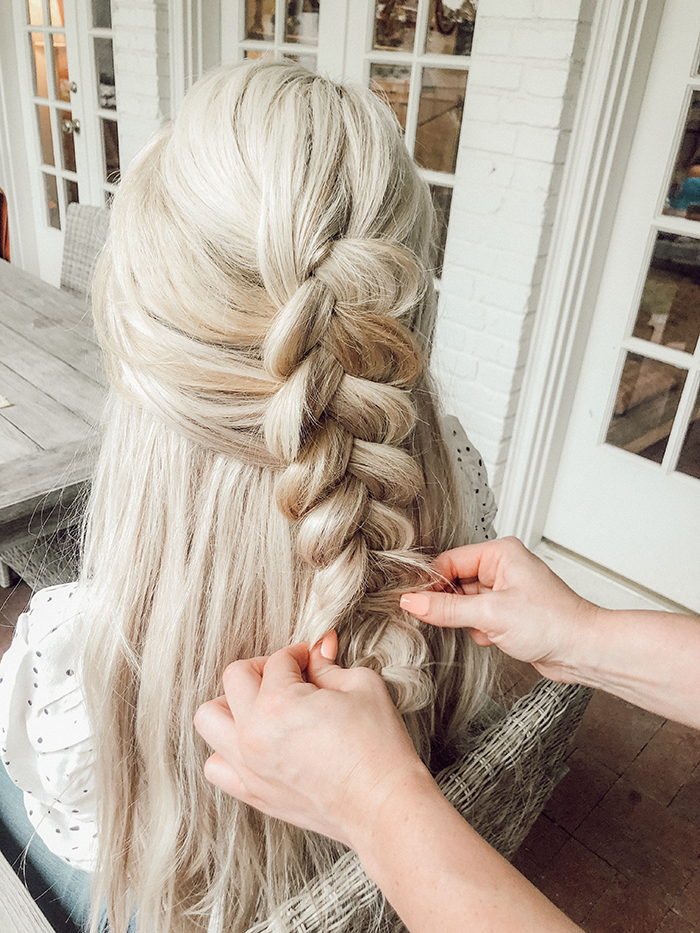
Section off the top third of your hair. Then beginning at the crown, create an inside out braid, loosely. Grab small sections from each side to add into the braid, and tuck under rather than over like a traditional braid.
When you’ve finished the braid, secure it with a clear band at the bottom, and then start to gently pull on each side, to create a thicker, looser look.
Using a big barrel curling iron, curl sections of hair away from your face. Leave the last 1/2 inch of hair out of the curling iron for a more natural, beachy look. Once you’ve curled all of your hair, and they’ve cooled a bit, run your fingers through to loosen them.
Just ten or fifteen minutes, and you have something so special for the whole day! Taking the time to feel beautiful is something we all deserve, and it really doesn’t have to take long. I hope you love your braids as much as I do!
 braids via

There is something so special about creating a love for reading in your children. And in those late nights, or while your children are laughing and playing outside, it is so fun to fall into a book. I'm so excited to share a few of my summer picks for reading today!!
I'm Brianna Venzke and when I'm not hanging with my 3 little ones (they are getting no so little!!), I'm blogging and sharing at www.briannavenzke.com and Casey invited me to share over here!
So excited to share my fav reading picks with you guys today: Top 5 Summer Reading Picks for Mamas
1.
"The Rules of Magic" by Alice Hoffman - I grew up in love with the movie Practical Magic, based on a book by Alice Hoffman, The Rules of Magic is the prequel, set in the 1960's and 70's, is a fun quick read perfect for summer afternoons.
2.
"Where'd You Go, Bernadette" by Maria Semple - This will be a movie this Fall! I love diving into a book before it hits the big screen, this was a funny, spurring novel that I think you'll enjoy!
3.
"Crazy Rich Asians" by Kevin Kwan - Even sweeter and funnier than the movie! This book is a part of a trilogy!
4.
"The Whole-Brain Child" by Daniel J. Siegel - Switching it up with this one, but this is a fantastic read for parents of children, at any age! It's a short book and to the point!
5.
"Where The Crawdads Sing" by Delia Owens - This is on my personal must-read list! I've just purchased it but the reviews are in, people can't put it down or stop talking about it! I can't wait to read!
Top 5 Summer Reading Picks for Toddlers
1.
"The Wonderful Things You Will Be" by Emily Winfield Martin - If you haven't picked this one up yet for your little, do so now! It is so sweet and the illustrations are stunning! We own all of the children's books by this author because they are so beautiful!
2.
"Dragons Love Tacos" by Adam Rubin - Your little one will love this fun and silly book!
3.
"Whose Boat" by Tony Buzzeo - This book shares about different types of boats and who operates them! A great book for any sea loving little one!
4.
"The Cat at Night" by Dahlov Ipcar - You'll love this one! It has pretty illustrations and the theme is great for young ones as well!
5.
"The 50 States: Explore the U.S.A." by Gabrielle Balkan - This fantastic book is one that the kids pull out over and over again, they love pouring over the maps and learning new facts!
Do you love reading? Have you read any of our top picks?
Life Lately.
15 Jun 2019 7:14 PM (6 years ago)


Tomorrow is Father's Day and our wedding anniversary and I cannot wait to be in our favorite place in the world together!
Words can't describe how grateful I am for you. Through it all you have chosen me and love our babies better than I could ever ask for. Thank you for pursuing our kiddos hearts in countless ways and for loving mine. We adore you with all that we are.
Thankful for this life together.
I just got all of the kids to bed and you made it to Florida! - you spent the last two days driving down so that when we fly in tomorrow- all of our stuff is there waiting for us. The sweetest.
 We have been here swimming and lounging and missing you like crazy. Adelaide keeps saying " daddy beach?!" and Apple packed your card that she made over a month ago!
 12 years ago had you shown me our life, how far we have come, what we have walked through and where we are now....I truly could never have dreamed it up!
  A beautiful life. We love you.
I’ve watched you shelf dreams, support us, love them with all that you are. Through all the hard, you were there. It’s always been you ❤️ It all started with us , what a perfect merging of celebrations today!


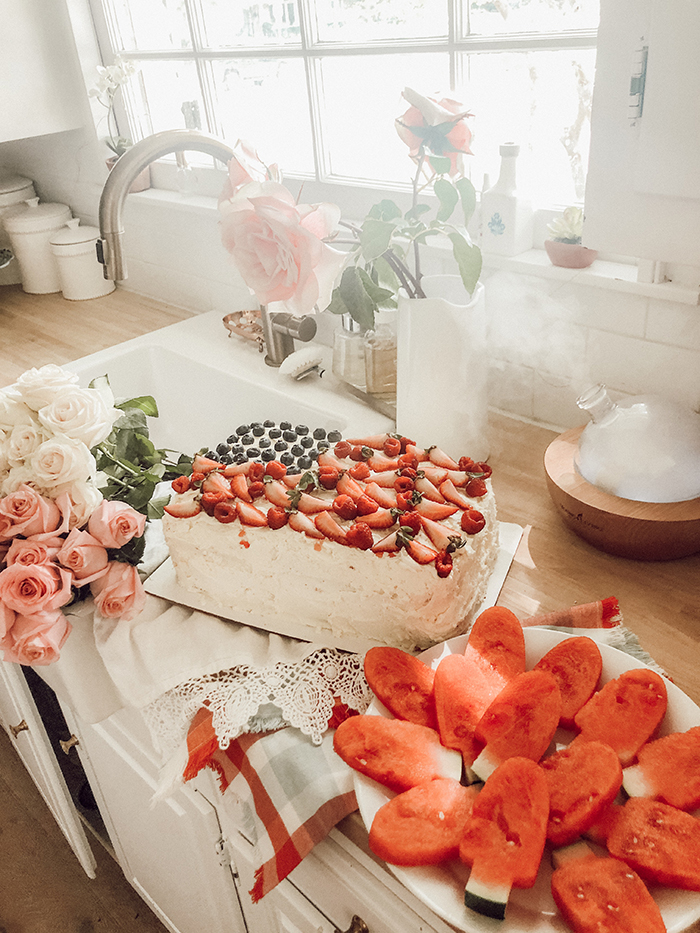
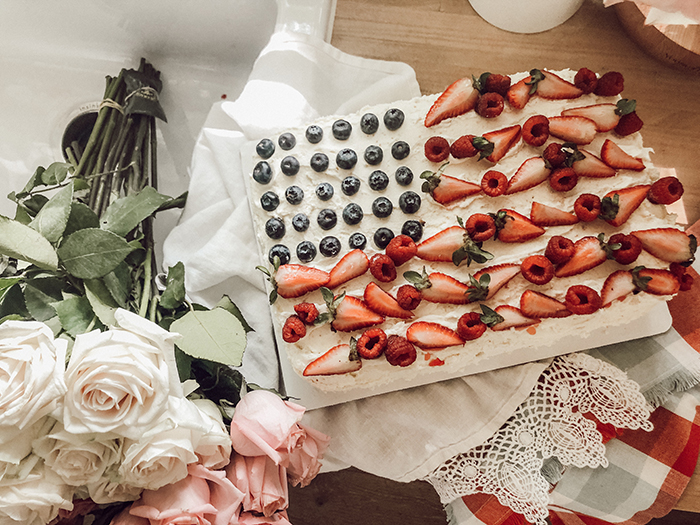
FOURTH OF JULY CAKE
I love creating special moments for our holiday celebrations, and this fourth of July cake is one of my favorites! It’s such a fun way to get festive, and to bring my kids in to help create something memorable.
We will definitely be making this on July 4th!!!
To start, make your favorite vanilla cake! You can grab a recipe online, or use a mix. Whatever works best for you. I made mine in a 9x13 pan - and sometime if we are feeding a crowd, I will make two to create a giant layer cake!
Next, make some whipped cream (or buy some!) and cover the cake on all sides. I love using whipped cream instead of frosting because it feels so much lighter, and I love that during warmer weather.
Then comes the fun part! This is great time to include your kids and put their decorating skills to work. You’ll need blueberries, raspberries, and strawberries.
Rinse your berries really well (I like to soak mine for a few minutes in Thieve Fruit and Veggie Soak before I rinse), and blot them dry. Quarter your strawberries. I leave the stems on for a little color - but that part is up to you!
In the upper lefthand corner, create a square with the blueberries for the stars! Next, you’re going to create your stripes. Just alternate your strawberries and raspberries in each row, and you’re done.
A beautiful cake, fresh fruit, and you have your own star spangled banner, ready for your next get together!


About a year ago I wrote this about our crib.
"Y’all. This crib. We bought it when I was pregnant with my first and all four babies have used it. I’ve slept in that crib, next to that crib.... I’ve rocked next to it, cried, laughed & prayed by that crib. It holds memories, motherhood and all my childhood dreams all in that piece. My throat tightens just at the thought of the day well pack it up for the last time. 👼🏻❤️."
Well. I hadn't planned on moving her out yet.
Ainsleigh is getting a new trundle bed and it's being delivered while we are in Florida. The plan was make her bed little again ( it has 3 sizes) and put in Adelaides room and slowly over the next 6 months maybe transition her.
Adelaide was OVER THE MOON. It was love at first sight!
She kept pointing at the crib " all done that bed, New one bed!!!"
 style has changed but bed here
She took one nap in the crib since we moved it in but otherwise has slept all night every night in the "new one bed" and officially says she is finished with the crib. Oh my mama heart. The last baby, * tears* - just like they say... I didn't know it would be the last time.
JavaScript is currently disabled in this browser. Reactivate it to view this content.

We love when school is out and we can start heading out on our summer adventures!
One of our favorite places to spend our days is in Watercolor and Seaside. The crystal blue water and white sandy beaches call to us, and we can’t wait be there in just a few days!!
As we look ahead to the joy we’re going to share with them and remember all of the memories we’ve created there in the past: snorkeling in the ocean, cannonballs into the pool under the moonlight, dance parties, riding bikes, building sand castles together, late light movies and snuggles in our bed.
These adventures are a way to say “yes” to being thankful for legs that run, eyes that see, and lungs that breathe. Soaking in the salty air and the bright warm sunlight, with hearts so full of gratitude.
Our years with these precious little ones are so limited - I will soak in every last drop and every little moment from big to small. I’m not going to miss a thing. The way they smile when they see me dive into a wave, the way their hair glistens in the sunset, or the way their eyes light up as they soak in the wonder. Thank you, Lord, for these gifts - I won’t miss a moment of the beauty that they are. And I can’t wait to a part of all the ones to come.
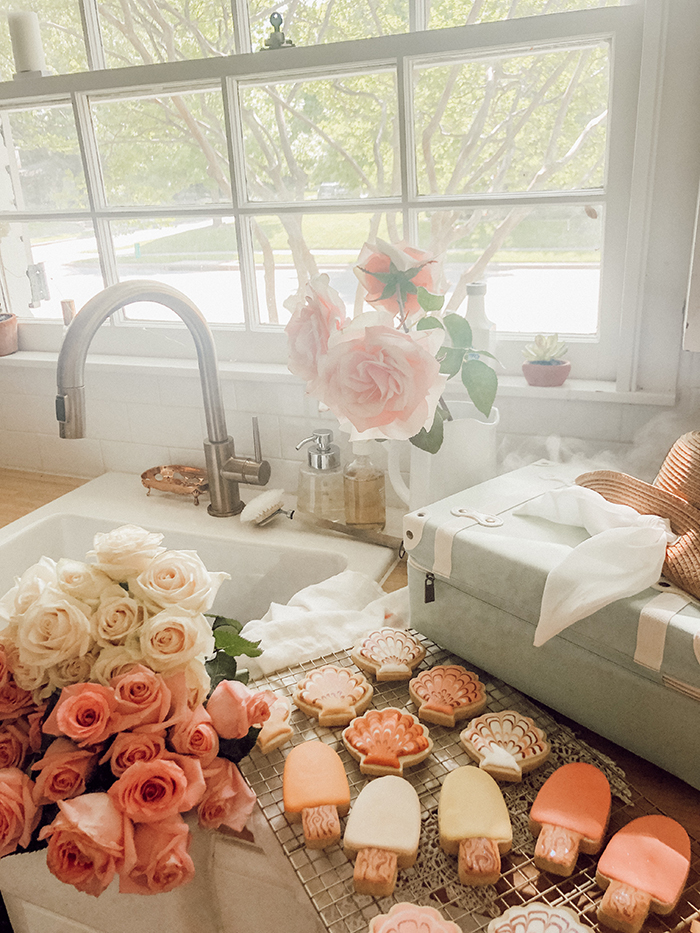
 Cookies via Kathleen Campbell HERE


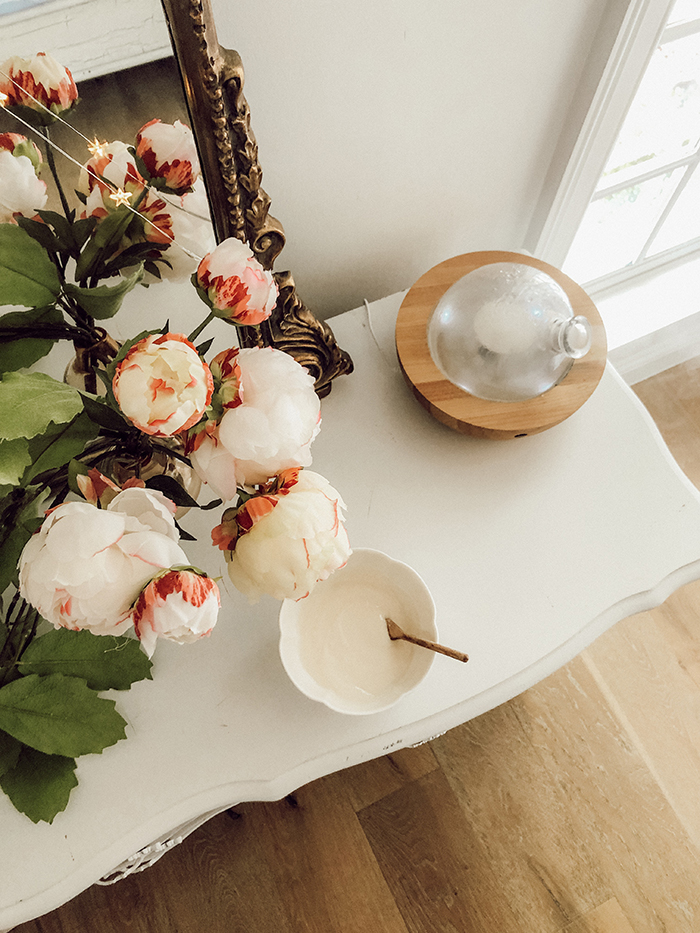
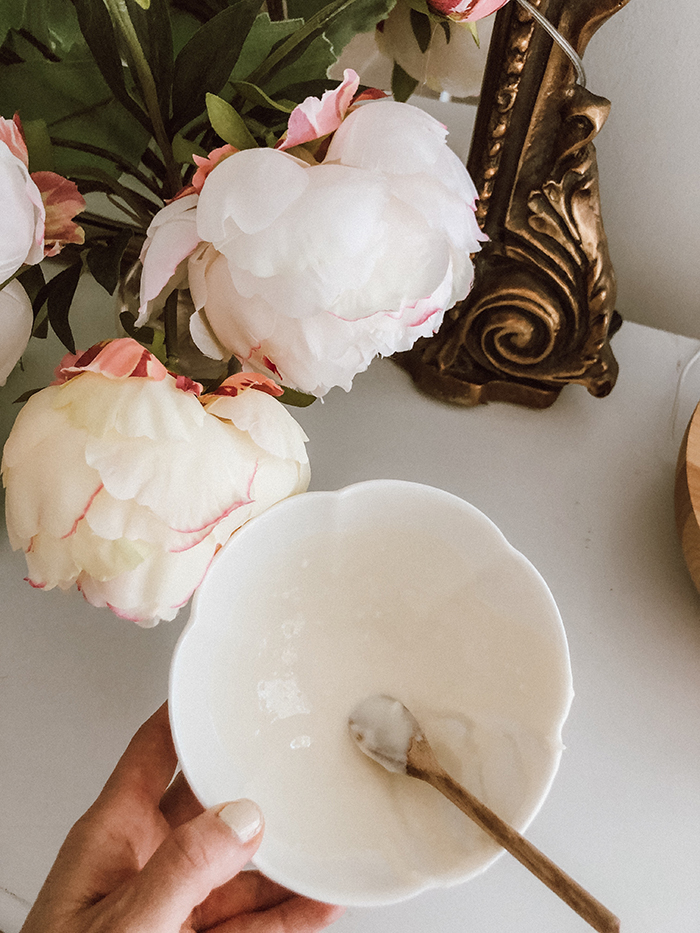
I am excited to share another super simple hair DIY with you today that is absolutely amazing!!
The “triple threat” conditioner - it does wonders for you hair, leaving it so silky and smooth, with all natural ingredients. Taking good care of my hair is so important to me, and I love that I can find a few ingredients right around my house that will leave it feel luxurious.
In a glass bowl,
combine 4 tablespoons of coconut oil and 2 tablespoons of honey.
Heat them in the microwave (or on the stovetop if you prefer), until melted and combined and not too hot.
I love adding a few essential oils into mine at this point - 5 drops each of Lavender, Cedarwood and Rosemary. This combo is beautiful for a healthy scalp and natural hair health. It may even boost growth! Once everything is combined, gently massage it into your scalp, and work it down to the ends of your hair. Cover your head with a shower cap and let it set for about 30 minutes.
Shampoo as you normally would after half and hour or so, and then style as usual. You won’t believe the difference those thirty minutes will make!

 braids via photos via beckley covia Kathleen Campbell HERE
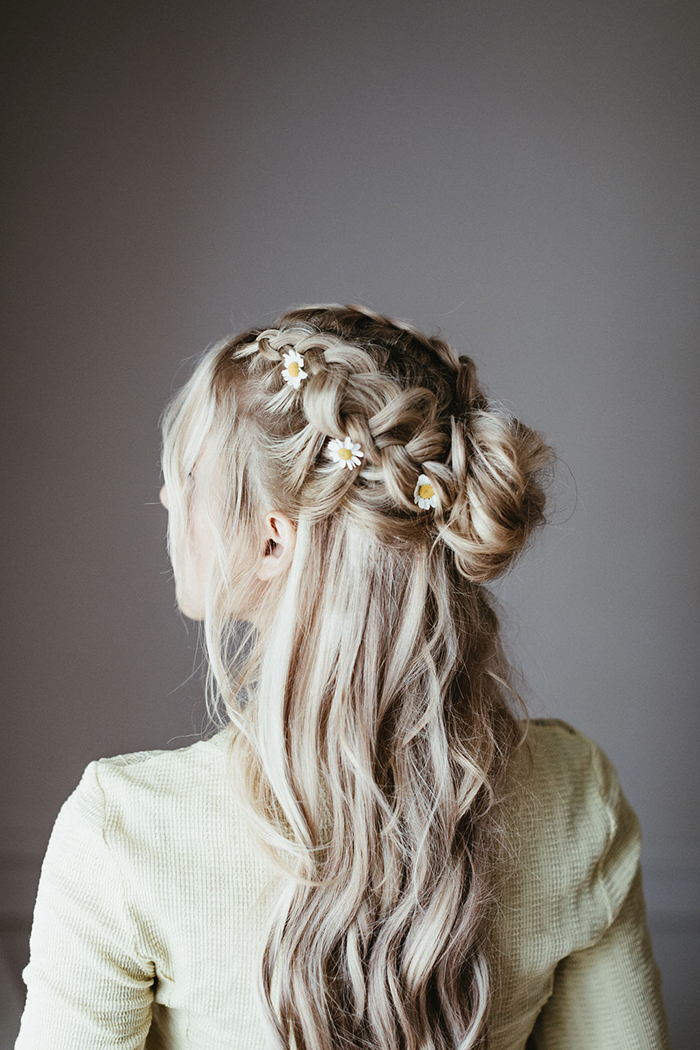
Flower Braids.
11 Jun 2019 4:29 AM (6 years ago)

Summer is here and that means gorgeous, warm weather and more time outside! I love to keep my hair pulled up to cool off, especially in the Texas heat. It’s easy to dress up a quick, casual look in a few different ways!
I also love to have my hair braided back and then add a few touches to "dress it up"!!

Try a braid to accent that ponytail. Just loosely braid the front of your hair on one side, gently pulling hair on each side once you’re done to make it look thicker and more natural. Pin halfway back, and then pull up as you normally would! OR two soft braids half up/ half down pinned back into a messy bun!
Add in some pretty flowers to create something extra special. I love adding little blooms into my hair when it’s braided - and my girls love doing it, too! It’s such an easy way to make something simple feel intentional.
Another super easy summer hair trick: put your hair up in a top knot. Once it’s secure, pull a bit here and there to keep it loose and natural, and pin a pretty flower in on the side of the knot. Effortless and lovely all at once!
We are busy mamas, especially in the summer, and creating a special look doesn’t have to be complicated. Adding in fresh flowers makes such a difference!
 photos via beckley cobraids via


%3C/div%3E%3Cdiv%3E+%20Watermelon%20and%20Mint%20leaves%3C/div%3E%3Cdiv%3E+%20Kiwi%20and%20Cucumber%3C/div%3E%3Cdiv%3E+%20Grapefruit%20and%20rosemary%20sprigs%3C/div%3E%3Cdiv%3E%3Cbr%20/%3E%3Ca%20href%3D%22https://2.bp.blogspot.com/-lrNgYTKQzYM/XPwLc9ZmK9I/AAAAAAAAciQ/qh1w9e46P8M0O4VDFQsSMi8QR9PI0C2zgCLcBGAs/s1600/IMG_4519.JPG%22%20imageanchor%3D%221%22%3E%3Cimg%20border%3D%220%22%20data-original-height%3D%22933%22%20data-original-width%3D%22700%22%20src%3D%22https://2.bp.blogspot.com/-lrNgYTKQzYM/XPwLc9ZmK9I/AAAAAAAAciQ/qh1w9e46P8M0O4VDFQsSMi8QR9PI0C2zgCLcBGAs/s1600/IMG_4519.JPG%22%20/%3E%3C/a%3E%3C/div%3E%3Cdiv%3E%3Cbr%20/%3E%3C/div%3E%3Cdiv%3EFor%20the%20one%20pictured%20all%20you%20need%20is,%26nbsp;%3C/div%3E%3Cdiv%3EHoneydew,%20Cucumber,%20and%20Mint:%3C/div%3E%3Cdiv%3E1/2%20cup%20honeydew%20cubes%3C/div%3E%3Cdiv%3E1%20cucumber%20thinly%20sliced%3C/div%3E%3Cdiv%3E10%20fresh%20mint%20leaves%20torn%3C/div%3E%3Cdiv%3E%3Cbr%20/%3E%3C/div%3E%3Cdiv%3E%3Cspan%3EHere%20is%3Cb%3E%3Ci%3E%20%3Ca%20href%3D%22https://livingthenourishedlife.com/infused-cucumber-water-recipe/%22%3Ea%20great%20link%20on%20Cucumber%20water!%26nbsp;%3C/a%3E%3C/i%3E%3C/b%3E%3C/span%3E%3C/div%3E%3Cdiv%3ESO%20simple%20yet%20so%20beautiful%20and%20of%20course%20incredible%20for%20the%20benefits!%26nbsp;%3C/div%3E%3Cdiv%3E%3Cbr%20/%3E%3C/div%3E%3Cdiv%3E%3Ca%20href%3D%22https://3.bp.blogspot.com/-d8-eR7uppao/XPwLc7TbdgI/AAAAAAAAciI/rTx7KxMkEbgZ_Rmzy3VKtBuOOd9eQyC8QCLcBGAs/s1600/IMG_4520.JPG%22%20imageanchor%3D%221%22%3E%3Cimg%20border%3D%220%22%20data-original-height%3D%22933%22%20data-original-width%3D%22700%22%20src%3D%22https://3.bp.blogspot.com/-d8-eR7uppao/XPwLc7TbdgI/AAAAAAAAciI/rTx7KxMkEbgZ_Rmzy3VKtBuOOd9eQyC8QCLcBGAs/s1600/IMG_4520.JPG%22%20/%3E%3C/a%3E%3C/div%3E%3Cdiv%3E%3Cbr%20/%3E%3C/div%3E%3Cdiv%3EFill%20a%20glass%20(or%20a%20jug%20if%20you%20want%20to%20make%20a%20large%20amount)%20with%20water.%20Add%20the%20ingredients%20and%20stir.%20Top%20with%20ice%20cubes%20and%20serve%20with%20a%20straw!%20%5BFor%20a%20stronger%20flavor%20allow%20the%20water%20to%20sit%20in%20the%20fridge%20for%201-2%20hours.%201-2%20tsp%20of%20coconut%20sugar%20can%20also%20be%20added%20to%20sweeten.%3C/div%3E%3Cdiv%3E%3Cbr%20/%3E%3Ca%20href%3D%22https://2.bp.blogspot.com/-rJqeu5YvOFA/XPwLdj9Yo9I/AAAAAAAAciY/BJPwieSZvvA1_UT5BrMUw7z5-z2tYz60ACLcBGAs/s1600/IMG_4528.JPG%22%20imageanchor%3D%221%22%3E%3Cimg%20border%3D%220%22%20data-original-height%3D%22933%22%20data-original-width%3D%22700%22%20src%3D%22https://2.bp.blogspot.com/-rJqeu5YvOFA/XPwLdj9Yo9I/AAAAAAAAciY/BJPwieSZvvA1_UT5BrMUw7z5-z2tYz60ACLcBGAs/s1600/IMG_4528.JPG%22%20/%3E%3C/a%3E%3C/div%3E%3Cdiv%3E%3Cbr%20/%3E%3C/div%3E%3Cdiv%3E%26nbsp;I%20encourage%20you%20to%20grab%20your%20fav%20fruits%20and%20herbs,%20get%20that%20water%20infused,%20and%20drink%20up%20this%20summer!%20%26nbsp;This%20could%20be%20a%20great%20habit%20to%20start....enjoy!!!%3C/div%3E%3Cdiv%3E%3Cbr%20/%3E%3C/div%3E%3Cdiv%3E%3Cspan%3E%3Cspan%3Evia%26nbsp;%3C/span%3E%3Ca%20href%3D%22https://www.instagram.com/tincystastries/%22%3E%3Cb%3E%3Ci%3EKathleen%20Campbell%20HERE%3C/i%3E%3C/b%3E%3C/a%3E%3C/span%3E%3C/div%3E)


%26nbsp;%3C/i%3E%3C/div%3E%3Cbr%20/%3E%3Cdiv%3E%3Ci%3EYou%E2%80%99ll%20need%20to%20create%20a%20little%20double%20boiler%20if%20you%20don%E2%80%99t%20already%20have%20one.%20Just%20add%20a%20couple%20inches%20of%20water%20to%20a%20saucepan%20and%20put%20a%20glass%20bowl%20on%20top,%20making%20sure%20that%20the%20bottom%20of%20the%20bowl%20doesn%E2%80%99t%20touch%20the%20water.%20Bring%20the%20water%20to%20a%20boil,%20and%20then%20add%20in%20your%20ingredients.%26nbsp;%3C/i%3E%3C/div%3E%3Cbr%20/%3E%3Cdiv%3EYou%E2%80%99ll%20need:%3C/div%3E%3Cdiv%3E1/2%20cup%20coconut%20oil%3C/div%3E%3Cdiv%3E1/3%20cup%20shea%20butter%3C/div%3E%3Cdiv%3E1/3%20cup%20cocoa%20butter%3C/div%3E%3Cdiv%3E2%20tablespoons%20beeswax%3C/div%3E%3Cdiv%3E1%20tablespoon%20jojoba%20oil%3C/div%3E%3Cdiv%3ETangerine%20%26amp;%20Lemon%20EO%3Cbr%20/%3E%3Cspan%3E%3Ci%3E(%20if%20going%20to%20be%20out%20in%20the%20sun,%20choose%20lavender%20instead)%3C/i%3E%3C/span%3E%3C/div%3E%3Ci%3E%3Cbr%20/%3E%3C/i%3E%3Cbr%20/%3E%3Ca%20href%3D%22https://3.bp.blogspot.com/-oQtzPW-7XfM/XQFWBpHlR-I/AAAAAAAAcnk/hmrPBbH___Ydbjz0drNiLQjVLyeoTT73gCLcBGAs/s1600/Photo+May+04%25252C+4+36+33+PM.jpg%22%20imageanchor%3D%221%22%3E%3Cimg%20border%3D%220%22%20data-original-height%3D%22933%22%20data-original-width%3D%22700%22%20src%3D%22https://3.bp.blogspot.com/-oQtzPW-7XfM/XQFWBpHlR-I/AAAAAAAAcnk/hmrPBbH___Ydbjz0drNiLQjVLyeoTT73gCLcBGAs/s1600/Photo+May+04%25252C+4+36+33+PM.jpg%22%20/%3E%3C/a%3E%3Cbr%20/%3E%3Cbr%20/%3E%3Cdiv%3E%3Ci%3EOnce%20the%20water%20is%20boiling,%20add%20in%20coconut%20oil,%20Shea%20butter,%20cocoa%20butter,%20beeswax,%20and%20jojoba%20oil.%20Stir%20occasionally%20until%20everything%20is%20melted%20and%20combined.%20Remove%20from%20heat%20and%20stir%20in%20your%20essential%20oil!%3C/i%3E%3C/div%3E%3Cdiv%3E%3Ci%3E%3Cbr%20/%3E%3C/i%3E%3C/div%3E%3Cdiv%3E%3Ci%3EOnce%20it%E2%80%99s%20cooled%20a%20bit,%20transfer%20to%20a%20container%20of%20your%20choice.%20Apply%20as%20needed!%26nbsp;%3C/i%3E%3C/div%3E)

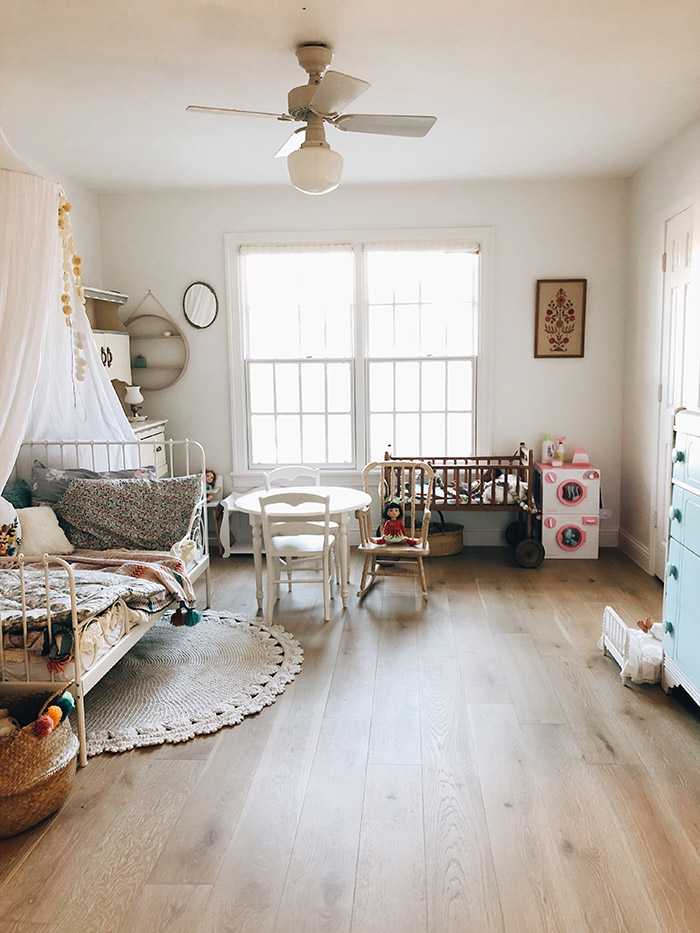


%3C/a%3E%3C/div%3E%3Cdiv%3E%3Cbr%20/%3E%3C/div%3E%3Cdiv%3E%3Ca%20href%3D%22https://2.bp.blogspot.com/-PI6iJiLbouI/WlpLPirx3TI/AAAAAAAAVhM/-CcN_KA6P0QjTNGevAvGMi0urrJrO9T5QCLcBGAs/s1600/0A4DD708-8D30-4933-B015-DAD5949C68EA.JPG%22%20imageanchor%3D%221%22%3E%3Cimg%20border%3D%220%22%20data-original-height%3D%22933%22%20data-original-width%3D%22700%22%20src%3D%22https://2.bp.blogspot.com/-PI6iJiLbouI/WlpLPirx3TI/AAAAAAAAVhM/-CcN_KA6P0QjTNGevAvGMi0urrJrO9T5QCLcBGAs/s1600/0A4DD708-8D30-4933-B015-DAD5949C68EA.JPG%22%20/%3E%3C/a%3E%3C/div%3E%3Cdiv%3E(%20%3Ca%20href%3D%22http://www.thewiegands.com/2018/01/home-tour-apples-room.html%22%3EApple's%20Room%3C/a%3E)%26nbsp;%3C/div%3E%3Cdiv%3E%3Cbr%20/%3E%3C/div%3E%3Cdiv%3E%3Ca%20href%3D%22https://2.bp.blogspot.com/-Y3M7ZfFaeUg/Wnva3zNizMI/AAAAAAAAVpY/NeVXR6D85U8KjJO-hHuCTW_U6D9sCxDvACLcBGAs/s1600/casey_feb2-150POST.jpg%22%20imageanchor%3D%221%22%3E%3Cimg%20border%3D%220%22%20data-original-height%3D%221050%22%20data-original-width%3D%22700%22%20src%3D%22https://2.bp.blogspot.com/-Y3M7ZfFaeUg/Wnva3zNizMI/AAAAAAAAVpY/NeVXR6D85U8KjJO-hHuCTW_U6D9sCxDvACLcBGAs/s1600/casey_feb2-150POST.jpg%22%20/%3E%3C/a%3E%3C/div%3E%3Cdiv%3E(%3Ca%20href%3D%22http://www.thewiegands.com/2018/02/a-home-tour-bathrooms.html%22%3EMaster%20bath%3C/a%3E)%3C/div%3E%3Cdiv%3E%3Cbr%20/%3E%3C/div%3E%3Cdiv%3E%3Ca%20href%3D%22https://3.bp.blogspot.com/-Pnzt0QiZHB0/Wnva1zCzn-I/AAAAAAAAVpI/KBTjVDoyz2w_l6QLWbEdzVPsWb1E-S6jACLcBGAs/s1600/casey_feb2-139POST.jpg%22%20imageanchor%3D%221%22%3E%3Cimg%20border%3D%220%22%20data-original-height%3D%221050%22%20data-original-width%3D%22700%22%20src%3D%22https://3.bp.blogspot.com/-Pnzt0QiZHB0/Wnva1zCzn-I/AAAAAAAAVpI/KBTjVDoyz2w_l6QLWbEdzVPsWb1E-S6jACLcBGAs/s1600/casey_feb2-139POST.jpg%22%20/%3E%3C/a%3E%3C/div%3E%3Cdiv%3E(%3Ca%20href%3D%22http://www.thewiegands.com/2018/02/a-home-tour-bathrooms.html%22%3EGirls%20Bath%3C/a%3E)%3C/div%3E%3Cdiv%3E%3Cbr%20/%3E%3C/div%3E%3Cdiv%3E%3Ca%20href%3D%22https://3.bp.blogspot.com/-6UrSlMWC6Sc/Wo79FN32M0I/AAAAAAAAV0c/OqHYCxxhLd8Mh4UZoQLIHZP45WISh7LFwCLcBGAs/s1600/casey_feb16-15EDIT.jpg%22%20imageanchor%3D%221%22%3E%3Cimg%20border%3D%220%22%20data-original-height%3D%221050%22%20data-original-width%3D%22700%22%20src%3D%22https://3.bp.blogspot.com/-6UrSlMWC6Sc/Wo79FN32M0I/AAAAAAAAV0c/OqHYCxxhLd8Mh4UZoQLIHZP45WISh7LFwCLcBGAs/s1600/casey_feb16-15EDIT.jpg%22%20/%3E%3C/a%3E%3C/div%3E%3Cdiv%3E(%3Ca%20href%3D%22http://www.thewiegands.com/2018/03/home-tour-photo-wall.html%22%3EPhoto%20Wall%3C/a%3E)%26nbsp;%3C/div%3E%3Cdiv%3E%3Cbr%20/%3E%3C/div%3E%3Cdiv%3E%3Ca%20href%3D%22https://4.bp.blogspot.com/-ZwxX4WKaOjs/Wo73GDM5MgI/AAAAAAAAVy8/XYbqSCeP3YYvbfTz0y-ONNYQrB_I_dBDgCLcBGAs/s1600/casey_feb16-85EDIT..jpg%22%20imageanchor%3D%221%22%3E%3Cimg%20border%3D%220%22%20data-original-height%3D%221050%22%20data-original-width%3D%22700%22%20src%3D%22https://4.bp.blogspot.com/-ZwxX4WKaOjs/Wo73GDM5MgI/AAAAAAAAVy8/XYbqSCeP3YYvbfTz0y-ONNYQrB_I_dBDgCLcBGAs/s1600/casey_feb16-85EDIT..jpg%22%20/%3E%3C/a%3E%3C/div%3E%3Cdiv%3E(%3Ca%20href%3D%22http://www.thewiegands.com/2018/03/home-tour-ainsleighs-room.html%22%3EAinsleigh%20Room%3C/a%3E)%3C/div%3E%3Cdiv%3E%3Cbr%20/%3E%3C/div%3E%3Cdiv%3E%3Ca%20href%3D%22https://3.bp.blogspot.com/-ZjCZwnB4xGE/WpmGWnILnqI/AAAAAAAAV7k/hY3T0Vvt6NED_zhl-Axox3MEM65USJPOgCLcBGAs/s1600/casey_feb23-135EDIT.jpg%22%20imageanchor%3D%221%22%3E%3Cimg%20border%3D%220%22%20data-original-height%3D%221050%22%20data-original-width%3D%22700%22%20src%3D%22https://3.bp.blogspot.com/-ZjCZwnB4xGE/WpmGWnILnqI/AAAAAAAAV7k/hY3T0Vvt6NED_zhl-Axox3MEM65USJPOgCLcBGAs/s1600/casey_feb23-135EDIT.jpg%22%20/%3E%3C/a%3E%3C/div%3E%3Cdiv%3E(%3Ca%20href%3D%22http://www.thewiegands.com/2018/03/home-tour-playroom.html%22%3E%20Playroom%3C/a%3E)%3C/div%3E%3Cdiv%3E%3Cbr%20/%3E%3C/div%3E%3Cdiv%3E%3Ca%20href%3D%22https://1.bp.blogspot.com/-SWCylUgxans/WpmF9OGvuxI/AAAAAAAAV6g/E7WDgshq26Ev8OSYcyxkPQ04dD1OYB-4gCLcBGAs/s1600/casey_feb23-36EDIT.jpg%22%20imageanchor%3D%221%22%3E%3Cimg%20border%3D%220%22%20data-original-height%3D%221050%22%20data-original-width%3D%22700%22%20src%3D%22https://1.bp.blogspot.com/-SWCylUgxans/WpmF9OGvuxI/AAAAAAAAV6g/E7WDgshq26Ev8OSYcyxkPQ04dD1OYB-4gCLcBGAs/s1600/casey_feb23-36EDIT.jpg%22%20/%3E%3C/a%3E%3C/div%3E%3Cdiv%3E(%20%3Ca%20href%3D%22http://www.thewiegands.com/2018/04/home-tour-adelaides-room.html%22%3EAdelaide%20Room%3C/a%3E)%3C/div%3E%3Cdiv%3E%3Cbr%20/%3E%3C/div%3E%3Cdiv%3E%3Cbr%20/%3E%3C/div%3E%3Cdiv%20data-widget-%3E%3Cbr%20/%3E%3Cdiv%3E%3Cimg%20onerror%3D%22this.parentNode.innerHTML%3D'Disable%20your%20ad%20blocking%20software%20to%20view%20this%20content.'%22%20src%3D%22http://assets.rewardstyle.com/production/0e4f3801d077575ac3d1ae289e2e437c6aad70f0/images/search/350.gif%22%20style%3D%22height:%2015px;%20width:%2015px;%22%20/%3EJavaScript%20is%20currently%20disabled%20in%20this%20browser.%20Reactivate%20it%20to%20view%20this%20content.%3C/div%3E%3C/div%3E)


,%20I'm%20blogging%20and%20sharing%20at%20%3Ca%20href%3D%22http://www.briannavenzke.com/%22%3Ewww.briannavenzke.com%3C/a%3E%20and%20Casey%20invited%20me%20to%20share%20over%20here!%3C/i%3E%3Cbr%20/%3E%3Ci%3E%3Cbr%20/%3E%3C/i%3E%3Ci%3ESo%20excited%20to%26nbsp;share%20my%20fav%20reading%20picks%20with%20you%26nbsp;guys%20today:%3C/i%3E%3C/div%3E%3Cbr%20/%3E%3Cdiv%3E%3Ca%20href%3D%22https://1.bp.blogspot.com/-TLUkTfBMSUc/XQhHrJypkSI/AAAAAAAAcuo/qMU1yLAebKgZ2nPoAfGaAQLGI43DCUPUQCLcBGAs/s1600/TopSummerReadingPicksforMom.jpg%22%20imageanchor%3D%221%22%3E%3Cimg%20border%3D%220%22%20data-original-height%3D%22955%22%20data-original-width%3D%22700%22%20src%3D%22https://1.bp.blogspot.com/-TLUkTfBMSUc/XQhHrJypkSI/AAAAAAAAcuo/qMU1yLAebKgZ2nPoAfGaAQLGI43DCUPUQCLcBGAs/s1600/TopSummerReadingPicksforMom.jpg%22%20/%3E%3C/a%3E%3C/div%3E%3Cbr%20/%3E%3Cbr%20/%3E%3Ch3%3ETop%205%20Summer%20Reading%20Picks%20for%20Mamas%3C/h3%3E%3Cbr%20/%3E1.%20%3Ca%20href%3D%22https://amzn.to/2KnSbUs%22%20target%3D%22_blank%22%3E%22The%20Rules%20of%20Magic%22%20by%20Alice%20Hoffman%3C/a%3E%20-%20I%20grew%20up%20in%20love%20with%20the%20movie%20Practical%20Magic,%20based%20on%20a%20book%20by%20Alice%20Hoffman,%20The%20Rules%20of%20Magic%20is%20the%20prequel,%20set%20in%20the%201960's%20and%2070's,%20is%20a%20fun%20quick%20read%20perfect%20for%20summer%20afternoons.%3Cbr%20/%3E%3Cbr%20/%3E2.%20%3Ca%20href%3D%22https://amzn.to/2IOz3f3%22%20target%3D%22_blank%22%3E%22Where'd%20You%20Go,%20Bernadette%22%20by%20Maria%20Semple%3C/a%3E%20-%20This%20will%20be%20a%20movie%20this%20Fall!%20I%20love%20diving%20into%20a%20book%20before%20it%20hits%20the%20big%20screen,%20this%20was%20a%20funny,%20spurring%20novel%20that%20I%20think%20you'll%20enjoy!%3Cbr%20/%3E%3Cbr%20/%3E3.%20%3Ca%20href%3D%22https://amzn.to/2N8yzpN%22%20target%3D%22_blank%22%3E%22Crazy%20Rich%20Asians%22%20by%20Kevin%20Kwan%3C/a%3E%20-%20Even%20sweeter%20and%20funnier%20than%20the%20movie!%20This%20book%20is%20a%20part%20of%20a%20trilogy!%3Cbr%20/%3E%3Cbr%20/%3E4.%20%3Ca%20href%3D%22https://amzn.to/2KoDUHk%22%20target%3D%22_blank%22%3E%22The%20Whole-Brain%20Child%22%20by%20Daniel%20J.%20Siegel%3C/a%3E%20-%20Switching%20it%20up%20with%20this%20one,%20but%20this%20is%20a%20fantastic%20read%20for%20parents%20of%20children,%20at%20any%20age!%20It's%20a%20short%20book%20and%20to%20the%20point!%3Cbr%20/%3E%3Cbr%20/%3E5.%20%3Ca%20href%3D%22https://amzn.to/2IOywKi%22%20target%3D%22_blank%22%3E%22Where%20The%20Crawdads%20Sing%22%20by%20Delia%20Owens%3C/a%3E%20-%20This%20is%20on%20my%20personal%20must-read%20list!%20I've%20just%20purchased%20it%20but%20the%20reviews%20are%20in,%20people%20can't%20put%20it%20down%20or%20stop%20talking%20about%20it!%20I%20can't%20wait%20to%20read!%3Cbr%20/%3E%3Cbr%20/%3E%3Cdiv%3E%3Ca%20href%3D%22https://1.bp.blogspot.com/-4yh7cofXKwo/XQhHo9KKjqI/AAAAAAAAcuk/lM-zssD43N4mC90rqIeI84N-d0BYxXTwQCEwYBhgL/s1600/TopSummerReadingPicksforKids.jpg%22%20imageanchor%3D%221%22%3E%3Cimg%20border%3D%220%22%20data-original-height%3D%221000%22%20data-original-width%3D%22700%22%20src%3D%22https://1.bp.blogspot.com/-4yh7cofXKwo/XQhHo9KKjqI/AAAAAAAAcuk/lM-zssD43N4mC90rqIeI84N-d0BYxXTwQCEwYBhgL/s1600/TopSummerReadingPicksforKids.jpg%22%20/%3E%3C/a%3E%3C/div%3E%3Cbr%20/%3E%3Ch3%3ETop%205%20Summer%20Reading%20Picks%20for%20Toddlers%3C/h3%3E%3Cbr%20/%3E1.%20%3Ca%20href%3D%22https://amzn.to/2IQBs95%22%20target%3D%22_blank%22%3E%22The%20Wonderful%20Things%20You%20Will%20Be%22%20by%20Emily%20Winfield%20Martin%3C/a%3E%20-%20If%20you%20haven't%20picked%20this%20one%20up%20yet%20for%20your%20little,%20do%20so%20now!%20It%20is%20so%20sweet%20and%20the%20illustrations%20are%20stunning!%20We%20own%20all%20of%20the%20children's%20books%20by%20this%20author%20because%20they%20are%20so%20beautiful!%3Cbr%20/%3E%3Cbr%20/%3E2.%20%3Ca%20href%3D%22https://amzn.to/2Rl52r8%22%20target%3D%22_blank%22%3E%22Dragons%20Love%20Tacos%22%20by%20Adam%20Rubin%3C/a%3E%20-%20Your%20little%20one%20will%20love%20this%20fun%20and%20silly%20book!%3Cbr%20/%3E%3Cbr%20/%3E3.%20%3Ca%20href%3D%22https://amzn.to/2N41sDw%22%20target%3D%22_blank%22%3E%22Whose%20Boat%22%20by%20Tony%20Buzzeo%3C/a%3E%20-%20This%20book%20shares%20about%20different%20types%20of%20boats%20and%20who%20operates%20them!%20A%20great%20book%20for%20any%20sea%20loving%20little%20one!%3Cbr%20/%3E%3Cbr%20/%3E4.%20%3Ca%20href%3D%22https://amzn.to/2WQvLwJ%22%20target%3D%22_blank%22%3E%22The%20Cat%20at%20Night%22%20by%20Dahlov%20Ipcar%3C/a%3E%20-%20You'll%20love%20this%20one!%20It%20has%20pretty%20illustrations%20and%20the%20theme%20is%20great%20for%20young%20ones%20as%20well!%3Cbr%20/%3E%3Cbr%20/%3E5.%20%3Ca%20href%3D%22https://amzn.to/2IQCfa3%22%20target%3D%22_blank%22%3E%22The%2050%20States:%20Explore%20the%20U.S.A.%22%20by%20Gabrielle%20Balkan%3C/a%3E%20-%20This%20fantastic%20book%20is%20one%20that%20the%20kids%20pull%20out%20over%20and%20over%20again,%20they%20love%20pouring%20over%20the%20maps%20and%20learning%20new%20facts!%3Cbr%20/%3E%3Cbr%20/%3EDo%20you%20love%20reading?%20Have%20you%20read%20any%20of%20our%20top%20picks?)


%20and%20cover%20the%20cake%20on%20all%20sides.%20I%20love%20using%20whipped%20cream%20instead%20of%20frosting%20because%20it%20feels%20so%20much%20lighter,%20and%20I%20love%20that%20during%20warmer%20weather.%3C/i%3E%3C/div%3E%3Cdiv%3E%3Ci%3E%3Cbr%20/%3E%3C/i%3E%3C/div%3E%3Cdiv%3E%3Ca%20href%3D%22https://1.bp.blogspot.com/-1kMiHX-kxQo/XOlgebqYzFI/AAAAAAAAcWk/ryZXp7Y2MvECfR-Ou-xVZS2ZUlSJlfYFgCLcBGAs/s1600/Photo+May+04%25252C+3+51+01+PM.jpg%22%20imageanchor%3D%221%22%3E%3Cimg%20border%3D%220%22%20data-original-height%3D%22933%22%20data-original-width%3D%22700%22%20src%3D%22https://1.bp.blogspot.com/-1kMiHX-kxQo/XOlgebqYzFI/AAAAAAAAcWk/ryZXp7Y2MvECfR-Ou-xVZS2ZUlSJlfYFgCLcBGAs/s1600/Photo+May+04%25252C+3+51+01+PM.jpg%22%20/%3E%3C/a%3E%3C/div%3E%3Cdiv%3E%3Cbr%20/%3E%3C/div%3E%3Cdiv%3E%3Ci%3EThen%20comes%20the%20fun%20part!%20This%20is%20great%20time%20to%20include%20your%20kids%20and%20put%20their%20decorating%20skills%20to%20work.%20You%E2%80%99ll%20need%20blueberries,%20raspberries,%20and%20strawberries.%3C/i%3E%3C/div%3E%3Cdiv%3E%3Ci%3E%3Cbr%20/%3E%3C/i%3E%3C/div%3E%3Cdiv%3E%3Ci%3ERinse%20your%20berries%20really%20well%20(I%20like%20to%20soak%20mine%20for%20a%20few%20minutes%20in%20Thieve%20Fruit%20and%20Veggie%20Soak%20before%20I%20rinse),%20and%20blot%20them%20dry.%20Quarter%20your%20strawberries.%20I%20leave%20the%20stems%20on%20for%20a%20little%20color%20-%20but%20that%20part%20is%20up%20to%20you!%3C/i%3E%3C/div%3E%3Cdiv%3E%3Ci%3E%3Cbr%20/%3E%3C/i%3E%3C/div%3E%3Cdiv%3E%3Ca%20href%3D%22https://1.bp.blogspot.com/-hAvNNTf2SZ0/XOlgePPVCxI/AAAAAAAAcWg/oYjhMcWQr4EIG1BRVcg7aLl7SpTr94mTgCLcBGAs/s1600/Photo+May+04%25252C+3+50+45+PM.jpg%22%20imageanchor%3D%221%22%3E%3Cimg%20border%3D%220%22%20data-original-height%3D%22933%22%20data-original-width%3D%22700%22%20src%3D%22https://1.bp.blogspot.com/-hAvNNTf2SZ0/XOlgePPVCxI/AAAAAAAAcWg/oYjhMcWQr4EIG1BRVcg7aLl7SpTr94mTgCLcBGAs/s1600/Photo+May+04%25252C+3+50+45+PM.jpg%22%20/%3E%3C/a%3E%3C/div%3E%3Cdiv%3E%3Cbr%20/%3E%3C/div%3E%3Cdiv%3E%3Ci%3EIn%20the%20upper%20lefthand%20corner,%20create%20a%20square%20with%20the%20blueberries%20for%20the%20stars!%20Next,%20you%E2%80%99re%20going%20to%20create%20your%20stripes.%20Just%20alternate%20your%20strawberries%20and%20raspberries%20in%20each%20row,%20and%20you%E2%80%99re%20done.%26nbsp;%3C/i%3E%3C/div%3E%3Cdiv%3E%3Ci%3E%3Cbr%20/%3E%3C/i%3E%3C/div%3E%3Cdiv%3E%3Ci%3EA%20beautiful%20cake,%20fresh%20fruit,%20and%20you%20have%20your%20own%20star%20spangled%20banner,%20ready%20for%20your%20next%20get%20together!%3C/i%3E%3C/div%3E%3Cdiv%3E%3Cbr%20/%3E%3Ca%20href%3D%22https://3.bp.blogspot.com/-sRplfB0pSAc/XOlg2oh_qEI/AAAAAAAAcXI/EwBaJMqeebkHOJfyJz_GPTYfliVkgNAeQCLcBGAs/s1600/Photo+May+04%25252C+3+51+14+PM.jpg%22%20imageanchor%3D%221%22%3E%3Cimg%20border%3D%220%22%20data-original-height%3D%22933%22%20data-original-width%3D%22700%22%20src%3D%22https://3.bp.blogspot.com/-sRplfB0pSAc/XOlg2oh_qEI/AAAAAAAAcXI/EwBaJMqeebkHOJfyJz_GPTYfliVkgNAeQCLcBGAs/s1600/Photo+May+04%25252C+3+51+14+PM.jpg%22%20/%3E%3C/a%3E%3Cbr%20/%3E%3Cbr%20/%3E%3Cdiv%3E%3Cspan%3E%3Cspan%3Evia%26nbsp;%3C/span%3E%3Cb%3E%3Ci%3E%3Ca%20href%3D%22https://www.instagram.com/tincystastries/%22%3EKathleen%20Campbell%20HERE%3C/a%3E%3C/i%3E%3C/b%3E%3C/span%3E%3C/div%3E%3Cbr%20/%3E%3C/div%3E)

%20and%20put%20in%20Adelaides%20room%20and%20slowly%20over%20the%20next%206%20months%20maybe%20transition%20her.%26nbsp;%3C/i%3E%3C/div%3E%3Cdiv%3E%3Cbr%20/%3E%3C/div%3E%3Ca%20href%3D%22https://4.bp.blogspot.com/-3lyQSmaU3IE/XQOPO6wD74I/AAAAAAAAcpI/TfEq0QhcXmE3DmgXtC09rRawUR2a5X6uACLcBGAs/s1600/IMG_5049.JPG%22%20imageanchor%3D%221%22%3E%3Cimg%20border%3D%220%22%20data-original-height%3D%22818%22%20data-original-width%3D%22700%22%20src%3D%22https://4.bp.blogspot.com/-3lyQSmaU3IE/XQOPO6wD74I/AAAAAAAAcpI/TfEq0QhcXmE3DmgXtC09rRawUR2a5X6uACLcBGAs/s1600/IMG_5049.JPG%22%20/%3E%3C/a%3E%3Cbr%20/%3E%3Cbr%20/%3E%3Cdiv%3E%3Ci%3EAdelaide%20was%20OVER%20THE%20MOON.%20It%20was%20love%20at%20first%20sight!%26nbsp;%3C/i%3E%3C/div%3E%3Cdiv%3E%3Ci%3EShe%20kept%20pointing%20at%20the%20crib%20%22%20all%20done%20that%20bed,%20New%20one%20bed!!!%22%3C/i%3E%3C/div%3E%3Cbr%20/%3E%3Ca%20href%3D%22https://1.bp.blogspot.com/-cxbQoPOToJI/XQOPPUFnPnI/AAAAAAAAcpU/kiXDS9JarzAUYgVwiG6pwwVShZ2OUpWFwCLcBGAs/s1600/IMG_5050.JPG%22%20imageanchor%3D%221%22%3E%3Cimg%20border%3D%220%22%20data-original-height%3D%22850%22%20data-original-width%3D%22700%22%20src%3D%22https://1.bp.blogspot.com/-cxbQoPOToJI/XQOPPUFnPnI/AAAAAAAAcpU/kiXDS9JarzAUYgVwiG6pwwVShZ2OUpWFwCLcBGAs/s1600/IMG_5050.JPG%22%20/%3E%3C/a%3E%3Cbr%20/%3E%3Ci%3E%3Ca%20href%3D%22https://www.ikea.com/us/en/catalog/products/S59124621/%22%3E%3Cspan%3Estyle%20has%20changed%20but%20bed%20here%26nbsp;%3C/span%3E%3C/a%3E%3C/i%3E%3Cbr%20/%3E%3Ci%3E%3Cbr%20/%3E%3C/i%3E%3Cbr%20/%3E%3Cdiv%3E%3Ci%3EShe%20took%20one%20nap%20in%20the%20crib%20since%20we%20moved%20it%20in%20but%20otherwise%20has%20slept%20all%20night%20every%20night%20in%20the%20%22new%20one%20bed%22%20and%20officially%20says%20she%20is%20finished%20with%20the%20crib.%20Oh%20my%20mama%20heart.%20The%20last%20baby,%20*%20tears*%20-%20just%20like%20they%20say...%20I%20didn't%20know%20it%20would%20be%20the%20last%20time.%26nbsp;%3C/i%3E%3C/div%3E%3Cdiv%3E%3Ci%3E%3Cbr%20/%3E%3C/i%3E%3C/div%3E%3Cdiv%3E%3Ci%3E%3Cbr%20/%3E%3C/i%3E%3C/div%3E%3Cdiv%20data-widget-%3E%3Cbr%20/%3E%3Cdiv%3E%3Cimg%20onerror%3D%22this.parentNode.innerHTML%3D'Disable%20your%20ad%20blocking%20software%20to%20view%20this%20content.'%22%20src%3D%22http://assets.rewardstyle.com/production/0e4f3801d077575ac3d1ae289e2e437c6aad70f0/images/search/350.gif%22%20style%3D%22height:%2015px;%20width:%2015px;%22%20/%3EJavaScript%20is%20currently%20disabled%20in%20this%20browser.%20Reactivate%20it%20to%20view%20this%20content.%3C/div%3E%3C/div%3E)


,%20until%20melted%20and%20combined%20and%20not%20too%20hot.%26nbsp;%3C/i%3E%3C/div%3E%3Cdiv%3E%3Ci%3EI%20love%20adding%20a%20few%20essential%20oils%20into%20mine%20at%20this%20point%20-%205%20drops%20each%20of%20Lavender,%20Cedarwood%20and%20Rosemary.%20This%20combo%20is%20beautiful%20for%20a%20healthy%20scalp%20and%20natural%20hair%20health.%20It%20may%20even%20boost%20growth!%20Once%20everything%20is%20combined,%20gently%20massage%20it%20into%20your%20scalp,%20and%20work%20it%20down%20to%20the%20ends%20of%20your%20hair.%20Cover%20your%20head%20with%20a%20shower%20cap%20and%20let%20it%20set%20for%20about%2030%20minutes.%26nbsp;%3C/i%3E%3C/div%3E%3Cdiv%3E%3Ci%3E%3Cbr%20/%3E%3C/i%3E%3Ca%20href%3D%22https://4.bp.blogspot.com/-DlIITEnm6JE/XPwgeQzaEtI/AAAAAAAAcjs/MyshO5Nf1VYTrWLQPIOCkkdzJr71zqQnwCLcBGAs/s1600/IMG_4560.JPG%22%20imageanchor%3D%221%22%3E%3Cimg%20border%3D%220%22%20data-original-height%3D%22525%22%20data-original-width%3D%22700%22%20src%3D%22https://4.bp.blogspot.com/-DlIITEnm6JE/XPwgeQzaEtI/AAAAAAAAcjs/MyshO5Nf1VYTrWLQPIOCkkdzJr71zqQnwCLcBGAs/s1600/IMG_4560.JPG%22%20/%3E%3C/a%3E%3Cbr%20/%3E%3Cbr%20/%3E%3C/div%3E%3Cdiv%3E%3Ci%3EShampoo%20as%20you%20normally%20would%20after%20half%20and%20hour%20or%20so,%20and%20then%20style%20as%20usual.%20You%20won%E2%80%99t%20believe%20the%20difference%20those%20thirty%20minutes%20will%20make!%3C/i%3E%3C/div%3E%3Cdiv%3E%3Ci%3E%3Cbr%20/%3E%3C/i%3E%3C/div%3E%3Cdiv%3E%3Ci%3ERecipe%20adapted%20from%20%3Ca%20href%3D%22https://rstyle.me/+kVMP8HOVf73pkRoijFaNUg%22%3E%3Cb%3EHello%20Glow.%3C/b%3E%3C/a%3E%3C/i%3E%3C/div%3E%3Cbr%20/%3E%3Ca%20href%3D%22https://3.bp.blogspot.com/-MXxrRVJ-AR4/XM-35y2yAHI/AAAAAAAAb4Q/KVwFkfDD0X8tA8rBW7QxkdwdezsE2Ca1gCLcBGAs/s1600/041119Casey284EDIT.jpg%22%20imageanchor%3D%221%22%3E%3Cimg%20border%3D%220%22%20data-original-height%3D%221050%22%20data-original-width%3D%22700%22%20src%3D%22https://3.bp.blogspot.com/-MXxrRVJ-AR4/XM-35y2yAHI/AAAAAAAAb4Q/KVwFkfDD0X8tA8rBW7QxkdwdezsE2Ca1gCLcBGAs/s1600/041119Casey284EDIT.jpg%22%20/%3E%3C/a%3E%3Ca%20href%3D%22https://3.bp.blogspot.com/-7b91Pfj0PgA/XPwgeY4DXNI/AAAAAAAAcjo/uhkZl6NQytQ9KYDpkAyTlyCio-_W2ozJwCLcBGAs/s1600/IMG_4562.JPG%22%20imageanchor%3D%221%22%3E%3Cimg%20border%3D%220%22%20data-original-height%3D%22933%22%20data-original-width%3D%22700%22%20src%3D%22https://3.bp.blogspot.com/-7b91Pfj0PgA/XPwgeY4DXNI/AAAAAAAAcjo/uhkZl6NQytQ9KYDpkAyTlyCio-_W2ozJwCLcBGAs/s1600/IMG_4562.JPG%22%20/%3E%3C/a%3E%3Cbr%20/%3E%3Cbr%20/%3E%3Ci%3E%3Ca%20href%3D%22https://www.instagram.com/beautybylaurengoforth/%22%3E%3Cb%3Ebraids%20via%26nbsp;%3C/b%3E%3C/a%3E%3C/i%3E%3Cbr%20/%3E%3Ci%3E%3Cb%3Ephotos%20via%26nbsp;%3Ca%20href%3D%22https://www.beckleyphoto.com/%22%3Ebeckley%20co%3C/a%3E%3C/b%3E%3C/i%3E%3Cbr%20/%3E%3Cspan%3E%3Cspan%3Evia%26nbsp;%3C/span%3E%3Cb%3E%3Ci%3E%3Ca%20href%3D%22https://www.instagram.com/tincystastries/%22%3EKathleen%20Campbell%20HERE%3C/a%3E%3C/i%3E%3C/b%3E%3C/span%3E)


%3C/span%3E%26nbsp;....%20on%20his%207th%20birthday%20he%20heard%20a%20Godzilla%20movie%20was%20coming%20out%20in%202019%20and%20has%20tab;ked%20about%20it%20ever%20since.%20His%20whole%20second%20grade%20year%20he%20signed%20his%20papers%20Aiden%20Godzilla%20(%20lol.%20and%20also%20how%20sweet%20are%20these%20precious%20teachers%20just%20embracing%20Aiden).%20Then%203rd%20grade%20his%20papers%20said%20Aiden%20G%20(%20His%20name%20is%20Aiden%20Christopher%20so%20the%20G%20is%20for%20Godzilla).%26nbsp;%3C/i%3E%3C/div%3E%3Cdiv%3E%3Ci%3E%3Cbr%20/%3E%3C/i%3E%3Ca%20href%3D%22https://4.bp.blogspot.com/-d0X6G7trtfo/XP5kSk3G_ZI/AAAAAAAAcms/fLTi_0XV-woTtN2I1e2LtnzXoj68Hk2FQCLcBGAs/s1600/IMG_4720.JPG%22%20imageanchor%3D%221%22%3E%3Cimg%20border%3D%220%22%20data-original-height%3D%22700%22%20data-original-width%3D%22700%22%20src%3D%22https://4.bp.blogspot.com/-d0X6G7trtfo/XP5kSk3G_ZI/AAAAAAAAcms/fLTi_0XV-woTtN2I1e2LtnzXoj68Hk2FQCLcBGAs/s1600/IMG_4720.JPG%22%20/%3E%3C/a%3E%3C/div%3E%3Cdiv%3E%3Ci%3E%3Cbr%20/%3E%3C/i%3E%3Ci%3EI%20cried%20the%20last%2020%20minutes%20of%20the%20movie....not%20about%20the%20movie%20but%20about%20how%20when%20you%20love%20a%20human%20so%20deeply%20and%20they%20love%20something,%20it%20seeps%20over.%20How%20I%26nbsp;never%20knew%20how%20much%20I%20would%20love%20Godzilla%20or%20Train%20your%20dragon%20or%20holding%20a%20little%20lizard,%20but%20I%20do.%20I%20love%20them%20so%20much.%26nbsp;%3C/i%3E%3Cbr%20/%3E%3Ci%3E%3Cbr%20/%3E%3C/i%3E%3Cspan%3E%3Ci%3ELoving%20someone%20else%20changes%20you.%20Maybe%20as%20a%20mom%20more%20than%20anything%20else.%20Suddenly%20you%20are%20outside%20of%20yourself%20and%20their%20interests%20and%20passions%20become%20your%20interests%20in%20passions%20in%20a%20way%20you%20hadn%E2%80%99t%20imagined.%20Sometimes%20I%E2%80%99m%20on%20the%20outside%20looking%20in,%20living%20this%20life%20I%20never%20would%20have%20imagined,%20my%20heart%20so%20overwhelmed%20with%20love%20for%20these%20people%20God%20has%20given%20me.%3C/i%3E%3C/span%3E%3Cbr%20/%3E%3Ci%3E%3Cbr%20/%3E%3C/i%3E%3Cbr%20/%3E%3Cdiv%3E%3Ci%3E%3Ca%20href%3D%22https://www.instagram.com/p/ByiBUqKlpS1/%22%3EWatch%20his%20cute%20reaction%20here!%26nbsp;%3C/a%3E%3C/i%3E%3C/div%3E%3C/div%3E%3Cbr%20/%3E)