PHPUK 2024 16 Feb 2024 11:27 AM (last year)
This week I had an amazing opportunity to head on down to London for the 2024 PHPUK Conference.

This was my first in-person developer conference since before covid, with more recent events Ive attended being either online or more commercial/product focused events with vendors, so it was great to get back to an in-person event where I can geek out a bit more.
I do really enjoy online events and will continue to attend them, but nothing beats getting to talk to fellow devs in a conferences corridor track sharing thoughts or getting the opportunity to speak directly to the people that build the tools we all use every day.
For those that dont know, PHPUK is a two-day conference with three tracks sandwitched with a keynote to start/end the day. In its 19th year its got a great history of industry leading speakers on a range of topics related to PHP and its surrounding eco-system.
The schedule this year interested me as now Ive moved to more of an architectural role at work Im keen to focus at bit more on the future and where we’d like to be and what we could use to get there. The schedule this year seemed to tick that box repeatedly in several talks with the added bonus of a few names Ive seen speak several times before so felt like a no brainer that this would be benifitial not just to me but to bring back to the wider team too.

As with all good conferences the schedule had several clashes, so I initially planned the day by picking out speakers Id seen before so knew they’d be worth seeing over a clash, but after a conversation with one of the organisers who mentioned they would be live editing and uploading straight to Youtube I decided to switch to talks where I might have questions and watch back some of the others later.
All the videos are available in the official PHPUK 2024 Youtube Playlist.
There are a few highlights for me I recommend you take a look at, the top two would be Marcel Pociot’s talk on Building desktop apps with PHP and Paul Dragoonis’ talk on Cutting Edge CI with Dagger. It feels like both of these are going to become big over the comming months, especially Dagger, so this is the perfect time to start exploring how they would work within your business and start taking advantage as soon as possible.
Not sure if I misread the description on Rob Allens talk on An Introduction to DDD but I was glad as it was a great insight into how he aproaches a project and even better theres so much alignment with what I do already. Its really insightful to hear how a legend in the industry such as Rob follows a similar path and noted some great tips to take back to the office to tweak what Im doing.
A talk I was looking forward to was by Dave Liddament on Elevating Legacy. We are planning a similar project ourselves at work and while I’ve been through framework upgrades like this many times now, you can never have too much experience in situations like this. Espacially when theres a large jump, so was keen to understand what hurdles he tripped over that would be useful for us to plan for as well. I wasnt left disapointed the talk was really informative and a new tool to look into as well a great overview on how to setup custom rector rules.
No PHP conference would be complete without the legend Derick Rethans giving us an update on whats new with PHP itself. PHP8 is maturing really well and extra features highlighted really help make things just that bit better.
These are just my initial thoughts from what I saw on the day(s), there are so many more talks to catchup on, and Im looking forward to watching them over the coming days/weeks.
So, next steps… I think the first thing has to be getting Dagger installed and get something building, it really does feel like this could be a game changer and save us all so much time and effort. After that Im diving straight into my first desktop app I think.
“PHP is dead” we keep hearing echo round the internet, several times during the conference this came up and we all laughed, its so far from dead, its alive and growing and its heading in an exciting direction.


Getting Started with eCloud 3 May 2020 5:53 AM (5 years ago)
I was having a conversation recently about hosting, who we use, why, etc. Those that know me will be unsurpried that I use UKFast to host things, specifically eCloud. The discussion arrived at documentation and why there arent any ‘Getting Started’ guides for eCloud like there are with AWS or DigitalOcean. This is a good question and the simple answer is just because nobody has written any, so Ive decided to dust some cobwebs off my blog and do a series of posts about how I use eCloud starting with this quick “how to get started” guide.
Disclaimer for new visitors to my blog or those unaware, I work for UKFast, but this blog is for my personal thoughts/opinions and Im writing this as a developer using a service not as an employee trying to sell it. Although I do hope by reading it I may pursuade you to give it a try 
As with other cloud hosting platforms, eCloud comes with a selection of services to meet different customers needs, from VMWare based solutions through to Openstack and Ceph. Im going to focus on eCloud Public which is a vmware based public cloud. Im also going to focus on using develpoer tools rather than the GUI provided by MyUKFast as this is how I use eCloud.
Getting an API key
The api and developer tools require an access token, so before going any further you’ll need to create one. There are some instrcutions on how to do this over on the developer website developers.ukfast.io and links to create an account if you dont have one already.
Once you have an api key, export it to your enviroment and we can get started.
export UKF_API_KEY=yourtokengoeshereCreate a virtual machine
Before I jump to how I manage my infrastructure, I just wanted to mention briefly that creating a vm (virtual machine) is as simple as you would expect, a POST request to the api and you can have a vm in a minute or two depending on the spec you request.
curl -H "Authorization:$UKF_API_KEY" -H "Content-Type:application/json" -XPOST https://api.ukfast.io/ecloud/v1/vms -d '{ "environment": "Public", "pod_id":14, "template":"CentOS 8 64-bit", "cpu":1, "ram":1, "hdd":20, "name":"test vm via curl" }' For those that dont want to curl, there is also a great command-line client what wraps the api’s into an nice easy to use interface.
ukfast ecloud vm create --environment "Public" --pod=14 --template "CentOS 8 64-bit" --cpu 1 --ram 1 --hdd 20 --name "test vm via cli tool"I highly recommend the cli tool for making quick calls to the api, it also works really well as part of automated scripts where there isnt a need to use the full sdk.
Terraform
Being able to create and manage vm’s via the cli is great for one off devices but not really practicle for managing multiple devices for a project long term, so I use and recommend Terraform so you can manage your infrastructure as code and commit it to your project repo for version control.
There is an eCloud terraform provider on Github for us to use, if you aren’t familier with terraform I would recommend spending a few minutes reading their getting started guide, it focuses on AWS but lets not hold that against them as it can be applied to any provider
The eCloud provider isnt currently available in the official registry for auto discovery as its currently in a closed beta and not accepting new vendors. So for now we have to pull it in as a custom provider.
Terraform recommend 3rd party plugins live in `~/.terraform.d/plugins` but you can put it in various locations if more suitable to your setup, I prefer to follow this standard and combine with version constraints to prevent any unexpected issues if a breaking change is released.
Create this user plugin directory if you dont already have it, then download the latest ecloud provider and export the provider into it.
Ensure the provider has the correct version string appended so you can store multiple releases if needed, eg.
terraform-provider-ecloud_v1.2.3Create a new file in your project called main.tf, and add a virtual machine resource as below.
provider "ecloud" {
  version = "~> 1.2"
  api_key = "yourtokengoeshere"
}

resource "ecloud_virtualmachine" "test-vm" {
    environment = "Public"
    pod_id = 14
    name = "test vm via terrafom"
    template = "CentOS 8 64-bit"
    cpu = 1
    ram = 1
    disk {
      capacity = 20
    }
}
Currently the provider requires your key in plain text within the configuration file, so I recommend securing this with ansible-vault or similar tool, this is to be addressed in a future release but for now lets just copy in our key.
sed -i "s/yourtokengoeshere/$UKF_API_KEY/g" main.tfYou can then initialise the provider with: terraform init
Calling terraform plan will then prepare a plan for the creation of a single vm. if happy, you can then run terraform apply to build it.
Terrafom will execute the plan and poll the api until the api confirms the state matches your plan. You can rerun your plan as many times as you like and if something doesnt match, it will reapply the plan to bring things back into sync with the plan.
So thats 3 ways you can create a new VM on eCloud Public using the api, there are also SDK’s on Github if you want to create and manage VMs through an appliacation. I’ll cover doing that from PHP in another post.
$ ukfast ecloud vm list
+--------+--------------------------------+-----+--------+--------+----------------+-----------------+----------+--------------+
|   ID   |              NAME              | CPU | RAM GB | HDD GB |  IP INTERNAL   |   IP EXTERNAL   |  STATUS  | POWER STATUS |
+--------+--------------------------------+-----+--------+--------+----------------+-----------------+----------+--------------+
| xxxx19 | test vm via curl               |   1 |      1 |     20 |                | xxx.xxx.xx.107  | Complete |              |
| xxxx20 | test vm via cli tool           |   1 |      1 |     20 |                | xxx.xxx.xx.108  | Complete |              |
| xxxx21 | test vm via terrafom           |   1 |      1 |     20 |                | xxx.xxx.xx.101  | Complete |              |
+--------+--------------------------------+-----+--------+--------+----------------+-----------------+----------+--------------+
speedtest-cli 20 Aug 2017 10:44 AM (8 years ago)
Ive been a big fan of Speedtest.Net for a long time, back when I was in Broadband Tech Support we used to advise customers to test using this site rather than others they found or knew about already. Unfortunately they seem to be adding more and more adverts onto the site the last few years so when I came across this tool to do tests from a terminal I was keen to jump on it and have been using it for couple of years now and realised Ive not helped to spread the word.
So, what is it? Basically its a python package that performs speedtests against speedtest.net servers but from your device instead of the speedtest.net website. The github repo is: https://github.com/sivel/speedtest-cli
Installation is simple, Im using pip but alternatives are listed on the projects readme
$ sudo pip install speedtest-cli

Collecting speedtest-cli

Downloading speedtest_cli-1.0.6-py2.py3-none-any.whl

Installing collected packages: speedtest-cli

Successfully installed speedtest-cli-1.0.6
thats it, then to run you just call ‘speedtest-cli’
$ speedtest-cli

Retrieving speedtest.net configuration...

Testing from Virgin Media (82.4.xx.xx)...

Retrieving speedtest.net server list...

Selecting best server based on ping...

Hosted by TNP Ltd. (Manchester) [7.81 km]: 27.27 ms

Testing download speed................................................................................

Download: 88.22 Mbit/s

Testing upload speed................................................................................................

Upload: 12.12 Mbit/s
multiple versions of php with apache 20 Aug 2017 10:41 AM (8 years ago)
NOTE: This is a Work In Progress post, published in note form for now, will revisit at later date.
steps to allow multiple versions of php with apache on centos 7
#remove current php and replace target repo
sudo yum remove php\*
sudo yum-config-manager --disable webtactic
sudo yum install centos-release-scl
#install php56
sudo yum -y install rh-php56 rh-php56-php-fpm rh-php56-php-bcmath rh-php56-php-cli rh-php56-php-common rh-php56-php-gd rh-php56-php-intl rh-php56-php-mbstring rh-php56-php-mcrypt rh-php56-php-mysql rh-php56-php-pdo rh-php56-php-pecl-redis rh-php56-php-soap rh-php56-php-xml rh-php56-php-xmlrpc
#set bash default
scl enable rh-php56 bash
#configure fpm
sudo sed -i 's/listen = 127.0.0.1:9000/listen = 127.0.0.1:9056/g' /etc/opt/rh/rh-php56/php-fpm.d/www.conf
sudo touch /var/log/php-fpm/php56_error.log
sudo sed -i 's/error_log = .*.log/error_log = \/var\/log\/php-fpm\/php56_error.log/g' /etc/opt/rh/rh-php56/php-fpm.conf
sudo systemctl start rh-php56-php-fpm
sudo systemctl enable rh-php56-php-fpm
#same again but for php7.0
sudo yum -y install rh-php70 rh-php70-php-fpm rh-php70-php-bcmath rh-php70-php-cli rh-php70-php-common rh-php70-php-gd rh-php70-php-intl rh-php70-php-mbstring rh-php70-php-mcrypt rh-php70-php-mysqlnd rh-php70-php-pdo rh-php70-php-pecl-redis rh-php70-php-soap rh-php70-php-xml rh-php70-php-xmlrpc
#only if you want php cli to be v7
scl enable rh-php70 bash
sudo sed -i 's/listen = 127.0.0.1:9000/listen = 127.0.0.1:9070/g' /etc/opt/rh/rh-php70/php-fpm.d/www.conf
sudo touch /var/log/php-fpm/php70_error.log
sudo sed -i 's/error_log = .*.log/error_log = \/var\/log\/php-fpm\/php70_error.log/g' /etc/opt/rh/rh-php70/php-fpm.conf
sudo systemctl start rh-php70-php-fpm
sudo systemctl enable rh-php70-php-fpm
# set apache default php version (eg to v5.6)
sudo nano /etc/httpd/conf.d/virtualhost.conf
SetHandler "proxy:fcgi://127.0.0.1:9056"
#set per project (eg to v7.0)
SetHandler "proxy:fcgi://127.0.0.1:9070"
switching apache from mod_php to php-fpm 20 Aug 2017 10:35 AM (8 years ago)
NOTE: This is a Work In Progress post, published in note form for now, will revisit at later date.
steps to move apache away from mod_php and onto php-fpm
sudo yum remove php56w

sudo yum install php56w-fpm
sudo nano /etc/php-fpm.d/www.conf
listen = 127.0.0.1:9000
;listen = /run/php-fpm/www.sock
sudo nano /etc/httpd/conf.d/virtualhost.conf
# configure default php-fpm version
#SetHandler "proxy:unix:/run/php-fpm/www.sock|fcgi://localhost"
#SetHandler "proxy:unix:/run/php-fpm/www.sock"
SetHandler "proxy:fcgi://127.0.0.1:9000"
systemctl start php-fpm
systemctl enable php-fpm
apachectl configtest
systemctl restart httpd
php logs in: /var/log/php-fpm
Twitter videos fail with “The media could not be played.” 27 Nov 2016 4:25 AM (8 years ago)
one of the first things I do when installing the Firefox on Fedora usually involves twitter so its quickly apparent on Fedora that videos and animated gifs (they convert animated gif’s to videos) dont play and show an error “The media could not be played.”
A while ago Cisco come to the worlds rescue regarding H.264 licensing with their opensource version of H264 (www.openh264.org), unfortunately on Firefox this is only used for webRTC and doesnt cover html’s video tag :/ (see https://bugzilla.mozilla.org/show_bug.cgi?id=1057646). Its worth installing anyway, so pop over to https://fedoraproject.org/wiki/OpenH264 for more info and how to install it.
Back to our original problem, Twitter videos, the solution is a simple one, we need to install a H.264 codec that will be used by html’s video tag. Firefox uses ffmpeg codecs if available so we can get up an running by installing that library
dnf install ffmpeg-libs
if you (re)start Firefox now you should be good to go. you cant test the codes are installed correctly by popping over to https://www.youtube.com/html5 and it will tell you if there are any issues.
As a side note, you can “solve” this problem by installing VLC, you should do this anyway. VLC installs ffmpeg as a dependency so you can solve your H.264 issue and get a better media player in one go
sudo dnf install vlc mozilla-vlc
Fedora: WiFi broken on Broadcom BCM43142 24 Nov 2016 11:30 AM (8 years ago)
I have the Lenovo Yoga 2 11s and after each Fedora major version upgrade the WiFi fails. This is due to Broadcom not having any free kernel modules so I need to install separately and as I never remember Im making a list, if you found your way here hopefully they will help you too.
1) check you do actually have a broadcom device
[root@localhost ~]# lspci | grep -i broadcom

01:00.0 Network controller: Broadcom Limited BCM43142 802.11b/g/n (rev 01)
2) install the RPM Fusion Repositories, they have some kernel modules we can use
[root@localhost ~]# su -c 'dnf install https://download1.rpmfusion.org/free/fedora/rpmfusion-free-release-$(rpm -E %fedora).noarch.rpm https://download1.rpmfusion.org/nonfree/fedora/rpmfusion-nonfree-release-$(rpm -E %fedora).noarch.rpm'
3) install the dev kernel and wifi module
[root@localhost ~]# dnf install kernel-devel-$(uname -r) akmod-wl
4) if you can, restart your device and enjoy wireless connectivity
if not, you can run the following to get connected without rebooting
5) loading the module
[root@localhost ~]# modprobe wl

modprobe: FATAL: Module wl not found in directory /lib/modules/4.8.8-300.fc25.x86_64
dont worry, this is what we expected, this is just so you can see its failed and that its worked when you try again in a moment
[root@localhost ~]# akmods --force

Checking kmods exist for 4.8.8-300.fc25.x86_64 [ OK ]

Building and installing wl-kmod [ OK ]
now try to probe the module again
[root@localhost ~]# modprobe wl

[root@localhost ~]#
no error this time means its loaded, looking good
[root@localhost ~]# systemctl restart NetworkManager
and you should now see your WiFi icon in the system tray and quick connection later and your ready to go.
Lollipop on your Nexus 5 13 Nov 2014 1:23 PM (10 years ago)
some quick instructions for those that want to pop Googles latest and greatest on your Nexus 5.
Download the system files
– Google Factory image: https://developers.google.com/android/nexus/images#hammerhead
if you want/need root, also get
– Latest TWRP Recovery: http://techerrata.com/browse/twrp2/hammerhead
– Chainfires kernel install script: http://download.chainfire.eu/363/CF-Root/CF-Auto-Root/CF-Auto-Root-hammerhead-hammerhead-nexus5.zip
Install Steps
Extract the files from the Factory image, until you have the following files together in one folder
bootloader-hammerhead-hhz12d.img
radio-hammerhead-m8974a-2.0.50.2.21.img
cache.img
boot.img
userdata.img
system.img
openrecovery-twrp-2.8.1.0-hammerhead.img
Boot into Bootloader Mode (Power + Volume Down) & run the following commands:
fastboot flash bootloader bootloader-hammerhead-hhz11k.img
fastboot reboot-bootloader
fastboot flash boot boot.img
fastboot flash radio radio-hammerhead-m8974a-2.0.50.2.21.img
fastboot flash system system.img (this will take a while!)
fastboot flash recovery openrecovery-twrp-2.8.1.0-hammerhead.img
this next step is optional, but if you want a completely clean flash, or you haven’t done a fresh install recently (ie. before 4.4.4) I recommend doing this for 5.0. Note this will wipe your SD card so make a backup!
fastboot flash userdata userdata.img
Once they are all complete, reboot into recovery and perform a factory reset.
If you need Root, reboot back into fastboot mode and run the Chainfire installer downloaded earlier.
Once your done, reboot your phone.
The first boot will take a while so go make a brew, once its booted your done. enjoy
First two weeks with a Moto360 29 Sep 2014 11:03 PM (11 years ago)
It’s been two weeks now since my Moto360 arrived from Motorola and I think it’s safe to say I wouldn’t send it back.
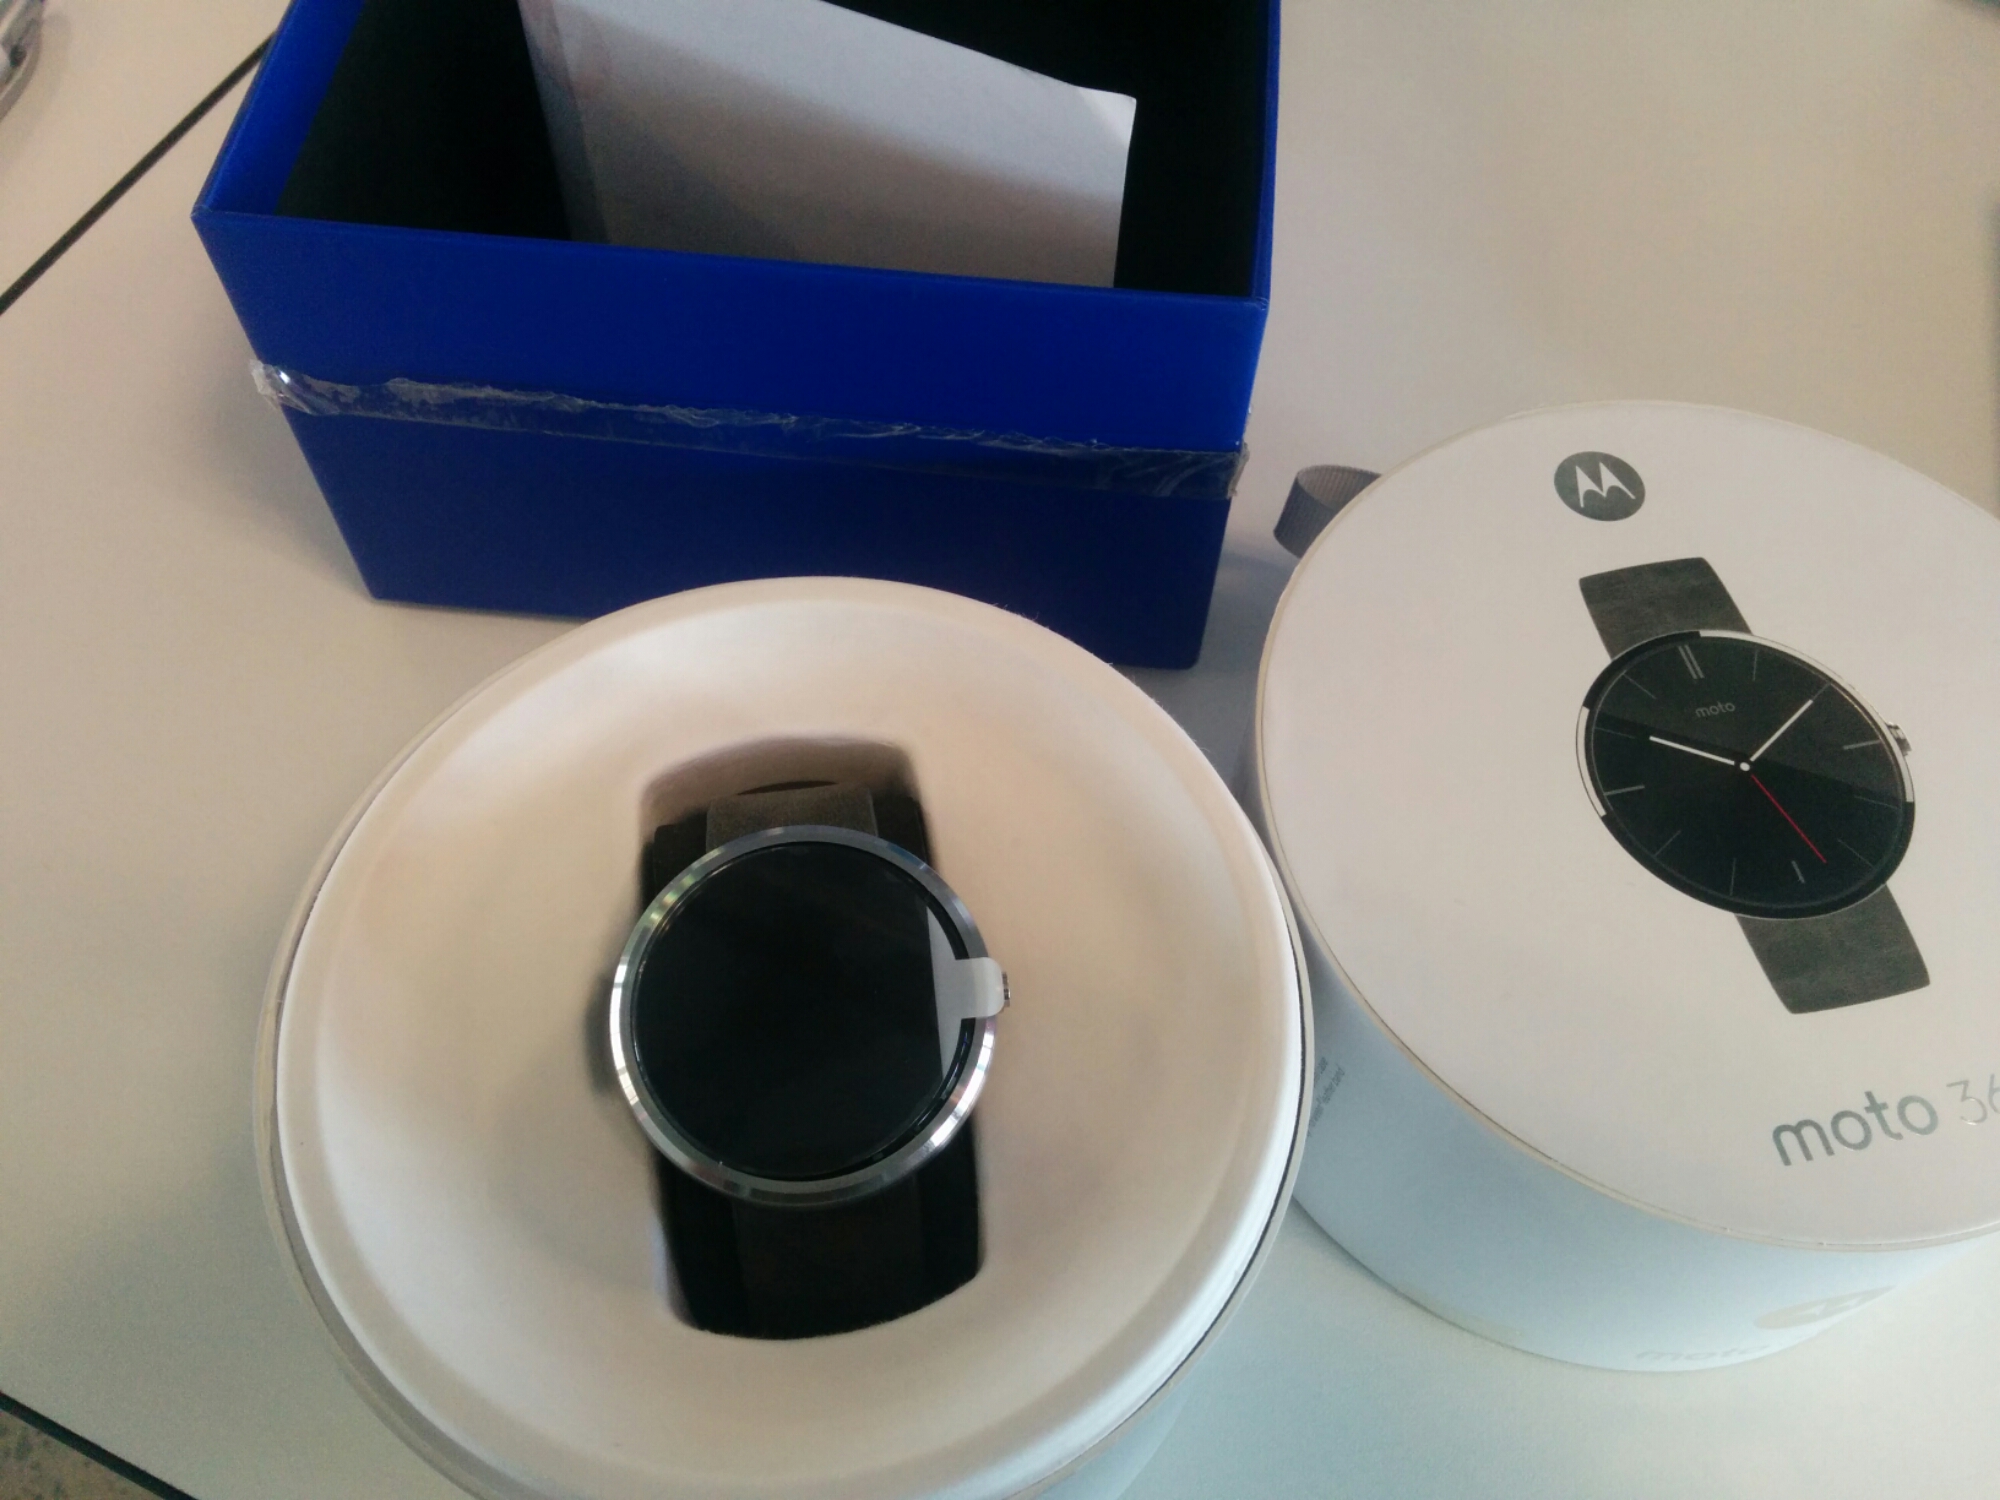


All my concerns about battery life, size and weight of the watch have been squashed and I’m a firm believer that smart watches are the future.
Battery life was by far the biggest concern I had but so far I’m going to bed around midnight with 45% remaining. When leaving it to run down completely it reached 36 hours which is pretty good in my opinion.
The biggest issue for me is the included leather strap. It does the job but it’s a little uncomfortable and annoyingly Motorola decided to add a little bit of plastic just inside the device to prevent you from using your own watch straps. A disappointing move in my opinion.
Motorola are planning on releasing a set of new straps, including my preferred metal strap but rumour is they may be around the £50 mark!
The good news is a post appeared on my Google Now feed about a chap who was looking for a metal strap for his Moto360 and found the Pebble also has the annoying bit of plastic in the strap slot so straps for the Pebble also fit the 360 and they only cost around £10. Result! I have ordered one to see and will update the post to mention how it goes.
Its still early days so am sure there is more to uncover, I’ve yet to find any apps other than the default ones so if you have any suggestions or would like me to test something, pop a comment below.
Malware Warning – ShowIP Addon for Firefox 29 Jul 2014 12:08 PM (11 years ago)
Quick FYI for anyone using the ShowIP Firefox addon
A new version was pushed out yesterday, v2.5, and it injects a request into every page load to a site thats seems to be well known for malware. I highly recommend disabling it or rolling back to v2.4 if you need it.
example request:
GET /coupons/deals?merchant=www.google.co.uk&referrer=&partner=ksod3 HTTP/1.1

Host: ads.panoramtech.net

User-Agent: Mozilla/5.0 (Windows NT 6.1; rv:34.0) Gecko/20100101 Firefox/34.0

Accept: application/json, text/javascript, */*; q=0.01

Accept-Language: en-gb,en;q=0.7,en-us;q=0.3

Accept-Encoding: gzip, deflate

DNT: 1

Referer: https://www.google.co.uk/

Origin: https://www.google.co.uk

Connection: keep-alive