Anthropologie Poppy Pie Pan GIVEAWAY!!! 5 Nov 2013 10:48 AM (11 years ago)


%3C/div%3E%0A%3Cdiv%3E%0A%3Cbr%20/%3E%3C/div%3E%0A%3Cdiv%3E%0A%3Cspan%3E(Facebook%20is%20in%20NO%20way%20connected%20to,%20or%20liable%20for%20any%20part%20of%20this%20giveaway.)%3C/span%3E%3C/div%3E%0A%3Cdiv%3E%0A%3Cspan%3E%3Cbr%20/%3E%3C/span%3E%3C/div%3E%0A%3Cdiv%3E%0A%3Ca%20href%3D%22http://www.rafflecopter.com/rafl/display/fc95631/%22%20rel%3D%22nofollow%22%3Ea%20Rafflecopter%20giveaway%3C/a%3E%3C/div%3E%0A%3Cdiv%3E%0A%3C/div%3E%0A%3Cdiv%3E%0A%3Cbr%20/%3E%3C/div%3E)


Kindergarten Photoshoot #2 4 Sep 2013 9:52 PM (12 years ago)


and... no more pictures please mom! This is so her...


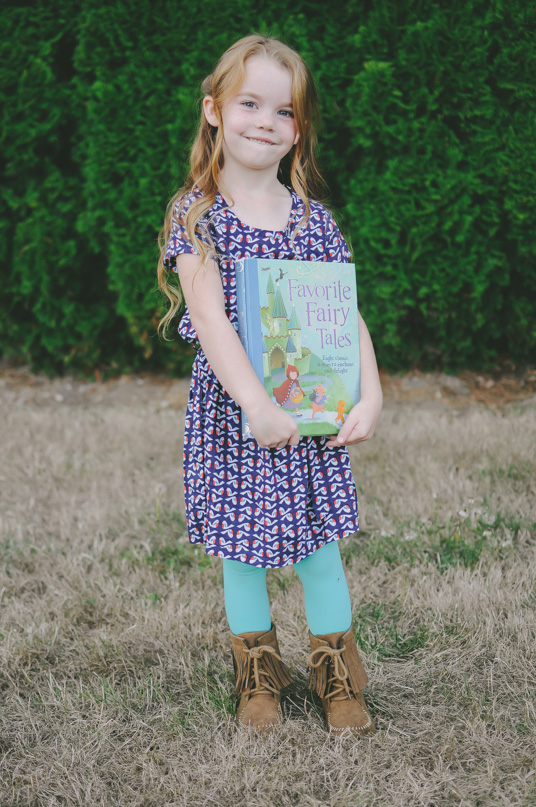
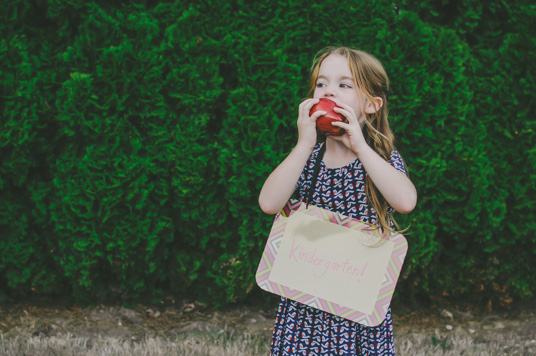
Kindergarten Photo Shoot 30 Aug 2013 9:52 PM (12 years ago)
As much as we are sad that we have to let them go and experience the real world, we are really excited for them and all they are going to learn! So, I decided to mark this momentous occasion by doing a Kindergarten photo shoot.
The mister below is my extremely adorable nephew (Lurlyn's first born)! He is my BF (boyfriend) and I love him to pieces. Since he started Kindergarten a week before my girl, I'm posting his photo shoot first.
I hope you enjoy my favorites and maybe it will inspire you to do the same with your kids. Maybe jot down a few of their favorite things with their picture to keep with you so you can always remember. Kids grow so fast and we forget the little things, so this will be a great reminder to look back on in the future.


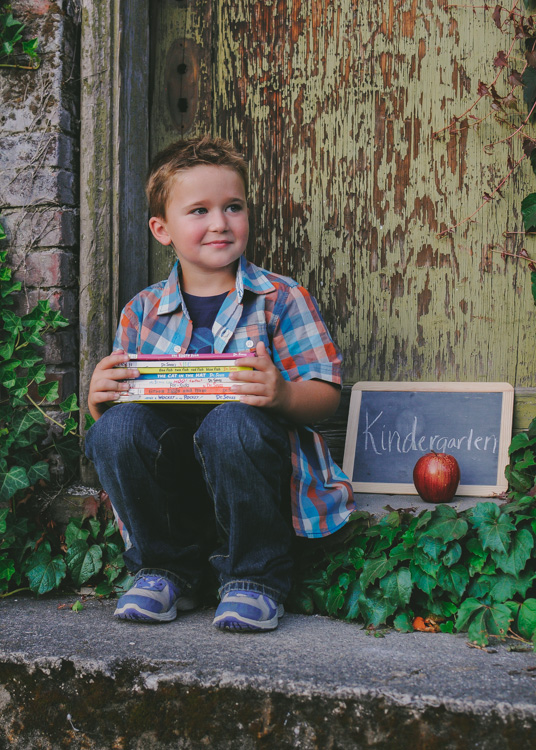


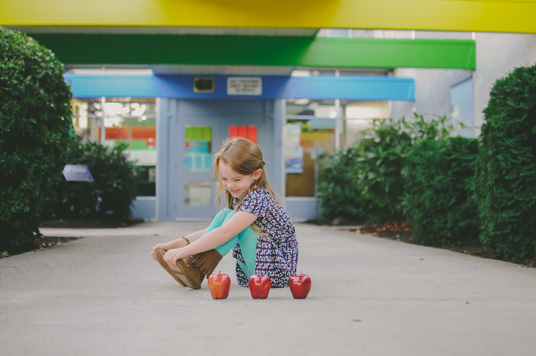
aaaaaand a behind the scenes look, just so you can get a taste (and a laugh) of what these photo shoots are like with 5 year olds... Classic!

Click HERE for the "girl" version! I hope these inspire!
Marionberry Pie 11 Aug 2013 9:43 PM (12 years ago)


Best Homemade Burgers! 31 Jul 2013 8:55 PM (12 years ago)
My hubby has a serious weakness for a yummy hamburger! Especially when its been homemade. I'm also always trying to find ways to impress my hubby with my cooking abilities, so I set out on Pinterest for one I thought looked delicious! I found it, tried it, and it was delicious! So thank you to Ashley, from Little Miss Mama blog. I did have all the ingredients her burgers called for but I also have some of my own flavors that I really like, so I took her recipe and made it a little bit more fitting for my family.
Here is how I made the burgers...
First, you need the following ingredients:

- 2 lbs ground beef (its best to use 85/15 so you have enough fat in the meat to hold it together)
- 1/4 cup bbq sauce
- 1/2 cup shredded Tillamook Mexican cheese (half pepper jack & medium cheddar cheese)
- 2 Tablespoons of McCormick's Hamburger seasoning (seasoning includes: salt, black pepper, chili pepper, onion, red bell peppers, sugar, garlic and natural flavors.)
- Sliced cheddar cheese
- Hamburger buns
Directions: Combine ground beef, bbq sauce, shredded cheese and Hamburger seasoning. Form into 1 inch thick (or more) patties. I like to make mine fairly large around because they shrink down when cooking. I throw the hamburger patties on my pancake griddle (yikes I know) because I don't have a grill. Use what you got is my motto. Keep in mind, these are hamburgers that are meant to be made inside, not on your bbq grill due to the fact that they will fall apart.
Make sure your griddle is nice and hot when you first put them on and then turn it down to about medium to medium high. It took about 4 minutes on each side. Just make sure you don't burn them.


Author Spotlight: Heidi Ashworth! 19 Jul 2013 4:09 PM (12 years ago)


This book is the 4th installment of her Miss Delacourt books, but if you have not read the previous books, in no way will you be lost (though I highly recommend them). This is a romantic story between Mira and Harry, children from the main characters from the previous Miss Delacourt books.
** If you are interested in reading any of the above mentioned books, simply click on the picture and it will take you to the book on Amazon.
coming up on the blog... The best homemade Burgers!
Avocado Hair Mask 29 Apr 2013 2:39 PM (12 years ago)


We let it sit for about 30 min, we didn't have a shower cap, or even saran wrap. Nicole suggested Glad press and seal, but combined with a blow dryer I thought it was best to avoid the smell of melted plastic and hair...She might not invite me back.


We both used this curling wand...
Amazon.com Widgets
and I am firm believer in Wen products.
Amazon.com Widgets
I hope you're not too weary to give this DIY Hair Mask a try. Let us know what you think. To stay updated with us, you can subscribe to our blog via the side bar. Just look for the mustache. ;)

The Ultimate Carrot Cake! 24 Apr 2013 8:18 PM (12 years ago)


I am a Carrot Cake lover, it can't be just any carrot cake though. It has to be perfect. It can't be dry. It can't be soggy. I want to see the flippin' carrots...that IS why it's called "Carrot Cake", am I right? I tweaked this recipe until it is seriously a piece of perfection.


Crockpot Lasagna 21 Apr 2013 8:09 PM (12 years ago)


This is yet another family favorite. It's so easy to make, I don't think I will ever return to making lasagna the "OG" way. I am all about keeping things simple.
So here ya go folks!
Ingredients:
1 lb Italian Sausage
1 Jar Spaghetti Sauce
1 Cup Water
1 15oz container of Ricotta Cheese
2 1/4 cups Italian Cheese
1/4 cup grated Parmesan cheese
1 egg
1 TBSP parsley
6 lasagna noodles
Directions:
Brown sausage in a large skillet, drain the fat, and add your spaghetti sauce and water. Let simmer for a few minutes.
In a small bowl mix together ricotta, egg, Italian and Parmesan cheeses, and parsley.
Now you going to start building your layers! First, add 1 cup of the meat mixture to the bottom of your crock pot. Cover with 3 lasagna noodles (you're going to have to break those bad boys up to fit), and then cover with 1/2 of the ricotta mixture. Next spoon 2 cups of the meat mixture on top, and cover with the remaining noodles. Top with remaining ricotta mixture, and spoon remaining meat mixture. Top with 1/4-1/2 cup Italian cheese. Cover with lid.
I usually cook mine on high for 2-3 hours, but you can easily adjust that to cook on low for 4-6. It is such a delicious easy meal!
,%20and%20then%20cover%20with%201/2%20of%20the%20ricotta%20mixture.%20Next%20spoon%202%20cups%20of%20the%20meat%20mixture%20on%20top,%20and%20cover%20with%20the%20remaining%20noodles.%20Top%20with%20remaining%20ricotta%20mixture,%20and%20spoon%20remaining%20meat%20mixture.%20Top%20with%201/4-1/2%20cup%20Italian%20cheese.%20Cover%20with%20lid.%3Cbr%20/%3E%0A%3Cbr%20/%3E%0AI%20usually%20cook%20mine%20on%20high%20for%202-3%20hours,%20but%20you%20can%20easily%20adjust%20that%20to%20cook%20on%20low%20for%204-6.%20It%20is%20such%20a%20delicious%20easy%20meal!%3Cbr%20/%3E%0A%3Cbr%20/%3E%0A%3Cdiv%3E%0A%3Ca%20href%3D%22https://blogger.googleusercontent.com/img/b/R29vZ2xl/AVvXsEiDN6XLfgcsdLHaFo9pt-G4N2OBE-Ca5SsQV4Qict-PaFLoLIQskN4lO8urHrg9IFt99kf8ppb1rGjQDCXBli6eaMe7FbfyfhBKfWrlwqGGbiYY969B61N4TGk5myodDdEQjm8KY2oNWBE/s1600/lur+signature.jpg%22%20imageanchor%3D%221%22%3E%3Cimg%20border%3D%220%22%20src%3D%22https://blogger.googleusercontent.com/img/b/R29vZ2xl/AVvXsEiDN6XLfgcsdLHaFo9pt-G4N2OBE-Ca5SsQV4Qict-PaFLoLIQskN4lO8urHrg9IFt99kf8ppb1rGjQDCXBli6eaMe7FbfyfhBKfWrlwqGGbiYY969B61N4TGk5myodDdEQjm8KY2oNWBE/s1600/lur+signature.jpg%22%20/%3E%3C/a%3E%3C/div%3E%0A%3Cbr%20/%3E)
Baked Instead Of Boiled 28 Mar 2013 10:37 AM (12 years ago)
Just in time for Easter... I was able to try out baking eggs instead of boiling them. Something I found on Pinterest. Found here. I loved how they turned out! They peeled perfectly. I only had two slightly cracked eggs. Everyone should definitely give this a try. I actually prefer this method over boiling my eggs now!
Here is how you make them.
1st - place the eggs on the center rack parallel (as shown) with a cookie sheet underneath incase an egg cracks and oozes. I have not had one make a mess on me yet, but better to be safe then sorry!
2nd - Preheat the oven to 325 degrees and bake for 30 minutes. *Eggs go into the oven before you preheat so they will cook slowly*
3rd - place the eggs in a bowl of ice water when done to cool down. Wait about 10 minutes before peeling them. After you peel them place them back in the water to continue cooling.
Done! You should have some perfectly hard baked eggs. Try it, I dare you!


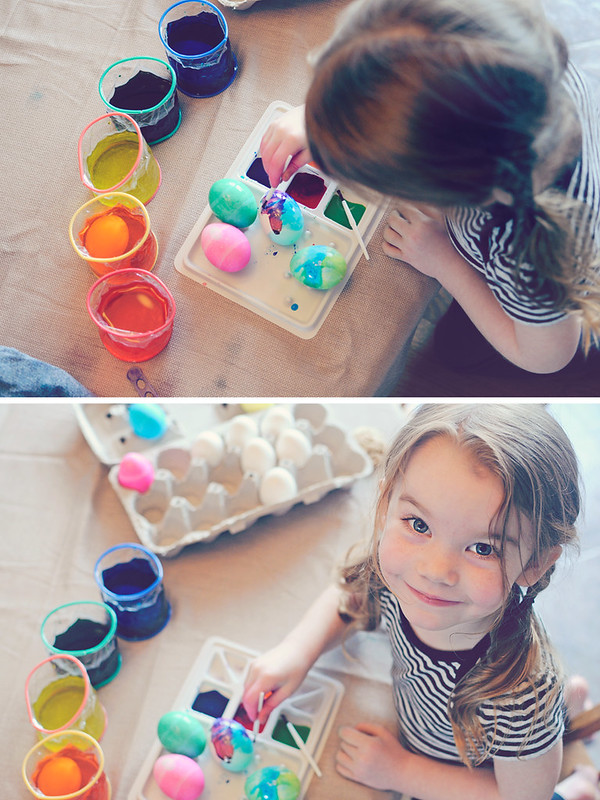
You can use the baked method of eggs to make Deviled Eggs, Egg Salad Sandwiches (must see our awesome recipe HERE!), or decorate them with the kids for Easter! Basically, whatever you use
My adorable Aubs had a great time decorating them for Easter!


%20with%20a%20cookie%20sheet%20underneath%20incase%20an%20egg%20cracks%20and%20oozes.%20I%20have%20not%20had%20one%20make%20a%20mess%20on%20me%20yet,%20but%20better%20to%20be%20safe%20then%20sorry!%3C/span%3E%3Cspan%3E%3Cbr%20/%3E%3C/span%3E%3Cspan%3E%3Cbr%20/%3E%3C/span%3E%3Cspan%3E%3Cspan%3E2nd%3C/span%3E%3C/span%3E%3Cspan%3E%26nbsp;%3C/span%3E%3Cspan%3E-%20Preheat%20the%20oven%20to%20325%20degrees%20and%20bake%20for%2030%20minutes.%3C/span%3E%3Cspan%3E%26nbsp;%3C/span%3E%3Cspan%3E%3Cspan%3E%3Ci%3E*Eggs%20go%20into%20the%20oven%20before%20you%20preheat%20so%20they%20will%20cook%20slowly*%3C/i%3E%3C/span%3E%3C/span%3E%3Cspan%3E%3Cbr%20/%3E%3C/span%3E%3Cspan%3E%3Cbr%20/%3E%3C/span%3E%3Cspan%3E%3Cspan%3E3rd%3C/span%3E%3C/span%3E%3Cspan%3E%26nbsp;%3C/span%3E%3Cspan%3E-%20place%20the%20eggs%20in%20a%20bowl%20of%20ice%20water%20when%20done%20to%20cool%20down.%20Wait%20about%2010%20minutes%20before%20peeling%20them.%20After%20you%20peel%20them%20place%20them%20back%20in%20the%20water%20to%20continue%20cooling.%3C/span%3E%3Cspan%3E%3Cbr%20/%3E%3C/span%3E%3Cspan%3E%3Cbr%20/%3E%3C/span%3E%3Cspan%3EDone!%20You%20should%20have%20some%20perfectly%20hard%20baked%20eggs.%20Try%20it,%20I%20dare%20you!%3Cspan%3E%3C/span%3E%3Cspan%3E%3C/span%3E%3Ca%20href%3D%22http://www.blogger.com/%22%3E%3C/a%3E%3C/span%3E%3Cbr%20/%3E%0A%3Cbr%20/%3E%0A%3Cdiv%3E%0A%3Cspan%3E%3Cbr%20/%3E%3C/span%3E%3C/div%3E%0A%3Cdiv%3E%0A%3Cspan%3E%3Ca%20data-pin-config%3D%22beside%22%20data-pin-do%3D%22buttonPin%22%20href%3D%22http://pinterest.com/pin/create/button/?url%253Dhttp://stamps4fun.blogspot.com/2013/03/baked-instead-of-boiled.html%2526media%253Dhttp://4.bp.blogspot.com/-OhSquulwF-U/UVSQofL6tmI/AAAAAAAABw0/_sBcFdgEpGw/s1600/_DSC9626.jpg%2526description%253DBaked%2520Eggs%2520instead%2520of%2520boiled%2520via%2520The%2520Jones%2520Way%2520Blog.%2520You'll%2520love%2520it!%22%3E%3Cimg%20src%3D%22http://assets.pinterest.com/images/pidgets/pin_it_button.png%22%20/%3E%3C/a%3E%3C/span%3E%3C/div%3E%0A%3Cbr%20/%3E%0A%3Cdiv%3E%0A%3Cspan%3E%3Cbr%20/%3E%3C/span%3E%0A%3C/div%3E%0A%3Cdiv%3E%0A%3Ca%20href%3D%22https://blogger.googleusercontent.com/img/b/R29vZ2xl/AVvXsEi4AGI86HI4IflDqfLvrIlTIL7_z6OeWVduQ3JkW07KQ0XNuH0-AjloBDdpkb8O7-c8V_q7hmtpVooe7pmovc__kVdF_i1gTv9dQm8RIOiVEYEV7ILGTqgX2FsaItH-4_BV0IPuRmBHWNA/s1600/_DSC9626.jpg%22%20imageanchor%3D%221%22%3E%3Cimg%20border%3D%220%22%20height%3D%22424%22%20src%3D%22https://blogger.googleusercontent.com/img/b/R29vZ2xl/AVvXsEi4AGI86HI4IflDqfLvrIlTIL7_z6OeWVduQ3JkW07KQ0XNuH0-AjloBDdpkb8O7-c8V_q7hmtpVooe7pmovc__kVdF_i1gTv9dQm8RIOiVEYEV7ILGTqgX2FsaItH-4_BV0IPuRmBHWNA/s640/_DSC9626.jpg%22%20width%3D%22640%22%20/%3E%3C/a%3E%3C/div%3E%0A%3Cdiv%3E%0A%3Cspan%3E%3Cbr%20/%3E%3C/span%3E%0A%3C/div%3E%0A%3Cdiv%3E%0A%3Cspan%3E%3C/span%3E%3C/div%3E%0A%3Cdiv%3E%0A%3Cdiv%3E%0A%3Cspan%3E%3Cbr%20/%3E%3C/span%3E%0A%3Cspan%3E%3C/span%3E%3C/div%3E%0A%3Cdiv%3E%0A%3Cspan%3E%3Cspan%3E%3Cbr%20/%3E%3C/span%3E%3C/span%3E%0A%3C/div%3E%0A%3Cdiv%3E%0AAubri%20is%20my%20huge%20fan%20of%20eggs%20at%20home!%20I%20don't%20have%20to%20worry%20about%20them%20going%20to%20waste...%3C/div%3E%0A%3Cbr%20/%3E%0A%3Ca%20href%3D%22http://www.flickr.com/photos/28729218@N08/7114650847/%22%20title%3D%22enjoying%20egg%20by%20NJ%20Photography,%20on%20Flickr%22%3E%3Cimg%20alt%3D%22enjoying%20egg%22%20height%3D%22320%22%20src%3D%22http://farm8.staticflickr.com/7251/7114650847_1d15542494_z.jpg%22%20width%3D%22640%22%20/%3E%3C/a%3E%3Cbr%20/%3E%0A%3Cbr%20/%3E%0AYou%20can%20use%20the%20baked%20method%20of%20eggs%20to%20make%20Deviled%20Eggs,%20%3Ca%20href%3D%22http://stamps4fun.blogspot.com/2013/03/egg-salad-blts.html%22%20target%3D%22_blank%22%3E%3Cspan%3EEgg%20Salad%20Sandwiches%3C/span%3E%20%3C/a%3E(must%20see%20our%20awesome%20recipe%3Ca%20href%3D%22http://stamps4fun.blogspot.com/2013/03/egg-salad-blts.html%22%20target%3D%22_blank%22%3E%20HERE!%3C/a%3E),%20or%20decorate%20them%20with%20the%20kids%20for%20Easter!%20Basically,%20whatever%20you%20use%20%3Cstrike%3Eboiled%3C/strike%3E%20eggs%20for,%20you%20do%20the%20same%20with%20these%20%3Cu%3Ebaked%3C/u%3E%20ones!%3Cbr%20/%3E%0A%3Cbr%20/%3E%0AMy%20adorable%20Aubs%20had%20a%20great%20time%20decorating%20them%20for%20Easter!%3Cbr%20/%3E%0A%3Cbr%20/%3E%0A%3Ca%20href%3D%22http://www.flickr.com/photos/28729218@N08/6968572348/%22%20title%3D%22colorful%20by%20NJ%20Photography,%20on%20Flickr%22%3E%3Cimg%20alt%3D%22colorful%22%20height%3D%22480%22%20src%3D%22http://farm9.staticflickr.com/8148/6968572348_7aea9f793f_z.jpg%22%20width%3D%22640%22%20/%3E%3C/a%3E%3Cbr%20/%3E%0A%3Cbr%20/%3E%0A%3Cdiv%3E%0A%3Ca%20href%3D%22http://www.flickr.com/photos/28729218@N08/7114650941/%22%20title%3D%22Painting%20eggs%20by%20NJ%20Photography,%20on%20Flickr%22%3E%3Cimg%20alt%3D%22Painting%20eggs%22%20height%3D%22800%22%20src%3D%22http://farm6.staticflickr.com/5192/7114650941_ec2a3c2656_c.jpg%22%20width%3D%22600%22%20/%3E%3C/a%3E%3C/div%3E%0A%3Cdiv%3E%0A%3Cbr%20/%3E%3C/div%3E%0A%3Cdiv%3E%0A%3Cbr%20/%3E%3C/div%3E%0A%3Cdiv%3E%0A%3Cspan%3ESUBSCRIBE%20(via%20our%20side%20bar)%20to%20our%20blog%20if%20you%20want%20to%20stay%20updated%20with%20all%20the%20fun%20things%20we%20have%20going%20on%20here%20and%20don't%20forget%20to%20be%20our%20fan%20on%20Facebook!%3C/span%3E%3C/div%3E%0A%3Cdiv%3E%0A%3Cspan%3E%3Cbr%20/%3E%3C/span%3E%3C/div%3E%0A%3Cdiv%3E%0A%3Cbr%20/%3E%3C/div%3E%0A%3Cdiv%3E%0AThanks%20for%20stopping%20by!!!%3C/div%3E%0A%3Cdiv%3E%0A%3Ca%20href%3D%22https://blogger.googleusercontent.com/img/b/R29vZ2xl/AVvXsEg3hBIquOMe01n3_0SmJ17_48FyCF7kJj24DGSpwTZaNYEvgmmDoOMLiZmdDcWmfmxM3Bg5BDYkT9k-Q-IG5N-IfA25J_pudjxq5ZhhAFfF-DyJEFjvh4vdVRAy4rziNRKVwODPkJes560/s1600/nicole%252527s+sig.jpg%22%20imageanchor%3D%221%22%3E%3Cimg%20border%3D%220%22%20src%3D%22https://blogger.googleusercontent.com/img/b/R29vZ2xl/AVvXsEg3hBIquOMe01n3_0SmJ17_48FyCF7kJj24DGSpwTZaNYEvgmmDoOMLiZmdDcWmfmxM3Bg5BDYkT9k-Q-IG5N-IfA25J_pudjxq5ZhhAFfF-DyJEFjvh4vdVRAy4rziNRKVwODPkJes560/s1600/nicole%252527s+sig.jpg%22%20/%3E%3C/a%3E%3C/div%3E%0A%3Cdiv%3E%0A%3Cbr%20/%3E%3C/div%3E%0A%3Cdiv%3E%0A%3Cbr%20/%3E%3C/div%3E%0A%3Cdiv%3E%0A%3Ca%20href%3D%22https://blogger.googleusercontent.com/img/b/R29vZ2xl/AVvXsEhmL1kQjsOWdW7TccIIwS-rPf4QsXQq94sDb0wqzcxloENjQr2Vb0luC9Oco8Aq7GeFv25kA_SCARd_gTMZ_kB0wJnExDOmvDcBpVW0tVtVpUa1oI6g6iinvKUr9ZOnLcXgXiGOj7DwxN0/s1600/comment+love.jpg%22%20imageanchor%3D%221%22%3E%3Cimg%20border%3D%220%22%20src%3D%22https://blogger.googleusercontent.com/img/b/R29vZ2xl/AVvXsEhmL1kQjsOWdW7TccIIwS-rPf4QsXQq94sDb0wqzcxloENjQr2Vb0luC9Oco8Aq7GeFv25kA_SCARd_gTMZ_kB0wJnExDOmvDcBpVW0tVtVpUa1oI6g6iinvKUr9ZOnLcXgXiGOj7DwxN0/s1600/comment+love.jpg%22%20/%3E%3C/a%3E%3C/div%3E%0A%3Cdiv%3E%0A%3Cbr%20/%3E%3C/div%3E%0A%3C/div%3E%0A%3Cdiv%3E%0A%3Cspan%3E%3C/span%3E%3C/div%3E)
Chicken Pillows | Recipes 13 Mar 2013 12:24 PM (12 years ago)


 When choosing the crescent rolls, I go with the Pillsbury Big & Buttery. They are bigger and seem a little more fluffy. Its a win win in my book.


Egg Salad BLT's 1 Mar 2013 1:20 PM (12 years ago)
I thought I would be really clever and come up with a double whammy of a blog post. Riiiggghhht, not so much. Have you seen the so cute, gotta try it, kids would love it, dying eggs with whip cream? Me, too! Well, let me just say, pinterest FAIL. Mine ended with my kids eating eggs, er, egg shells and rainbow stained hands, hair, and teeth. I think we might try it again, like never. Do you have a pinterest fail story? I'd love to hear it. Head on over to our Facebook page and share it with us. The entry with the greatest fail will win a $20 gift card to Amazon from yours truly. Oh, and "like" us, because we are pretty awesome.
My hubby is a man of simple taste buds, eggs are a staple in a house. Egg sandwiches, fried eggs, hard boiled eggs, breakfast for dinner, you get the idea? He also loves BLT's, so I decided to marry his favs.


Ingredients:
- 8 slices Sour Dough Bread
-Mayo... or are you a miracle whip fan?
-Tomato
-Lettuce
-Bacon...buy the center cut kind, nothing is worse than fatty rubbery bacon.
Egg Salad:
-1 dozen eggs... We bake ours.
-1/2 cup onion
-1 stalk celery
-1/2 cup mayo
-2 TBSP relish
-2 TBSP mustard, I use honey mustard
-1 TBSP lemon juice-Salt and pepper to taste

Vegetarian 4 Bean Enchiladas 1 Mar 2013 12:40 PM (12 years ago)
 I'm baaaaaaaack. Whew, it's been a whirl wind of a month, and it doesn't look like it's going to ease up for another month or so...aye!
I recently had the opportunity to take a meal to a friend, her husband is a vegetarian so I was struggling a bit to come up with something that would be easy to transport and delicious...it's harder than it sounds. I did some searching on pinterest and found this recipe. I made some alterations to make it vegetarian friendly, and it turned out great. I made two since we needed dinner too, haha.., my in-laws were visiting, and it's hubby and FIL approved!

- 1 can red kidney beans rinsed and drained
- 1 can garbanzo beans rinsed and drained
- 1 can black beans - drained
- 1 can great northern beans rinsed and drained
- 1 can (10.75 oz) Campbell's Fiesta Nacho Cheese
- 1 can whole green chilies (you will get more flavor if you dice these bad boys up yourself, or go ahead and buy the diced ones)
- 1/3 cup chopped onions (optional)
- 1 can enchilada sauce (pick your flava)
- 1 1/2(+) cup shredded Mexican blend cheese (Am I the only one that doubles the amount of cheese called for...I hope not)
%20spanish%20rice.%26nbsp;%3C/div%3E%0A%3Cdiv%3E%0A%3Cbr%20/%3E%3C/div%3E%0A%3Cdiv%3E%0AIngredients:%3C/div%3E%0A%3Cdiv%3E%0A%3Cbr%20/%3E%3C/div%3E%0A-10%20Tortillas%20(Nicole%20and%20I%20both%20prefer%20Mission%20brand)%3Cbr%20/%3E%0A%3Cdiv%3E%0A(all%20beans%20are%2015%20oz%20cans)%3Cbr%20/%3E%0A-%201%20can%20red%20kidney%20beans%20rinsed%20and%20drained%3Cbr%20/%3E%0A-%201%20can%20garbanzo%20beans%20rinsed%20and%20drained%3Cbr%20/%3E%0A-%201%20can%20black%20beans%20-%20drained%3Cbr%20/%3E%0A-%201%20can%20great%20northern%20beans%20rinsed%20and%20drained%20%3Cbr%20/%3E%0A-%201%20can%20(10.75%20oz)%20Campbell's%20Fiesta%20Nacho%20Cheese%3Cbr%20/%3E%0A-%201%20can%20whole%20green%20chilies%20(you%20will%20get%20more%20flavor%20if%20you%20dice%20these%20bad%20boys%20up%20yourself,%20or%20go%20ahead%20and%20buy%20the%20diced%20ones)%3Cbr%20/%3E%0A-%201/3%20cup%20chopped%20onions%20(optional)%3Cbr%20/%3E%0A-%201%20can%20enchilada%20sauce%20(pick%20your%20flava)%3Cbr%20/%3E%0A-%201%201/2(+)%20cup%20shredded%20Mexican%20blend%20cheese%20(Am%20I%20the%20only%20one%20that%20doubles%20the%20amount%20of%20cheese%20called%20for...I%20hope%20not)%3C/div%3E%0A%3Cdiv%3E%0A%3Cbr%20/%3E%3C/div%3E%0ADirections:%3Cbr%20/%3E%0A%3Cdiv%3E%0A%3Cbr%20/%3E%3C/div%3E%0A%3Cdiv%3E%0APreheat%20oven%20to%20350%20degrees.%3C/div%3E%0A%3Cdiv%3E%0ACombine%20beans,%20soup,%20onions%20and%20chilies%20in%20bowl.%20Put%20a%20thin%20layer%20of%20the%20mixture%20on%20the%20bottom%20of%20a%2013x9%20inch%20casserole%20dish.%20(I%20used%20the%20foil%20kind%20for%20delivery)%20Spoon%20about%201/2%20cup%20filling%20onto%20each%20tortilla.%20Roll%20tortillas%20up%20and%20put%20into%20pan.%3C/div%3E%0A%3Cdiv%3E%0ASpoon%20on%20your%20enchilada%20sauce%20so%20that%20it%20covers%20all%20of%20the%20tortillas.%20Cover%20with%20foil.%20Bake%20for%2030%20minutes.%20Then%20take%20out%20and%20sprinkle%20with%20cheese.%20Put%20it%20back%20into%20the%20oven%20until%20cheese%20is%20melted...%20about%2010%20minutes.%20I%20like%20it%20when%20the%20edges%20of%20the%20tortillas%20are%20crunchy.%3Cbr%20/%3E%0A%3Cbr%20/%3E%0A%3Cdiv%3E%0A%3Ca%20href%3D%22https://blogger.googleusercontent.com/img/b/R29vZ2xl/AVvXsEiDN6XLfgcsdLHaFo9pt-G4N2OBE-Ca5SsQV4Qict-PaFLoLIQskN4lO8urHrg9IFt99kf8ppb1rGjQDCXBli6eaMe7FbfyfhBKfWrlwqGGbiYY969B61N4TGk5myodDdEQjm8KY2oNWBE/s1600/lur+signature.jpg%22%20imageanchor%3D%221%22%3E%3Cimg%20border%3D%220%22%20src%3D%22https://blogger.googleusercontent.com/img/b/R29vZ2xl/AVvXsEiDN6XLfgcsdLHaFo9pt-G4N2OBE-Ca5SsQV4Qict-PaFLoLIQskN4lO8urHrg9IFt99kf8ppb1rGjQDCXBli6eaMe7FbfyfhBKfWrlwqGGbiYY969B61N4TGk5myodDdEQjm8KY2oNWBE/s1600/lur+signature.jpg%22%20/%3E%3C/a%3E%3C/div%3E%0A%3Cbr%20/%3E%3C/div%3E%0A%3Cdiv%3E%0A%3Cbr%20/%3E%3C/div%3E%0A%3Cdiv%3E%0A%3Cbr%20/%3E%3C/div%3E)
Bling Push Pin Art 23 Feb 2013 9:21 AM (12 years ago)
Ok! This was an awesomely EASY project to tackle. I have so many projects on my To Do list that I decided this was a good one to start with. Yeah!
I saw this idea on Pinterest. It was just basically a picture... no tutorial or website to go to. So, I decided to come up with my own tutorial. This is a really cheap project. You basically just need 1- 12x12 white canvas, 2 packages of push pins (Walmart), letters, and a pencil and scissors. Thats it!

To make the letters, you just need a program... microsoft word, photoshop... I don't know, whatever you have that you can print a font of your choice. I used my photoshop. I opened a plain white file using the size 8 in x 8 in. The font I chose was Times New Romans in Bold using the size of 380px. I just tried to fill up the whole white space with my font. Here is my screen shot (click on image to see it larger):

I printed out LOVE on card stock. I needed something thicker than printer paper for tracing the font onto my canvas. After you cut out the letters, place it onto your canvas how you would like it, then trace it on your canvas with a pencil. Then you are ready to start layering your push pins to create your blingy (yes I made up that word) art!
You may get intimidated about how to put your push pins in your canvas, but trust me, the more you do it the faster you will get. Sometimes you need to put the pins in at an angle. You'll get the hang of it. Hopefully my pictures below will help you... :)


(side note: The push pins stay very well in the canvas. You don't have to worry about them falling out. It also helps that the push pins overlap each other. I have yet to have one fall out.)
Look at that!!! How fun is that?!!! I LOVE IT! You can use this tutorial to make a number of things like this... put together your own words or just someones initials or a silhouette, chevron, anything really. So cool! So BLINGY!
I plan to use this in a collage with more 12x12 canvases of pictures of my little family but for now, I'm displaying it on my fireplace with my wedding photo until I can get the other ones done.

Best Ever Sugar Cookies 16 Feb 2013 1:03 PM (12 years ago)
We are very sorry we have been a bit MIA this past month. One of us has been dealing with some big health issues and the other one of us is in the process of selling their home and moving very soon. I'm hoping you will accept these next two posts as a bit of an apology and we promise to get back into the swing of things on the blog and bring you more great ideas and yummy recipes!
I know Valentines Day was 2 days ago and I should have posted this ahead of time, but this is a recipe you can make anytime, for any holiday (Easter is coming up). All you have to do is just switch out the cookie cutters and decorations. I happen to like making this recipe with my kids on Valentines Day and let them decorate cookies and have fun.

I've known this recipe from my childhood. The recipe comes from my Grandma Carmen, my dads mom, whom my mom's cooking never seemed to live up to (men). My Grandma Carmen is no longer with us so I'd like to share her recipe in memory of her.
Best Ever Sugar Cookies
by: Carmen Nielson
1/2 cup butter flavored crisco
1 cup sugar
2 beaten eggs
1 tsp vanilla
1/2 tsp salt
1 tsp baking powder
1 tsp baking soda
3 1/2 cup flour
1/2 cup milk
Directions:
Cream shortening with sugar add eggs and vanilla. In a separate bowl combine dry ingredients. Add dry ingredients alternating with the milk to the shortening and sugar. Once all ingredients are well mixed, put cookie dough in a bowl, cover and refrigerate for 1 hour. Once the cookie dough is nice and chill, flour your surface and roll cookie dough to 1/4 inch thick. Cut with cookie cutters and bake @ 375 degrees for 9 minutes.
Cream Cheese Frosting
1 8oz package of cream cheese
1/4 cup softened butter
1 tsp vanilla
2 1/2 cups sifted powdered sugar
Directions:
In a bowl, beat together cream cheese, butter and vanilla until light and fluffy. Gradually add powdered sugar half a cup at a time, beating well until combined. Separate the frosting and add food color to desired colors.
** This recipe makes about 3-4 dozen cookies depending on your cookie cutter size. I was able to get about 4 dozen with this batch because my heart cookie cutter wasn't that big.


.%20All%20you%20have%20to%20do%20is%20just%20switch%20out%20the%20cookie%20cutters%20and%20decorations.%20I%20happen%20to%20like%20making%20this%20recipe%20with%20my%20kids%20on%20Valentines%20Day%20and%20let%20them%20decorate%20cookies%20and%20have%20fun.%3Cbr%20/%3E%0A%3Cbr%20/%3E%0A%3Cdiv%3E%0A%3Ca%20href%3D%22https://blogger.googleusercontent.com/img/b/R29vZ2xl/AVvXsEh2zNHkgJUGUmziXfNeroiyht5dNnTGg5S_RHpD4MeLCjuUt6ar6lxujdsMheInTbOtHOppw5pjoIFcd9m7fqGY2qyoZDM4IvCn0LXD4gjZpr5sVp5szsV-oCsjtLkB2UKmNfF4fbF8P00/s1600/_DSC4763.jpg%22%20imageanchor%3D%221%22%3E%3Cimg%20border%3D%220%22%20height%3D%22266%22%20src%3D%22https://blogger.googleusercontent.com/img/b/R29vZ2xl/AVvXsEh2zNHkgJUGUmziXfNeroiyht5dNnTGg5S_RHpD4MeLCjuUt6ar6lxujdsMheInTbOtHOppw5pjoIFcd9m7fqGY2qyoZDM4IvCn0LXD4gjZpr5sVp5szsV-oCsjtLkB2UKmNfF4fbF8P00/s400/_DSC4763.jpg%22%20width%3D%22400%22%20/%3E%3C/a%3E%3C/div%3E%0AYou%20will%20be%20so%20glad%20I%20shared%20this%20recipe.%20They%20are%20%3Cspan%3Esoft%3C/span%3E%20and%20%3Cspan%3Efluffy%3C/span%3E%20and%20%3Cspan%3Emelt%20in%20your%20mouth%3C/span%3E%20sooooooo%26nbsp;%3Cspan%3Egood%3C/span%3E!%20The%20fact%20that%20they%20are%20topped%20off%20with%20%3Cspan%3ECream%20Cheese%20Frosting%3C/span%3E%20makes%20these%20cookies%20the%20best!%3Cbr%20/%3E%0A%3Cbr%20/%3E%0A%3Cbr%20/%3E%0AI've%20known%20this%20recipe%20from%20my%20childhood.%20The%20recipe%20comes%20from%20my%20Grandma%20Carmen,%20my%20dads%20mom,%20whom%20my%20mom's%20cooking%20never%20seemed%20to%20live%20up%20to%20(men).%20My%20Grandma%20Carmen%20is%20no%20longer%20with%20us%20so%20I'd%20like%20to%20share%20her%20recipe%20in%20memory%20of%20her.%3Cbr%20/%3E%0A%3Cbr%20/%3E%0A%3Cbr%20/%3E%0A%3Cspan%3EBest%20Ever%20Sugar%20Cookies%3C/span%3E%3Cbr%20/%3E%0Aby:%20Carmen%20Nielson%3Cbr%20/%3E%0A%3Cbr%20/%3E%0A1/2%20cup%20butter%20flavored%20crisco%3Cbr%20/%3E%0A1%20cup%20sugar%3Cbr%20/%3E%0A2%20beaten%20eggs%3Cbr%20/%3E%0A1%20tsp%20vanilla%3Cbr%20/%3E%0A1/2%20tsp%20salt%3Cbr%20/%3E%0A1%20tsp%20baking%20powder%3Cbr%20/%3E%0A1%20tsp%20baking%20soda%3Cbr%20/%3E%0A3%201/2%20cup%20flour%3Cbr%20/%3E%0A1/2%20cup%20milk%3Cbr%20/%3E%0A%3Cbr%20/%3E%0ADirections:%3Cbr%20/%3E%0ACream%20shortening%20with%20sugar%20add%20eggs%20and%20vanilla.%20In%20a%20separate%20bowl%20combine%20dry%20ingredients.%20Add%20dry%20ingredients%20alternating%20with%20the%20milk%20to%20the%20shortening%20and%20sugar.%20Once%20all%20ingredients%20are%20well%20mixed,%20put%20cookie%20dough%20in%20a%20bowl,%20cover%20and%20refrigerate%20for%201%20hour.%20%26nbsp;Once%20the%20cookie%20dough%20is%20nice%20and%20chill,%20flour%20your%20surface%20and%20roll%20cookie%20dough%20to%201/4%20inch%20thick.%20Cut%20with%20cookie%20cutters%20and%20bake%20@%20375%20degrees%20for%209%20minutes.%3Cbr%20/%3E%0A%3Cbr%20/%3E%0A%3Cspan%3ECream%20Cheese%20Frosting%3C/span%3E%3Cbr%20/%3E%0A%3Cspan%3E%3Cbr%20/%3E%3C/span%3E%0A1%208oz%20package%20of%20cream%20cheese%3Cbr%20/%3E%0A1/4%20cup%20softened%20butter%3Cbr%20/%3E%0A1%20tsp%20vanilla%3Cbr%20/%3E%0A2%201/2%20cups%20sifted%20powdered%20sugar%3Cbr%20/%3E%0A%3Cbr%20/%3E%0ADirections:%3Cbr%20/%3E%0AIn%20a%20bowl,%20beat%20together%20cream%20cheese,%20butter%20and%20vanilla%20until%20light%20and%20fluffy.%20Gradually%20add%20powdered%20sugar%20half%20a%20cup%20at%20a%20time,%20beating%20well%20until%20combined.%20Separate%20the%20frosting%20and%20add%20food%20color%20to%20desired%20colors.%3Cbr%20/%3E%0A%3Cbr%20/%3E%0A%3Cspan%3E%3Ci%3E**%20This%20recipe%20makes%20about%203-4%20dozen%20cookies%20depending%20on%20your%20cookie%20cutter%20size.%20I%20was%20able%20to%20get%20about%204%20dozen%20with%20this%20batch%20because%20my%20heart%20cookie%20cutter%20wasn't%20that%20big.%3C/i%3E%3C/span%3E%3Cbr%20/%3E%0A%3Cbr%20/%3E%0A%3Cdiv%3E%0A%3Ca%20data-pin-config%3D%22beside%22%20data-pin-do%3D%22buttonPin%22%20href%3D%22http://pinterest.com/pin/create/button/?url%253Dhttp://stamps4fun.blogspot.com/2013/02/best-ever-sugar-cookies.html%2526media%253Dhttp://1.bp.blogspot.com/-uBIxKjrv3PI/UR_54nykG7I/AAAAAAAABrQ/9nzp7GIkD4g/s1600/sugar+cookies+grouped.jpg%2526description%253DBest%2520Ever%2520Sugar%2520Cookies%22%3E%3Cimg%20src%3D%22http://assets.pinterest.com/images/pidgets/pin_it_button.png%22%20/%3E%3C/a%3E%3C/div%3E%0A%3Cbr%20/%3E%0A%3Cdiv%3E%0A%3Ca%20href%3D%22https://blogger.googleusercontent.com/img/b/R29vZ2xl/AVvXsEjB7VulL8ZmRfN8Dmty960AUeiTzaEA_8Tb3l1c_xK3gZcjspD9cz2v_OBEZ1u22BAs4lidesaeVnL5li1iKNDXfN6jj4R2FiENxqrHVxpsQHJ-JvJaSDJOpipkbKMk7b3IKcGPIlUqrzA/s1600/sugar+cookies+grouped.jpg%22%20imageanchor%3D%221%22%3E%3Cimg%20border%3D%220%22%20src%3D%22https://blogger.googleusercontent.com/img/b/R29vZ2xl/AVvXsEjB7VulL8ZmRfN8Dmty960AUeiTzaEA_8Tb3l1c_xK3gZcjspD9cz2v_OBEZ1u22BAs4lidesaeVnL5li1iKNDXfN6jj4R2FiENxqrHVxpsQHJ-JvJaSDJOpipkbKMk7b3IKcGPIlUqrzA/s1600/sugar+cookies+grouped.jpg%22%20/%3E%3C/a%3E%3C/div%3E%0A%3Cdiv%3E%0A%3Cbr%20/%3E%3C/div%3E%0A%3Cdiv%3E%0AThe%20best%20part%20is%20watching%20your%20kiddos%20decorate%20and%20enjoy%20their%20tasty%20treat!%3C/div%3E%0A%3Cdiv%3E%0A%3Cbr%20/%3E%3C/div%3E%0A%3Cdiv%3E%0A%3Ca%20href%3D%22https://blogger.googleusercontent.com/img/b/R29vZ2xl/AVvXsEht2CsX2QFmUbgw-5gs1V4yADzQJq3c9H-lLrfgSQI8Ep37H41FtNHN5Oac-SP8v-vHTPaTdq3GCpVwvmvt6UXmSgGOGX7DZwSH-gXf4zaopeBl_Q2kXkSozXrMkoTw1HYc6TrOyA6nXhA/s1600/_DSC4712.jpg%22%20imageanchor%3D%221%22%3E%3Cimg%20border%3D%220%22%20height%3D%22426%22%20src%3D%22https://blogger.googleusercontent.com/img/b/R29vZ2xl/AVvXsEht2CsX2QFmUbgw-5gs1V4yADzQJq3c9H-lLrfgSQI8Ep37H41FtNHN5Oac-SP8v-vHTPaTdq3GCpVwvmvt6UXmSgGOGX7DZwSH-gXf4zaopeBl_Q2kXkSozXrMkoTw1HYc6TrOyA6nXhA/s640/_DSC4712.jpg%22%20width%3D%22640%22%20/%3E%3C/a%3E%3C/div%3E%0A%3Cbr%20/%3E%0A%3Cdiv%3E%0A%3Ca%20href%3D%22https://blogger.googleusercontent.com/img/b/R29vZ2xl/AVvXsEjYt_XaGwYCb4iDQw2zprjyMEeeUL4Mty3enmqbLvdB5POvyVPb6y0Wf-lbzjBW4aeOvI2PdDFyWJLYBGDA9CwX7Oar31LZ9ZGYNJSZ3tGv8qgZOxQAVkG5c9Xa7ChTlPieNzD-FHEiR9Y/s1600/aubs+decor.jpg%22%20imageanchor%3D%221%22%3E%3Cimg%20border%3D%220%22%20height%3D%22476%22%20src%3D%22https://blogger.googleusercontent.com/img/b/R29vZ2xl/AVvXsEjYt_XaGwYCb4iDQw2zprjyMEeeUL4Mty3enmqbLvdB5POvyVPb6y0Wf-lbzjBW4aeOvI2PdDFyWJLYBGDA9CwX7Oar31LZ9ZGYNJSZ3tGv8qgZOxQAVkG5c9Xa7ChTlPieNzD-FHEiR9Y/s640/aubs+decor.jpg%22%20width%3D%22640%22%20/%3E%3C/a%3E%3C/div%3E%0A%3Cdiv%3E%0A%3Cbr%20/%3E%3C/div%3E%0A%3Cdiv%3E%0A%3Cbr%20/%3E%3C/div%3E%0A%3Cdiv%3E%0AEnjoy!%3C/div%3E%0A%3Cdiv%3E%0A%3Cbr%20/%3E%3C/div%3E%0A%3Cdiv%3E%0A%3Ca%20href%3D%22https://blogger.googleusercontent.com/img/b/R29vZ2xl/AVvXsEg3hBIquOMe01n3_0SmJ17_48FyCF7kJj24DGSpwTZaNYEvgmmDoOMLiZmdDcWmfmxM3Bg5BDYkT9k-Q-IG5N-IfA25J_pudjxq5ZhhAFfF-DyJEFjvh4vdVRAy4rziNRKVwODPkJes560/s1600/nicole%252527s+sig.jpg%22%20imageanchor%3D%221%22%3E%3Cimg%20border%3D%220%22%20src%3D%22https://blogger.googleusercontent.com/img/b/R29vZ2xl/AVvXsEg3hBIquOMe01n3_0SmJ17_48FyCF7kJj24DGSpwTZaNYEvgmmDoOMLiZmdDcWmfmxM3Bg5BDYkT9k-Q-IG5N-IfA25J_pudjxq5ZhhAFfF-DyJEFjvh4vdVRAy4rziNRKVwODPkJes560/s1600/nicole%252527s+sig.jpg%22%20/%3E%3C/a%3E%3C/div%3E%0A%3Cbr%20/%3E)
Best Ever Banana Bread 7 Jan 2013 10:25 PM (12 years ago)


1/2 cup butter, melted
1 cup white sugar
2 eggs
1 teaspoon vanilla extract
1 teaspoon cinnamon
1 1/2 cup all purpose flour
1 teaspoon baking soda
1/2 teaspoon salt
1/2 cup sour cream (it makes everything better! Click, here and here)
1/2 chopped walnut...we opt for chocolate chips. The kids really have to twist my arm.
2 medium bananas, smashed.
Directions:
Preheat oven to 350 degrees.
In a large bowl stir butter and sugar, add eggs and vanilla, stir until mixed well.
In another bowl, combine flour, baking soda, salt, and cinnamon, stir into the butter mixture until smooth.
Fold in the sour cream, bananas, and walnuts (*cough* chocolate chips) Spread evenly into a greased 9x5 loaf pan.
Bake at 350 degrees for 50-60min.
PRINT RECIPE
%3Cbr%20/%3E%0A1/2%20chopped%20walnut...we%20opt%20for%20chocolate%20chips.%20The%20kids%20really%20have%20to%20twist%20my%20arm.%3Cbr%20/%3E%0A2%20medium%20bananas,%20smashed.%3Cbr%20/%3E%0A%3Cbr%20/%3E%0A%3Cbr%20/%3E%0A%3Cb%3EDirections:%3C/b%3E%3Cbr%20/%3E%0A%3Cb%3E%3Cbr%20/%3E%3C/b%3E%0APreheat%20oven%20to%20350%20degrees.%3Cbr%20/%3E%0A%3Cbr%20/%3E%0AIn%20a%20large%20bowl%20stir%20butter%20and%20sugar,%20add%20eggs%20and%20vanilla,%20stir%20until%20mixed%20well.%3Cbr%20/%3E%0A%3Cbr%20/%3E%0AIn%20another%20bowl,%20combine%20flour,%20baking%20soda,%20salt,%20and%20cinnamon,%20stir%20into%20the%20butter%20mixture%20until%20smooth.%3Cbr%20/%3E%0A%3Cbr%20/%3E%0AFold%20in%20the%20sour%20cream,%20bananas,%20and%20walnuts%20(*cough*%20chocolate%20chips)%20Spread%20evenly%20into%20a%20greased%209x5%20loaf%20pan.%3Cbr%20/%3E%0A%3Cbr%20/%3E%0ABake%20at%20350%20degrees%20for%2050-60min.%3Cbr%20/%3E%0A%3Cbr%20/%3E%0A%3Cb%3E%3Cspan%3E%3Ca%20href%3D%22https://sites.google.com/site/thejoneswayprintablerecipes/best-ever-banana-bread%22%20target%3D%22_blank%22%3EPRINT%20RECIPE%3C/a%3E%3C/span%3E%3C/b%3E%3Cbr%20/%3E%0A%3Cbr%20/%3E%0A%3Cdiv%3E%0A%3Ca%20href%3D%22https://blogger.googleusercontent.com/img/b/R29vZ2xl/AVvXsEiDN6XLfgcsdLHaFo9pt-G4N2OBE-Ca5SsQV4Qict-PaFLoLIQskN4lO8urHrg9IFt99kf8ppb1rGjQDCXBli6eaMe7FbfyfhBKfWrlwqGGbiYY969B61N4TGk5myodDdEQjm8KY2oNWBE/s1600/lur+signature.jpg%22%20imageanchor%3D%221%22%3E%3Cimg%20border%3D%220%22%20height%3D%22198%22%20src%3D%22https://blogger.googleusercontent.com/img/b/R29vZ2xl/AVvXsEiDN6XLfgcsdLHaFo9pt-G4N2OBE-Ca5SsQV4Qict-PaFLoLIQskN4lO8urHrg9IFt99kf8ppb1rGjQDCXBli6eaMe7FbfyfhBKfWrlwqGGbiYY969B61N4TGk5myodDdEQjm8KY2oNWBE/s320/lur+signature.jpg%22%20width%3D%22320%22%20/%3E%3C/a%3E%3C/div%3E%0A%3Cbr%20/%3E%0A%3Cb%3E%3Cbr%20/%3E%3C/b%3E%0A%3Cb%3E%3Cbr%20/%3E%3C/b%3E%0A%3Cbr%20/%3E%0A%3Cbr%20/%3E%0A%3Cbr%20/%3E)
It's Party Time! 7 Jan 2013 10:03 PM (12 years ago)
I am a big fan of cakes, er, make that frosting. I LOVE making cakes for my kiddos and in this case, my hubby. The man loves golf, so I thought it would be awesome to bring a golf course into this house this year! Ha!


Here is the play by play:
First I baked 24 spice cupcakes, if you want a hint on making a box mix taste like homemade, click HERE.
While those were baking I smashed about 8 graham cracker cookies in a Ziploc bag for the sand trap...or whatever that's called.
You can also prepare your pole/flag. Mine is a pretzel stick and a fruit roll up. I just cut it into a diamond shape and wrapped it around.
Now you're going to want to make your frosting, I used my own recipe for cream cheese frosting.
6 of the cupcakes will be used in the sand trap I used some untinted frosting and put some on those cupcakes to make the graham crackers stay put. I also reserved some of the frosting and put it in the freezer to make the golf balls...More on that later.
Then I tinted the frosting using Wilton's "kelly green", I used Wilton tip #18 to make the grass effect. The fairway is just simply spread, and the "green" is dusted with green sugar.
For the final touch I rolled tiny balls of frosting I had put in the freezer to make the golf balls.
The Hubs loved it, I am a huge fan of making cupcake cakes!

Tricks For Finding The Next Good Book To Read 7 Jan 2013 4:22 PM (12 years ago)
 I love to find a great book to read... but it use to be really hard for me to find the next good one. Mostly it would be word of mouth or I would go to the Authors website of the book I just read and sometimes they would give recommendations for another good book.
This last year, 2012, I made a goal for myself to read more and watch TV less. It's always easier to read more in the summer when there isn't much on TV to entice you. I also bought an Ipad, which made it great for having the Kindle app to download books. So throughout the year, I learned tips and tricks on my own to find more books that are great to read, based on the books I have already read and enjoyed.
So, for all you New Years Resolution type of people that have a goal of reading more... I hope these tips help you out quite a bit.
1. If you don't already have a kindle or an ipad or the kindle app on your phone... I would seriously recommend it. If you are a big reader, you will save lots of money this way and coming by books is definitely easier.
2. Amazon is your best friend! If you don't already have one, you need to start your own Amazon account. You only need to give your credit card when you are purchasing something. You can buy used books for less then half the price of a new one. You can download books to your kindle or you can get an audio version of the book. Its such a great resource!
3. I'm going to take you through Amazon step by step on finding just the right book that fits your style... First go to Amazon and Search by books. Type in the last book that you read that you really enjoyed; I'm using Matched by Ally Condie as an example.
Example (if you can't see it very good, just click on the image):


8. If you like The Book Thief but aren't sure if you're in the mood for reading it right now, you can always save it to your wish list for later. This is a great resource for remembering books that you want to read and can come back to them later. Especially if you saw more than one book you wanted to read from the recommended list of books.

9. Amazon keeps track of the things you buy and will give you Recommendations for future things you would like according to what you have already purchased. So, in other words, the more books you buy on there, the more it will recommend other books to you by what you are reading. Example:

Crumb Cake 31 Dec 2012 7:46 PM (12 years ago)
This is a special recipe, one that my brother Pat and I would beg the Mama Jones to make often. It's a recipe I willing risked my own life for. You see, we had a scary basement. The kind you held your breath and ran up the stairs like a bat out of hell as soon as you got what you were after. My mission was canned peaches; sweet delicious peaches the Mama Jones had canned herself and had stock piled in the horrifying basement. They would chill in refrigerator while she made this yummy deliciousness, and are the perfect side to this sweet cake. I make it for my own kidlets now, who affectionately call it "Crummy Cake", trust me, this is not a reflection on how it tastes. It disappears into thin air.
Crumb Cake aka Coffee Cake


Apple Crisp Pie 22 Dec 2012 4:38 PM (12 years ago)
Ok. I'm going to share with you "my" version of Apple Crisp Pie. My Mother-in-law (whom is a very great baker) said that someday when she opens her own bakery, she will have this pie on the menu and name it Nicole's Famous Apple Pie. Since then, she has made this pie, I've been asked to make this pie, and have given the recipe many times for Holiday occasions. So, I hope you enjoy!
 It all started 3 or 4 years ago, when I was given this beautiful pie plate from my Grandmother Barnes (super generous and sweet sweet lady!). It is my absolute favorite pie plate ever! Why? Just look at it! It's beautiful! It also has the apple pie recipe on the bottom, stamped into the plate.
This is where I got the recipe... However, there were weird things about the recipe so I had to alter it quite a bit to how I would like it.
Sooo... Lets get started with the Pie. It's super super easy and you don't have to wait an hour for it to bake. We'll get to that in a few... (the recipe is at the bottom of the post)
First, preheat your oven to 375.
First you need about 6-7 medium size Granny Smith apples. I actually had to use 8-9 because my pie plate is very deep.
Peel the apple, like so...

Then you want to cut the apple into 4 different pieces, omitting the core...


 Once you've got your apple slices done and in the bowl, you'll add to it:


By the time you are finished with the crumb topping, your apples should be done partially cooking in the microwave. It should look something like this... If it looks like there is too much juice in the bottom like mine, you will want to just add in a couple of more tablespoons of flour and stir it up.


 If you are anything like me... You will not be willing to wait very long to have a slice. I try to let it cool for at least 15 minutes. Grab yourself a slice and add a scoop of your favorite vanilla ice cream on top and Enjoy! It is sooooooo DELICIOUS! Trust me! My husband has to have this pie every Thanksgiving and Christmas or he is not a happy boy.

Filling Ingredients
6-7 cups sliced peeled apples
1/2 cup sugar
1 tsp ground cinnamon
2 Tbls Flour
3 Tbls Water
1 Tbls Lemon Juice
Topping Ingredients
1 Cup Oatmeal
1/2 Cup brown sugar
1/2 cup flour
2 tsp Cinnamon
1 tsp Nutmeg
2/3 cup butter, soft
Preheat oven to 375.
Place crust in pie plate.
In large bowl combine all filling ingredients: mix, cover and microwave for 7 minutes. spoon into crust-lined pan.
In small bowl, combine all dry topping ingredients, then cut in butter until mixture is crumbly. Sprinkle topping evenly over filling.
Bake 35-40 minutes.
Red Velvet Snow Globe Cake 18 Dec 2012 9:04 PM (12 years ago)


Enjoy!
Photo Challenge | 6. Ornaments 7 Dec 2012 3:09 PM (12 years ago)
Here is my #6 a day late. Sorry about that! A little about my photo... My little guy of the house decided to decorate the back of the tree where the cord was hanging. He moved a big section of ornaments from the lower front to the back. I didn't even know until I was plugging in the tree lights. :) Gotta love toddlers!

Since I'm a day late, there is no link up today but you can still use hashtag #thejoneswayblog on instagram and upload your ornament photos.
%20Gotta%20love%20toddlers!%3Cbr%20/%3E%0A%3Cbr%20/%3E%0A%3Ca%20href%3D%22http://www.flickr.com/photos/28729218@N08/8253846454/%22%20title%3D%226.%20ornaments%20by%20NJ%20Photography,%20on%20Flickr%22%3E%3Cimg%20alt%3D%226.%20ornaments%22%20height%3D%22640%22%20src%3D%22http://farm9.staticflickr.com/8477/8253846454_7a2d63ae30_z.jpg%22%20width%3D%22609%22%20/%3E%3C/a%3E%3Cbr%20/%3E%0A%3Cbr%20/%3E%0ASince%20I'm%20a%20day%20late,%20there%20is%20no%20link%20up%20today%20but%20you%20can%20still%20use%20hashtag%20%23thejoneswayblog%20on%20instagram%20and%20upload%20your%20ornament%20photos.)
Easy, Man Pleasing Appetizers! 5 Dec 2012 9:45 PM (12 years ago)
 Usually, when I hear the word appetizers I visualize something on a fancy platter, ingredients that I can't pronounce, and I mimic the face of a baby being fed canned green beans for the first time....Throw that attitude out the window! These are super easy, man pleasing recipes for family favorite appetizers that you will get complimented for again, and again, and one more time, again! The Mama Jones holds these recipes tight to her chest, so consider yourself family!
First up, Lil' Smokies. My Mom, aka, Mama Jones, actually left Thanksgiving dinner prep to deliver these little guys to a family friend who is in love with them. For reals?!


Photo Challenge | 5. Something You Made 5 Dec 2012 7:21 PM (12 years ago)


%3C/div%3E%0A%3Cdiv%3E%0A%3Cbr%20/%3E%3C/div%3E%0A%3Cdiv%3E%0A%26nbsp;%0A%0A%3Ca%20href%3D%22https://blogger.googleusercontent.com/img/b/R29vZ2xl/AVvXsEgKb7iHU2WLjLz6lLgLqyIbCFCQHRI9BKyxLKEEwo5LGULsYbXqDDTVNJ3JpxREtv8Jgp34dAEJetZnTfs3Kq7UO3GgzB_OBIEAMvnYTD8lvWnoFjapQEIq-rl0-Ak4zOkZRxw2iYuOHDE/s1600/photo.JPG%22%20imageanchor%3D%221%22%3E%3Cimg%20border%3D%220%22%20height%3D%22400%22%20src%3D%22https://blogger.googleusercontent.com/img/b/R29vZ2xl/AVvXsEgKb7iHU2WLjLz6lLgLqyIbCFCQHRI9BKyxLKEEwo5LGULsYbXqDDTVNJ3JpxREtv8Jgp34dAEJetZnTfs3Kq7UO3GgzB_OBIEAMvnYTD8lvWnoFjapQEIq-rl0-Ak4zOkZRxw2iYuOHDE/s400/photo.JPG%22%20width%3D%22400%22%20/%3E%3C/a%3E%3C/div%3E%0A%3Cdiv%3E%0A%3Cbr%20/%3E%3C/div%3E%0A%3Cdiv%3E%0AThis%20was%20taken%20with%20my%20Iphone%20and%20uploaded%20in%20Instagram.%20Use%20hashtag%20%23thejoneswayblog.%3C/div%3E)
Photo Challenge | 4. Something Cold 4 Dec 2012 3:07 PM (12 years ago)
I kind of had a hard time figuring out what to photograph that was cold. If only we had some snow. We only have lame rain, but nothing fun to photograph. So my hubby said I should take a picture of some ice cubes... HAHA! So original.
So, I opted to take my favorite model outside wrapped in a blanket with her favorite snowflake beanie (made by my talented sister Lynlee). It kinda helped the cold factor that it was a little windy. Hope you like.

Hit us with your best shot!
.%20It%20kinda%20helped%20the%20cold%20factor%20that%20it%20was%20a%20little%20windy.%20Hope%20you%20like.%0A%3Cbr%3E%0A%3Ca%20href%3D%22http://www.flickr.com/photos/28729218@N08/8246092528/%22%20title%3D%22_DSC4463%20by%20NJ%20Photography,%20on%20Flickr%22%3E%3Cimg%20alt%3D%22_DSC4463%22%20height%3D%22425%22%20src%3D%22http://farm9.staticflickr.com/8069/8246092528_0cb40621b6_z.jpg%22%20width%3D%22640%22%20/%3E%3C/a%3E%0A%0A%3Cbr%3E%0AHit%20us%20with%20your%20best%20shot!%0A%3Cbr%3E%0A%3C!--%20start%20InLinkz%20script%20--%3E%0A%0A%3C!--%20end%20InLinkz%20script%20--%3E)