Chip-Carving a Summer Scene 13 Aug 10:56 AM (2 months ago)
You won’t want to cover these coaster-sized designs
By Roman Chernikov
I love chip carving, and I like experimenting with patterns. For a fresh new look, I used traditional chips to create two summer scenes. I use the tiles as coasters, but they would also make great decorations for a memorabilia box or key holder. If you want a more colorful finish, learn how to add stain to make the chip details pop!
Making a CoasterCut the squares to size. Transfer the patterns to the blanks using a hot tool with a laser print or graphite transfer paper. Strop your knife. I use simple three-corner chips with straight edges to carve these scenes. Refer to the photos to keep track of where the deepest part of the chip should be. Apply several light coats of acrylic spray finish or apply an oil finish, such as walnut, tung, or boiled linseed oil. |
 |
TIPWarming UpCarve several chips on a practice board before you start the project. This helps to ensure that your hand position is correct and your knife is sharp. Draw your own practice board or buy a preprinted board.
|
 |
|
MATERIALS • Basswood, at least 1/4″ (6mm) thick: 4″ (10.2cm) square • Graphite transfer paper (optional) • Finish, such as clear acrylic spray, walnut, tung, or boiled linseed oil |
TOOLS • Chip-carving knife • Hot tool (to transfer pattern, optional) • Paintbrushes |
| About the Author |
|
Roman Chernikov is a software engineer who has been carving as a hobby since 2013. He lives near San Francisco and attends the Santa Clara Valley Carvers Club. For more of his work, visit readNtry.com. |
 |
Get the Latest Issue! Purchase the Latest IssueFor more articles like this, subscribe to Woodcarving Illustrated magazine. Magazine SubscriptionPlus! Get digital mini magazines in your e-mail between printed issues.
|
The post Chip-Carving a Summer Scene appeared first on Woodcarving Illustrated.


Adding Color to Chip Carvings 13 Aug 10:53 AM (2 months ago)
By Marty Leenhouts
|
Many first-time chip carvers experience issues with color bleeding out of the chips and into the surrounding wood when staining projects. Here’s what you can do to keep the color inside the chips. Once you master adding color to chip carvings, test it out on some summer-themed coasters. When your carving is finished, first seal the wood completely. Apply several light coats of spray satin lacquer, matte acrylic, or shellac-based sanding sealer to the entire carving—front, back, and edges. If your carved item is quite thin, avoid a penetrating sealer, as this will cause the wood to cup. With the wood properly sealed, brush a gel stain into the recesses of your carving and wipe off the surface with a cotton cloth. Gel stains do not absorb into the wood like penetrating oil stains. Let the stain dry overnight and spray on a final topcoat to complete the finish. |
If you try to color the chips with a penetrating oil stain or dye before sealing the wood properly, the colors will bleed.
|

|
|

| About the Author |
|
Marty Leenhouts is the founder of MyChipCarving.com with over 30k subscribers and 200k hours of watch time. Courses, videos, patterns and more are available at his website. He and his wife Shelley, also run Red Barn Retreats in Garden City, Minn. |
|
Get the Latest Issue! Purchase the Latest IssueFor more articles like this, subscribe to Woodcarving Illustrated magazine. Magazine SubscriptionPlus! Get digital mini magazines in your e-mail between printed issues.
|
The post Adding Color to Chip Carvings appeared first on Woodcarving Illustrated.
Woodcarving Illustrated Fall Issue, Issue #112 12 Aug 7:27 AM (2 months ago)
The Fall 2025 issue of Woodcarving Illustrated includes a variety of projects, patterns, and features, as well as interesting techniques. This issue is a part of the regular magazine subscription. It is also available from your favorite retailer or from Fox Chapel Publishing, foxchapelpublishing.com or 1-800-457-9112.
Scroll down for a sneak peek!
Purchase the Latest Issue Print Magazine Subscription Digital Magazine Subscription
In This Issue
Feature
 |
Imitation of Life Artist David Boone captures moments in time and place with his storytelling carvings By Dorissa Bolinski |
Patterns
 |
Stretching Cat Dramatic woodgrain adds appeal to this elegant feline figure By Bartłomiej Kaczmarek |
 |
Decorative Plate Patience and attention to detail can yield a museum-worthy chip-carved piece By Marty Leenhouts |
 |
Rock and Roll Gnome Round out a block of wood to discover the character living within By Manuel De Santis |
 |
Pumpkin Candlestick Practice achieving symmetry in this spooky decoration By Tony Tanev |
 |
Little Pumpkin Carve one or a handful of these friendly-faced trinkets By Kevin Johnson |
Projects
 |
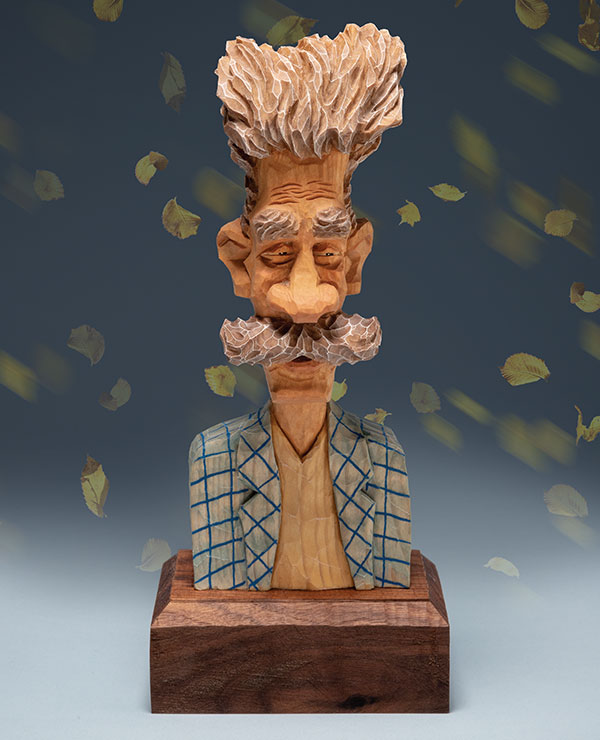
Hipster Frankenstein This cool ghoul is always on the guest list for the best Halloween parties By Dwayne Gosnell |
 |
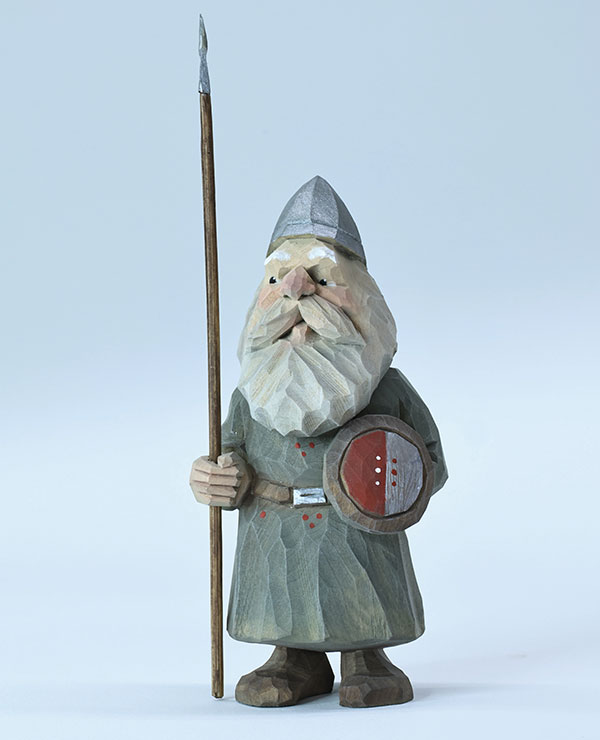
Angry Viking Plunder a block of basswood and get started on a hilarious carve By Chris Hammack |
 |
Cottonwood Bark House Create a whimsical dwelling with unique features and texture By Ales Janosik |
 |
Hardwood Mouse Transform colorful scraps into a cute little rodent on a bed of leaves By Paul Purnell |
 |
Goofy Gargoyle Carve a glaring roof-sitter who’s more friend than foe By Rich Wetherbee |
 |
Pumpkin Patch Scarecrow Easy painting technique highlights the wood on this friendly piece By Jim Willis |
 |
Oktoberfest Celebration Everything is going “accordion” to plan with this charming music maker By W. Todd Martin |
Technique
 |
Two-in-One Measuring Spoon Get cooking with a useful carving for the kitchen By Emmet Van Driesche |
Web Extras
Free Project – Want more Halloween projects? Carve Floyd Rhadigan’s “Jack o’Phantom.”
|
Get the Latest Issue! Purchase the Latest IssueFor more articles like this, subscribe to Woodcarving Illustrated magazine. Magazine SubscriptionPlus! Get digital mini magazines in your e-mail between printed issues.
|
The post Woodcarving Illustrated Fall Issue, Issue #112 appeared first on Woodcarving Illustrated.
Carving Folk-Art Birds 13 May 10:11 AM (5 months ago)
Highlight the tool marks with a little paint to simulate feathers on these simple designs
By Don Dearolf
Carve these simple designs with just a few tools. The pattern is generic enough that you can easily adapt the design to your favorite bird with only a few knife cuts and some paint. Before making your first cut, check out our exclusive article on adding cushions to your gouge handles.
Carving the Birds
Transfer the pattern to the blank and cut the two profiles with a band saw. Leave the wood thick around the beak. Then, carefully round the sharp corners with a knife. Thin the edges of the tail, but leave the middle thicker to create an oval shape when looking at the end. Carve the eye channels. Then, carve the beak. Burn the outlines of the eyes, around the base of the beak, and the mouth lines. Drill a small hole in the bottom and insert a toothpick (to mount the bird to the base, and to hold the bird while painting).
Painting the Birds
Finish the project with thinned acrylic paints. Apply thin washes of color and build up the color in layers. Use Payne’s grey for the dark parts of the back, burnt umber for the brown areas, and raw sienna for the breast. Then, when the paint is dry, apply a heavily thinned coat of burnt umber to tie everything together.
Paint each eye with full-strength Mars black and allow it to dry. Then add a dot of full-strength burnt umber in the bottom front corner and a titanium white highlight dot in the upper back corner of each eye. When the eyes are fully dry, dry-brush titanium white over the whole piece to highlight the tool marks.
 |
 |
 |
Making the Base
Slice a small section of a tree limb across the grain. Drill a hole matching the diameter of the toothpick in the center of the slice. Apply a clear finish to the base. When it is dry, glue a toothpick into the bottom of the bird and the hole in the base.
|
Materials • Basswood, 1 1/4″ (3.2cm) thick: 2 1/2″ x 3″ (6.4cm x 7.6cm) • Tree limb slice, 3/4″ (1.9cm) thick: 2″ (5.1cm)-dia. • Toothpick • Acrylic paints, such as Liquitex: burnt umber, Mars black, Payne’s grey, raw sienna, titanium white • Clear finish (for base) • Glue |
Tools • Carving knife • Small gouge • Woodburner with nibs: assorted • Paintbrushes: assorted • Drill with bit: 1/16″ (2mm)-dia. |
| About the Author |
|
Don Dearolf painted for several years before taking up carving in 1994 after his brother Dave took him to the Lancaster County Woodcarvers Show. Don loved to carve and share patterns, blanks, and rough outs with others. |
 |
Get the Latest Issue! Purchase the Latest IssueFor more articles like this, subscribe to Woodcarving Illustrated magazine. Magazine SubscriptionPlus! Get digital mini magazines in your e-mail between printed issues.
|
The post Carving Folk-Art Birds appeared first on Woodcarving Illustrated.
Cushioning Gouge Handles 13 May 10:10 AM (5 months ago)
By Vernon DePauw
I’ve tried gloves and padding for my hands, but my palms still hurt after using full size gouges. So, I decided to add ribbed rubber chair tips to my gouge handles, and not only has this helped ease the pain, it has also reduced my carpal tunnel pain.
Measure the end of your gouge handle; I used a circle drafting template, but you could also use calipers. The tips should fit tightly. The tips usually cost around a $1 each and are available in most hardware stores, but I found the largest selection at youngs-inc.com. Choose a tip with a flat bottom, because a rounded bottom will continue to focus the pressure into the center of your palm.
The tips spread out the pressure as I carve, and, as a bonus, the ribs give you another gripping surface. Once you have added the cushioned tips to your handles, test them out on this folk-art bird project.
|
Get the Latest Issue! Purchase the Latest IssueFor more articles like this, subscribe to Woodcarving Illustrated magazine. Magazine SubscriptionPlus! Get digital mini magazines in your e-mail between printed issues.
|
The post Cushioning Gouge Handles appeared first on Woodcarving Illustrated.
Woodcarving Illustrated Summer Issue, Issue #111 7 May 7:09 AM (5 months ago)
The Summer 2025 issue of Woodcarving Illustrated includes a variety of projects, patterns, and features, as well as interesting techniques. This issue is a part of the regular magazine subscription. It is also available from your favorite retailer or from Fox Chapel Publishing, foxchapelpublishing.com or 1-800-457-9112.
Scroll down for a sneak peek!
Purchase the Latest Issue Print Magazine Subscription Digital Magazine Subscription
In This Issue
Feature
 |
Think Sharp Behind the blade with Flexcut’s product manager Matt Retkowski |
Patterns
 |
Peace, Man Follow this guy to the biggest festival of the summer By Bruce Ankeny |
 |
Classic Gnome Walk in the enchanted forest with this friendly little character By Mehmet Berat Tas |
 |
Magical Seahorse Carve an elegant decoration that’s sure to please any fan of the open sea By Birce Keser |
 |
Wacky Blade Cover This funny tool guard will protect your favorite knife By Mark Akers |
|
|
Hummingbird and Crane Soar above the clouds with miniature birds in flight By Steve Tomashek |
 |
Crop Circles Frame Use a burr meant for roughing out to carve a textured design By Kristin LeVier |
 |
Realistic Atlantic Salmon Reel in a trophy fish that looks like the real thing By Charles Weiss |
 |
Celtic Chip Carving Create a wall hanging or decorate a box lid with an ancient design By Blandine Champagneur |


Projects
 |
Salty Sea Captain Embark on a high seas adventure with a friendly seafaring gent By Jonathan Creason |
 |
Happy Hopper This charming fishing frog is ready to star in his own fairy tale By Alice Wang |
 |
Diamond Rosettes Take chip carving to the next level with four unique geometric designs By Nikolas Rocha |
 |
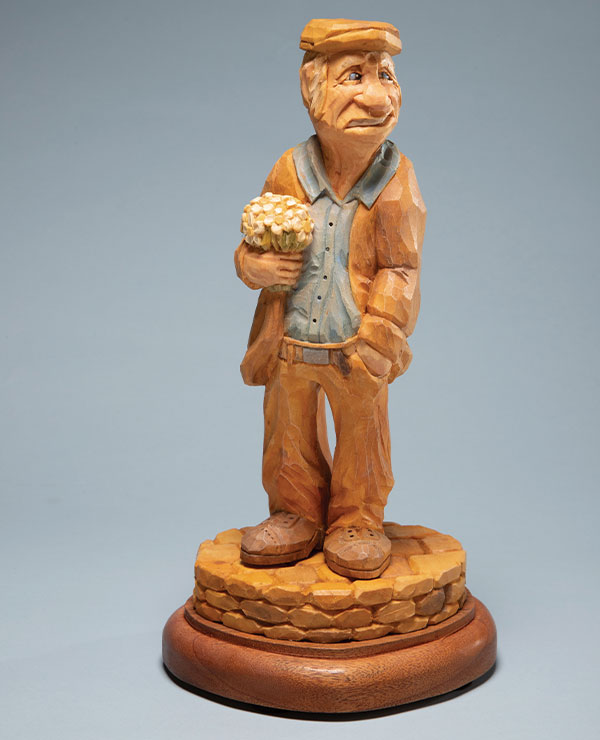
Walking Farmer Get a groove on and put some movement into your carvings By Blake Lunsford |
 |
Sunflower Starburst Catch the summer sun in a medium relief carving that exudes happiness By Dustin Strenke |
 |
Easy Dolphin Whittle a sweet, pocket-sized sea mammal By Tom Hindes |
Technique
 |
Mustache Man Curve the centerline to add interest and a natural flow to carvings By Dave Dion |
Web Extras
Upcoming Events – Find information on future carving shows in our Calendar of Events section.
Free Projects – Check out our online collection of carving projects and patterns under the Free Articles section.
Club Information – Discover what carving clubs are active in your area on our website.
|
Get the Latest Issue! Purchase the Latest IssueFor more articles like this, subscribe to Woodcarving Illustrated magazine. Magazine SubscriptionPlus! Get digital mini magazines in your e-mail between printed issues.
|
The post Woodcarving Illustrated Summer Issue, Issue #111 appeared first on Woodcarving Illustrated.
Chip Carving a Flower 10 Feb 5:31 AM (8 months ago)
Break out of the mold with this organic ornament
By Wayne Barton
Chip-carve ornaments are usually based on geometric figures. However, I decided to branch out and make an ornament with a more positive image and organic style. You can display the ornament alone, attach it to the top of a box, or even carve several to decorate a mantel or door frame. In addition to this chip-carved ornament, try your hand at making your own carving knife handle with a block of wood and a few materials and tools.
Carving the FlowerTransfer the pattern to the wood with graphite paper. I always advise transferring the pattern with graphite paper rather than gluing the pattern. This way you can see if you are removing or cracking away wood that isn’t supposed to be removed. As you carve the flower, hold the blade at approximately a 65° angle to the wood. When making tight or small curved cuts, raise the angled blade up so it’s more on its tip, reducing the amount of metal in the wood. Don’t cut deeper than necessary to remove the chips. Keep the “vein” lines narrow so they don’t overpower the carving. If desired, add a scalloped border on the back side of the ornament. |
Finishing the FlowerSpray both sides of the ornament with three coats of polyurethane, such as Minwax. If desired, paint the outer edge and add a message on the back. Apply a light brown finishing wax, such as Briwax, to both sides of the ornament to emphasize the carved areas while preserving a natural appearance. |
|
MATERIALS • Wood, such as basswood, 3/8″ (10mm) thick: 5″ square (12.7cm) • Graphite transfer paper • Spray polyurethane, such as Minwax • Paint • Colored wax, such as Briwax: light brown |
TOOLS • Chip-carving knives |
| About the Author |
|
Wayne Barton Wayne is the founder of The Alpine School of Woodcarving, Ltd. He has written several books and teaches seminars around the country. For more information, visit his website at www.chipcarving.com. |
 |
Get the Latest Issue! Purchase the Latest IssueFor more articles like this, subscribe to Woodcarving Illustrated magazine. Magazine SubscriptionPlus! Get digital mini magazines in your e-mail between printed issues.
|
The post Chip Carving a Flower appeared first on Woodcarving Illustrated.
Make Your Own Blade Handle 10 Feb 5:31 AM (8 months ago)
By John Allard
The benefits of a custom handle are enormous! You can fit the tool to the exact size of your hand, creating a comfortable grip for a safe, enjoyable carving experience. You can also extend the life of a favorite blade if the handle has become worn or broken. Once you have crafted your own handle, try out your knife by chip carving a flower ornament.
|
To make your own handle, first select the wood you wish to use—I used a piece of zebrawood because of its beautiful grain. Use either a coping saw or a band saw to cut out the handle. Then use a belt sander or wood files and sandpaper to smooth and shape it to size. Most carving blades are not full tang, meaning they have a short, flat extension into the handle. A full tang extends the length of your handle. Most Mora blades have a long tang, but I chose to cut mine shorter to about 2″ (5.1cm) long. Since the Mora blade is flat, I cannot just drill a hole and glue the blade in—I need to mark the width of the blade on one of the ends of my handle (select a drill bit slightly larger than the thickness of the tang) and drill a few close holes along the line. Clean out the thin pieces of wood between the drill holes. Apply a thin layer of epoxy to the blade tang and a little down into the hole. Slide the blade in and wipe away any excess with a rag. Let dry. Add a coat of finish to the handle and strop the blade. Check for a secure git and no wobbling before you begin to carve. |
Create a template and trace the design on the wood running with the grain.
Make a handle from a simple piece of oak, or deck out a “dream blade” with a piece of exotic hardwood. |


| About the Author |
|
An artist for over 30 years, John Allard is a professional multimedia artist who works as a sculptor in the toy industry and as an illustrator in advertising and publishing. His hobbies are power carving, whittling, and metal engraving. Email him at allarddesignstudio@yahoo.com. |
|
Get the Latest Issue! Purchase the Latest IssueFor more articles like this, subscribe to Woodcarving Illustrated magazine. Magazine SubscriptionPlus! Get digital mini magazines in your e-mail between printed issues.
|
The post Make Your Own Blade Handle appeared first on Woodcarving Illustrated.
Woodcarving Illustrated Spring Issue, Issue #110 5 Feb 12:06 PM (8 months ago)
The Spring 2025 issue of Woodcarving Illustrated includes a variety of projects, patterns, and features, as well as interesting techniques. This issue is a part of the regular magazine subscription. It is also available from your favorite retailer or from Fox Chapel Publishing, foxchapelpublishing.com or 1-800-457-9112.
Scroll down for a sneak peek!
Purchase the Latest Issue Print Magazine Subscription Digital Magazine Subscription
In This Issue
Feature
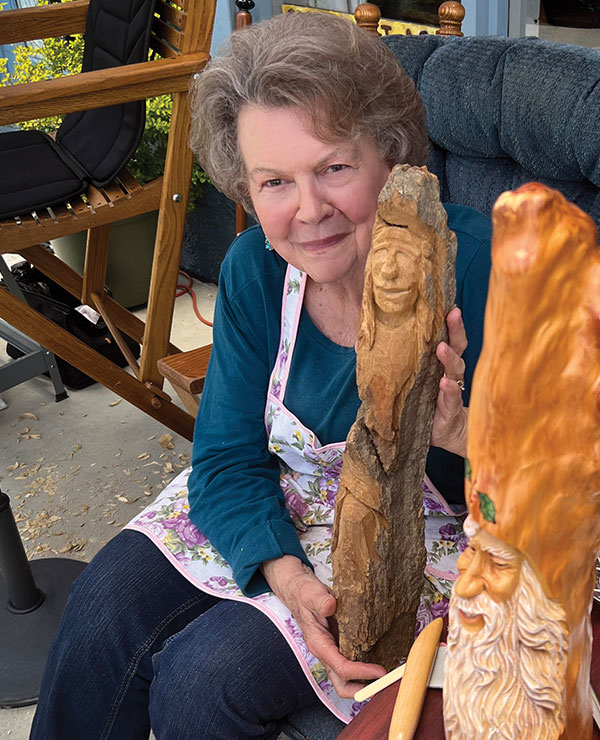 |
Tree Charmer Carole Jean Boyd combines multiple styles in her imaginative carvings By Dorissa Bolinski |
Patterns
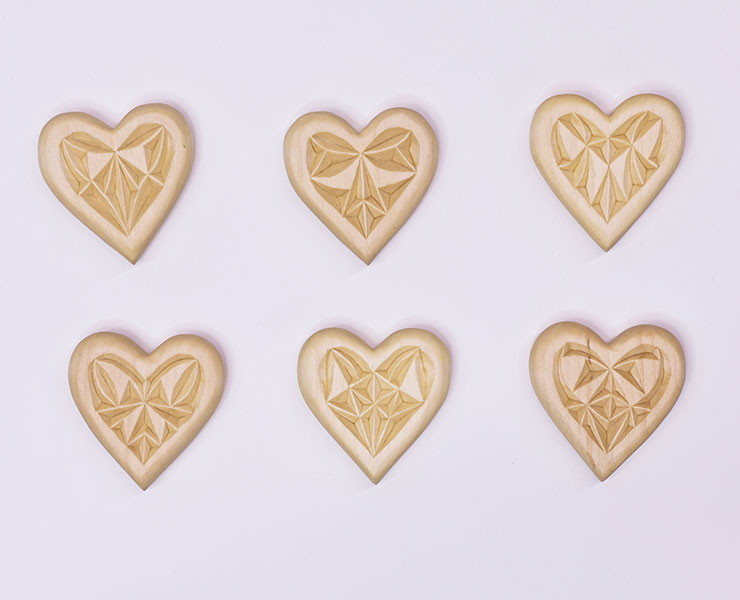 |
Comfort Hearts Carve a pocket full of cheer with these sweet Valentines By Charlene Lynum |
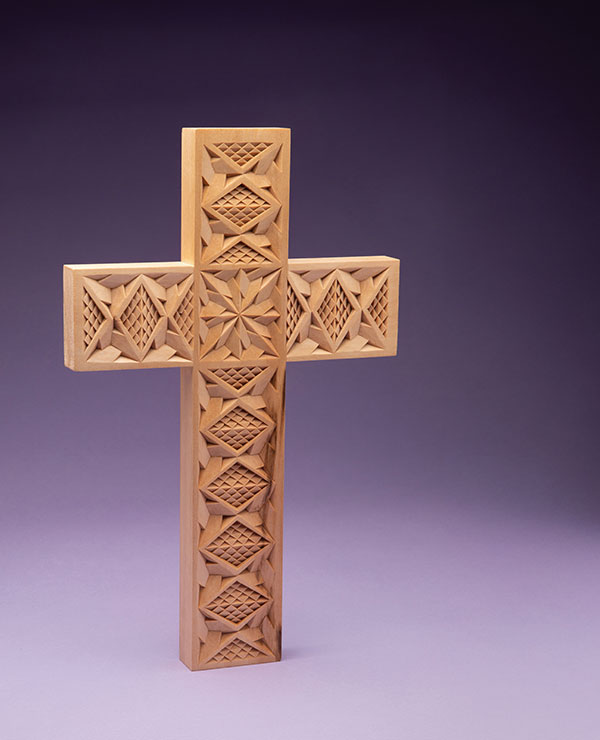 |
Chip-Carved Cross Intricate cuts create a reverent masterpiece By Marty Leenhouts |
Projects
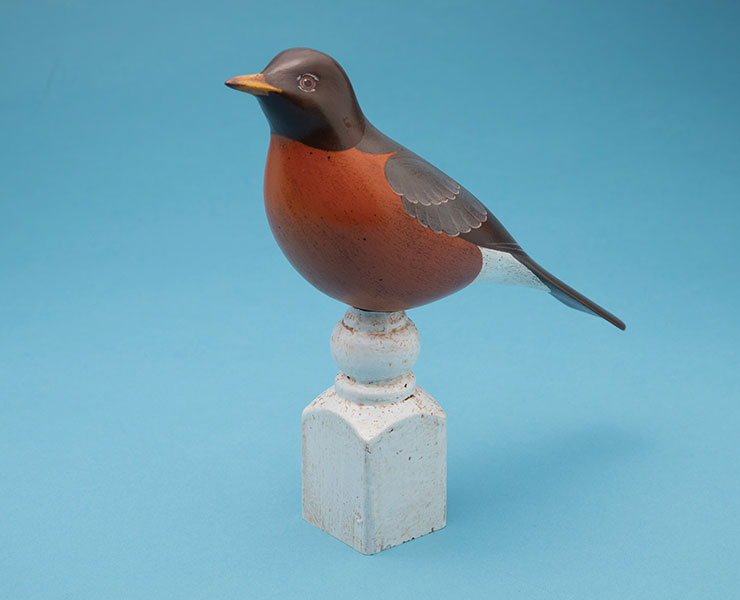 |
Folk Art Robin The early bird gets the worm with this Americana-inspired piece By Brooks Wilson |
 |
Bad Hair Day Spring weather came in like a lion for this guy’s hilarious hair By Kevin Applegate |
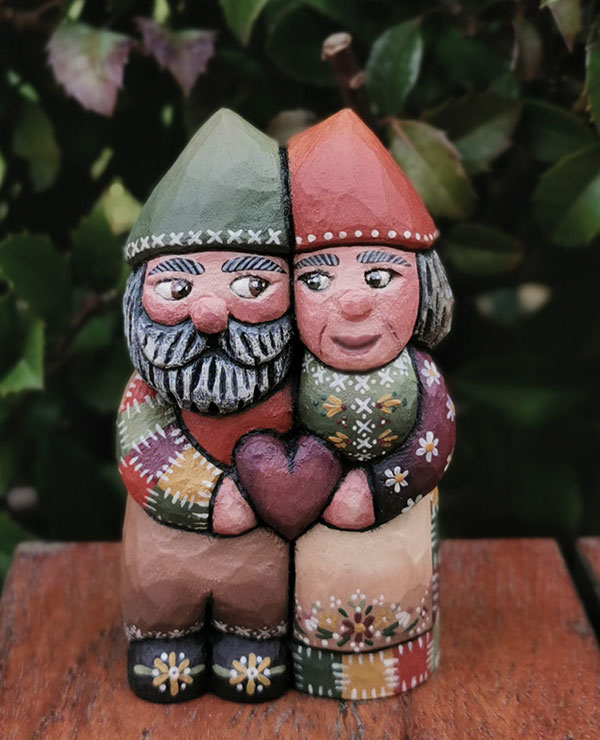 |
Valentine Gnomes Enhance the charm of this cute couple with folksy painting By Roxana Cristean |
 |
Goofy Golf Balls Hit a hole in one practicing expressions with these fun carves By Tony Harris |
 |
Hidden Greenman A mysterious woodland character lurks in found wood By Alec LaCasse |
 |
First Date Create a sense of movement with posture in this wistful character By Jerry McNulty |
 |
Flat-Plane Viking Carve a sea-faring caricature with just a few tools By James Ray Miller |
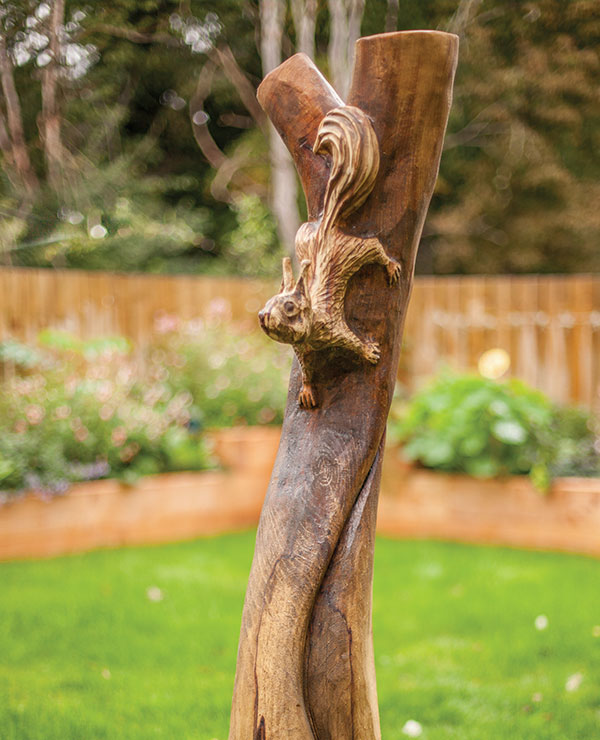 |
Climbing Squirrel Add interest to your yard with a beginner-friendly chainsaw carving By Pawel Drozd |
 |
Whimsical Mushroom Hone your symmetry skills with this one-knife project By Nikki Reese |
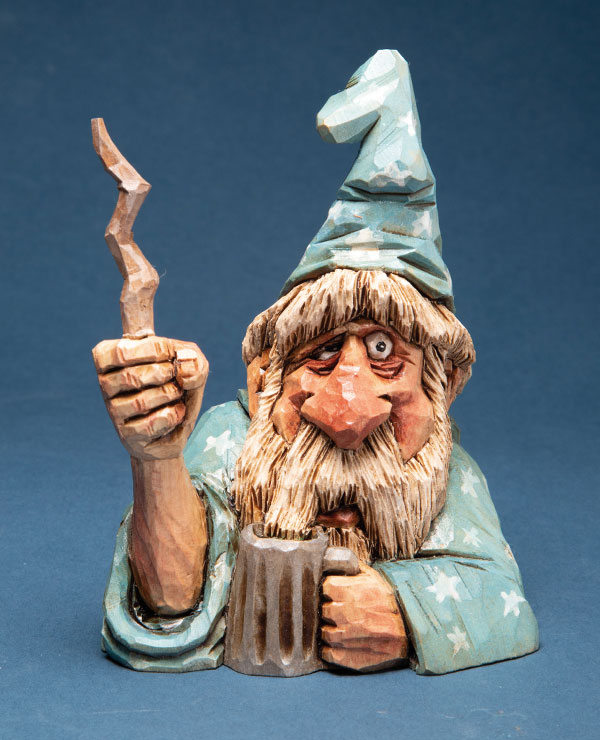 |
Swizzle Stick This comical wizard could use a little magic By Chris Hammack |
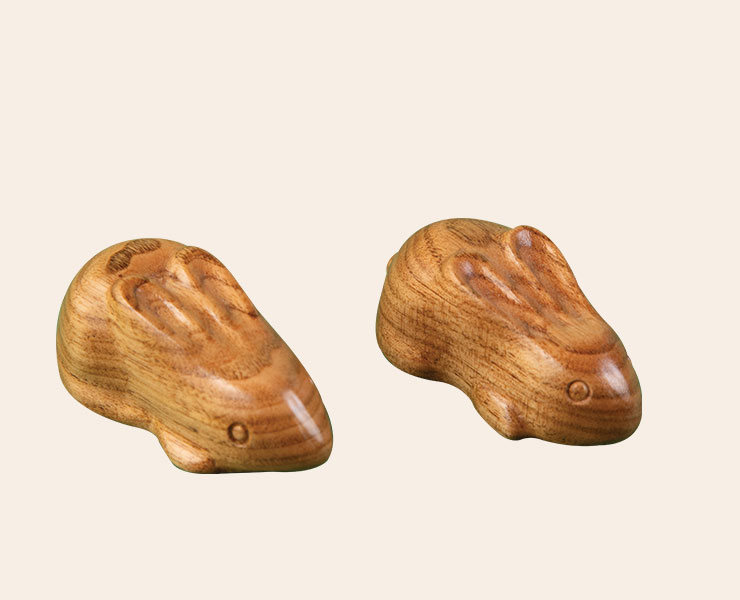 |
Sleek Bunny Hop to it with a smooth rabbit carving By Tom Mellott |
 |
Chickadee in Acorn Nest Bring the outdoors in with a flock of tiny bird carvings By Steve Tomashek |
Technique
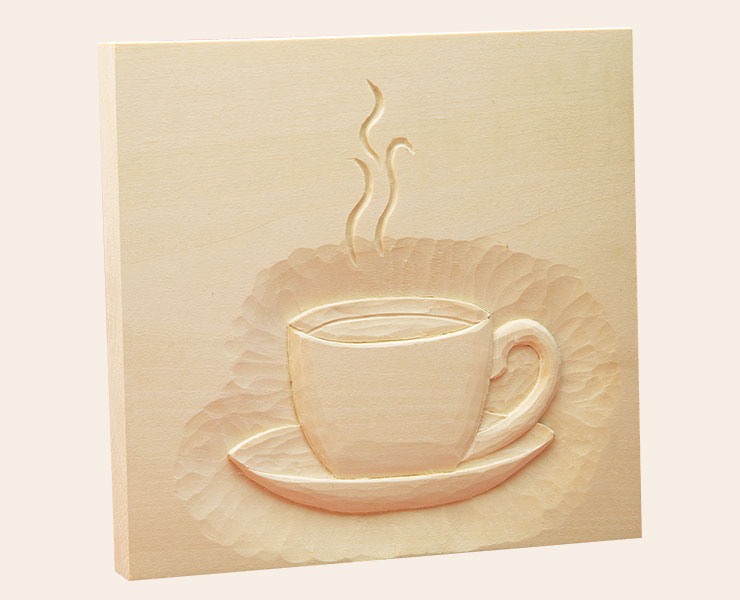 |
Cup and Saucer Add depth to shallow relief carvings By Mary May |
Web Extras
Free Project – Carve an infinity cross from Dennis Drazkowski and Pat Moore.
E-Newsletter – Subscribe to our online newsletter, Strop Talk, to get more carving projects!
|
Get the Latest Issue! Purchase the Latest IssueFor more articles like this, subscribe to Woodcarving Illustrated magazine. Magazine SubscriptionPlus! Get digital mini magazines in your e-mail between printed issues.
|
The post Woodcarving Illustrated Spring Issue, Issue #110 appeared first on Woodcarving Illustrated.
Infinity Cross 5 Feb 11:07 AM (8 months ago)
Carve intricate loops and braids to create a holy keepsake
By Dennis Drazkowski
Design by Pat Moore
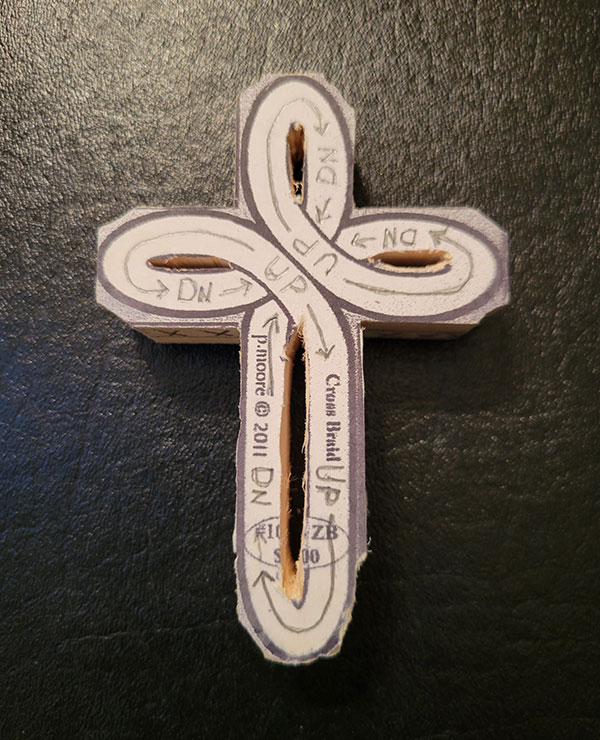
While attending a woodcarving show in Wisconsin, I came across Randy and Pat Moore’s vendor table, Moore Wood and Roughouts, and saw their “Cross Braid” pattern roughout. It ended up being the perfect gift to make my granddaughter Amelia for her First Holy Communion. This cross is a great intermediate skill-level project and makes a beautiful keepsake for your friends or family.
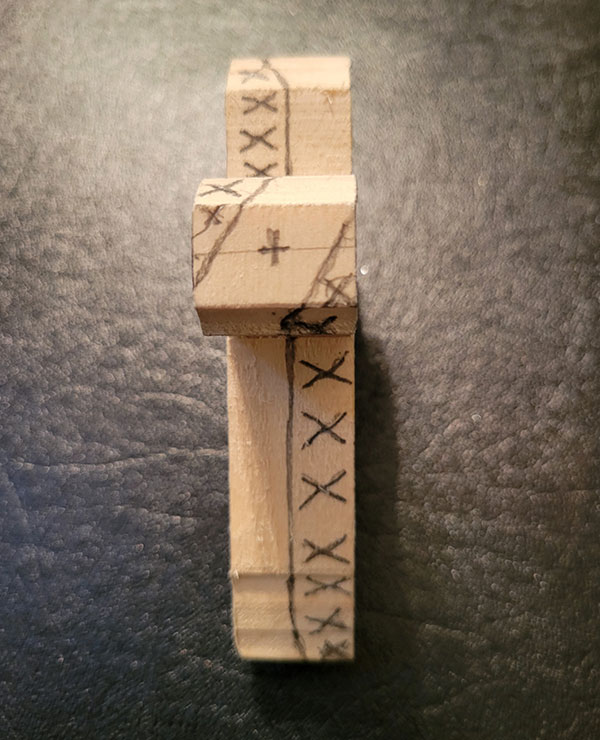
Getting StartedMake two copies of the pattern. Attach the copies to opposite sides of the blank using spray adhesive or glue stick. Note: To keep the cross symmetrical during the carving process, make sure both patterns are directly opposite each other on the front and back of the blank. Cut the blank to size on a band saw, coping saw, or scroll saw. Then use a scroll saw or coping saw to cut the four interior elliptical shapes. Strive to maintain symmetry during the carving since it is easy to get confused as the braids weave up, down, and over each other. Label the front and back of the blank with loop directional notations to indicate which braids will be overlapping each other. Mark the center point on the top, bottom, and both sides of the blank. Draw a centerline on each side profile around the entire blank. Note: The center lines on both sides should slope in the middle (the top part of the line should slope toward the left and the bottom of the line slope to the right) to follow the direction of braid. Draw “X”s on both side profiles to mark the wood that will be removed during the roughing out process. |
 |
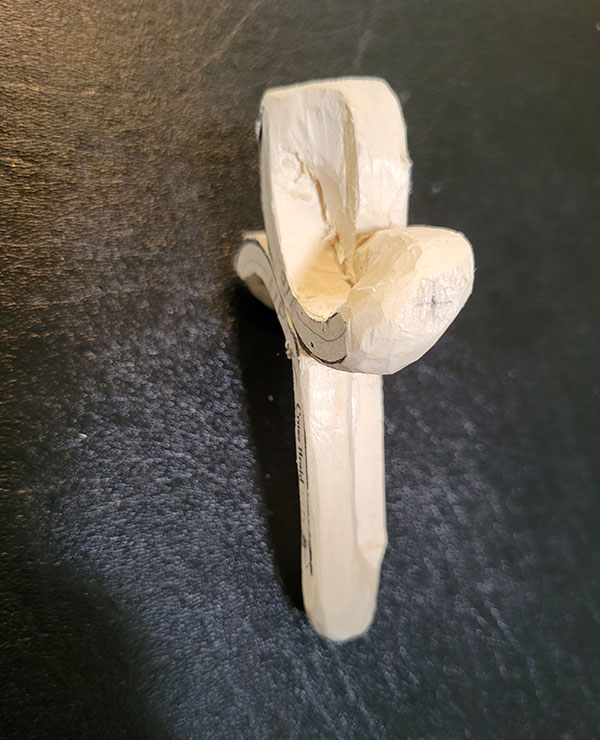
CarvingMake a stop cut around the perimeter of the top and bottom sides of the blank using a carving knife. Follow the outside lines on the cross pattern. Then make a stop cut along the side profile centerlines. Start shaping the cross by removing areas marked with “X”s on the side profile with the carving knife or gouges of your choice. Be mindful of the grain direction as your tools could sever the braids or remove too much wood that would severely diminish the symmetrical shape and diameter of the braids. Round the inside and outside of the individual braids with the carving knife and gouges; I used a 3/16″ (5mm) micro gouge from the inside of the four loops to maintain an equal braid diameter. Then use a detail knife to separate the braids where they meet in the middle and on the side profile. Aim for the cross braids to be about 3/8″ (10mm) in width. |
|
Sanding and FinishingSand the cross; I used Abranet sanding mesh in assorted grits up to 320 that I cut into thin strips about 3/16″ (5mm) wide and 3″ (7.6cm) long. Alternatively, you can use sandpaper in assorted grits. Loop the 80-grit sanding mesh strip or sandpaper around the individual braid and sand in a back-and-forth motion along the braid’s length and end loops. Use this sanding technique to smooth out the area where the braids intersect in the middle of the cross. Do not rush this process. Continue sanding through the other grits until you reach 320. After sanding, use a digital caliper to measure the braid. The braid should have a final diameter of about 5/16″ (8mm). Remove excess dust and dirt from the cross and apply three to four coats of a wax finish such as Howard Feed-N-Wax®. Then saturate narrow strips of a cloth with the finish and loop it around the braids to apply the wax in narrow areas. Let sit for 20 minutes and wipe off excess finish. Then polish the cross with a clean, soft cloth. |
Materials• Basswood, 3/4″ (1.9cm) thick: 3″ x 4″ (7.6cm x 10.2cm) • Spray adhesive or glue stick • Pencil • Sanding mesh (Abranet) or sandpaper: 80-, 120-, 240-, 320-grits • Clean, soft cloths • Finish, such as Howard Feed-N-Wax® |
Tools• Band saw, coping saw, or scroll saw • Knives: carving, detail • #3 gouge: 5/8″ (16mm) • Micro-gouge: 3/16″ (5mm) • Digital caliper • Ruler |
SPECIAL SOURCES:The Cross Braid pattern and roughout (#1004ZB) are available for sale at Moore Wood and Roughouts, www.roughouts.com. |
| About the Author |
|
Dennis Drazkowski lives in The Villages, Fla. and North Prairie, Wis. He has been woodcarving since 2018. His father, August, inspired his interest in woodcarving at an early age while both were actively involved in the local Boy Scout troop. Since his retirement from law enforcement, Dennis has been further inspired by members of The Villages Woodcarvers Club. Contact Dennis by emailing him at ddrazkowski@gmail.com. |
|
Get the Latest Issue! Purchase the IssueFor more articles like this, subscribe to Woodcarving Illustrated magazine. Magazine SubscriptionPlus! Get digital mini magazines in your e-mail between printed issues.
|
The post Infinity Cross appeared first on Woodcarving Illustrated.