Struggle to Eat or Drink While Riding? Experts Share What to Do 5:46 AM (13 hours ago)
Not being able to eat or drink while riding is a common issue for cyclists for a multitude of reasons. Maybe you struggle to actually grab your water bottle, take a sip, and return it to its cage – especially on a group ride where you’re trying to stay safe in the peloton.
“First and foremost, you have to fuel in order to train effectively.”
Maybe you had a rotator cuff injury that makes it nearly impossible to grab that gel out of your jersey pocket without stopping. Or maybe, you have a grumpy gut after 90 minutes on the bike and find the idea of eating or drinking anything extremely unappetising. Whatever the reason, one thing is certain: It’s pretty much impossible to make it through a century ride unless you’re fuelling adequately. So, we turned to some experts, from dietitians to pro racers, to get their secrets for fuelling successfully, no matter what your limiter is.
Fuel off the Bike First
Considering cyclists are advised to consume about 60 grams of carbohydrates per hour (which equates to around 240 calories per hour) during a 160-km ride, if you struggle to take in calories on the bike, it’s more important to start a century fully fuelled, with your muscle glycogen stores topped up. “First and foremost, you have to fuel in order to train effectively,” says Stevie Lyn Smith, registered dietitian and author of Power Up. “If training goes up, eating goes up.”
Pre-ride, she says riders definitely want to be thinking about having some easy-to-digest carbohydrates. Even if it feels hard to eat and you’re not hungry, you should be eating before you roll out. Ensure – that’s right, the meal replacement shake often recommended for seniors—is a favourite of many top pro riders for its easy-to-digest formulation (and the fact that it can be found at most pharmacies).
“How much and what you eat is going to depend since we all tolerate something different,” she says. “Start to find what’s right for you by testing out easy-to-digest carbohydrates like a banana, toast with jam, oats with fruit, or a bagel with peanut butter and honey. If it sounds like something you like to eat or drink when your stomach hurts, it’s likely a good pre-workout option.” And for the really sensitive stomachs, opting for the same sports drink you use in-ride may seem boring, but it is a good option.
On-Bike Fuelling Issues
On the bike, there are two primary fuelling issues riders encounter: A skills-based limiter and a gut-based limiter. For those with skills-based limiters, you struggle to grab your water bottle or pull gels out of your pocket. You may need to fully stop in order to take a sip or have a snack.
On the other hand, if you have a gut-based limitation, you may struggle to find a fuelling option that doesn’t make your gut gurgle or inspire heartburn or nausea.
Skills-Based Fuelling Limitation
Practice, practice, practice
Grabbing a bottle or gel requires riding one-handed, paying attention to several things at once. It’s not a skill most of us are born with. Unfortunately, many of us skip practicing our bottle grabs and jersey pocket rummages when we’re indoors on the trainer. We set up tables or stools with all of our water bottles, gels, and bars so they’re easy to grab while we pedal away on Zwift Island. While this leaves you fuelling well on the trainer, you don’t gain the technical ability to grab bottles from cages, or to reach with one hand into your jersey pockets.
Use the trainer as a great chance to practice these motions in a controlled environment. You can also use easy solo rides as a chance to hone these skills before your long century effort.
Switch to sports drink vs. solids
“I do almost everything in my bottles,” says pro road racer Lauren Stephens. If you’re struggling to get water out of its holder and fumbling to grab gels, you’re likely not drinking or eating enough in your ride. But if you use a sports drink mix instead of water, Smith notes that you’re able to get carbohydrates, electrolytes, and hydration in every sip, optimising every time you do manage to take a drink. Ted King, pro racer and cofounder of UnTapped, even mixes syrup into his water in order to have speedier caloric consumption during rougher gravel races.
Try a hydration vest
The even easier version of swapping liquids to solids is to switch to a hydration pack or vest so you just need to bring the hose to your mouth to sip, rather than taking bottles in and out of their cages. King is a fan of hydration vests for longer rides – they’re typically used by gravel racers, but there’s no reason you can’t use a hydration pack or vest on a road ride as well, especially if your century route doesn’t have an easy water/snack stop and you need to carry all of your supplies.
Use stops as snack stops
While you should be working on those fuelling skills and troubleshooting your technical abilities, you can still speed up your ride time by making stops more efficient. If you do need to put a foot down and be completely stopped to take out a gel or grab a sip of water, use anytime you do stop (red lights, to check your phone, etc.) to take a sip of water and a bite of food.
Gut-Based Limitation
Cut back on pre-ride fibre
Smith advises to stay away from foods that could trigger stomach problems the day or two before your big ride. “No matter how solid your gut is, two hours ahead of a workout, you really want to limit fat and fibre, and avoid having a lot of protein in your pre-ride meal, because those things will slow down digestion and can lead to having an upset stomach during your ride,” she says.
This means avoiding fried foods or a hefty amount of cheese or butter (fat) and large amounts of fruit or vegetables (fibre). A normal serving size of protein and a small amount of fat is fine for most riders – a couple of eggs, a piece of chicken, a tablespoon of peanut butter – but if you have a truly sensitive gut, try to stick to lower-fibre, well-tested carb-based meals for the day before your big ride.
Fuel right before you go
Especially if you’re racing a century, the first hour is almost always the hardest to fuel because you’re riding in a pack, people are going at higher speeds, and it can feel more hectic. Stephens says her best tip is to fuel on the line: Have an extra bottle with sports drink, or take a gel/eat a bar and sip some water a few minutes before the start so that when the whistle blows, you’re fully fueled and can wait until things calm down a bit before you have to stress about food. Fuelling during your warmup, if you’re doing one, is also helpful.
Fuelling less is a vicious cycle
If your gut bothers you whether you eat or not, you may actually be making matters worse by underfuelling. The strangest/most ironic problem with your gut on the bike may be that underfuelling often ends up giving riders the same uncomfortable feelings as when they are overfueled.
If you’re underfuelling, registered dietitian Kristen Ziesmer notes you can experience the same kind of bloating, acid reflux, and even nausea that you may feel if you eat something that doesn’t agree with you – especially if you’re regularly riding in an underfueled state.
Tone it down
On the other hand, you may be trying to fuel too much and that could be causing your gut distress. Most riders don’t need over 90 grams of carbohydrates (360 calories) per hour – more than that may lead to discomfort. “We live in the age of crazy, high-calorie carbohydrate consumption,” says King. “That’s great, because we used to not fuel nearly enough, and now we know that we should be eating every 10 or 12 minutes to stay fueled in a race. But we don’t need to go too overboard.
“Somewhere in the middle of no carb and super high carb is this livable consumption of fuelling your ride so that you’re recovered and ready for the next day and not completely depleted.”
Try something with added ginger
Ginger has long been touted as a remedy for a grumpy gut, and its ability to relieve nausea has been backed by research. That’s why some sports drinks and gels now add ginger.
“In an age of people taking gels at a pretty crazy rate and suffering from gut distress, this is an answer to that problem,” he says. You can also try a piece of candied ginger, or even infuse your plain water with ginger and lemon for a bit of a gut-soothing palette cleanser during your ride.
Careful with caffeine
Finally, Smith says to be cautious with caffeine, because it can disrupt your gut and make fuelling trickier. Know yourself and your gut: If too much coffee makes you sprint for the restroom, stick to none or a single cup. On the other hand, if you know it takes two cups to get you feeling great (and needing to ‘go’ before you go), then by all means, enjoy that second cup… but give yourself enough time to hit the bathroom before your ride starts. Avoid energy drinks, though, as she notes they often contain more caffeine than several cups of coffee. Consuming more than a few servings of caffeinated gels/chews can also cause issues, so make sure to read the labels when choosing your fuelling products.
The post Struggle to Eat or Drink While Riding? Experts Share What to Do appeared first on Bicycling.


6-Week Cycling Training Plan For Speed, Strength & Endurance 16 Oct 10:17 PM (yesterday, 10:17 pm)
Millions of people own bicycles, and just about everyone who has one knows how to pedal it around the block. But surprisingly few people take full advantage of all that riding has to offer. For those who haven’t yet tapped into cycling’s benefits, the list is long: It burns calories at a steady clip, helps reduce the risk of diabetes and heart disease, improves your memory and brain power, and makes for deeper and more recharging sleep. It’s gentle on the joints – and maybe most important of all, riding is fun.
So how can you reap this windfall of good health and a slimmer waistline? We created a plan, then we recruited a panel of real people – from beginners looking to lose some weight to fit riders who wanted to get leaner and stronger – to try it out.
The more you focus and follow along, the greater the results
This six-week, step-by-step training plan is perfect for beginners, but it also works just as well for intermediate riders. The workouts are designed to challenge your muscles and cardiovascular system and build your abilities on the bike in a carefully calibrated (but relatively short) amount of time. The more you focus and follow along, the greater the results. About those results: You’ll feel stronger, more energetic, sharper, and happier. And there’s a good chance you’ll see some change on the scale, too. So, pull your bike out of the garage and join the ride.
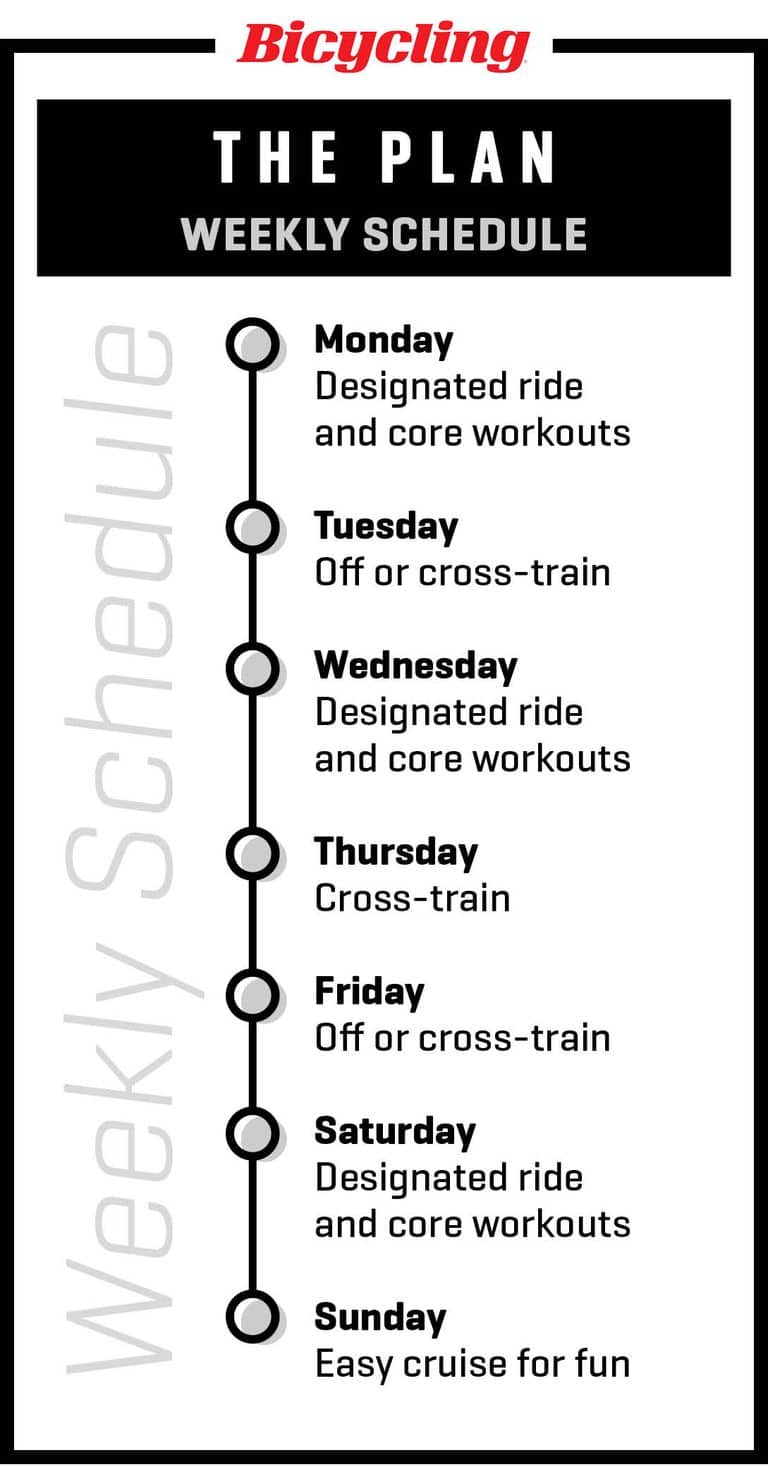
The Training Plan
Follow this weekly schedule for rides and workouts. For cross-training days, activities such as running, swimming, or even walking work well – just stay active and stretch daily. For core workouts, find inspiration here.
One tip: If you can’t remember the details of the rides, screenshot it on your phone or write notes on masking tape and stick it on your bike’s top tube.
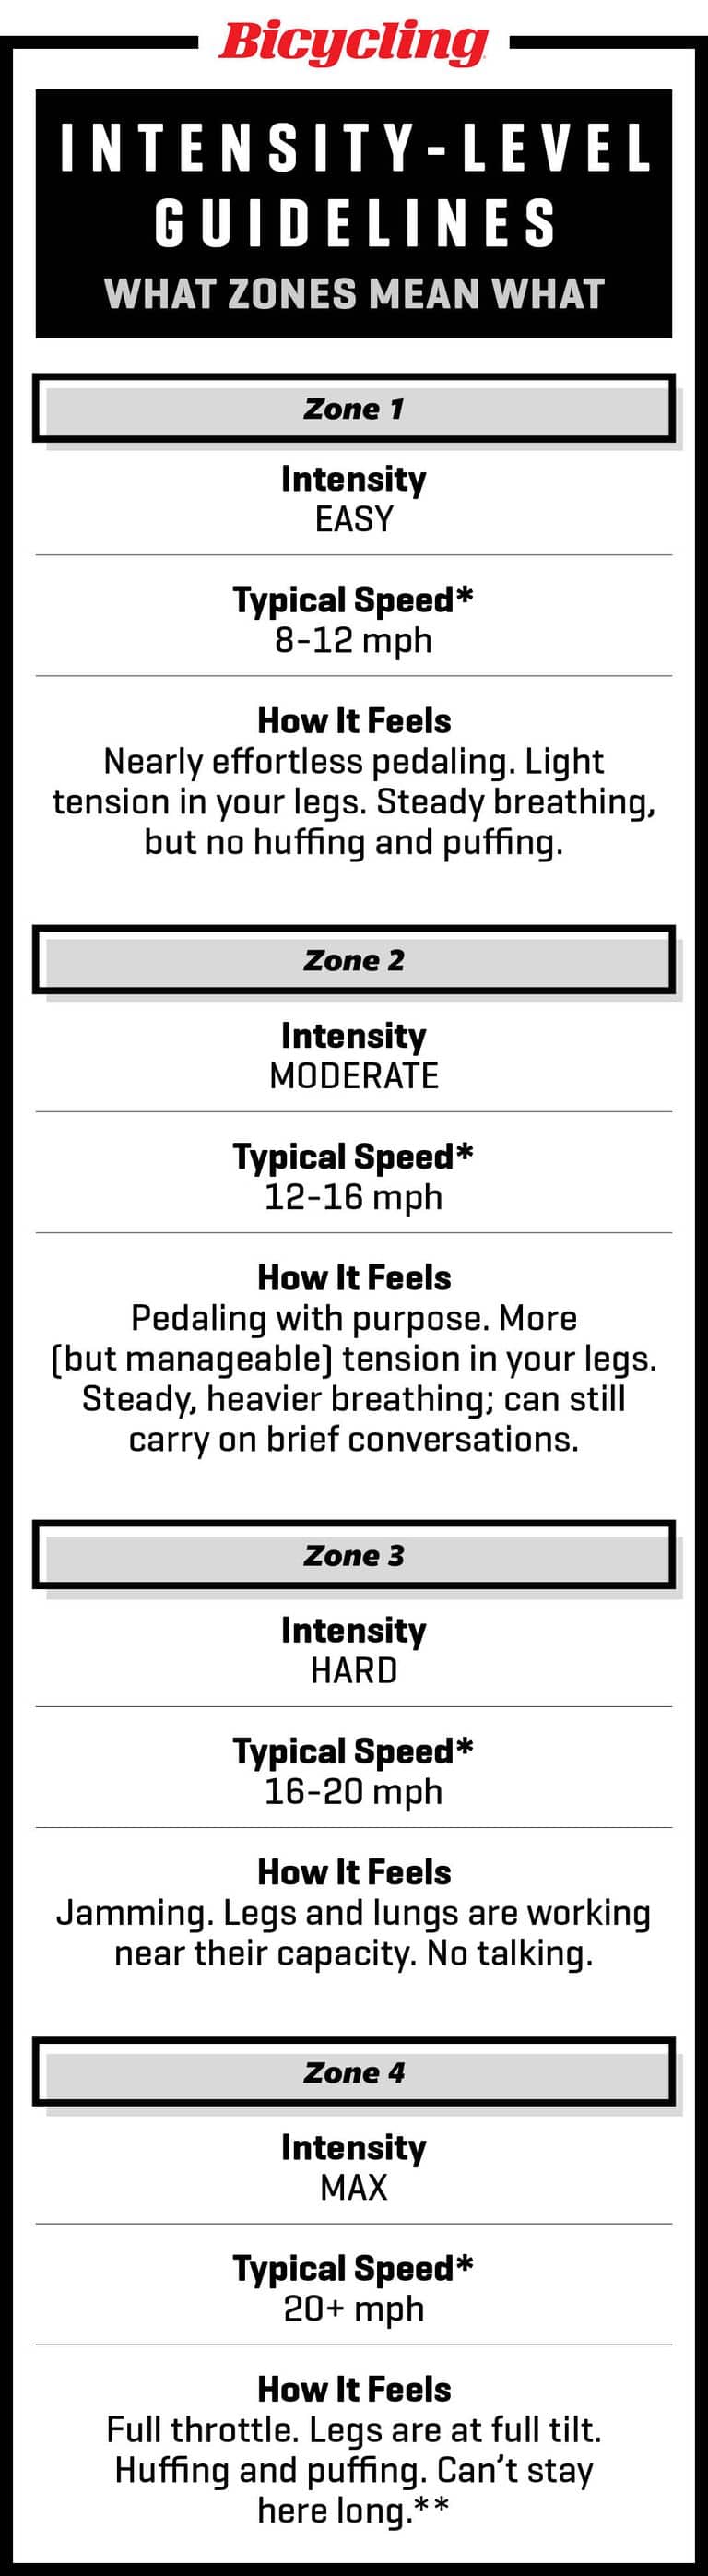
The Intensity
Below, you’ll find rough estimates of the intensity levels in each workout. So many factors affect speed (wind, terrain, bike type), that it’s impossible to take them all into consideration. Don’t get hung up on the numbers; effort is what counts.
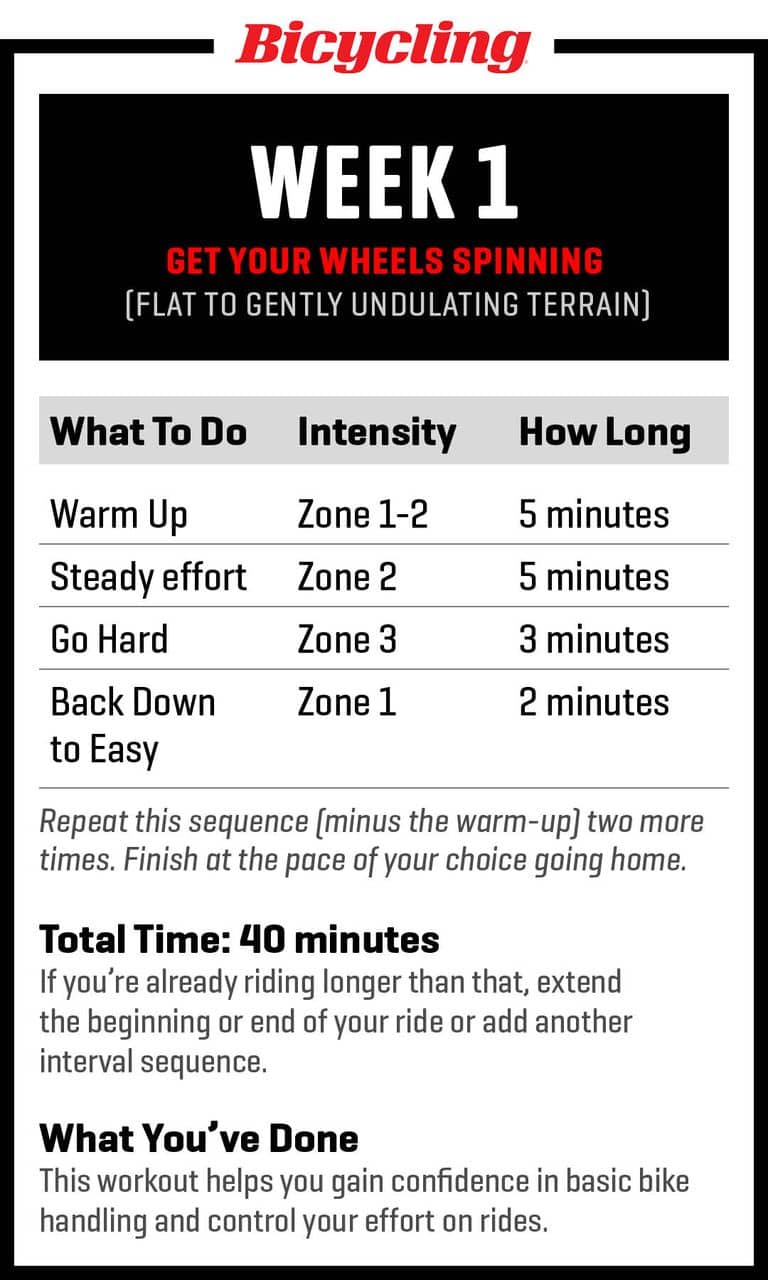
Week 1:
This week’s workout is all about getting you out there on the road. It will help you gain confidence in basic bike handling and control your efforts on rides.
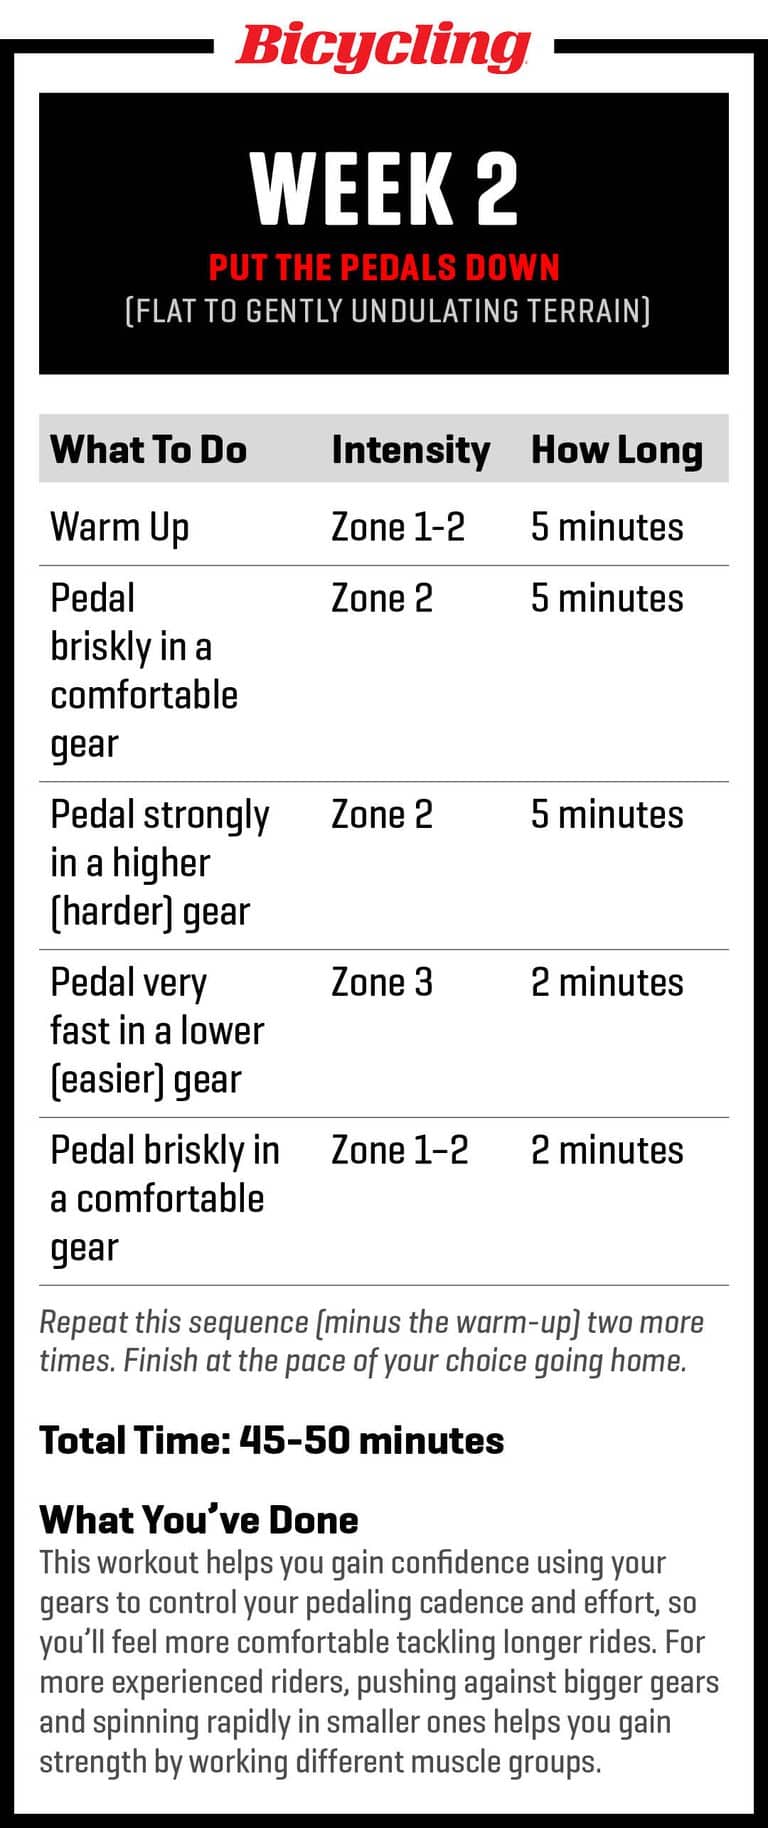
Week 2:
This week’s workout helps you gain confidence using your gears to control your pedalling cadence and effort, so you’ll feel more comfortable tackling longer rides. For more experienced riders, pushing against bigger gears and spinning rapidly in smaller ones helps you gain strength by working different muscle groups.
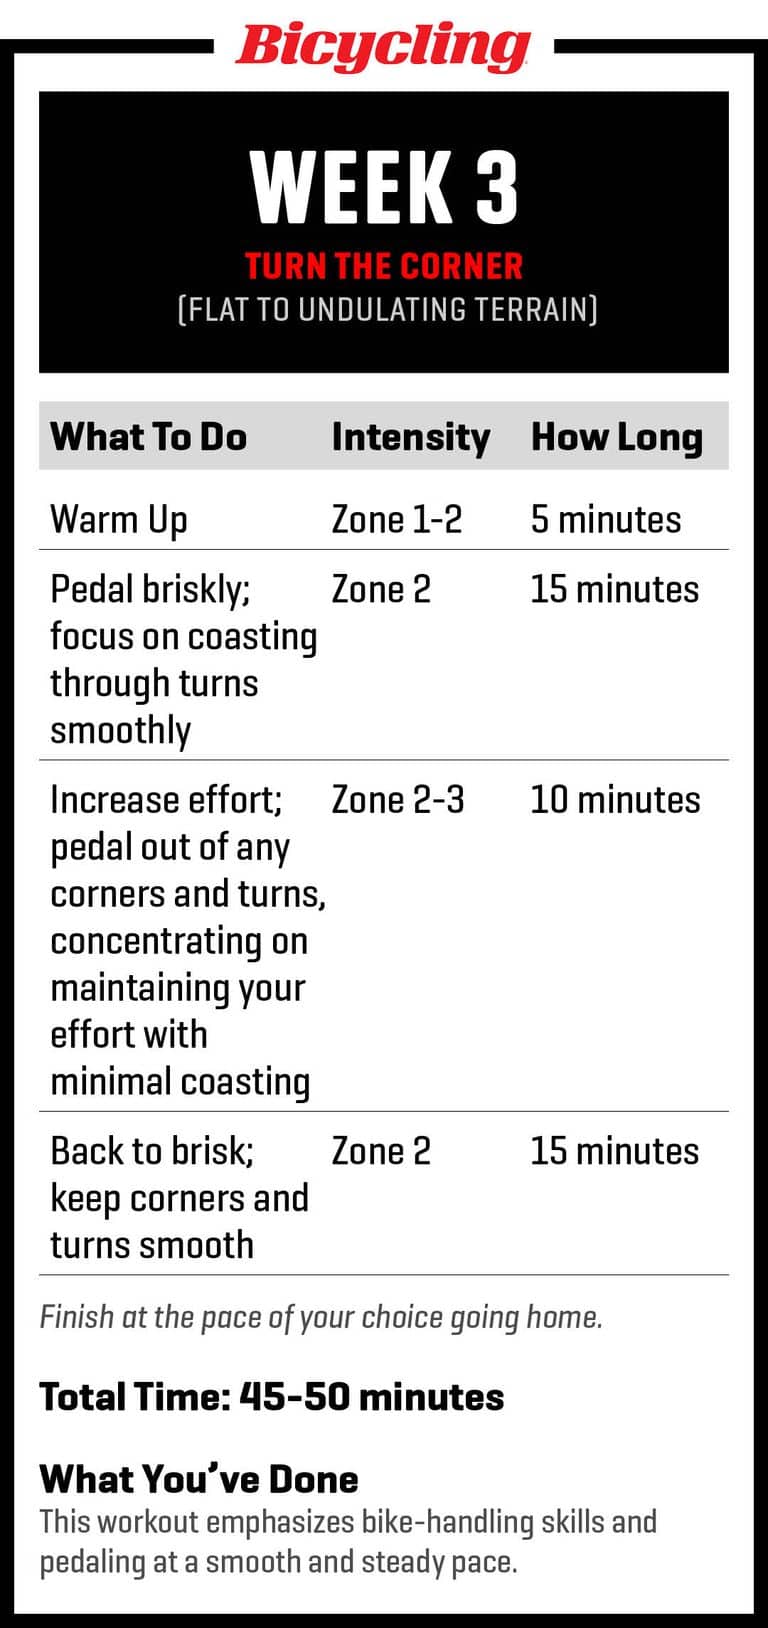
Week 3:
This week’s workout emphasises bike-handling skills and pedalling at a smooth and steady pace. It will help you feel comfortable coasting through turns smoothly and taking corners like a pro.
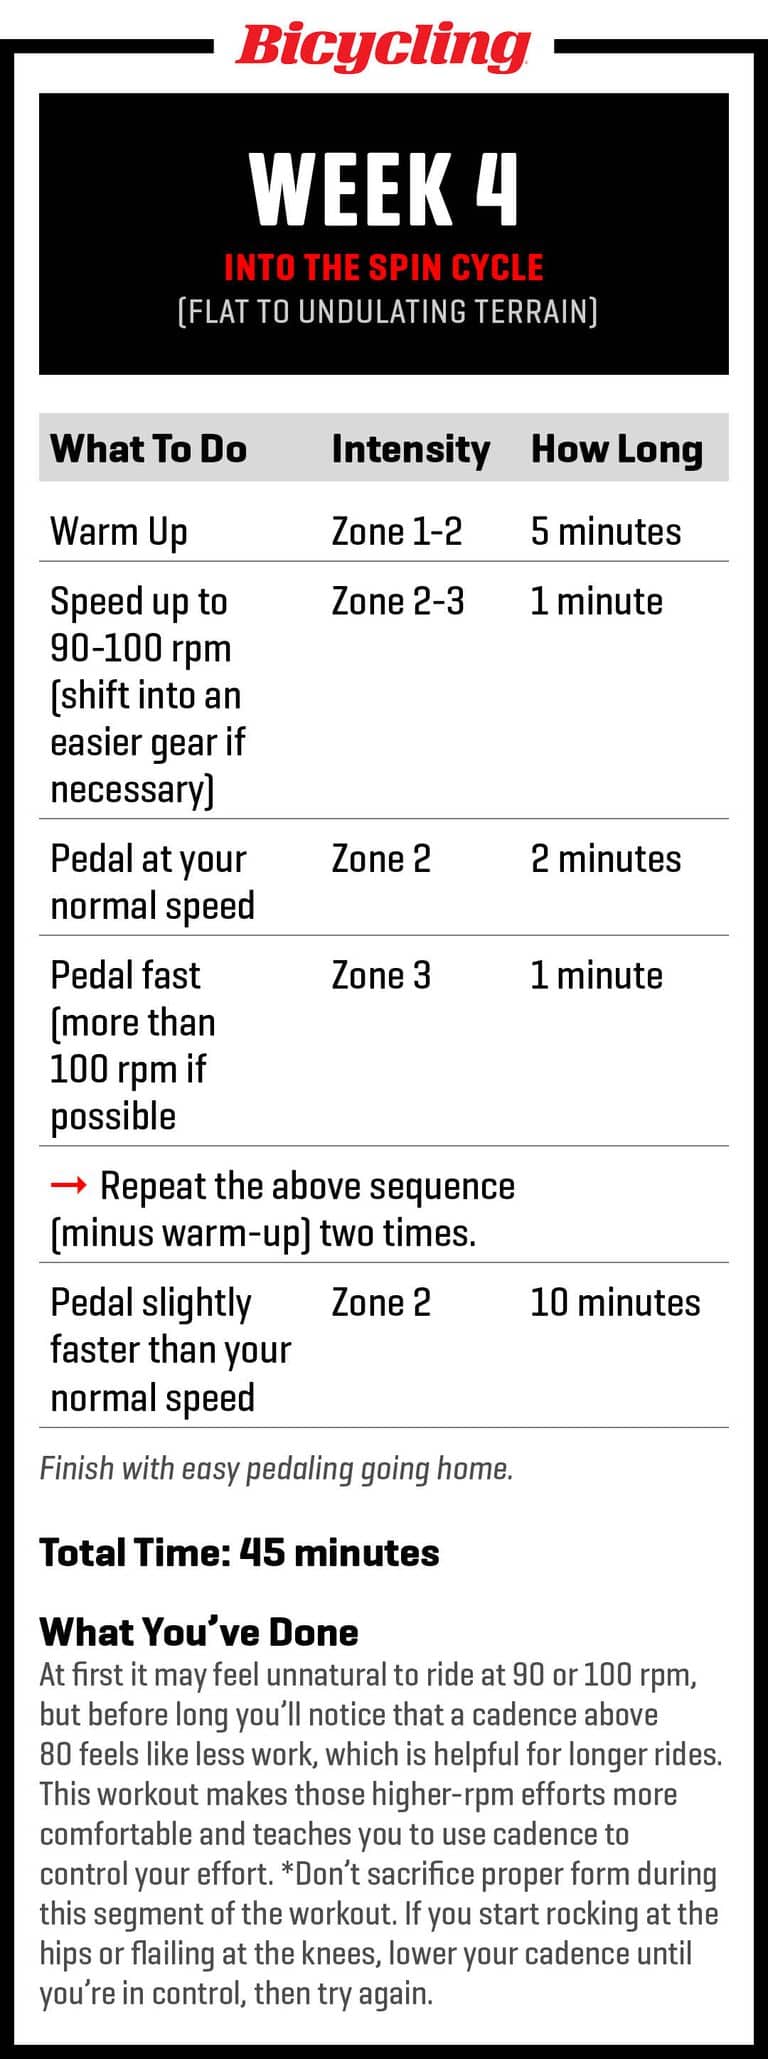
Week 4:
At first it may feel unnatural to ride at 90 or 100 rpm, but before long you’ll notice that a cadence above 80 feels like less work, which is helpful for longer rides. This workout makes those higher-rpm efforts more comfortable and teaches you to use cadence to control your effort. Don’t sacrifice proper form during this segment of the workout. If you start rocking at the hips or flailing at the knees, lower your cadence until you’re in control, then try again.
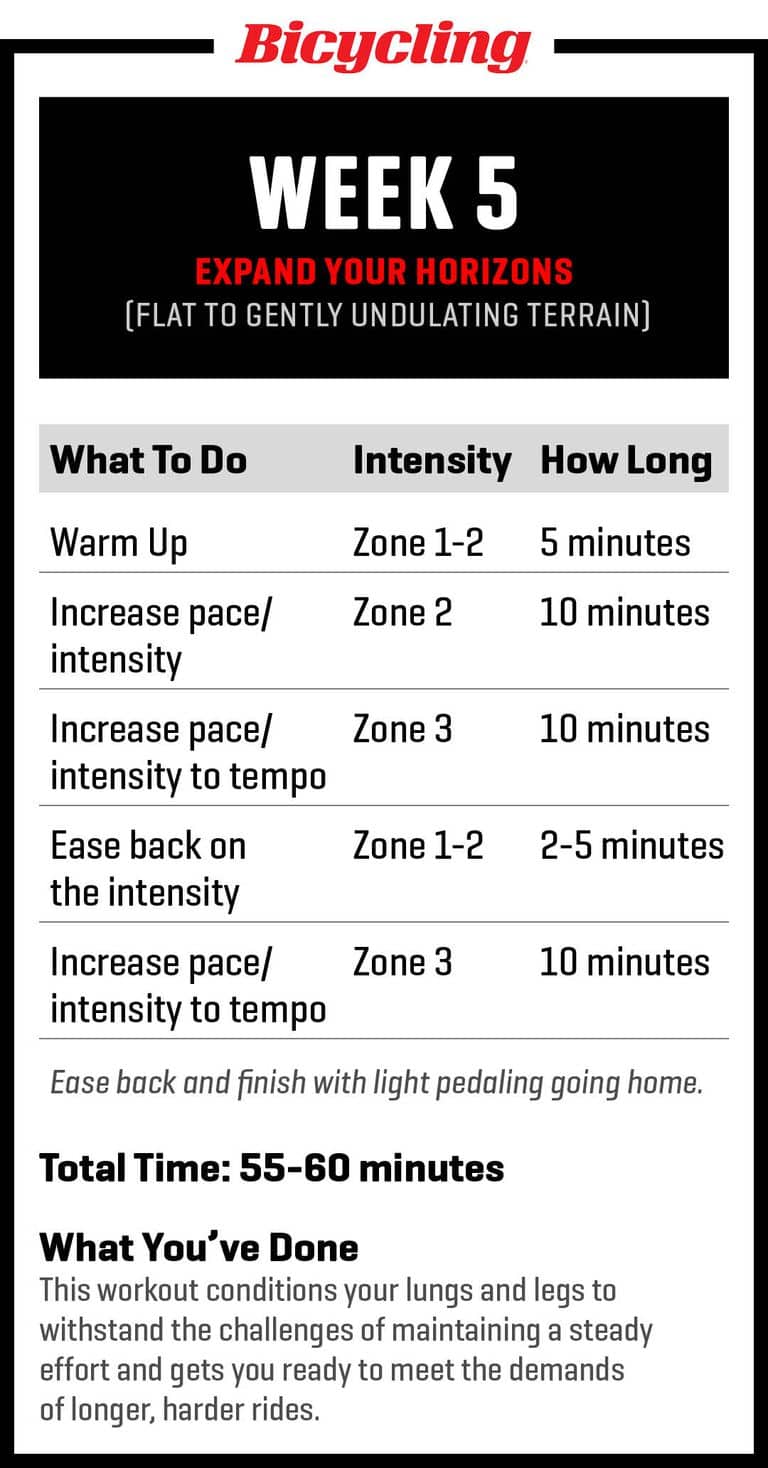
Week 5:
This week’s workout conditions your lungs and legs to withstand the challenges of maintaining a steady effort and gets you ready to meet the demands of longer, harder rides.
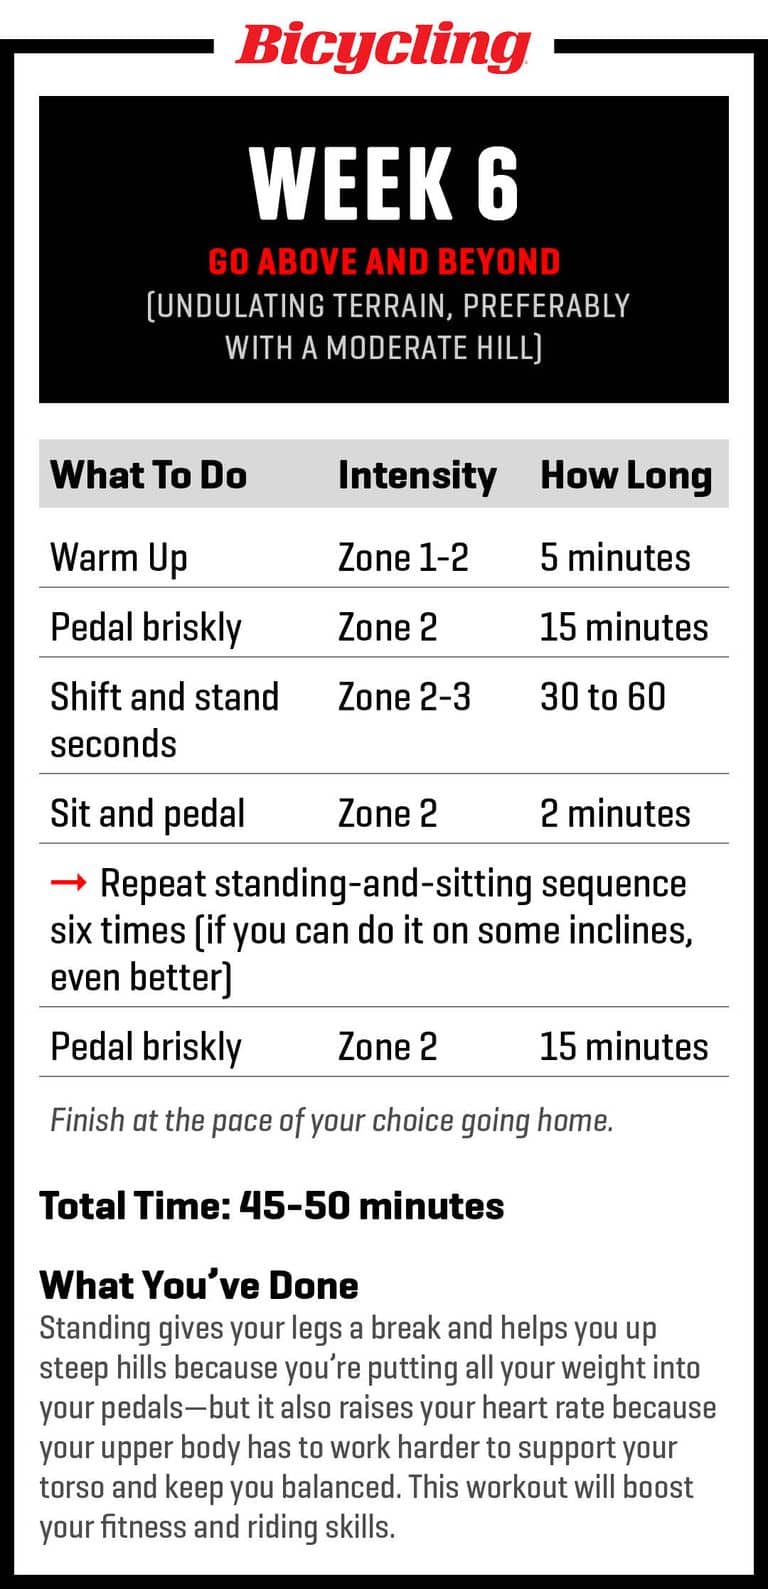
Week 6:
Standing gives your legs a break and helps you up steep hills because you’re putting all your weight into your pedals – but it also raises your heart rate because your upper body has to work harder to support your torso and keep you balanced. This week’s workout will boost your fitness and riding skills.
This article was adapted from the book, Bike Your Butt Off!: A Breakthrough Plan to Lose Weight and Start Cycling (No Experience Necessary!) by Selene Yeager and Leslie Bonci (Rodale Books, 2014) which includes nutritional information, tips, a six-week training plan, and fat-burning exercises for beginner and experienced cyclists alike.
The post 6-Week Cycling Training Plan For Speed, Strength & Endurance appeared first on Bicycling.
Crash! Here’s What You Should Do Next. 15 Oct 9:33 PM (2 days ago)
If you ride a bike, you’re almost guaranteed to fall off of it at some point. And while that sounds like bad news, we’ve got all the info you need on how to handle the inevitable crash in the smartest, safest way possible, so you’re back up and pedalling ASAP.
We spoke with Amanda Sin, a physiotherapist and former mountain bike pro racer who’s had her share of bad crashes over the years, along with former pro mechanic Scott Kelly – who was actually Sin’s mechanic during her pro years! – to explain what you need to check on your bike (and your body!) post crash and before you start riding again.
Your Physical Post-Crash Checklist
1. Assess the Situation – from the Ground
First and foremost, check and make sure you don’t have any major injuries – before you even get off the ground. If you have the wherewithal to think about doing this assessment, you’re not in too bad of shape. Assuming you can move, that all of your limbs are attached and intact, and you’re not seeing three bikes where there’s only one, move quickly to a safe spot off the road or out of the way of other riders and start a more thorough assessment.
2. Slow Down
After you assess the situation, Sin says the best thing you can do is take your time getting up and moving around, assuming you’re off the trail and not at risk for a car or other rider crashing into you. It’s tempting to try to get up and moving as fast as possible – especially if you’re with friends – but give yourself a moment.
Does anything feel unusual?
Take a few deep breaths, and as you do, Sin recommends doing a body scan. “Does anything feel unusual? Try to take stock of that. And then after that scan, see if you can wiggle your hands, feet, arms, legs. If that feels okay, then you can try to get up or, depending on the situation you’re in, scoot to a more comfortable position,” she says.
Once you’re up, try walking around a bit before you hop back onto your bike. Take a minute and pay attention to how everything feels, then decide whether you can pedal—or need to wait for help.
Remember: There’s no shame in calling a friend or an Uber for a pickup, even if you’re able to get up and ride. It’s better to cut a ride short than to ride on with a wrenched knee, bad road rash, or a potential concussion.
3. Practice Basic First Aid
If you do feel seriously injured, don’t risk moving too much. Instead, call for help and seek medical attention.
Here’s where you do need to make a tough call: If you’re injured in a remote area (whether it’s a gravel road in an area with no cell reception or on a mountain bike trail that’s a few kilometres from the nearest road), you need to decide whether you’re able to walk or pedal your way to a spot where you can call for help.
If you’re dealing with “flesh wounds” like a scrape from a tree or a bit of road rash, you can bandage them as well as you can with what you have in order to staunch any bleeding. Ideally this would be gauze from your first aid kit, but in a pinch, your base layer, a buff, or even a sports bra will do.
If you think something is broken, call for help if at all possible rather than trying to splint it yourself.
4. Consider a Concussion
Hits to the head can often go unnoticed as you assess for other injuries, and even if you don’t hit your head directly, a jarring impact can still lead to a concussion.
If you’re not sure if you knocked your head, it’s worth pausing and checking to see if you bent, scratched, or cracked your helmet in the crash. It’s imperfect, but it is a quick way to assess head injuries, Sin says. Even a small scuff can indicate that your head took a hit, and if that’s the case, pay attention to potential symptoms of a concussion for the next couple of days.
If you have a bad concussion, you’ll probably feel disoriented and confused; if you don’t know where you are right away, it’s likely you’ve got one. If you have a headache, struggle to find your balance, feel nauseous (or actually vomit), or simply feel off, assume you have a concussion and cut your ride short.
If you even suspect you have a concussion, try to get a friend to come pick you up rather than continuing with your ride.
Your Bike Post-Crash Checklist
If your body is okay – just bruised or slightly banged up – and you know you can physically make it home, you can move on to assessing your bike.
Don’t skip this step, as a cracked frame may not be immediately obvious but could lead to an even worse crash if you ride away on it. When Kelly is working the pit at a race and a rider comes running in with a banged-up bike, he looks for a few key things.
1. Wheels
Typically, the wheels take the brunt of the crash and incur the easiest problems to diagnose. Regardless of how you crashed, Kelly recommends checking that the tyres hold air, that the wheels are true, that there are no broken spokes sticking out. Also, check that the brakes – cantilever or disc – haven’t jammed up. Once that’s done, you can give components a once-over.
2. Components
Kelly always checks the position of the brake levers and shifters on any bike after a crash. He says it’s usually easy to push them back into place, but you don’t want to ride away only to realize your lever is so tilted that it’s hard to grab.
He also checks for a bent derailleur hanger before he shifts gears, since it could snap as soon you click the shifter. Your derailleur hanger is the tiny piece that connects your derailleur (which shifts your chain up and down your cassette) to the bike frame. The hanger is designed to bend or break in a crash in order to save the pricey derailleur and not crack your frame, but that means the piece does bend very easily. Try shifting up and down while holding the rear wheel aloft and pedaling with your hand to make sure that your bike is still shifting properly before you start riding.
Then, examine the chain: Is it jammed, are there any frozen links, and is it still in one piece?
Finally, just do a quick check on your saddle to make sure it’s still firmly attached to your seatpost.
3. Frame
The last thing Kelly checks is the bike frame, inspecting carefully for cracks or deep scratches. This becomes more important on a carbon frame, because a crack can quickly turn into a serious problem as you pedal away, whereas bends and cracks in aluminium or steel frames tend to be more forgiving.
How to Prepare for a Crash Ahead of Time
It’s important to have everything you’ll need in case of a bike crash – especially when you’re planning an adventure to the middle of nowhere. Sin is a big fan of making a small first aid kit that permanently lives in your saddle bag or hydration pack.
You know you should carry basic bike tools – a multitool, chain link, spare tube, and mini-pump, at the least. Those few basic first-aid supplies include a large bandage and elastic bandage you can use to create a splint or secure gauze (or a wadded-up baselayer) when you need to cover a wound. Even an emergency blanket stashed in your pack can be a literal lifesaver if you’re stuck waiting for help for a few hours.
The goal: Mitigate your risks so that when you do crash, it’s not a cause for blind panic.
When to Seek Help After a Crash
After you make it home, it can be tempting to put a crash behind you and just ignore any lingering aches or pains. But putting off medical help can delay or hinder the healing process, says Sin.
First and foremost, if you’re worried you broke something, may have internal injuries, are unsure if your gnarly road rash needs professional attention, or you’re dealing with concussion symptoms, seek medical attention STAT once you’re back in civilisation.
Whether or not you hit your head in the crash, pay attention to signs of a concussion for a few days. Symptoms may take a while to develop – and as Sin mentioned, even a crash that jars the rest of your body but doesn’t include an actual direct hit to the head can still leave you with a concussion. Symptoms can include things like sensitivity to light or sound, balance issues, headaches, and even nausea.
For less obvious injuries, like knee pain, monitor your healing process if you don’t go straight to a doctor. A bit of soreness for a couple of days is normal, but you should feel like it’s getting better.
“If you’re having difficulty doing your regular daily activities after a day or two, I would suggest getting assessed,” says Sin. “I’ve seen clients who thought they just wretched an ankle but actually broke it pretty badly. Cyclists in particular tend to try to walk it off or work through the pain, but that’s often not helpful.”
“The sooner you get help for an injury, the sooner you’re going to be back on your bike and enjoying the ride again,” she adds.
The post Crash! Here’s What You Should Do Next. appeared first on Bicycling.
You Should Not Ride Every Day; This Is Why 15 Oct 1:35 AM (3 days ago)

How many days in a row have you ridden your bike?
While many cyclists simply aren’t fussed about riding every day – or avoid it because the challenge of riding every day doesn’t agree with their training plan, some riders get hung up on needing to ride every day. I fall into that category: This spring, I broke a 125-day riding streak (aka an unbroken sequence of riding a bike), and over a month later, I’m still beating myself up about snapping it.
“Riding every day also caused me to feel burnt out.”
Unfortunately, riding every day and getting sucked into a streak also caused me to feel burnt out. And now, as long daylight days and summer temps are here, I lack the motivation to get out on the road or trails.
Some riders’ streak goals might be a week, ten days, or even a month. While my slightly longer than four-month streak wasn’t short, it was tiny compared to those of some riders. Other cyclists continue streaks for hundreds, if not thousands, of days. Bicycling alum Jim Langley’s riding streak lasted 10,269 days.
The Case For Riding Every Day
Your motivation might be fitness, but others ride daily for consistency and to develop a habit. Riding daily helps some people add cycling to their daily routine. And some undertake it for the challenge or to do something bold that they didn’t think was possible.
“Riding is like meditation for me and keeps me sane. I think about all sorts of things and sometimes try to empty my thoughts.”
Motivating yourself to ride every day can be tough. Colin Gay’s riding streak is approaching 4,000 days. “I am best at following rules. It’s not if I ride today, but when,” Gay told me. He explained that riding “is like meditation for me and keeps me sane. I think about all sorts of things and sometimes try to empty my thoughts.”
The challenge itself can also be your motivation; I often need that kick in the rear to go outside and pedal my bike, and continuing a daily challenge can be my main motivator. “I needed a change and this offered that,” Gay said. “It won’t do that for everyone, but for me, I just love riding my bike.”
Consistency is important when developing routines. If you strive to ride more or commute to work by bike, undertaking a daily riding challenge can help you settle into a routine that works with your lifestyle. It pushes you to find ways to squeeze riding into your day; rather than blowing off a ride, you will find time in the morning or after work to get out on the road or trail.
If your riding goals are based on distance or time, riding daily can quickly boost those numbers. It also keeps you riding, even when the weather is unfavourable. “While I love bicycles and riding, my desire to ride wanes when the outside temperature ticks above 32 degrees or falls below 5°. Rainy weather also often pushes me to ride the couch instead of my bike. The risk of breaking a streak is sometimes all I need to get on the bike in less-than-favourable conditions.”
The Case Against Riding Every Day
However, riding daily can also do more harm than good. While participating in my most recent daily riding challenge, I rode on a few days when I should have decided against getting on the bike. Though I usually rode indoors on Zwift on days with freezing outside temps, I also unwisely kitted up and rode when I was sick to keep my streak alive. This lack of rest probably prolonged my illness and contributed to some of the riding burnout I currently feel.
Riding daily can be particularly unwise if fitness is one of your cycling priorities or if you are training for an event. A good training plan builds rest days and recovery periods into your schedule. And to properly recover, you need to know when to stay off the bike.
“Rest isn’t a break from training, it is training,” said Bicycling’s membership coach David Lipscomb. He explained, “Without recovery, fitness becomes fatigue, and performance becomes punishment.” Rest and recovery are strategies cyclists use to ride stronger. Lipscomb’s recently released book, The System 6×6 Framework, “blends science, structure, and strategy to help athletes train smarter, recover better, and perform longer”.
You need those days off the bike to recover and adapt before undertaking more training. As Coach David told me, your body doesn’t get stronger from the ride itself because it grows from the response to the ride. “A rest day is where the real adaptation happens,” he said.
Coach David’s response to my questions about riding daily ended with a great pearl of wisdom: “Riding every day without strategy is just stress with a fancy name – and the fast track to burnout or a performance plateau.” And he is right; that stress takes a toll on your body and mind. I know this firsthand as I’m experiencing this burnout and plateau from riding almost every day this year.
I contacted sports psychologist and Certified Mental Performance Consultant Dr. Erin Ayala for more advice on why rest days are important for cyclists to avoid burnout. Ayala, is also an accomplished road, gravel, and indoor racer.
“Cycling is a stress on the body – even if it’s the good kind,” she notes. Your body’s stress response can stay in overdrive if you do not take occasional breaks from riding. “Rest helps us balance our moods, keeps anxiety in check, and helps us manage our emotions on and off the bike,” Dr. Ayala said.
Research shows that a lack of recovery can significantly increase the risk of burnout in athletes. It finds that athletes who build rest and recovery into their training plans will stay more motivated and stick to their training plans long-term. Dr. Ayala said this is especially true “when combined with intense training schedules or other life stressors.”
Dr. Ayala emphasised that chronic training stress can negatively affect mood and motivation. “Overtraining can lead to brain fog, mood swings, sleep concerns, and poorer performance over time,” she said.

Riding streaks are not the only thing that keeps cyclists from taking rest days. Cycling’s social media culture, particularly Instagram and Strava, is another big culprit. Many riders get caught up in posting photos and stats from every ride. And honestly, I am one of those riders.
However, that drive to feed the algorithm also hurts rider recovery, and therefore our performance on the bike in the long term. Cyclists need those days off to boost fitness and avoid burnout. For example, Stava’s Fitness Score graph (particularly the version on the mobile app) can make riders feel that taking a day off from riding or working out negatively impacts their fitness.
Of course, Strava’s calculations are based on a more complicated formula (it combines training load and relative effort) than simply, “Ride more and the score goes up.” Strava also offers a separate Fitness and Freshness graph on its desktop site, but it is easily overlooked. (Plus, how many riders use the desktop features in 2025?) The company offers a more detailed explanation of the features and calculations on its support site.
Finally, re-evaluate your social media use if you feel pressure not to take rest days from Strava or another platform. Dr. Ayala helped put social media’s impact on riding into context. “Ask yourself, ‘If I posted about this on social media and received zero likes or kudos, would I still be doing it?’ If the answer is no, it may be time to reconsider your training strategy to prioritise what works best for you.”
The post You Should Not Ride Every Day; This Is Why appeared first on Bicycling.
These 6 High-Protein Snacks Keep Cyclists Going Strong 14 Oct 8:51 AM (4 days ago)

When it comes to post-ride recovery, your nutrition becomes paramount. Whether you just rode for hours or lifted weights, your muscles experience microtears, and the nutrients you include in your post-workout meal or snack can help them repair and become stronger. A key ingredient to making this happen: protein.
Reach for a high-protein snack after your ride to start the muscle-building process right away.
Reach for a high-protein snack after your ride to start the muscle-building process right away, suggests Marie Spano, RD and sports dietitian. Athletes who consume protein and carbohydrate soon after they finish training tend to have more energy that day and a better ride the next day, says Spano.
While your protein needs will vary depending on several factors like age, weight, and the type of workout you did, you can follow a few simple guidelines to get your fill: For a workout that lasts 45 to 60 minutes at a moderate intensity or at relatively easy pace, aim for a snack that provides 10 to 15 grams of protein, says Kelli Santiago, RD, and owner of Inso Sports Nutrition. A container of Greek yoghurt serves up 11 to 15 grams of protein, while two hard-boiled eggs total 10 to 15 grams.
A workout of about 60 minutes or longer, or one completed at a higher intensity, calls for more protein. Santiago suggests around 20 grams of the macronutrient, which you’ll get from one cup of cottage cheese.
For more high-protein snacks you can turn to after a ride or other workout, we gathered both quick recipes and packaged options. Add these to your fueling plan to boost your recovery and prep your body for the next effort.
1. Egg and Veggie Muffins

Spano recommends using a slice of ham in place of a baking cup for these egg bites, which have 7 grams of protein per bite (9 grams with the ham).
Ingredients:
- 1 dozen eggs
- ¼ cup 2% milk
- roasted vegetables, diced fin
- one cup spinach leaves, torn
- ½ cup cheddar cheese, shredded
- ½ tsp salt; pepper to taste
- Non-stick cooking spray
- Thinly-sliced ham
Directions: Preheat oven to 180. In a large bowl, mix eggs and milk. Add diced vegetables, spinach, and cheese. Stir to incorporate. Add salt and pepper, to taste. Spray a muffin tin with non-stick cooking spray. Use thin slices of ham as the muffin cups. Pour egg mixture into each muffin cup until it’s ¾ of the way full. Cook for approximately 20 minutes. Test for doneness by inserting a toothpick into the center. Toothpick should be clean and egg should be firm to the touch. Remove from oven and allow to rest for five minutes. To remove, use a knife to loosen the side of the egg from the pan.
2. Tuna and Crackers

Santiago suggests a simple snack of canned tuna, as it contains leucine, an important branched chain amino acid (BCAA), which helps with muscle growth. Plus, tuna is convenient, shelf-stable, and doesn’t need to be refrigerated. Try adding to crackers for a quick snack. A half a can of tuna contains about 21 grams of protein.
3. Overnight Oats With Protein Powder

This personal fave of Spano’s contains a whopping 30 grams of protein thanks to the milk, yoghurt, and protein powder.
Ingredients:
- 1/3 cup steel-cut oats
- 1/3 cup plain higher protein Greek yoghurt
- 2/3 cup 2% milk
- 1/2 scoop vanilla whey protein powder
- Cinnamon, nuts, or other toppings
Directions: Combine oats, yoghurt, milk, and protein powder in container. Refrigerate overnight and serve cold, topped with cinnamon, fruit, and nuts, if desired.
4. Hard Boiled Eggs

Cook these in advance for an easy source of protein to snack on after a workout or when you get home from a ride. Sprinkle on hot sauce, salt, and pepper, or everything seasoning for extra flavour. You’ll get seven grams of protein per egg.
5. Two-Ingredient Bagels

This might be the easiest baking recipe ever. All you need is two cups of self-rising flour and 1 to 2 cups of nonfat plain Greek yoghurt (plus an egg wash and seasoning!). Bake the recipe ingredients ahead of time so you have a grab-and-go high-protein snack after a ride. One bagel contains 9 to 10 grams of protein, and offers up sodium and carbs for replenishment, too.
6. Gluten-Free Blueberry Cottage Cheese Flapjacks

This special homemade recipe is a family favourite of Spano’s. It’s high in protein thanks to cottage cheese, eggs, and milk, with each four-inch flapjack containing 4 grams of the macro. Make them ahead of time and freeze them for a quick bite post-ride during the week, or whip them up right after a workout and top with nut butter and berries for more protein, healthy fats, and antioxidants.
The post These 6 High-Protein Snacks Keep Cyclists Going Strong appeared first on Bicycling.
Thule OutPace – Towbar Carriers Don’t Get Much Better Than This 12 Oct 10:44 PM (5 days ago)

If your weekends often involve juggling bikes, boot space and family gear, Thule’s latest rack might make life a little easier. The OutPace is a compact, lightweight bike carrier that takes the fuss out of getting your bike from A to B.
Available in two versions – two-bike and three-bike – it’s quick to setup and easy to store and use.

Compact Design, Easy Loading
The OutPace folds away when not in use, fitting easily into a car boot or tight garage space. This makes it particularly useful for those living in the city or in an apartment, where every bit of storage counts.
One of the standout features is its independent, pivoting bike arms that adjust to different frame shapes and sizes, accommodating road bikes, gravel bike, mountain bikes and kids’ bikes. The flexible strap system ensures that bikes stay secure without any fuss, while the design keeps the bikes a safe distance apart from each other and tangle-free.
 |
 |
The tilt-up function is another thoughtful touch, allowing the carrier to reduce its footprint when parked, minimising the chance of accidental knocks. Integrated safety lamps improve visibility on the road, while the lightweight build and carry handle make it simple to attach to the towbar.

The Thule OutPace is available in two-bike (R18 999,00) and three-bike (R21 999,00) models, from authorised Thule retailers and thule.com.
The post Thule OutPace – Towbar Carriers Don’t Get Much Better Than This appeared first on Bicycling.
ABSA Cape Epic Announce 2026 Route 9 Oct 10:59 AM (9 days ago)

Organisers of the 2026 Absa Cape Epic, the pinnacle of the Epic Series, have announced the route for the 2026 event. The eight-day sufferfest will take in 692 kilometres of raw South African wilderness, with 15 900 metres of climbing from the dusty singletracks of Meerendal Wine Estate to the wild vastness of Montagu, through the rugged passes and trails of Greyton and into the heart of Stellenbosch.
This is what stands between teams and the chance to call themselves Absa Cape Epic finishers.

PROLOGUE
Stage name: Familiar Ground
Location: Meerendal Wine Estate, Durbanville
Distance: 20km
Climbing: 650m
Rating: ★★ 1/2
Date: 15 March 2026
Nerves are, more often than not, the biggest hurdle of the Absa Cape Epic Prologue. However, at Meerendal, the pace will be fierce after a calm start allows for the rapid finding of rhythm. The Stairway to Heaven Climb leads to the unforgiving pitches of Dorstberg, where fans and supporters will line the trails, their cheers echoing across the lands.
It will be easy to get carried away on the Prologue and venture into the red. But remember, no team has ever won the Absa Cape Epic on Prologue day. If smarts are applied, the opening 20 kilometres of the race can kickstart the momentum that will be so necessary for success in what is set to be an Absa Cape Epic for the ages.

STAGE 1
Stage name: Reignition of Tradition
Location: Montagu
Distance: 90km
Climbing: 2 150m
Rating: ★★★★ 1/2
Date: 16 March 2026
It has been nearly two decades since the Absa Cape Epic last ventured into the dry lands of Montagu. Inhospitable but beautiful, Montagu is set to reignite traditions of yesteryear and spark memories of glories past.
Stage 1 will be a roller coaster through the Klein Karoo that trends upward just as much as it does down. The main protagonists of the race will likely find themselves together until the Dead Man’s descent separates those who are willing to risk short term gain with long term success. An arduous set of climbs and descents follow, driving home the fatigue under the burning African sun.
On an opening stage like this, anyone who arrived sans form will be left wanting and with an extremely long week ahead.

STAGE 2
Stage name: Out of Sight, Out of Mind
Location: Montagu
Distance: 102km
Climbing: 2 250m
Rating: ★★★★
Date: 17 March 2026
Long an unrelenting, Stage 2 asks questions that build on those asked in Stage 1. The climbing begins immediately, and cold legs will ache all the way to the summit of Ouberg Pass.
At the top, a long ridgeline stretches out as far as the eye can see, though if the wheel ahead is dropped, the teams ahead may disappear out of sight, out of mind, and out of reach.
The descent of Slagkloof is tough but leads to the welcome respite of African Game Lodge. But still, the Karoo is unforgiving, unpredictable and a moment too long spent enjoying the views could prove race ending.
The final third of the stage offers little relief, especially if the sun blazes and the winds rip. Stage 2 is a test of patience, endurance, and resolve.

STAGE 3
Stage name: A Friend Indeed
Location: Montagu to Greyton
Distance: 134km
Climbing: 1 750m
Rating: ★★★★1/2
Date: 18 March 2026
Stage 3 of the Absa Cape Epic will be an ode to the past. A long day across open roads. A stage that will have the Amabubesi members who last raced here smiling.
The racing will start fast, bidding farewell to Montagu and heading through the iconic Cogmanskloof Pass. Here, partnerships will be key, between teammates and teams, working together in an embodiment of the ethos of this magical race.
The small town of Bonnievale will welcome the courageous as they cross the Breerivier, before the test of Drecaso threatens to break the day apart. Teams will need grit, focus and determination with more than half the journey still ahead.
Open roads stretch ahead with unsurpassed views of vineyards and orchards, and the Langeberg Mountains on the horizon. A brief, ironic pass through Riviersonderend reminds riders how long this stage really is, before a gradual trek leads to Greyton.

STAGE 4
Stage name: A Country Favourite
Location: Greyton
Distance: 84km
Climbing: 1 950m
Rating: ★★★1/2
Date: 19 March 2026
Though short on distance, Stage 4 will by no means be short of demand. The battleworn trails surrounding Greyton and Genadendal are characterised by energy sapping climbs and rolling descents that offer no real respite.
After a relatively flat first quarter, the action begins and every turn will offer a choice: risk and reward, or safe and steady. A line taken too boldly over a moment of caution may result in immediate consequence.
The final quarter of the stage looms heavy in the distance as the UFO climb and its infamous ramps are part and parcel of MTB legend in the region. Teams who overcome burning lungs and legs will have no time to rejoice as the Toyota Tough section arrives immediately after on the descent to Middelplaas. With the end in sight, will this be the time to roll the dice and hope for glory — or not? Choose wisely.

STAGE 5
Stage name: The Real Queen
Location: Greyton to Stellenbosch
Distance: 128km
Climbing: 2 700m
Rating: ★★★★★
Date: 20 March 2026
Stage 5 rules over the Absa Cape Epic with an iron fist. It is, without doubt, one of the biggest, meanest stages that the race has seen in years and the numbers alone tell a story of extreme distance, massive elevation, and relentless trials from Greyton to Stellenbosch.
The race leaves Greyton with its sights set on Botrivier. Once reached, KatPas stands guard of the Cape Floral Kingdom in Grabouw. Here, trails abound before the portage down the historic Gantouw Pass tests minds and legs alike. The descent will lull teams into a false sense of security, but all they need to do to remind themselves that they’re in the Absa Cape Epic is to cast their eyes across the Helderberg basin to the wall that is the Lourensford Nek. And then begin the grind to the top.
When over the Nek, a taste of what’s to come in the final two stages will cap off an epic day and guarantee a good night’s sleep for those who make it to the new race village intact.

STAGE 6
Stage name: The Home of Mountain Biking
Location: Stellenbosch
Distance: 76km
Climbing: 2 450m
Rating: ★★★★1/2
Date: 21 March 2026
The penultimate stage of the Absa Cape Epic will be day where the start line feels like a lifetime ago and the finish line feels within reach – this is, arguably, the biggest mental hurdle of the week.
Stellenbosch, the home of mountain biking in South Africa, presents a route that is tailored to the strengths of the cross-country specialists; offering them the opportunity to claw back time on marathon specialists, or drive home their lead.
Strong legs will be vital from the gun as the climbing begins almost immediately up Botmaskop. Banhoek Berms, Nick Naks, Klipwerf and Old Rocky follow. The sawtooth profile relents lightly for a few kilometres near halfway before relaunching itself up and down through famed trails like Porcupine, Inferno and through Idas Valley before a check-in with The Doctor and a descent back to Coetzenburg. This is the stage for the racers and the trail lovers.

STAGE 7
Stage name: The Grand Finale
Location: Stellenbosch
Distance: 58km
Climbing: 2 000m
Rating: ★★★
Date: 22 March 2026
By this stage, teams will be begging for an easy day. But at the Absa Cape Epic, nothing comes easy. The Grand Finale will be no pleasure cruise to the finish line, rather it’s a concluding demand for fatigued minds and aching bodies.
But hand in hand with the demands come the pleasures of the Jonkershoek trail network, where the trail builders wear the dirt on their shirts like badges of honour. The trails will be lined with hundreds of spectators chanting teams onwards, from the very front of the field to the very back.
For the racers, the trail-laden route will make it tough to pull away. If the title is up for grabs this late in the day, there’s no telling what will happen. If the Jersey wearers start the Grand Finale with a healthy gap, then the title is theirs to lose.
Either way, a thrilling Finale waits for the teams hailing from over 50 countries.
The post ABSA Cape Epic Announce 2026 Route appeared first on Bicycling.
New Huawei GT 6 Pro: The Do-Everything Smart Watch 8 Oct 12:42 AM (10 days ago)

Performance in cycling isn’t just about watts, cadence or how fast you crest the next climb – it’s about understanding your effort and recovery on a deeper level. That’s exactly where the new Huawei GT 6 Pro comes in.
Recently unveiled in Paris and now available in South Africa, Huawei’s latest performance smart watch features elite-level training intelligence, endurance-focused design and impressive battery life – up to 21 days on a single charge. For cyclists chasing gains on the road, trail or trainer, it’s a compelling all-in-one training partner.

Train with Purpose
The standout feature is Cycling Virtual Power – a world-first feature that estimates your power output using speed, gradient and rider data. Through extensive simulations and wind-resistance modelling, it delivers results comparable to professional power meters, giving riders meaningful power insight without having to buy or install the extra hardware.
The watch also supports FTP (Functional Threshold Power) measurement and virtual cadence tracking, putting advanced performance metrics directly on your wrist. Whether you’re dialling in your threshold efforts or keeping an eye on your pacing during a long ride, the GT 6 Pro gives you real-time, actionable data.
Add dual-band GPS accuracy, reliable tracking (even in mountainous terrain) and the ability to sync routes from your phone, and the watch quickly becomes a capable cycling computer alternative, especially for those who value simplicity.

Smarter Recovery, Better Riding
Cyclists know that progress doesn’t just happen on the bike; it’s what you do between rides that counts. The GT 6’s new TruSense health management system uses multi-sensor data and AI modelling to analyse recovery.
With enhanced sleep tracking, heart-rate monitoring and stress analysis, the watch goes beyond measuring effort to help you manage fatigue and maintain consistency. Over time, that insight translates into smarter training decisions and better on-bike performance.
Designed for Life
The GT 6 Pro features a 1.47-inch AMOLED display (5.5% bigger than before), sapphire glass for scratch resistance, and an aviation-grade titanium body. Visibility is excellent, even in full sun.
The 46 mm model comes in three finishes – with a black elastomer strap for sporty rides; with a woven brown strap for classic everyday wear; or with a silver titanium bracelet for that ultra-refined look. Lighter, smaller 41 mm versions are also available, offering the same performance in a sleeker package.
 |
 |
 |
Endurance to Match Your Training
Battery life remains one of Huawei’s strongest draw cards. The GT 6 Pro lasts up to 21 days with light use; or up to 40 hours of continuous operation in dual-band GPS mode – plenty of juice for an ultra-distance ride or a weekend adventure.
For cyclists training across multiple sports, there’s plenty of crossover value, too. The GT 6 Pro supports more than 100 workout modes, including trail running, golf, and skiing, each with its own intelligent tracking and data analysis.

Connected, Intuitive, Ready to Go
The GT 6 Pro integrates seamlessly with Huawei, iOS and Android devices through the HUAWEI Health app. You can review ride data, analyse trends and manage training goals via a single, clean interface. Notifications, calls and music control are easily handled mid-ride.
The Takeaway
The Huawei GT 6 Pro delivers an impressive blend of accuracy, endurance and design. It’s a great choice for riders who want data-driven training without the complexity or constant charging demands of traditional cycling computers or other smart watches.

The post New Huawei GT 6 Pro: The Do-Everything Smart Watch appeared first on Bicycling.
The Secret to Smarter Training Isn’t on Your Wrist – It’s In How You Feel 6 Oct 10:24 PM (11 days ago)
As a trainer, I’ve seen firsthand how relying solely on performance feedback from fitness tracker or power meter data can sometimes miss the mark when it comes to building fitness. Tracking our performance is an absolutely invaluable training tool; the slope gets slippery when we entirely outsource how we modulate our efforts to technology.
That’s where using rate of perceived exertion (RPE) as a method to track our efforts becomes invaluable. RPE isn’t just a backup for when technology fails; it’s a method to fine-tune your awareness, teaching you to interpret your breathing, leg sensations, cadence, and mental state. By mastering RPE, you can pace rides more effectively, optimize recovery, and approach races and everyday cycling with greater confidence.
Let’s explore how developing this mind-body connection through RPE provides practical tools for enhancing your training, regardless of whether you use a power meter, wearable fitness tracker, or prefer riding without technology.
Benefits of Training with RPE
Sensing Versus Measuring
Tech gives numbers; RPE trains your senses. Rather than relying only on watts or a heart rate monitor, RPE asks you to tune into your breathing rate, the way your muscles feel, how easy or hard it feels to turn over the pedals, how hard you’re working, and even mental strain. Over time, you stop being a passive reader of data and become an active interpreter of signals from your lungs, legs, and mind. This heightened awareness translates to better self-monitoring during workouts and rides.
Learning to Read Your Body’s Signals
RPE develops interoception, which is the ability to notice internal bodily states. That might sound abstract, but it has real and practical training implications. For example, you learn to recognise the exact difference between the way “this feels like a sustainable tempo” and “this is a short hard effort I can repeat” physically and mentally affects you. That skill helps you pace a ride, decide whether to attack in a group, or back off when you might be getting sick or haven’t got enough rest.
Better Performance Decisions in the Moment
When you learn to trust your RPE, you can adjust your training or riding on the fly based on how you feel, rather than how hard you work being dictated by pre-set metrics. This flexibility is particularly useful when dealing with unexpected conditions like changes in terrain, weather, or energy levels.
In a windy group ride, instead of chasing numbers or trying to match every surge, you can respond to how hard it feels and save energy if you need to. RPE gives you a reliable, context-aware gauge that works across terrains and conditions.
Faster Learning and Resilience
Using RPE frequently builds pattern recognition: intervals that once felt brutal become manageable, recovery feels truly restorative, and you notice small performance gains before the devices do. That feedback loop not only speeds up progress but also builds confidence and mental toughness – you know what hard feels like and how to handle it.
Injury Prevention and Recovery
A solid mind-body connection helps you spot warning signs early of something not feeling the way it should or something being off. If a “normal” RPE 6 session feels like an RPE 8 on a given day, that’s a sign to check your sleep quality, stress, fuelling, or fatigue. Listening to that signal and adjusting your training intensity accordingly prevents overtraining and reduces injury risk.
Power is precise, but RPE offers important benefits that using a power meter can’t give. It captures whole-body fatigue – your legs might be able to hit the numbers, but your lungs, sleep debt, or mental state might not, so RPE reflects how ready you actually are IRL.
It also adapts to conditions: hilly, windy, or hot days change how an effort feels, and RPE lets you match effort to intent regardless of what the numbers say. Finally, it’s tech‑agnostic—trainers fail, batteries die, and not everyone has or wants a power meter—so RPE keeps your training on point even when devices don’t.
How to Use RPE in Structured Training
RPE Scale
- 1–2: Very easy. You could chat or ride all day (zone 1).
- 3–4: Easy endurance. Conversational, slightly aerobic. (zone 2).
- 5–6: Tempo. You can talk in short sentences, but it’s purposeful (zone 3).
- 7: Threshold-ish. Hard to speak a whole sentence; uncomfortable but sustainable for a while (zone 4).
- 8–9: VO2/anaerobic. Very hard, short efforts; talking stops (zone 5).
- 10: All-out. Sprint, max effort, no more than a few seconds to a minute.
RPE works at every training level. Here are practical ways to apply it to common interval sessions:
- VO2 intervals (3-5 minutes): Aim for 8-9 RPE. You should be gasping by the end. Recover back to RPE 2-3 before the next interval.
- Threshold/20-min efforts: Aim for 7 RPE. Breathing should be controlled but heavy.
- Tempo: Aim for 5-6 RPE. This should feel like an intensity you could hold for 20-60 minutes.
- Recovery rides: Keep it 1-3 RPE. If you find yourself bumping above 3, ease off—you aren’t recovering.
RPE isn’t perfect, and has its limitations, the biggest being that it’s subjective and can be biased by ego or mood. That’s why it pairs well with occasional objective checks (a weekly test or a few rides with power/HR) and physiological measures (such as resting HR and HRV).
By using RPE as a training tool instead of relying solely on tech, you learn to hear your body’s internal language and adjust your efforts accordingly. Try leaving your bike computer at home for some of your rides, or experimenting with tackling training sessions on your indoor trainer without a heart rate monitor. What you learn will no doubt make you a better and stronger rider, no matter what your smartwatch says.
Weekly Training Plan Using RPE
- Monday: Easy spin or rest—RPE 1-2. Keep it relaxed; the goal is to recover.
- Tuesday: VO2 session—warm up, then 5 x 3 minutes at RPE 8-9 with easy recovery until you feel back at RPE 2-3; cool down. Total time: 60-75 minutes.
- Wednesday: Recovery ride—45-60 minutes at RPE 1-3, conversational pace.
- Thursday: Threshold block—2 x 20 minutes at RPE 6-7 (a solid 7 by the end) with 10 minutes easy between; cool down. Total time: 75-90 minutes.
- Friday: Optional short efforts or rest—if you ride, do 4-6 x 30 seconds all-out (RPE 10) with long recoveries, or keep it a gentle spin (RPE 1-2).
- Saturday: Long endurance ride—2-3 hours at RPE 2-3 with a few short surges (RPE 7-8) to shake out the legs.
- Sunday: Group ride or tempo—Treat group ride surges as interval practice (hit RPE 7-9 on efforts, recover in between), or do a solo tempo ride at RPE 4-5 for 60-90 minutes.
The post The Secret to Smarter Training Isn’t on Your Wrist – It’s In How You Feel appeared first on Bicycling.
5 Tips to Maximise Your Long, Slow Distance Training 6 Oct 5:43 AM (12 days ago)
Long, slow distance training, a.k.a. zone 2 workouts, might seem too easy to create a training effect, but spending time at a conversational or endurance pace is fundamental to your performance. “Zone 2 training builds your endurance and becomes the foundation on which you can build higher-intensity efforts,” says exercise physiologist and former cycling coach, Mollie Brewer.
Zone 2 training builds your endurance and becomes the foundation on which you can build higher-intensity efforts
While an effective, well-rounded training plan will always include higher intensity work, the “no pain, no gain” philosophy just doesn’t make sense. “When we go above zone 2 we begin to bring in some non-aerobic metabolic processes,” says Rob Pickels, a cycling-certified coach, exercise physiologist, and consultant with Forever Endurance. “That’s not necessarily a bad thing; we know we need to be riding harder than zone 2 at times. But zone 2 maximizes our ability to focus on these beneficial processes without adding too much undue stress onto the body.
While you’re logging easy miles and enjoying the scenery or chatting with a friend, important physiological adaptations are taking place under the surface. For one thing, in zone 2, your body relies primarily on fat, rather than carbohydrate. Over time, this helps you utilise fats more efficiently, which spares your carbohydrate stores so they’re available when you need them to power higher efforts, says Brewer.
Lower intensity training—about 4 out of 10 on the rate of perceived exertion (RPE) scale—also stimulates the production of new mitochondria while also making them more efficient, says Brewer. Those microscopic powerhouses help process lactate, and with a bigger, better-trained army of them, you can ride harder for longer before fatigue slows you down.
Zone 2 training is also where your body develops new capillaries (the tiny blood vessels that deliver oxygen to your muscles), says Brewer. With more capillaries on board, you can deliver more oxygen to your muscles with every heartbeat, which over time, helps you generate more power without necessarily working harder.
Why You Should Log Long, Slow Distance Miles
One of the most compelling reasons to train in zone 2 is that you can crank out significant mileage here without a high risk of injury or overtraining. “Because this is a low-stress, low-inflammation zone where you’re very resistant to fatigue, you can do high volume,” says Brewer.
While it may seem obvious, those long, slow distance miles also develop your endurance, says Brewer. If your goal is to ride (or race) long, practicing riding your bike for long distances at a sustainable pace is one of the best ways to do it.
And though it seems counterintuitive, training at a lower intensity is fundamental to tackling higher intensity training and racing. In other words, you have to go slow to get fast. “Your body will do a better job of clearing the lactate and other byproducts that accumulate when you work hard and do it repeatedly because of the base you’ve established with zone 2 training,” says Brewer.
So don’t be surprised if prioritizing zone 2 training makes your intervals (and all your riding, for that matter) feel a little easier. “You’ll decrease your heart rate for a given workload,” explains Pickels.
You may also find that endurance training gives you a powerful mental boost when your schedule calls for a spicy interval session. “Because zone 2 training feels easy, it tends to make people really excited to go hard when it is time to go hard. They’re chomping at the bit to get out there and do some interval workouts,” says Pickels. “But if every day is kind of hard, when they have to do a hill climb, they’re like, ‘Oh god, again?’”
Tips to Optimise Your Long, Slow Distance Workouts
Zone 2 training is an excellent way to boost your fitness – but it can be tempting to ride just a little (or a lot) harder. But working harder than you need to won’t make you stronger. “Training even a little bit harder than we should be actually makes us worse. It doesn’t make us better,” says Pickels.
Here are some tips to ensure you’re actually in zone 2 during your long slow distance training.
Be Clear About Your Objectives
Zone 2 training is the perfect workout for enjoying a conversation with your training buddies. But a casual ride among friends can easily turn into a hammerfest if you’re not careful. To make sure you keep your effort where it needs to be, state what you want out of the workout up front. “Announce your intentions at the start of the ride,” suggests Pickels.
If you’re with friends who are stronger than you, let them know you plan to sit on their wheel. “Instead of feeling like you’re obligated to take pulls, you can just say ‘Hey, today is an easy ride, I’m targeting 170 watts.’ Just let people know what the plan is,” says Pickels.
But Don’t Go Too Easy
On the other hand, don’t let your group rides get too light on the effort scale. Look at your RPE to make sure you’re in the right zone for gaining all the benefits of zone 2 workouts.
If you’re any lower than 4 out of 10 RPE, you’re probably in zone 1, which is great when you need active recovery, but it won’t yield the benefits you’ll get from a zone 2 ride. You can also use metrics like power and heart rate to ensure you’re not going too easy. Although it depends on the athlete, generally speaking, zone 2 is 56 to 75 percent of your functional power threshold (FTP) and 60 to 70 percent of your max heart rate.
Pay Attention to Power
While you don’t necessarily need to train with a power meter, it can be a very handy tool for ensuring you stay in zone 2. “Power updates a lot quicker than heart rate,” says Pickels. “So you can be pedaling around at lower zone 2, you push it up a hill, and your heart rate might climb to upper zone 2 and then fall back down once the climb is over. Meanwhile, your power meter will show that you were well over your FTP.”
While both heart rate and power are important metrics, if you have power data, take advantage of the numbers in real time during your long slow distance rides to keep your efforts in check.
And while you’re looking at those numbers, be honest about how much time you’re actually in zone 2. Both Brewer and Pickels agree, if your average wattage or heart rate puts you in zone 2, but you were mostly above or below that range, you’re not getting the benefits you’d get from being squarely in zone 2 for most of your ride.
Choose Your Route Carefully
Some routes include inclines that will inevitably force you to exceed zone 2 training. And while some time at higher intensities won’t ruin your workout, you want to be mindful of keeping the majority of the workout (not the average heart rate or wattage) in zone 2.
To avoid workouts where you have no choice but to go anaerobic for significant chunks of time, plan your route accordingly. “For a true zone 2 day, maybe you have to find a flat gravel road and ride on that instead of the rolling hills,” says Pickels. Then you can keep your intensity in check my tuning into that RPE of about 4 the entire time.
Bring Your Workout Inside
If a flatter route isn’t accessible, consider getting your long, slow distance miles in on your trainer. “People think zone 2 isn’t a good trainer workout but it’s a great movie-watching pace,” says Brewer, who prefers doing endurance training to hard intervals on the trainer.
To keep it interesting, she suggests breaking up your workout with alternating intervals of high zone 2 efforts with intervals of low zone 2 efforts.
Don’t worry too much about your long, slow distance ride on the trainer being too short. “It’s actually a great way to get a concentrated, steady-state workout. You can get a lot of benefit from a 45-minute workout,” says Brewer. After all, something is better than nothing when it comes to building endurance.
The post 5 Tips to Maximise Your Long, Slow Distance Training appeared first on Bicycling.