Client Servers and Browsers 12 Mar 2021 8:31 AM (4 years ago)
Web Concepts: Key Terms
Understand the term client/server. Understand the functionality and relationship between the browser, web server.
Understand The Term “Client /Server”

Understand The Relationship Between Web Browser & Server
Client / Server refers to the relationship between two pieces of software, in which the client program requests a service from the server program.
The server fulfils the request for the client by undertaking the service and providing the result.
For example, if you want to check your balance using online banking, the client program on the website requests the information from a server program owned by the bank

A Web Server hosts the websites and pages that you can visit via the WWW.
A Web Browser is a program that allows you to access pages through the WWW.
The web browser understands the HTML code of the page and translates and formats it into text and other media that displays on your device.

There is a connection between the web server and web browser.
Each webpage or web resource has a unique URL (uniform resource locator).
The web browser asks the web server to retrieve and display the information for the specific page when the URL is entered or a link is clicked in a search engine or another website.

Some web browsers let you know what is happening between the client and server with a visual display.
For instance, in Google Chrome, the spinning blue circle that appears next to the cursor when a web page is loading rotates clockwise when receiving data from the server, and counter-clockwise when uploading to the server.

Acknowledgements
Music from Blues In Buckle:
Images from Pexels:
The Internet and the World Wide Web 8 Mar 2021 5:50 AM (4 years ago)
Key Concepts: Key Terms
Understand that the Internet supports a range of services like the World Wide Web (WWW), file transfer, email, instant messaging (IM).
The Internet supports a range of services, like the World Wide Web (WWW), File Transfer Protocol (FTP), and Instant Messaging (IM). Each service provides unique functionality that helps users communicate and collaborate.

What is the internet?
The internet is a global network of computers which spans the entire world. The internet can be described as computing devices such as PCs, iPads, mobile phones communicating information and data through standardised communication protocols such as FTPS, TCP/IP, HTTP and HTTPS. These protocols will be explained more thoroughly later.
Most websites use HTTPS protocol these days as it’s more secure – see https:// in the browser address bar!
Computers with content that people want to access are often called ‘servers’ because they serve up that content to other computers – servers are usually kept in huge datacentres with 100s or 1000s of other servers owned by many different companies.
Imagine huge rooms filled with computers, joined by cables that cover every country and go under every ocean – that is what the internet is like physically! It doesn’t matter to us where the computers are or how we are connected to them – once you’re connected to the internet you can talk to any of the other computers.
The Internet currently supports a range of services such as the World Wide Web (WWW), file transfer, email and instant messaging (IM).

World Wide Web As A Service On The Internet
The World Wide Web (WWW) refers to the sharing of text, images, audio, and video, as well as other file types, through the internet.
The WWW is accessed through a web browser such as Internet Explorer, Google Chrome, or Mozilla Firefox (as well as others) In the web browser you can type a domain address for direct access to a website or use a search engine such as Google or Bing to find sites.

File Transfer As A Service On The Internet
An example of a file transfer service is you can upload and download files using services such as Dropbox, Google Drive, Box.com and others. These services enable users to store and share files and folders online and access them from any computer or mobile device with an internet connection. They also facilitate file sharing and collaboration.
Email As A Service On The Internet
As a service, email enables users to send a message from one person to a group of people in an electronic format that can be viewed on a computer or other device with access to the internet. You connect your email account to your web-based email provider, such as Yahoo! Mail, Google Mail, or Microsoft Live. You then use your web-based email client to send and receive messages from that account.

Instant Messaging As A Service On The Internet
Instant messaging enables users to have a live online conversation with another person through text on their computer screen in real time. Some examples of instant messaging programs are AIM (AOL Instant Messenger), Google Talk, and iMessage (Apple).

The World Wide Web – or web – is not the same as the internet. The internet is a global network that connects computers all over the world. The World Wide Web – or web – is a way of accessing information over that network.
Acknowledgements
Music from Blues In Buckle:
Images from Pexels:
Advanced Database Quiz 8 May 2018 5:47 AM (7 years ago)
This quiz is designed to test your knowledge of the contents of the Understanding Databases Course, part of the Office Software Suite series. These quizzes are designed to improve your database skills.
There are twenty questions. The pass mark is 70 out of a potential 100 points, 5 for each question.
Once you are satisfied with your answers, complete your name and email address and select “Submit Quiz“ to have your answers marked.
You will shortly receive an email advising you of your score, whether you have passed the quiz, and how your answers have been scored. It will also include your Free Online Training course quiz completion Certificate for the appropriate quiz.
A relational database…
What is a 'combo box'?
An input mask that uses: NaLAc stands for:
To change the tab order of a form which icon/command must you select?
How do you modify an existing relationship between two tables?
When you create a junction table you must…
What does a 'subtract join' do?
What does the SQL statement INSERT do?
To append records from one table to another using SQL you must…
Which character do we use to designate a parameter in SQL?
The '?' wildcard represents…
When is an 'Alias' used in a query?
Bound controls limit…
If we want to create a list of options that can be selected for a list box, what do we select for the 'Type of list contents' in the control properties?
What is an 'option group' in a form?
What is a subform?
How do you concatenate fields in LibreOffice Base?
How can you make sure each grouped record appears on a new page in a report?
If you link data from a spreadsheet to a database…
How can use macros in a LibreOffice Base database?
Be sure to click Submit Quiz to see your results!

Time's up
Advanced Database – Assign/attach a macro to a control 6 May 2018 7:52 AM (7 years ago)
Another way to directly run a macro is to create a button in the form.
In the main Base window, right click the form and click Edit to open it in design view.
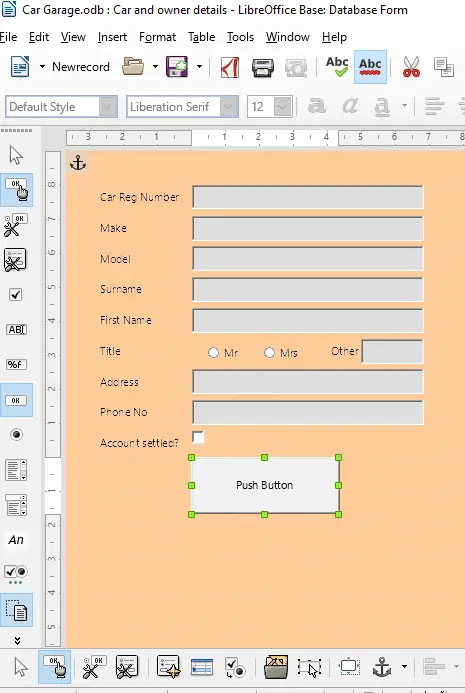
Select the ‘Push button’ icon from the controls toolbar.
Click and drag in the form to draw a button.
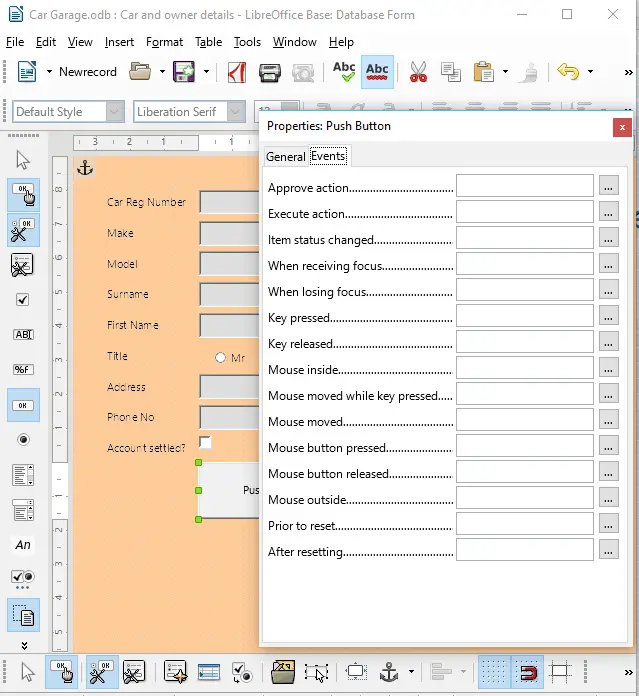
Right click on the button and select Control.
In the properties window, click the events tab.
Click the … symbol next to the ‘Mouse button pressed’ section.
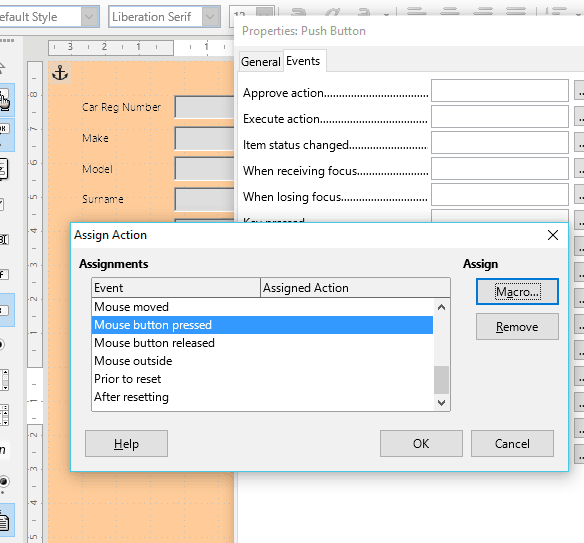
Click the Macro button in the Assign section.
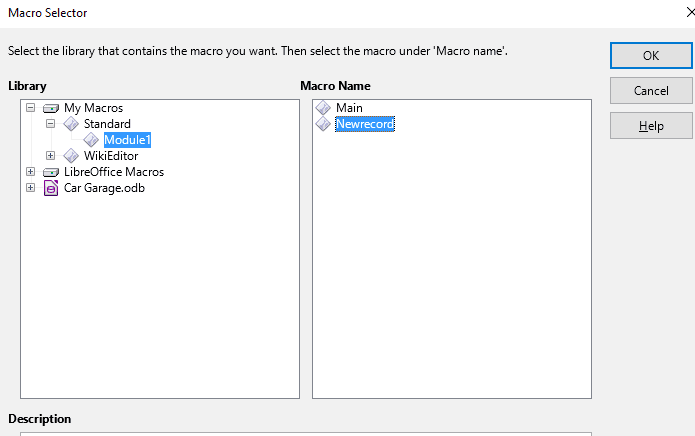
Navigate to the macro we created earlier and select it.
Click OK twice.
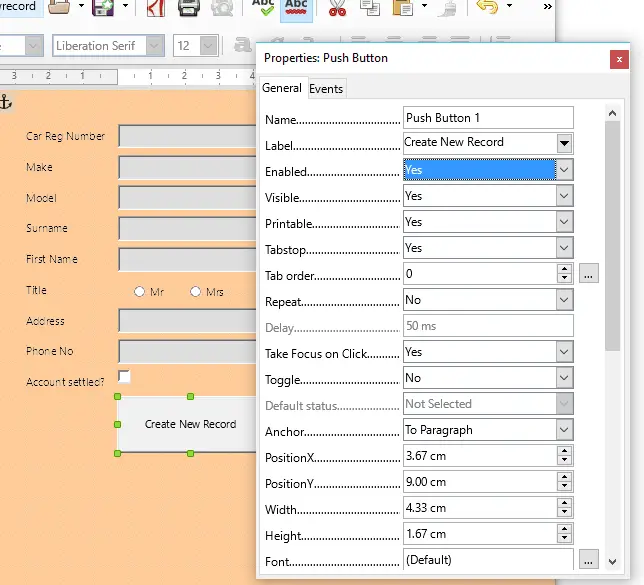
In the properties window, click the General tab.
In the label section type ‘Create New Record’.
This changes the text displayed on the button.
Close the properties window save the form and exit the design view.
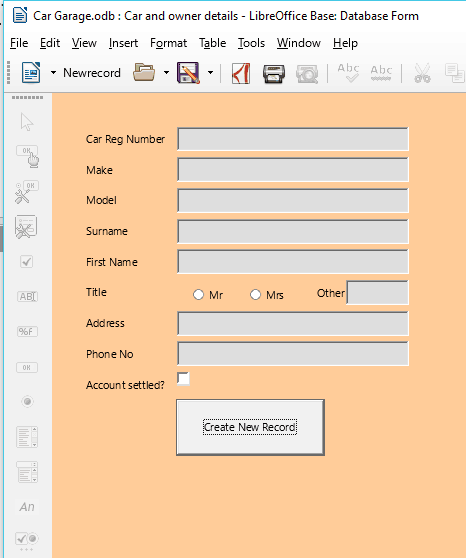
Double click to from the main window to open the form.
Now, if you want to add a new record you can just click the push button.
Again, this makes it much clearer for a novice database user when inputting data through the form.
Advanced Database – Assign/attach a macro to a command button 4 May 2018 7:46 AM (7 years ago)
Open the form and select Tools->Customize
Select the ‘Standard’ Toolbar from the drop-down list.
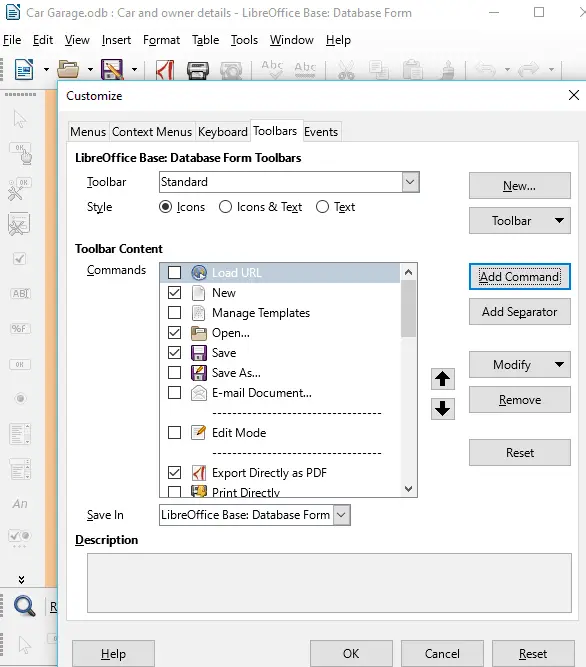
Click Add Command.
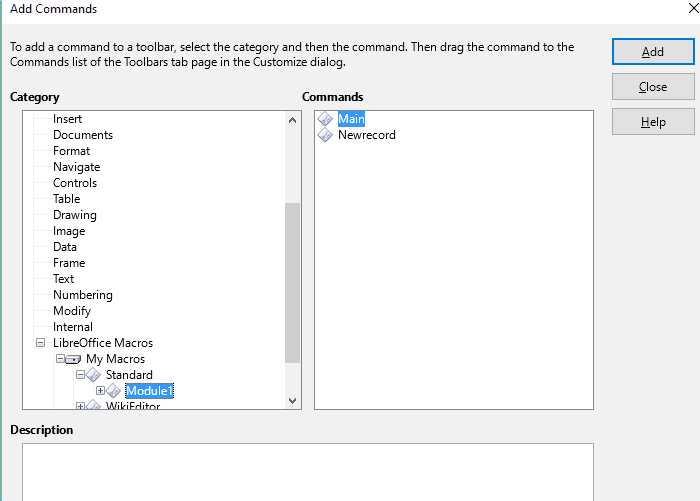
At the bottom of the Category section, select LibreOffice Macros.
Navigate to the ‘Newrecord’ macro we created.
Click Add.
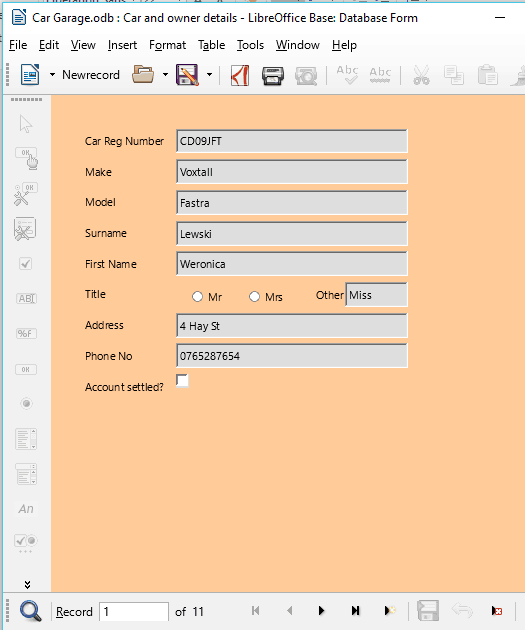
Notice that there is now a button on the Standard form toolbar that says Newrecord.
If you click on this button it runs the macro and creates a new record.
This makes it a bit simpler and more clear for a novice user, rather than asking them to use the New record icon.
Advanced Database – Create a simple macro 2 May 2018 7:37 AM (7 years ago)
First, make sure that macro recording is enabled.
Open a Libreoffice Base database file. From the main window taskbar select Tools->Options then select LibreOffice->Advanced.
Check the optional feature: Enable macro recording.
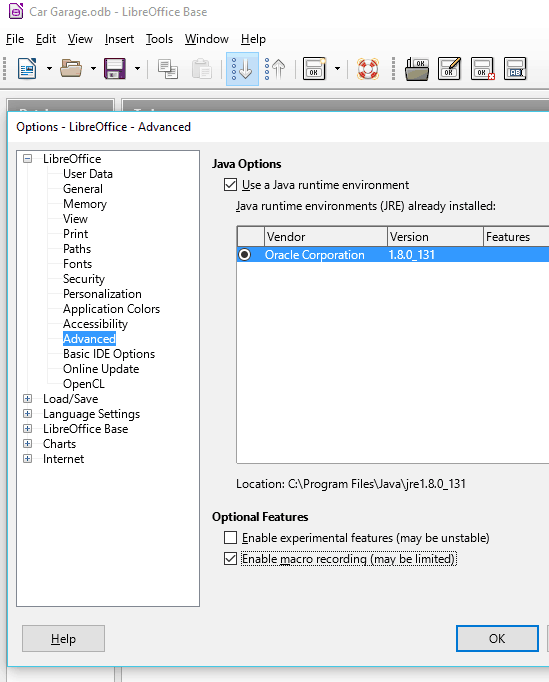
Please note that macro recording is limited in LibreOffice Base due to program stability issues.
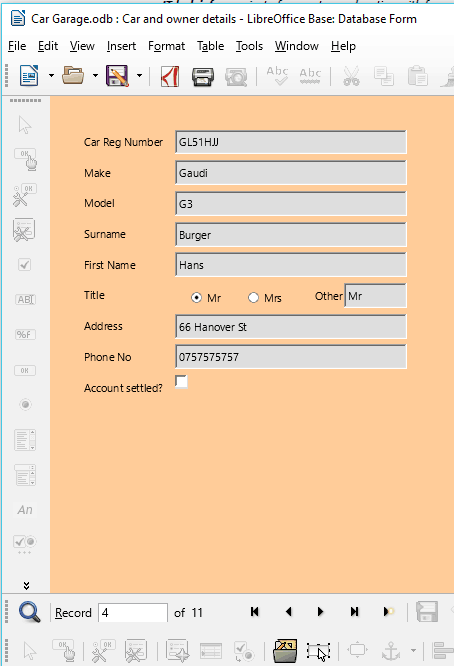
In the current version of Base, macros can only be recorded to modify forms.
This is due to the fact that it can often be useful to add a button to a form that runs a macro, as we will see later.
We are going to record a simple macro that adds a new record.
Open any form in the database.
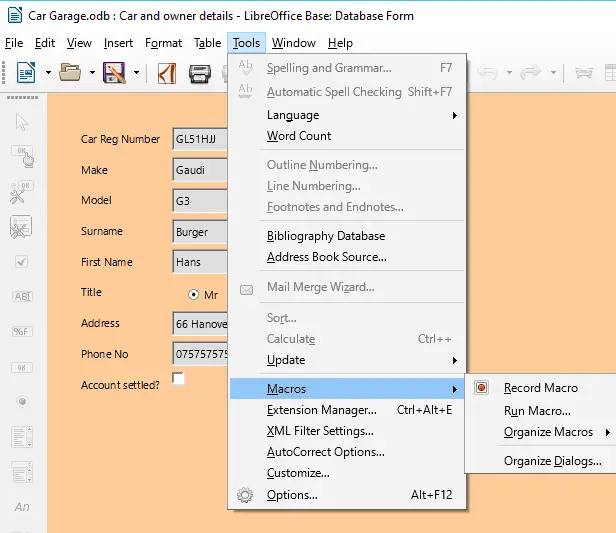
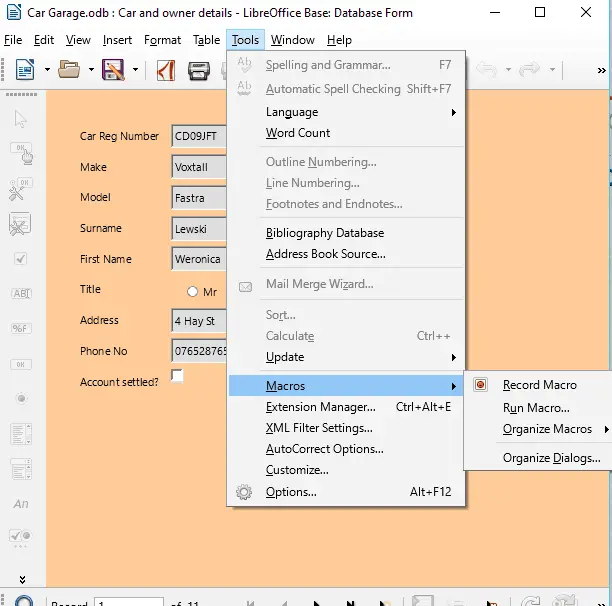
In the form window, go to Tools->Macros->Record Macro
Any actions you take from now on will be recorded in the macro.
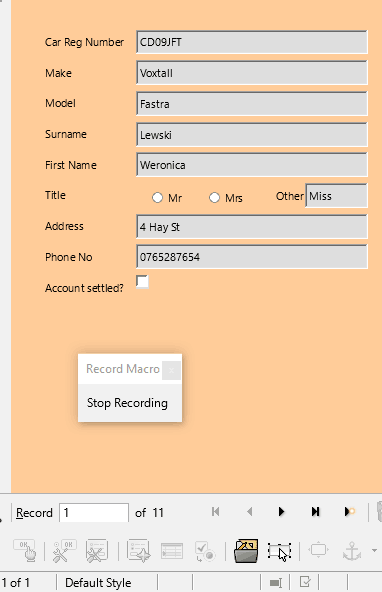
Click the New record icon.
Next, click the ‘Stop Recording’ button.
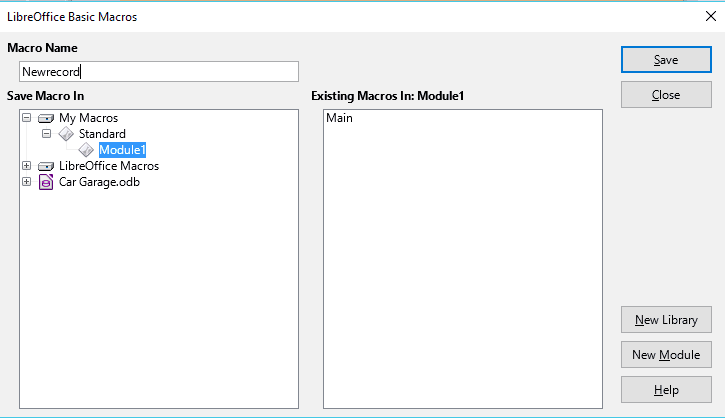
Name the macro ‘Newrecord’ then click ‘Save’.
We will use this macro in the next tutorial so remember where you save it.
To run the macro, re-open the same form.
Go to Tools->Run Macro
Select the Newrecord macro and run it.
It will automatically create a new record, without having to select the icon at the bottom of the page.
Advanced Database – Import from existing database into a database. 30 Apr 2018 7:03 AM (7 years ago)
Open two separate database files.
To import data, you can simply drag and drop between the windows.
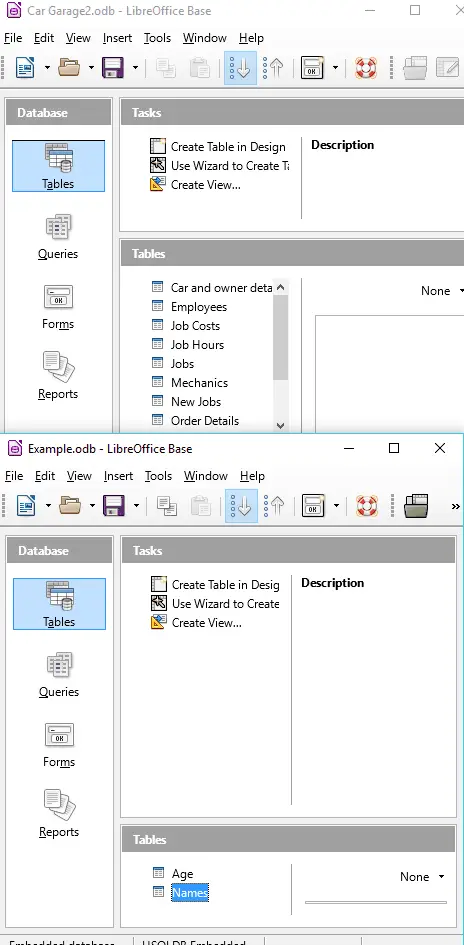
For example, to copy the Names table from the lower database in the example shown, left click and hold on ‘Names’ in the Tables section and drag it to the Tables section of the other database.
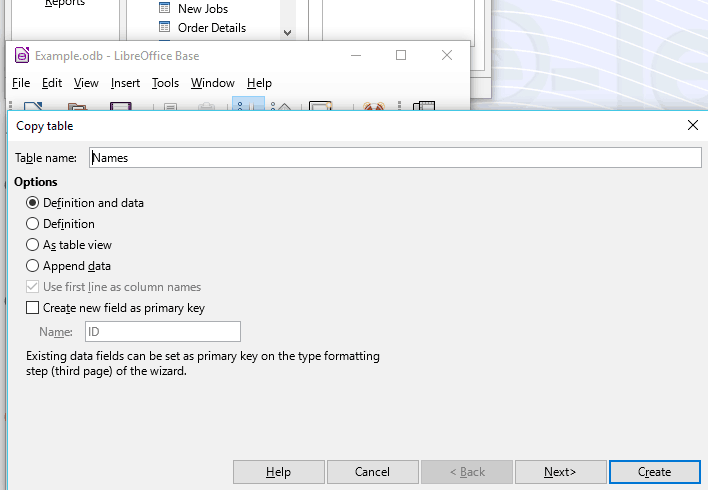
A dialogue box will appear in which you can choose to copy various parts of the data.
If you select ‘Definition and data’ the entire table will copy over. ‘Definition’ just copies the field names and formats. ‘As table view’ and ‘append data’ will work if the data is in already in the same format, and add new data to the table.
Select ‘Definition and data’ and click Next.
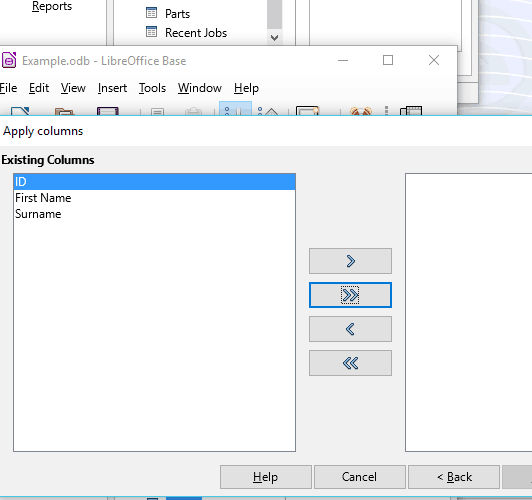
Here you can select which fields to copy over.
Click the double arrow to select them all.
Click Create.
Open the new table in the other database and it will be identical to the original one, as all of the data has been imported.
Advanced Database – Link external data to a database: existing database 28 Apr 2018 6:51 AM (7 years ago)
To link data from a different database source, open a new LibreOffice Base file.
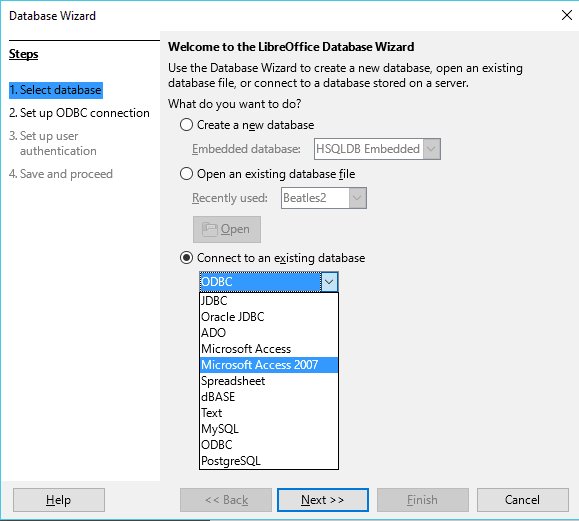
In step 1 of the wizard, choose ‘Connect to an existing database’ and select the format of the database e.g. Microsoft Access 2007.
Click Next and then select a database file.
Finish and save. The database will then import data from that database and any changes will automatically update.
Import spreadsheet, text (.txt, .csv), XML into a database.
There is no automatic way to import data from a spreadsheet or document into Base.
You must simply copy and paste the values into a table.
This method is outlined in full in the Using Databases module.
Advanced Database – Link external data to a database: text 26 Apr 2018 4:30 AM (7 years ago)
For this tutorial, we are going to create a text file in LibreOffice Writer.
Open LibreOffice Writer.
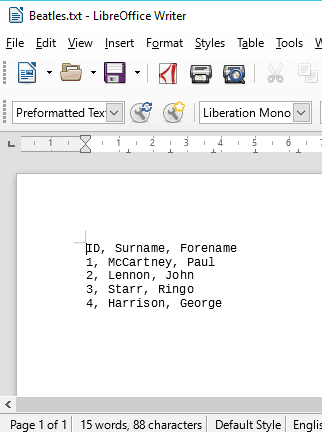
Enter the text shown. The first line designates field names, separated by commas. Each new line represents a new record with fields in the same order as the top line.
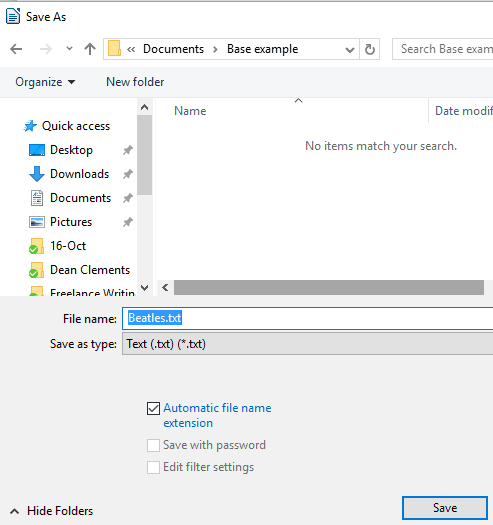
Select Save As from the File menu.
Name the file and set Save as Type: to ‘Text (.txt)(*.txt)’
Exit writer and open a new database in LibreOffice Base.
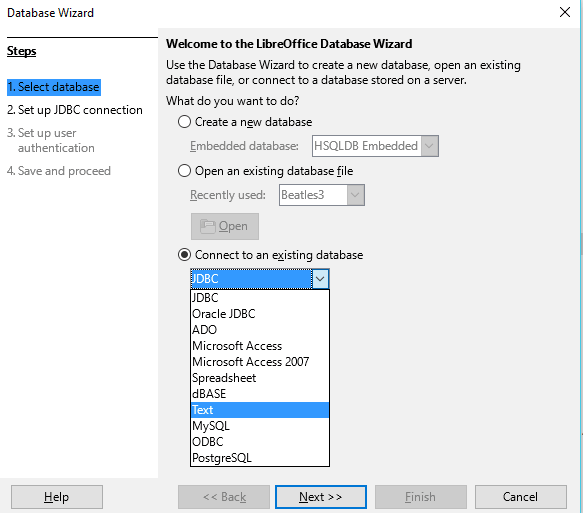
In the wizard, select Connect to and existing database -> Text
Click Next.
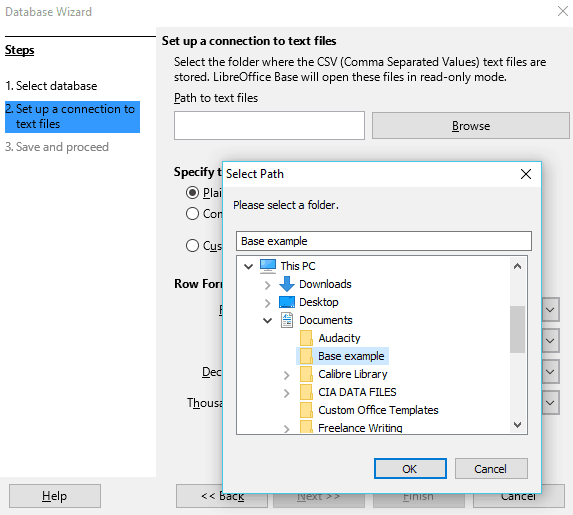
Click Browse in the ‘Set up a connection to text files’ section.
Select the folder that contains the text file we created.
Click OK.
Click Next.
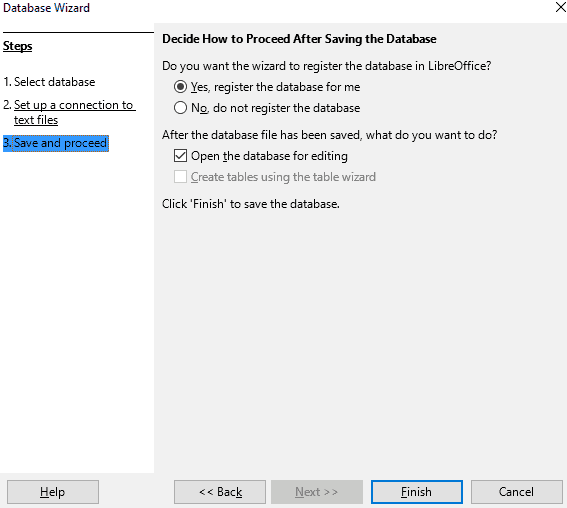
Select to register the database and open it for editing.
Click Finish, name the database and click Save.
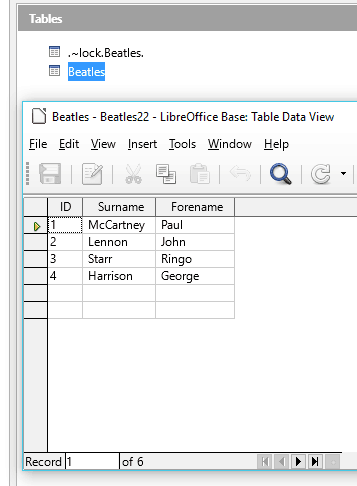
The database will automatically open for editing.
Go to the Tables section and double-click the table with the same name as the text file as we created.
Notice that the table has been populated with the text that was saved in the document.
As the database is connected to the text file, you cannot add tables directly to the database.
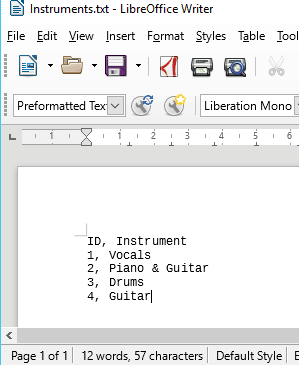
To add a table, create a new LibreOffice Writer file and add some data in the same format as previously.
Save the file in the same folder as the previous text file (it must be the same folder for it to work).
Exit Writer and re-open the connected database file.
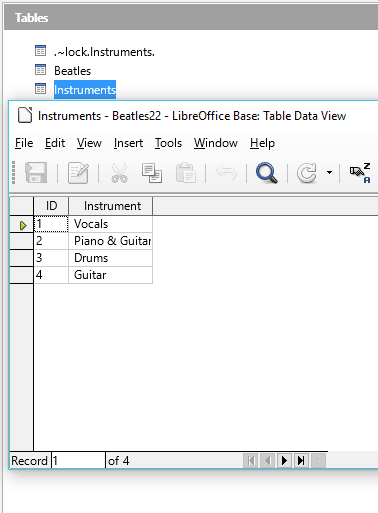
As the database is linked to the folder, the text file we just created will automatically create an identical table.
We can also add or edit the records within these text files and it will automatically update the database.
Advanced Database – Link external data to a database: spreadsheet 24 Apr 2018 4:10 AM (7 years ago)
For this tutorial, first we are going to create a LibreOffice Calc spreadsheet. Open a new Calc file.
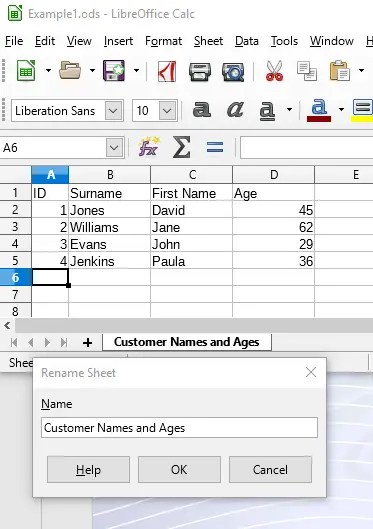
In sheet 1, enter the data shown to the left. Then right click on the tab for the sheet and select ‘Rename Sheet’
Type Customer Names and Ages, click OK.
Save the sheet as ‘Example 1’
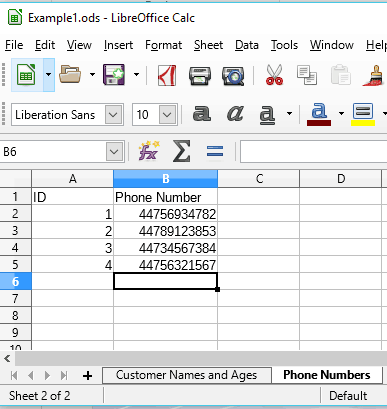
Click the + button to add a new workbook.
Enter data for phone numbers as shown and rename the sheet to Phone Numbers.
Save the spreadsheet, then exit.
Open a new Libreoffice Base file.
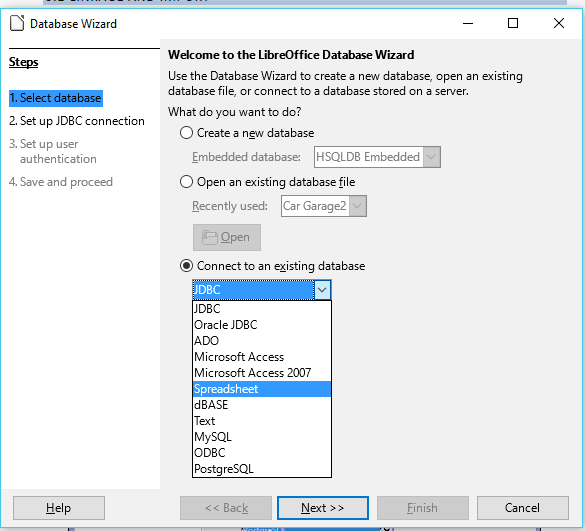
Linking data (unlike importing data) allows users to work on the same data in different applications and changes are updated between the two.
In the Base wizard, select ‘Connect to an existing database’ and select ‘Spreadsheet’.
Click Next.
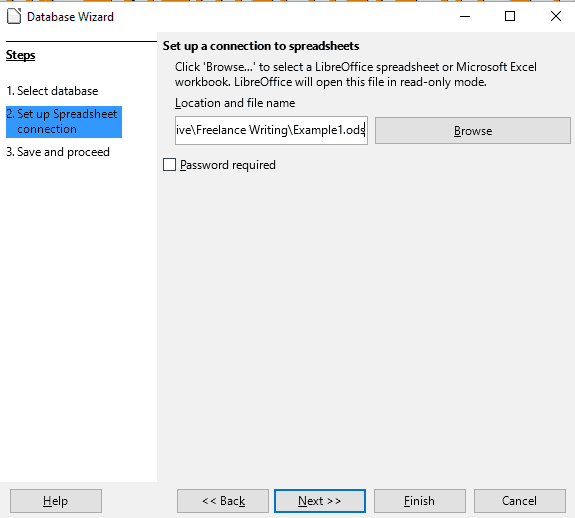
Browse to the Calc spreadsheet we just created and select it to set up a connection.
Click Next.
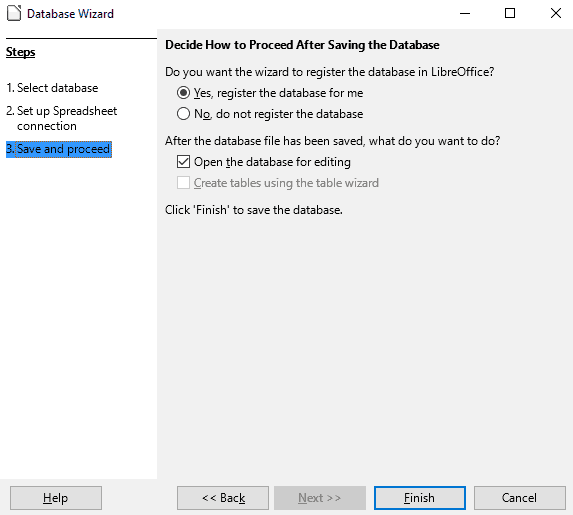
Select Yes, to register the database.
Check the box for ‘Open the database for editing’.
Click Finish and name the database and save it.
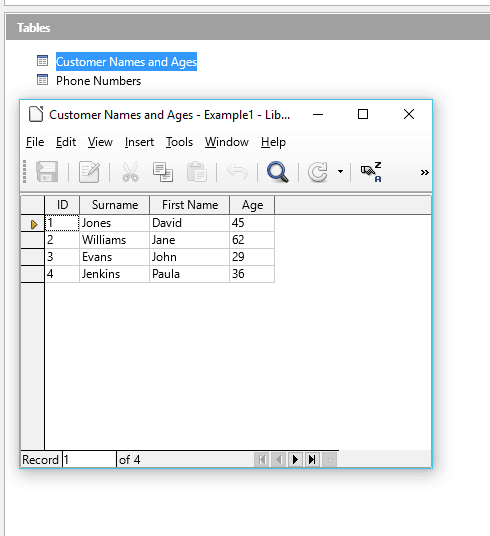
Notice that the database has automatically created two tables based on the two workbooks in the Calc spreadsheet.
Open one of them to see that the data has been automatically transferred.
Save the database, exit Base and re-open the Calc file.
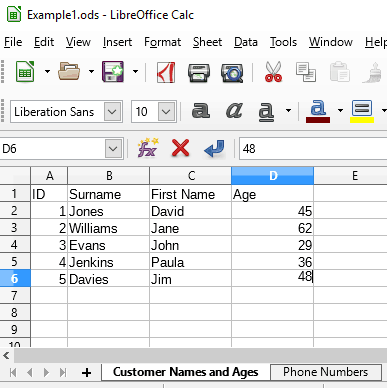
Add a new row to the Customer Names and Ages workbook.
Save the spreadsheet, exit and re-open the Base file we just created.
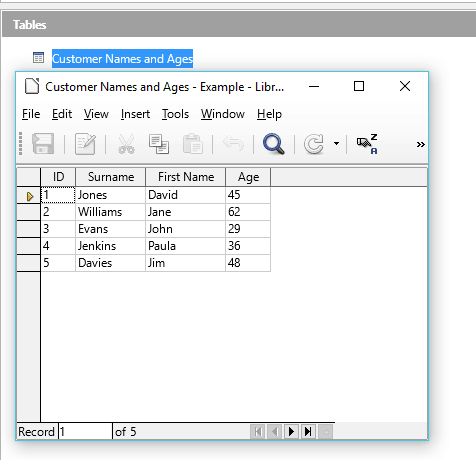
Open the Customer Name and Age table.
Notice that the data we added in the Calc spreadsheet has been automatically added to the database.
As they are linked any changes made in the Calc file will update in the Base file and vice versa.
Note: you cannot create new tables in the database, but you can create them by adding workbooks in Calc.
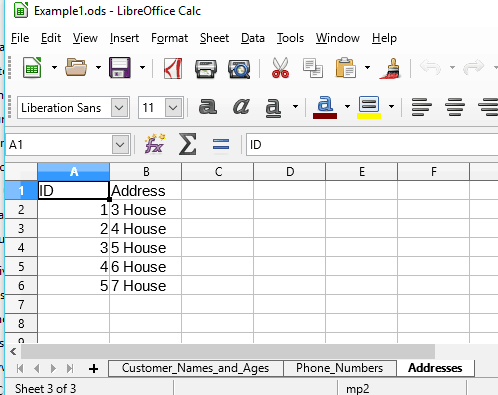
Exit Base and open the Calc file again.
Add a workbook, add some data and rename it to Addresses.
Save and exit Calc.
Open the database in Base again.
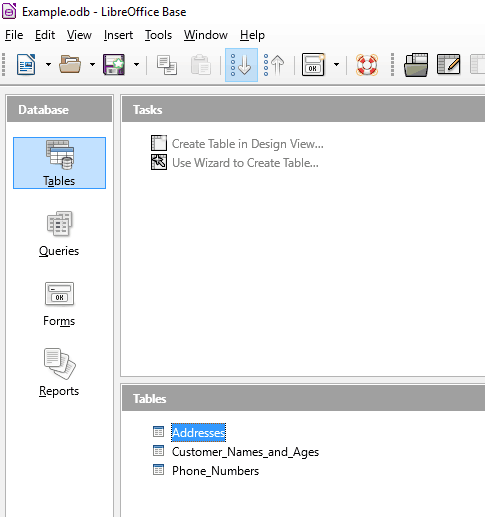
Notice that the Addresses table has been automatically added to the database.
Also notice that the Create Table options are greyed out, meaning you cannot add tables through the Base application.